Is your orchid dying with no roots? Learn how to revive it using a simple recovery routine – pruning, cleaning, and natural garlic water. Bring your orchid back to life with these proven steps.
Let’s be honest: orchids have a reputation for being elegant, exotic, and a little intimidating. One week they look perfect, with glossy leaves and stunning blooms. The next week, they seem tired, rootless, and completely unwilling to flower. If your orchid is drooping, losing leaves, or sitting there with no sign of fresh growth, it does not always mean the plant is beyond saving. In many cases, an orchid can recover when you focus on the real issue: root health.
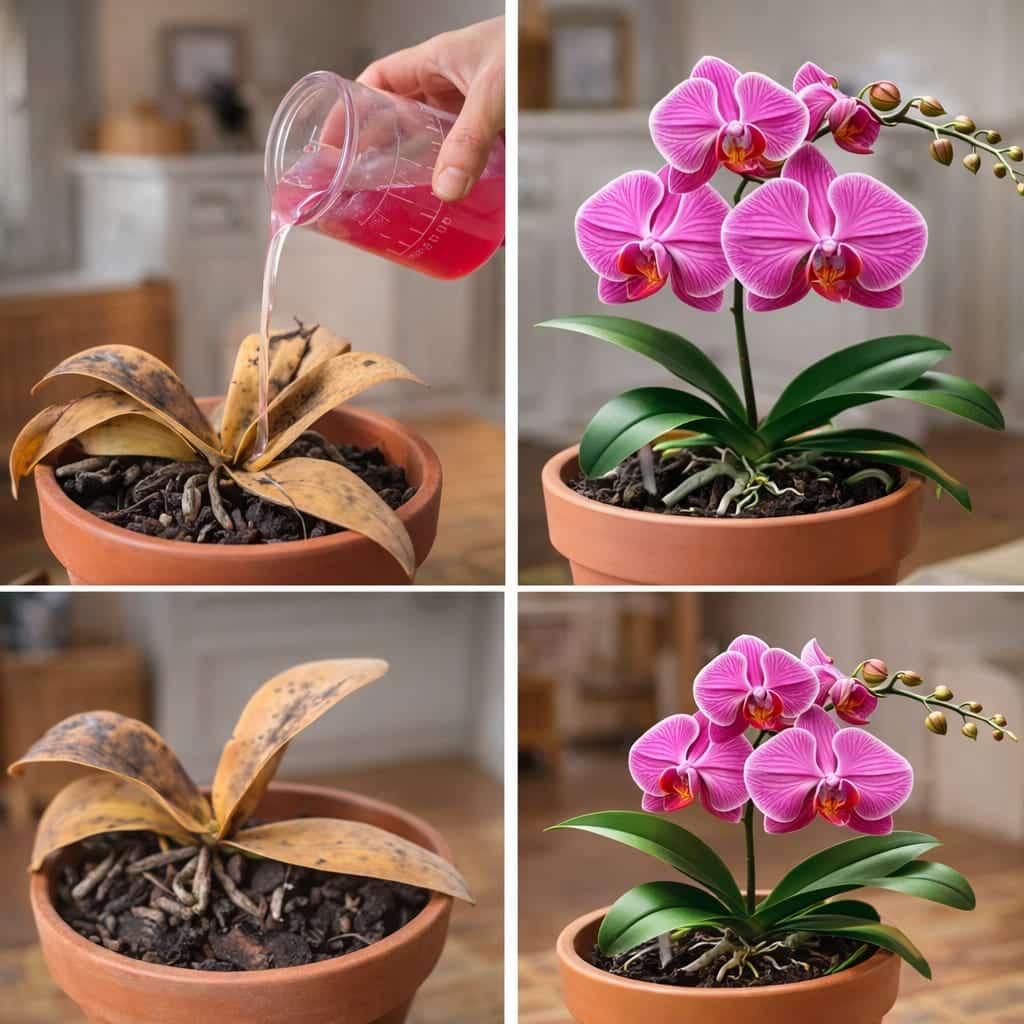
The viral internet is full of “miracle” remedies – a spoonful of this, a spray of that. But the truth is that reviving a struggling orchid is not about magic. It is about a systematic recovery routine: pruning damaged parts, refreshing the roots, using supportive natural treatments like garlic water and ginger water, and then providing the right environment.
In this complete guide, I’ll walk you through the exact steps used by experienced growers to bring weak, rootless orchids back to life. You’ll learn why blooms are not the real problem, how to clean and prune your orchid, how to make and use garlic water safely, and what conditions are essential for long‑term recovery. No hype, just practical advice.
Let’s save that orchid.
First, Understand: Blooms Are Not the Real Problem
When an orchid stops flowering, many people assume it just needs fertilizer. They buy a bloom booster, spray the leaves, and wait. But orchids usually stop blooming because something deeper is wrong.
According to experienced growers, the most common triggers are:
Problem Effect
Improper watering Overwatering suffocates roots and causes rot; underwatering leaves the plant too dry to support growth.
Dry air Low humidity stresses the plant and prevents bud formation.
Poor lighting Too little light means no energy for flowers; too much direct sun burns leaves.
Damaged roots Roots are the plant’s lifeline – if they are rotten or dried out, the orchid cannot take up water or nutrients.
Old, degraded substrate Bark or moss breaks down over time, becoming compacted and acidic.
Nutrient deficiency Lack of proper feeding weakens the plant over time.
That is why the smartest way to “revive” an orchid is not to chase flowers first. Start by helping the plant rebuild its foundation. Healthy roots lead to healthy leaves, and healthy leaves eventually lead to blooms. It is a slower process than viral posts suggest, but it is far more reliable.
Step One: Clean Up the Plant Before You Feed It Anything
One of the most important parts of any successful orchid recovery is cleanup. Before using any treatment, you must remove what is already hurting the plant. This is the step that most people skip – and it is often the reason their orchid never improves.
What You’ll Need
· Clean, sharp scissors or pruning shears (sterilized with rubbing alcohol)
· Paper towels
· A small bowl or container
· Optional: candle wax or cinnamon powder (for sealing cut stems)
Step‑by‑Step Cleanup
- Trim yellow or brown leaves. Cut them at the base, close to the main stem. Do not pull them off – tearing can damage the plant.
- Remove the orchid from its pot. Gently loosen the old potting mix (bark or moss) and rinse the roots with lukewarm water to see them clearly.
- Cut off unhealthy roots. Healthy roots are firm, greenish or silvery. Dead roots are brown, black, mushy, or papery dry. Cut them back to healthy tissue.
- Remove any blackened stem sections. If the stem (rhizome) has soft, dark spots, cut them out until you see only healthy green or white tissue.
- Dry the roots gently with a paper towel. Do not rub – just dab.
- Seal large cuts. Some growers recommend applying a thin layer of wax or dusting with cinnamon powder to prevent infection. This is optional but helpful for large wounds.
- Let the plant rest in a cool, dry place for 24 hours before repotting. This allows cut surfaces to callus over.
Why this matters: A struggling orchid often stays stuck because dead tissue, rot, or stale potting material keeps stressing the plant. Removing damaged parts redirects energy toward recovery. Even if your orchid looks dramatic after pruning, this reset often gives it the best chance to bounce back.
Garlic Water – The Homemade Remedy People Keep Talking About
One of the most discussed natural treatments for orchids is garlic water. The source article describes garlic as a natural antifungal and antibacterial ingredient that can help protect roots, reduce disease pressure, and support new growth.
Why Garlic?
Garlic (Allium sativum) contains allicin and other sulfur compounds that have been shown in studies to inhibit the growth of certain fungi and bacteria. When used as a diluted soak, it may help:
· Suppress root rot pathogens.
· Cleanse the root zone without harsh chemicals.
· Provide a mild immune boost to the plant.
How to Make Garlic Water
Step Instructions
1 Chop 3 cloves of fresh garlic finely.
2 Place the chopped garlic in 1 liter (about 4 cups) of room‑temperature water.
3 Cover the container and keep it away from light (wrap with a cloth or use a dark bottle).
4 Let it infuse for 24 hours.
5 Strain out the garlic pieces – use only the liquid.
Important: Do not use undiluted garlic juice or let the garlic sit for more than 24 hours – the solution can become too strong and burn roots.
How to Use Garlic Water on Orchids
- After pruning and cleaning your orchid, pour the strained garlic water into a clean glass or bowl.
- Soak the orchid’s roots in the garlic water for 15–20 minutes.
- Remove the orchid and let the roots air dry on a paper towel for 10–15 minutes.
- Repot the orchid into fresh, dry orchid substrate (bark or sphagnum moss). Do not water immediately – wait 2–3 days.
Optional: The same garlic water can be lightly sprayed on other plants as a pest‑prevention step, but avoid over‑spraying.
Realistic expectations: Garlic water is a supportive homemade treatment, not a true instant fix. What really helps is the whole recovery routine: pruning, cleaning, fresh substrate, stable temperatures, and better moisture control. Garlic water is one piece of that larger process.
Ginger Water – Another Natural Helper
The source article also mentions ginger water as a second natural helper. Ginger (Zingiber officinale) contains gingerols and other compounds with antimicrobial and anti‑inflammatory properties. It is sometimes used to stimulate growth and protect roots.
How to Make Ginger Water
Step Instructions
1 Grate 1 inch of fresh ginger (about 2–3 cm).
2 Steep in 1 liter of warm (not boiling) water for 2–3 hours.
3 Strain out the ginger pieces.
4 Dilute with an equal amount of fresh water (1:1).
How to Use Ginger Water
· Use the diluted ginger water as a root soak (similar to garlic water) or as a light spray on the potting medium.
· Apply once every 2–3 weeks, alternating with plain water.
Note: The larger care routine is about giving the plant the conditions it needs to restart growth safely. Treat these homemade solutions as gentle support, not as a substitute for proper orchid care. If the plant goes back into soggy bark, sits in harsh sun, or stays in stagnant air, no tonic will save it for long.
Continue to Page 2
Continue to page 2 for more details about this article and the key points many readers miss on the first page.