Can garlic water save a rotten orchid? Learn the truth – it’s not a miracle cure, but it can support recovery when combined with proper root pruning, repotting, and care. Step‑by‑step rescue guide included.
Let’s be honest: if you’ve ever looked at a struggling orchid with yellow leaves, shriveled roots, and dried flower spikes, you know how discouraging it can feel. Orchids are beautiful, elegant plants, but once root rot starts, many people assume the plant is finished. They toss it in the trash and buy a new one.
That is exactly why “garlic water” has become such a popular home remedy.
You’ve probably seen viral posts claiming that a rotten orchid can be revived instantly with a simple garlic soak. The videos are dramatic: a dying orchid, a glass of cloudy liquid, and suddenly – new roots! It sounds almost too good to be true – and in one important way, it is. Garlic water is not magic, and it will not bring a dying orchid back overnight. But used carefully, it may support recovery as part of a proper rescue routine.
The real secret is not the liquid itself. The real secret is fixing the root problem, improving airflow, and giving the plant a fresh start.
In this complete guide, I’ll walk you through exactly why orchids rot, how garlic water can (and cannot) help, and a step‑by‑step rescue plan that actually works. You’ll learn how to prune rotten roots, repot into fresh medium, and create the right conditions for new growth. Plus, you’ll get a realistic timeline, troubleshooting tips, FAQs, and a printable rescue checklist.
Let’s save that orchid.
Why Orchids Rot in the First Place (The Real Cause)
Most orchids do not rot because they are weak. They rot because their growing conditions stop matching what orchids actually need.
Orchids are very different from regular potted plants. In nature, most orchids are epiphytes – they grow on trees, with their roots exposed to air and rain. Their roots need air just as much as moisture. When they stay wet for too long, especially in old bark or compact medium, the roots begin to suffocate. Once that happens, they turn brown, mushy, hollow, or black. The leaves may start yellowing, flower spikes dry out, and the whole plant begins to collapse.
In many cases, overwatering is only part of the problem. Poor drainage, a pot with no airflow, broken‑down bark, or keeping the orchid constantly damp can all lead to root rot.
Common Causes of Root Rot in Orchids
Cause Explanation
Overwatering Watering too often; roots never dry out.
Old, degraded bark Bark breaks down, becomes compacted, and holds too much moisture.
Pot with poor drainage No holes or saucer traps water.
Low light Slows drying; roots stay wet longer.
Cool temperatures + wet medium Roots rot faster in cold, wet conditions.
Dense potting mix Using soil or fine bark instead of orchid‑specific medium.
That is why the first step is never “add something.” It is always: remove the cause.
Why People Use Garlic Water
Garlic is often used in home remedies because it is associated with natural cleansing properties. Plant lovers sometimes use garlic water as a gentle soak for damaged roots because they believe it helps reduce bacterial or fungal pressure around the orchid.
What’s in Garlic?
Garlic (Allium sativum) contains allicin and other sulfur compounds that have been shown in laboratory studies to inhibit certain bacteria and fungi. This is why garlic has a long history of use in traditional medicine and gardening.
The idea is that a diluted garlic soak might:
· Suppress root rot pathogens.
· Cleanse the root zone without harsh chemicals.
· Give the orchid a mild “immune boost” after pruning.
That idea is why this trick keeps spreading.
And to be fair, garlic water may have a place in a rescue routine when used lightly and only once in a while. It can be treated as a mild support step after rotten roots are removed. But it should never replace proper orchid care, and it should never be used as a constant fertilizer or miracle fix.
The Real Way to Rescue a Rotten Orchid – Step by Step
If your orchid is struggling, this is the part that matters most. Follow these steps in order.
What You’ll Need
· Clean, sharp scissors or pruning shears (sterilized with rubbing alcohol)
· Paper towels
· Fresh orchid potting mix (bark or sphagnum moss)
· Optional: cinnamon powder (natural antifungal)
· Optional: fresh garlic (for garlic water)
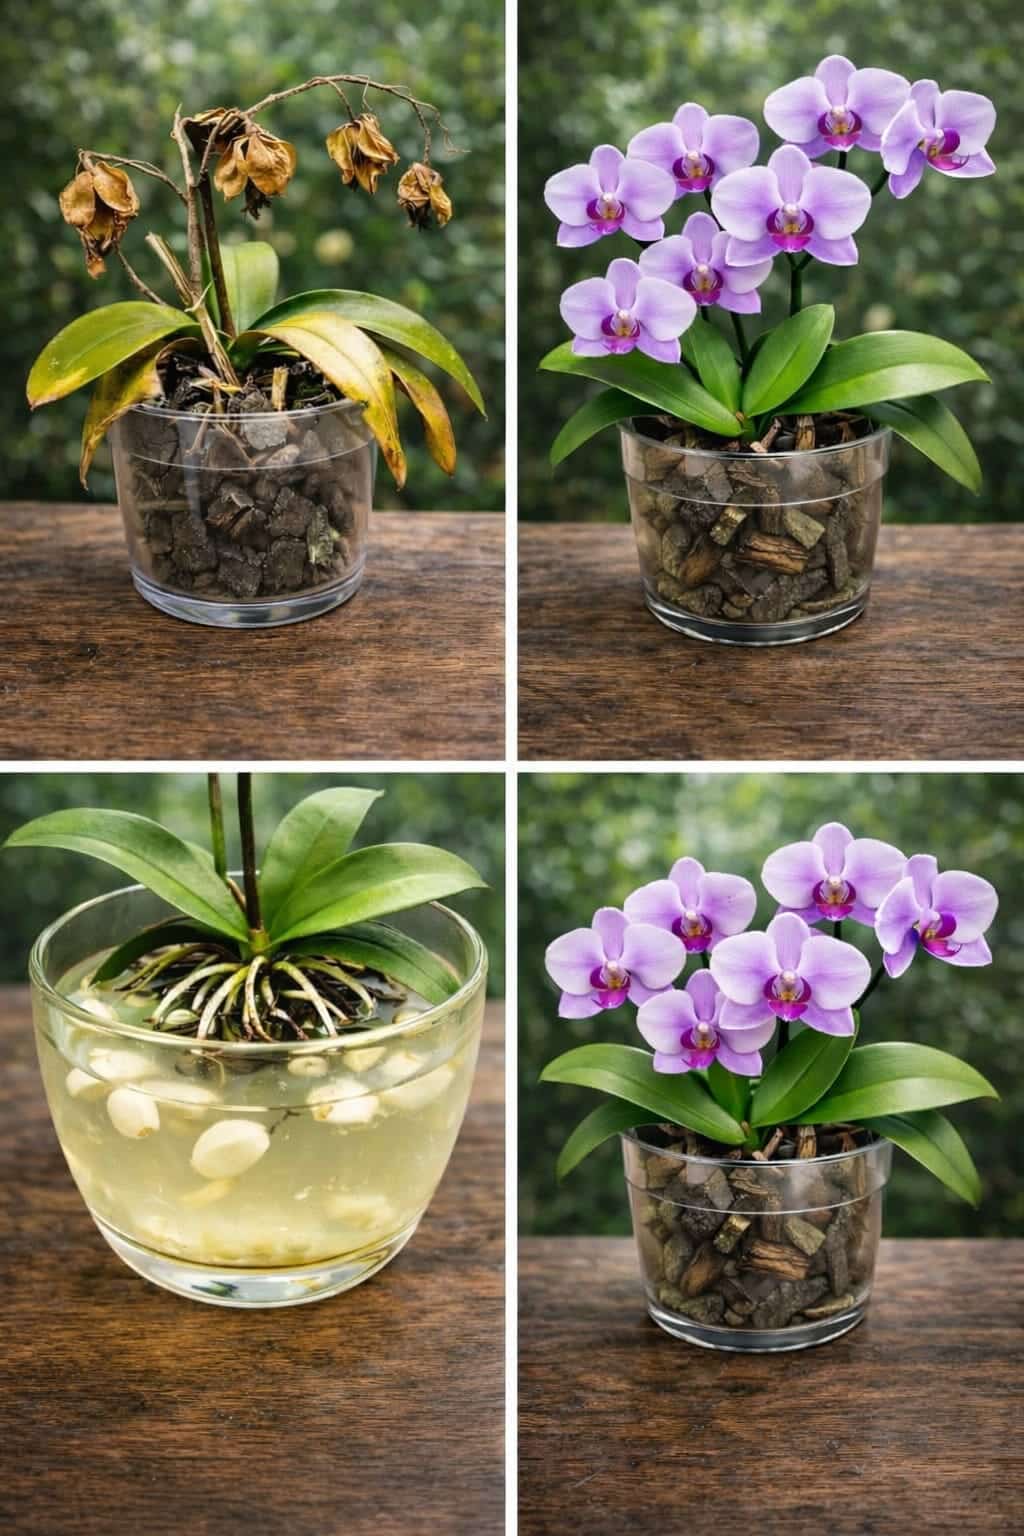
Step 1: Remove the Orchid from the Pot
Take the plant out gently. If the pot is tight, squeeze the sides or tap it. Do not yank the orchid by the leaves. Shake off old bark to expose the roots.
Step 2: Inspect the Roots
Healthy roots are usually firm, green or silvery. Rotten roots are brown, mushy, flat, or hollow. Sometimes roots may be completely dry and papery – those are also dead.
Healthy Roots Unhealthy (Rotten) Roots
Firm to the touch Soft, mushy, or hollow
Green or silvery when dry Dark brown or black
Plump, not shriveled Flat, papery, or stringy
No foul smell Rotten odor
Step 3: Cut Away All Rotten Roots
Using clean scissors, remove every dead or mushy root. This step is critical. If you leave rotted tissue attached, the problem continues spreading. Cut back to healthy tissue. If the orchid has no healthy roots left, do not despair – it can still be saved, but recovery will take longer.
Step 4: Rinse the Remaining Roots
Wash away old debris and broken bark under lukewarm water. This helps you clearly see what is still healthy. Gently pat dry with a paper towel.
Step 5: (Optional) Use Garlic Water Carefully
If you want to try this method, make a mild garlic water soak:
How to make garlic water:
· Crush 3–4 cloves of fresh garlic.
· Steep in 1 liter of room‑temperature water for 24 hours.
· Strain out all garlic pieces (use only the liquid).
· Do not use fresh undiluted garlic juice – it will burn roots.
How to use:
· Soak the healthy remaining roots for 10–15 minutes.
· Remove and let roots air dry on a paper towel for 10–15 minutes.
· Do not soak longer – over‑exposure can harm roots.
Think of this as a light cleansing step – not the cure.
Step 6: Let the Roots Dry Briefly
After trimming and rinsing, give the orchid a short rest (15–30 minutes) before repotting. This helps reduce excess moisture around damaged areas. If you cut large roots, you can dust the cut ends with cinnamon powder – a natural antifungal.
Step 7: Repot into Fresh Orchid Medium
Use fresh bark, orchid mix, or sphagnum moss. Never return the rescued orchid to old, soggy material. The new setup should drain quickly and allow airflow around the roots.
Potting medium options:
· Bark mix – best for most orchids; excellent drainage.
· Sphagnum moss – holds more moisture; good for rootless orchids (use carefully).
· Mixed (bark + moss) – balanced approach.
Pot selection:
· Use a pot with drainage holes (clear plastic pots are ideal).
· Choose a pot size just large enough for the root ball – too large holds excess moisture.
Step 8: Wait Before Watering Again
Do not soak the plant immediately after repotting. Give it 3–5 days to settle so the cut root ends are less likely to rot again. After that, water lightly – keep the medium slightly moist, not wet.
Continue to Page 2
Continue to page 2 for more details about this article and the key points many readers miss on the first page.