🌱 The REAL Secret to Reviving Orchids – Root Recovery First
Forget the viral tricks. The real key to saving a dying orchid is root recovery. Without healthy roots, the plant cannot take up water or nutrients. Here’s the proven, step‑by‑step method.
✂️ Step 1: Remove the Orchid from Its Pot and Assess the Damage
Gently take the orchid out of its pot. Remove all old potting medium (bark, moss, etc.). Rinse the roots with lukewarm water to see them clearly.
Identify healthy vs. dead roots:
| Healthy Roots | Dead/Rotten Roots |
|---|---|
| Firm to the touch | Soft, mushy, or flat |
| Green or silvery when dry | Brown, black, or dark |
| Plump, not shriveled | Papery or hollow |
| No foul smell | Rotten smell |
✂️ Step 2: Remove Dead Roots (This Is Crucial)
Using sterilized scissors or pruning shears (wipe with rubbing alcohol), cut away every dead, mushy, or brown root. Leave only firm, healthy roots.
- If the orchid has no healthy roots at all: Don’t despair. You can still save it using the “sphagnum moss and humidity” method (see below).
- If the orchid has some healthy roots: Trim only the dead parts. Leave any root that is still firm, even if it’s not perfect.
Pro tip: After cutting, dust the cut ends with cinnamon powder. Cinnamon is a natural antifungal and will help prevent infection.
🌿 Step 3: Repot in Fresh Orchid Bark (Not Soil!)
Orchids do NOT grow in regular potting soil. They need a chunky, well‑draining medium that allows air to reach the roots.
| Best Medium | Why |
|---|---|
| Orchid bark mix (pine bark, charcoal, perlite) | Excellent drainage, air circulation, mimics natural tree bark. |
| Sphagnum moss (for rootless or very weak orchids) | Holds moisture, good for encouraging root growth, but can rot if overwatered. |
For a severely root‑bound or rootless orchid, use sphagnum moss – it provides consistent humidity around the base, which encourages new root growth.
How to repot:
- Choose a pot with drainage holes. Clear plastic orchid pots are ideal because you can see the roots.
- Place a layer of bark or moss at the bottom.
- Position the orchid so the base of the leaves (the crown) sits just above the medium – never buried.
- Gently fill in around the roots with bark or moss. Do not pack tightly.
💧 Step 4: Fix Your Watering Routine – The #1 Mistake
Most orchids die from overwatering. After repotting, your watering routine must change.
| Guideline | Details |
|---|---|
| When to water | When the potting medium is almost dry. For bark, this is about once every 7–10 days. For moss, less often. |
| How to check | Stick your finger or a wooden skewer into the medium. If it feels dry, water. If damp, wait. |
| How to water | Run room‑temperature water through the pot for 1–2 minutes, allowing it to drain completely. Never let the pot sit in standing water. |
| Signs of overwatering | Yellow, mushy leaves; black roots; foul smell. |
| Signs of underwatering | Wrinkled, floppy leaves; shriveled roots. |
For a rootless orchid: Do not water normally – the roots can’t absorb water. Instead, use the “humidity dome” method (see Step 6).
☀️ Step 5: Give Bright, Indirect Light – Energy for Recovery
Light is essential for photosynthesis, which provides the energy to grow new roots and leaves.
- Best location: East or west‑facing window, with bright, indirect light.
- Avoid: Direct afternoon sun (burns leaves) and dark corners (no energy).
- If you have no good window: Use a full‑spectrum LED grow light for 12–14 hours per day.
Pro tip: If your orchid’s leaves are dark green, it’s not getting enough light. Move it closer to a window.
🌡️ Step 6: Create a Humid Environment (Crucial for Root Growth)
Orchids are tropical plants. They need humidity to grow new roots – especially if they have few or no roots.
| Humidity Level | Effect |
|---|---|
| Below 40% | Roots dry out quickly; new root growth stalls. |
| 50–70% | Ideal – encourages root and leaf growth. |
| Above 80% | Risk of fungal issues; ensure good airflow. |
How to increase humidity for a recovering orchid:
- Use a humidity dome: Place a clear plastic bag or a large clear container over the pot (without touching the leaves). This traps moisture and creates a mini‑greenhouse. Remove for 1 hour daily to prevent mold.
- Pebble tray: Place the pot on a tray filled with pebbles and water. The water evaporates, increasing local humidity.
- Humidifier: The most reliable method, especially in dry climates.
For a rootless orchid, a humidity dome is essential. Without roots, the orchid can only absorb moisture through its leaves – but that’s very limited. The dome prevents the plant from dehydrating while new roots form.
🌿 Step 7: Be Patient – New Roots Take Time
Reviving an orchid is not an overnight process. Here’s what to expect:
| Timeframe | What to Look For |
|---|---|
| 2–4 weeks | New root tips emerging from the base of the plant. They may look like tiny green or silver bumps. |
| 1–2 months | Roots grow longer. New leaves may appear. |
| 2–4 months | The orchid is stable. You can resume normal watering and feeding. |
| 6–12 months | With proper care, the orchid may bloom again. |
Do not fertilize a recovering orchid until it has several new roots at least 2–3 inches long. Fertilizer can burn tender new roots.
🧴 Optional: Rooting Hormones and Other Natural Aids
While not necessary, some products can help speed up root recovery.
| Product | How It Helps | How to Use |
|---|---|---|
| Cinnamon powder | Natural antifungal – protects cut roots | Dust on cut ends after pruning. |
| Honey | Mild antibacterial (but can attract ants) | Use sparingly on cut ends, not on healthy tissue. |
| Commercial rooting hormone | Contains auxins that stimulate root growth | Dip cut ends in powder or gel before potting. |
| Seaweed extract (kelp) | Natural growth stimulant | Dilute and water once a month. |
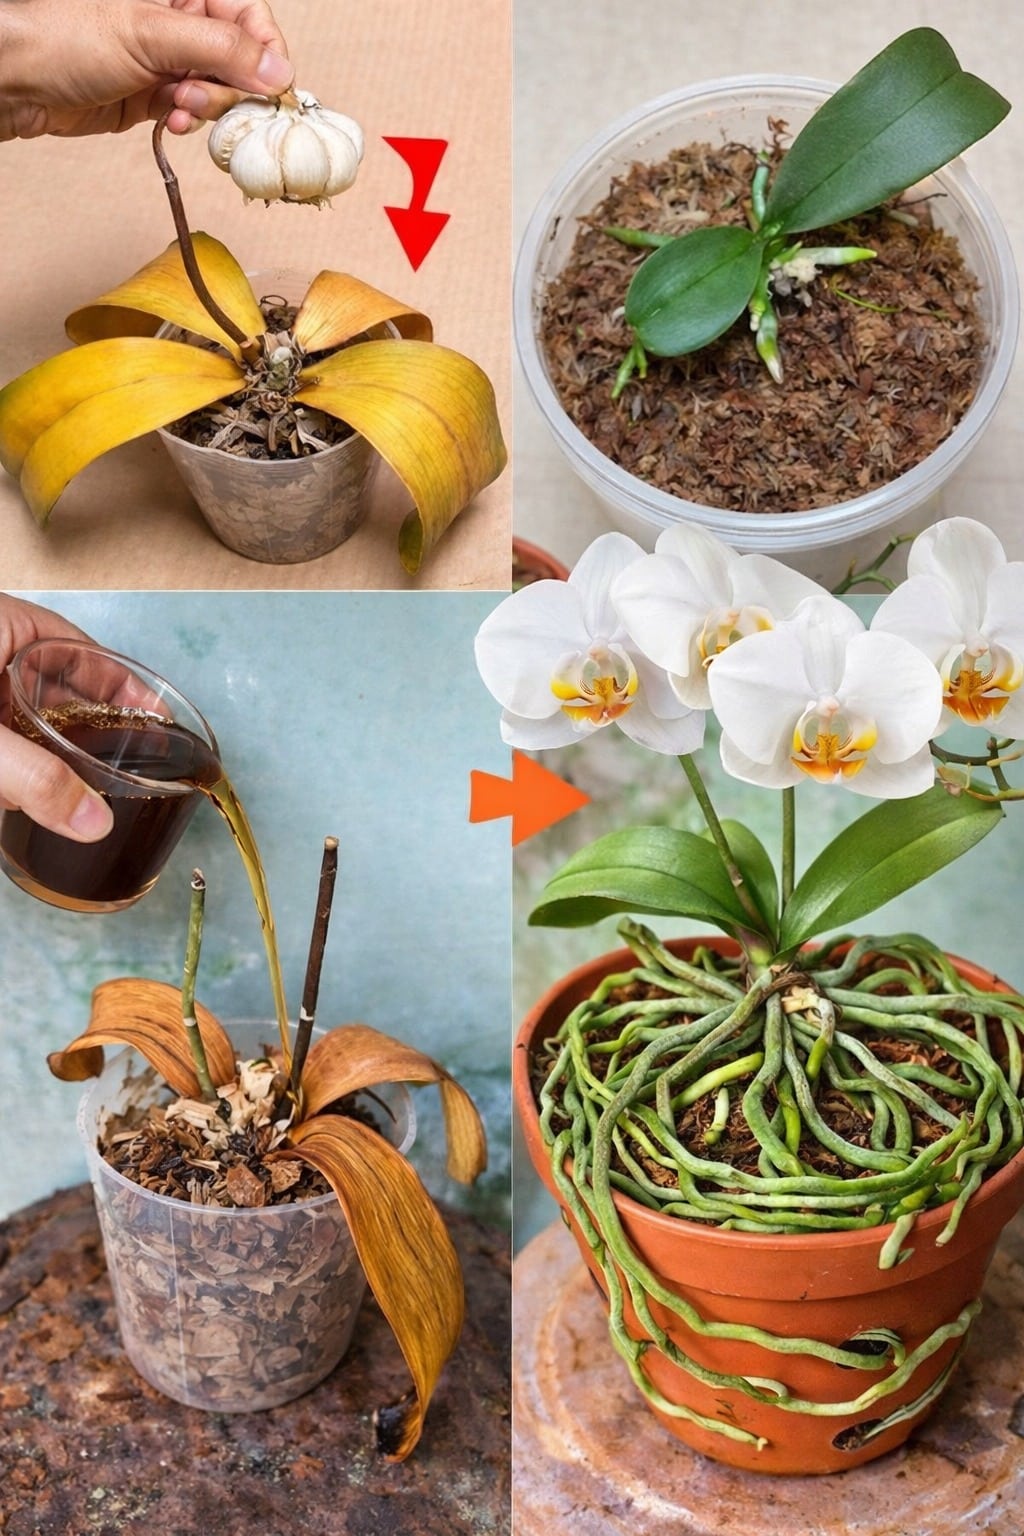
Garlic water falls into this category – it’s a natural antifungal, not a root stimulant. Use it sparingly if at all.
🚫 Common Mistakes That Kill Orchids (Even When Trying to Revive Them)
| Mistake | Why It’s Harmful | Correct Approach |
|---|---|---|
| Overwatering | Roots rot, no oxygen | Let medium dry between waterings |
| Using regular potting soil | Suffocates roots, causes rot | Use orchid bark or sphagnum moss |
| No drainage holes | Water pools, roots drown | Always use pots with holes |
| Too many DIY hacks | Garlic, cinnamon, honey, etc. can burn roots | Stick to one method at a time |
| Fertilizing too soon | Burns new root tips | Wait until roots are 2–3 inches long |
| Placing in direct sun | Leaves burn, plant dehydrates | Use bright, indirect light |
| Ignoring humidity | New roots dry out before they grow | Use a humidity dome or pebble tray |
🧪 Can You Revive an Orchid with No Roots? (Yes – Here’s How)
The most desperate situation is an orchid with zero roots. The leaves may be wrinkled, and the plant looks almost dead. But even then, you can often save it.
Step‑by‑Step for a Rootless Orchid
- Remove all dead tissue: Cut off any rotten or dried‑out roots. Leave only the stem (rhizome) and healthy leaves.
- Dust with cinnamon on cut surfaces.
- Prepare a small pot with damp (not wet) sphagnum moss.
- Place the orchid on top of the moss – do not bury the stem. The base should rest on the surface.
- Create a humidity dome (clear plastic bag or container) to trap moisture.
- Place in bright, indirect light – no direct sun.
- Mist the moss when it feels dry – do not pour water.
- Wait. New roots should appear in 4–8 weeks. Once roots are 1–2 inches long, you can pot normally.
This method has a high success rate, even with orchids that look dead.
Frequently Asked Questions (FAQs)
Q: Can I use garlic water on my orchid every day?
No. Once every 2–3 weeks at most. Overuse can burn roots and leaves.
Q: How do I know if my orchid is too far gone?
If the stem is completely brown, shriveled, and there is no green tissue anywhere, it may be dead. But if there’s any green – on leaves or stem – there’s hope.
Q: Should I cut off yellow leaves?
Only if they are completely yellow and dry. Partially yellow leaves can still photosynthesize. Let them fall off naturally.
Q: Can I use hydrogen peroxide on orchid roots?
Diluted 3% hydrogen peroxide (1 part peroxide to 3 parts water) can be used to clean rotten roots. It kills bacteria and fungus. Use sparingly – it can also kill healthy tissue.
Q: How long does it take for a revived orchid to bloom?
After successful recovery, it may take 6–12 months for a new flower spike, depending on the species and care.
Q: Why are my orchid’s new roots growing above the soil?
Orchid roots naturally grow in all directions. Aerial roots are normal – they absorb moisture from the air. Do not bury them.
Q: Can I use eggshells or coffee grounds to revive my orchid?
No. These are not suitable for orchids and can cause rot or pH imbalances.
Final Thoughts – Patience and Proper Care Beat Viral Tricks
The viral garlic water trick might get views, but it’s not the secret to reviving a dying orchid. The real transformation comes from:
- Removing dead roots – giving the plant a fresh start.
- Using the right potting medium – bark or moss, never soil.
- Fixing your watering routine – let the medium dry between waterings.
- Providing bright, indirect light – energy for recovery.
- Creating humidity – especially for rootless orchids.
- Being patient – new roots take weeks, blooms take months.
That “simple liquid” can help a little as a mild antifungal, but it’s not the main fix. Don’t rely on shortcuts. Focus on root health and proper care, and your orchid can go from dying to blooming again.
Now it’s your turn! Have you revived a dying orchid? What worked for you – garlic water, humidity domes, or something else? Drop a comment below – I’d love to hear your story.
And if you found this guide helpful, share it with a friend who’s about to throw away their orchid. Pin it for later, and subscribe to our newsletter for more honest, evidence‑based plant care.
Stay patient, stay hopeful, and watch your orchid come back to life. 🌸✨