Can you really grow a snake plant in a spiral? I thought it was fake until someone showed me the trick. Here’s the simple method most plant lovers don’t know about to create a living sculpture.
I consider myself a pretty seasoned plant parent. I’ve propagated pothos, nursed finicky calatheas back from the brink, and kept a fiddle-leaf fig alive for three years (which, as we all know, is practically a miracle). So when a friend sent me a photo of a snake plant twisted into a perfect, elegant spiral, I had two immediate thoughts.
First: That is the most beautiful thing I’ve ever seen.
Second: That has to be fake. There’s no way.
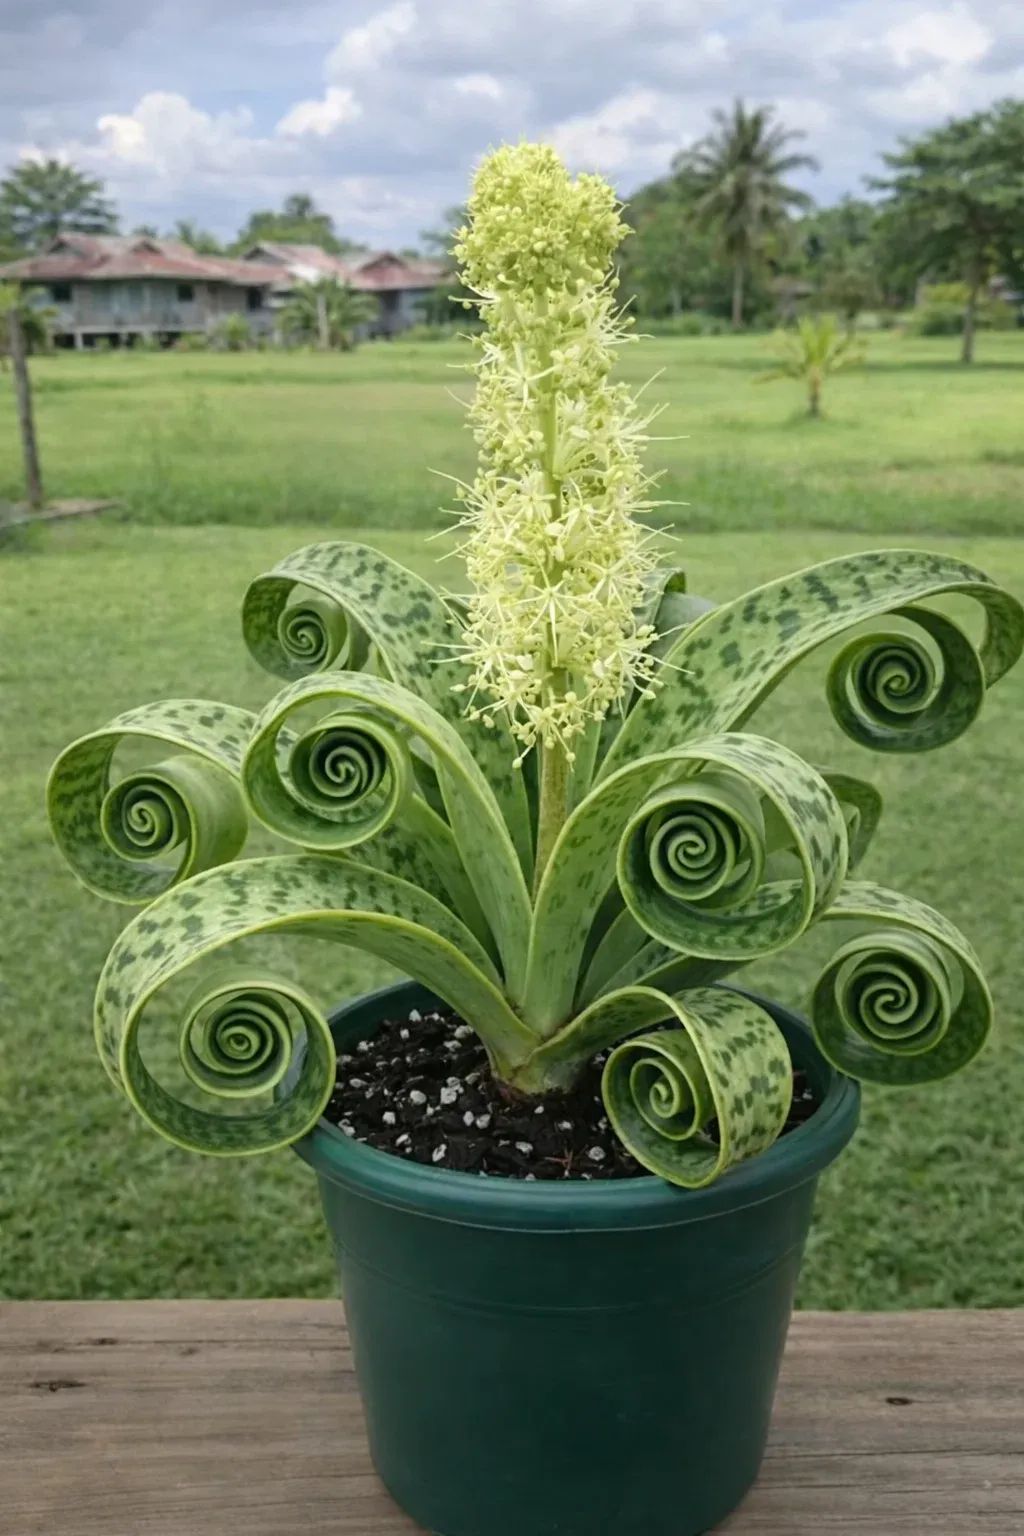
It looked too perfect, too sculptural. Snake plants (Sansevieria) are known for their stiff, upright, sword-like leaves . The idea of coaxing one into a graceful curl seemed impossible. I was convinced it was either an AI-generated image or a very expensive piece of artificial decor.
Then, my friend came over and showed me how it was done. She didn’t bring a magic wand or a bag of tricks. She brought a young plant, a piece of bamboo, and a lot of patience. As she gently guided a leaf around the support, explaining the process, I realized my skepticism was misplaced. It wasn’t a trick or a hoax. It was horticulture.
It turns out, there’s a simple, methodical way to train your snake plant into a stunning living sculpture. It requires the right technique and a little patience, but the result is absolutely worth it. In this article, I’ll share the secrets most plant lovers don’t know, so you can create your own spiraled masterpiece.
The Truth About Spiraled Snake Plants: It’s Not Magic, It’s Training
First, let’s bust a myth: you can’t take a mature snake plant with stiff, fully grown leaves and force it into a tight spiral. The leaves will simply snap. The “trick” is about training new growth .
Snake plants are naturally upright, but with gentle, consistent guidance, you can influence the direction their leaves grow . Think of it like training a bonsai tree or guiding a vine up a trellis. You’re not forcing the plant; you’re working with its natural tendencies over time.
There are a few different methods to achieve this look, from using support frames to strategic light placement. The method you choose depends on the look you want and how much time you want to invest .
The Simple Trick: A Step-by-Step Guide to the Perfect Spiral
After watching my friend and doing a deep dive into the techniques, I’ve broken down the process into manageable steps. This method uses a support frame and is the most reliable way to get a defined, elegant spiral .
Step 1: Start with the Right Plant
This is the most critical step for success. You cannot start with an old, established plant. You need a young snake plant with pliable, fresh growth . Mature leaves are rigid and will break if you try to bend them.
While the cylindrical snake plant (Sansevieria cylindrica) is famous for its spear-like leaves that are often braided, other flexible varieties can work, especially when they are young . Look for healthy, compact plants like:
· Sansevieria trifasciata ‘Laurentii’
· Sansevieria ‘Zeylanica’
· Sansevieria ‘Hahnii’ – This compact variety naturally grows in a rosette shape, which can be easier to guide .
Step 2: Gather Your “Training” Tools
You’ll need a few simple supplies to create a support structure for your plant:
· A Spiral Frame or Central Support: You can buy a pre-made spiral plant frame, but a simple bamboo stake, wooden dowel, or even a piece of sturdy wire bent into a spiral shape works perfectly . This will act as the guide around which the leaves will twist .
· Soft Plant Ties: Use something soft and flexible that won’t cut into the leaves. Velcro strips, foam-coated wire, soft garden twine, or even strips of old pantyhose are ideal .
· A Well-Draining Pot: Ensure your pot has drainage holes to prevent root rot, which can weaken the plant .
Step 3: Set Up the Support and Start Shaping
- Insert the Frame: Gently push your central support (bamboo stake or wire spiral) deep into the soil, close to the base of the plant. Be careful not to damage the roots .
- Start with the Longest Leaves: Begin with the most flexible, mature leaves. Gently curve them around the support frame in the direction you want your spiral to go .
- Secure the Leaves: Use your soft plant ties to loosely attach the leaves to the frame at multiple points. This helps support the curve evenly. Crucially, do not tie them too tightly, as this can scar the leaves or restrict growth . The ties are just gentle guides.
- Be Patient and Repeat: Don’t try to create a full spiral in one day. The plant needs time to adjust. Every few weeks, as the plant grows, you can gently guide new leaves around the frame and adjust the ties . Over several months, the spiral will become more defined .
Pro Tips for a Perfect Spiral
To ensure your plant stays healthy and your spiral is a success, keep these expert tips in mind:
· Rotate the Pot Regularly: Plants naturally grow toward light. To keep your spiral even and prevent all the leaves from leaning one way, rotate the pot every week or two so all sides get equal light exposure .
· Mist for Flexibility: If your home has dry air, lightly mist the leaves in the morning. This can help keep them a bit more hydrated and flexible during the training process .
· Stick to Basic Care: A healthy plant shapes better. Place it in bright, indirect sunlight. Water only when the soil is completely dry (every 2-4 weeks). During spring and summer, feed it once a month with a balanced liquid fertilizer diluted to half strength .
· Don’t Overwater: Overwatering leads to weak, floppy roots and leaves that won’t hold their shape. It’s the fastest way to ruin your spiral project .
Alternative Methods to Try
If the support frame method feels like too much commitment, there are other ways to achieve a similar look.
· The Gradual Twist Method: For a more hands-on, frame-free approach, you can gently rotate a young leaf a few degrees every week in the direction you want it to go. It requires immense patience and consistency, but over many months, the leaf will harden into a gentle curve .
· Light Positioning: You can use the plant’s natural phototropism (growing towards light) to help create a curve. By placing a light source slightly off-center and regularly rotating the pot, you can encourage the plant to grow in a gentle, spiraling motion . This works best in conjunction with other methods.
· The “Cheater” Method (Multi-Plant Illusion): This method creates the look of a spiral without any training. Plant 3-5 young, cylindrical snake plants in a circular pattern in the same pot, angling them slightly inward. As they grow, their clustered, upright leaves will create the illusion of one giant, spiraled plant .
Troubleshooting: Why Isn’t My Spiral Working?
· Leaves are snapping: You’re bending them too much, too fast. Slow down, and always work with young, flexible leaves.
· The spiral is uneven: You’re probably not rotating the pot regularly, causing the plant to lean toward its primary light source .
· The plant is floppy and weak: This is a classic sign of overwatering. Let the soil dry out completely before watering again .
Frequently Asked Questions (FAQs)
Q: How long does it take to train a snake plant into a spiral?
A: Patience is key. It can take several months to a year or more to see a significant, defined spiral . The process is slow, but the results are a stunning living sculpture.
Q: Can I use this method on any snake plant?
A: While possible, it’s much easier with varieties that have flexible leaves, like Sansevieria cylindrica or young plants of ‘Laurentii’ or ‘Zeylanica’ . Mature plants with stiff, flat leaves are very difficult to train without breaking.
Q: What if new leaves don’t follow the spiral?
A: You must continue to train new leaves as they emerge. Guide them gently around the support frame and secure them with ties. Eventually, you may find that new “pups” will sometimes follow the mother plant’s shaped form .
Q: When can I remove the support frame?
A: Once the plant has held its spiral shape for a significant period (many months) and the leaves feel firm in their new position, you can start removing the support gradually . Remove one tie at a time and see if the plant holds its form. If it starts to spring back, re-tie it and wait longer.
Conclusion
Seeing a perfectly spiraled snake plant for the first time is a moment of disbelief. It looks like an optical illusion, something that couldn’t possibly be natural. But as I learned, it’s not magic—it’s the beautiful result of patience, technique, and a little bit of plant psychology.
The simple trick isn’t a secret potion or a fancy tool. It’s the methodical process of guiding new growth, using gentle supports, and providing consistent care. It’s a long-term project that blends plant care with artistry, and the reward is a living sculpture that adds an undeniable touch of elegance to any room .
So, if you’re ready for a rewarding plant project, pick out a young snake plant, grab a bamboo stake, and give it a try. In a year, you might just have a conversation-starting masterpiece of your own.
Have you ever tried training a plant into a new shape? Share your experiences or questions in the comments below! And if you’re looking for more unique plant care guides, check out our articles on Reviving a Struggling Orchid and The Secret to Lush Peace Lilies.
More Iideas You Might Like
-

How to Make Your Spider Plant Bushy and Full Instead of Thin and Sparse – The Complete Guide
Is your spider plant looking thin, stretched, or uneven? Learn how to make it bushy and full with better light, … Read more
-

How to Make African Violets Bloom Abundantly All Year Long
Are your African violets all leaves and no flowers? Learn the secrets to abundant blooms – bright indirect light, proper … Read more
-
How to Make a Snake Plant Grow in a Spiral or Circular Shape – The Complete Guide
Want a stunning spiral snake plant? Learn how to gently train your Sansevieria into a spiral or circular shape. Step‑by‑step … Read more