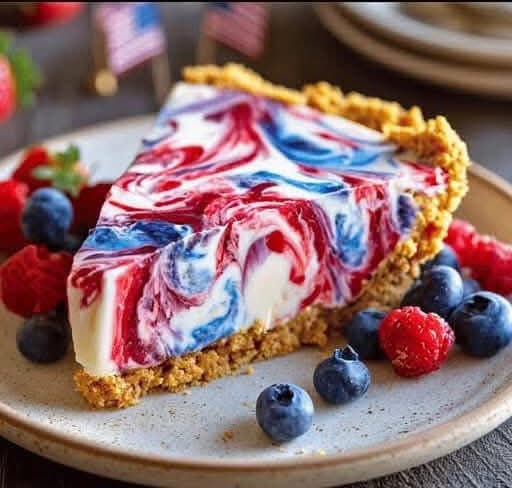
A Red, White & Blue No-Bake Treat That’s as Patriotic as It Is Delicious!
When summer hits full swing and fireworks light up the sky, there’s no better way to sweeten your celebration than with a slice of 4th of July Swirl Pie. This dessert has it all: a buttery graham cracker crust, a light and creamy no-bake cheesecake filling, and festive fruit swirls that honor the red, white, and blue spirit of Independence Day.
Whether you’re hosting a backyard cookout or attending a family picnic, this pie is sure to turn heads—and delight taste buds. Plus, it’s made with fresh strawberries and blueberries, so it’s a great way to use seasonal fruit. Light, refreshing, and stunning to look at, this is a show-stopping summer dessert that doesn’t require any complicated decorating skills.
❤️ Why You’ll Love This Recipe
No-Fuss but Fancy: A simple swirl technique gives this pie a bakery-style look without needing fancy tools or piping bags.
Make-Ahead Friendly: It sets in the fridge, making it perfect to prep the night before your event.
Patriotic and Pretty: Red and blue fruit purees swirled into a creamy white filling—this pie is practically waving a flag.
Cool & Creamy: No heavy baking involved; just whip, swirl, and chill!
🛒 Ingredients You’ll Need
Let’s break down everything you need for this festive treat:
For the Crust:
1¼ cups graham cracker crumbs (about 10 full sheets)
3 tbsp granulated sugar
5 tbsp unsalted butter, melted
For the Filling:
16 oz cream cheese, softened
¾ cup powdered sugar
1 tsp vanilla extract
1 cup heavy cream, cold
For the Red Swirl:
1 cup fresh strawberries, hulled & chopped
2 tbsp granulated sugar
For the Blue Swirl:
1 cup fresh blueberries
2 tbsp granulated sugar
Optional Garnish:
- Extra berries for topping
- A dollop of whipped cream on each slice
- Mint leaves for a refreshing touch
👩🍳 How to Make 4th of July Swirl Pie
1. Make the Crust
Preheat your oven to 350°F (175°C).
In a medium bowl, combine the graham cracker crumbs, sugar, and melted butter. Mix until the crumbs are evenly moistened. Press the mixture firmly into the bottom and up the sides of a 9-inch pie plate.
Bake for 8–10 minutes or until lightly golden. Let it cool completely before adding the filling.
Tip: For a no-bake version, skip baking and chill the crust for 30 minutes to firm up. However, baking gives it that perfect toasty crunch.
2. Prepare the Fruit Purees
In two small saucepans, cook your fruits separately:
For the strawberry puree, combine chopped strawberries and sugar. Cook over medium heat, stirring occasionally, until soft and syrupy—about 5 minutes. Remove from heat and blend until smooth. Cool completely.
For the blueberry puree, repeat the same process with blueberries and sugar. Blend and cool.
Quick Cool Tip: Place the purees in shallow bowls in the fridge while you prep the filling to speed things up.
3. Whip the Filling
In a large mixing bowl, beat the cream cheese, powdered sugar, and vanilla until smooth and creamy.
In a separate bowl, beat the cold heavy cream to stiff peaks. This is key to a light, mousse-like filling.
Gently fold the whipped cream into the cream cheese mixture until no streaks remain. The result should be a fluffy, silky filling.
4. Assemble the Pie
Spoon about one-third of the filling into the cooled pie crust and spread evenly.
Using small spoons, drop dollops of strawberry and blueberry puree over the layer. Don’t worry about being perfect—you’ll be swirling it all soon.
Repeat with another layer of filling and more dollops of puree on top. Use a knife or skewer to gently swirl the colors across the surface. Swirl in an “S” or figure-eight motion for a pretty marbled effect.
Swirl Tip: Don’t overdo it—too much swirling can muddy the colors.
5. Chill & Serve
Cover the pie and refrigerate for at least 4 hours, preferably overnight. This helps it set and develop flavor.
Before serving, slice with a hot, clean knife for sharp, defined layers. Wipe the knife between slices for the neatest presentation.
🎆 Tips for Success
Room-Temp Cream Cheese: Ensures a smooth filling with no lumps.
Cold Cream: Whips faster and holds its structure better when folded in.
Use Fresh Berries: They create a brighter swirl and more natural flavor than frozen.
Chill Time: Don’t rush the chilling process—this is what helps the pie firm up enough to slice beautifully.
🎉 Serving Suggestions
This pie is perfect on its own, but if you want to take it to the next level:
Top with Fresh Berries for a burst of texture and color.
Add Whipped Cream rosettes or dollops along the edge.
Garnish with Mint Leaves for a refreshing contrast.
Pair it with:
Iced tea or lemonade
A scoop of vanilla bean ice cream
A light rosé or fruity mocktail
🧊 Storage & Make-Ahead
Refrigerator: Store in the fridge for up to 4 days covered with plastic wrap or in an airtight container.
Freezer: This pie can be frozen for up to 1 month. Let it firm up first in the fridge, then wrap tightly and freeze. Thaw in the refrigerator before serving.
Note: Swirls may blur slightly after freezing, but the flavor will still be excellent.
⭐ Final Thoughts
This 4th of July Swirl Pie is more than just a dessert—it’s a celebration in every slice. Easy to make, beautiful to serve, and guaranteed to wow your guests, this no-bake cheesecake-style pie is destined to become a staple at all your summer get-togethers.
It’s a wonderful mix of creamy, tangy, and sweet with that perfect pop of color that screams “Happy Independence Day!” So swirl up some red, white, and blue magic and get ready to celebrate with style.