Spider plants are some of the easiest and most rewarding houseplants to grow indoors. Their long arching leaves, green and white stripes, fast-growing baby plantlets, and graceful hanging shape make them perfect for windowsills, shelves, plant stands, hanging baskets, and glass jar displays. They are beginner-friendly, forgiving, and beautiful in almost any home.
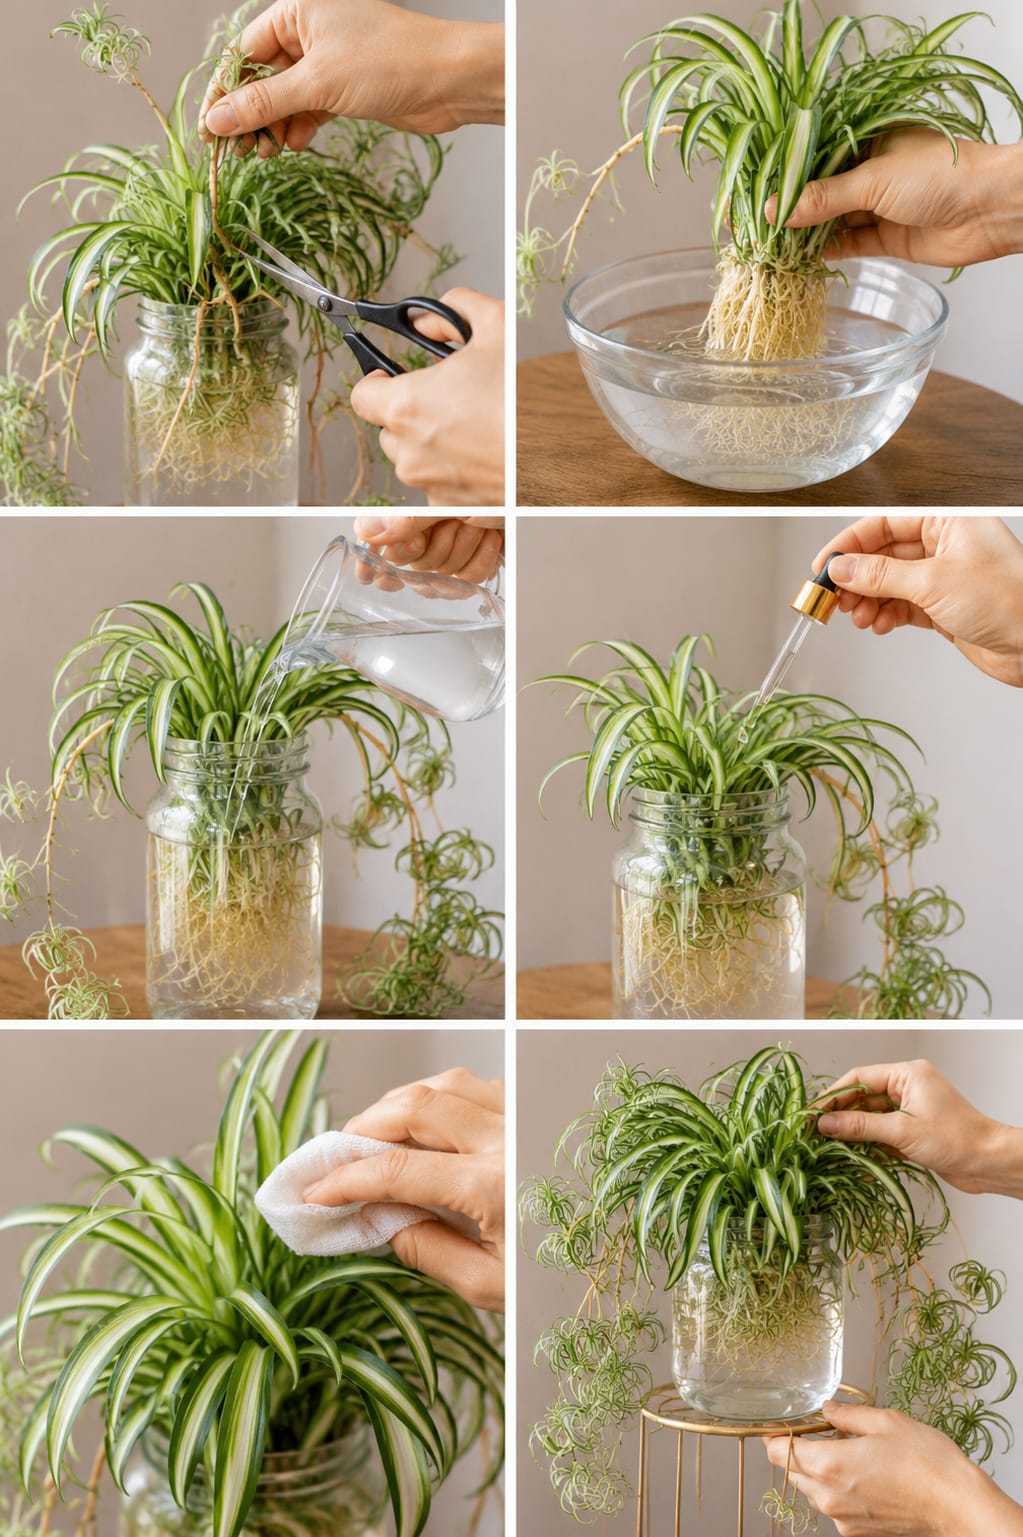
The image shows a simple spider plant water-growing method. The plant is removed from an old jar, weak or messy runners are trimmed, the roots are rinsed in a bowl of water, the plant is placed back into a clean glass jar, fresh water is added, a few drops of liquid plant food are applied, the leaves are wiped clean, and the finished plant is displayed on a small stand. This method is useful when you want a clean, decorative, soil-free spider plant display with visible roots and fresh green leaves.
Growing spider plants in water is popular because it looks beautiful and feels simple. You can see the roots, watch new white growth appear, and enjoy a modern indoor plant style without soil mess. But water culture also needs care. The water must stay clean, the roots need oxygen, the jar should not become slimy, and the plant still needs light and nutrients. A spider plant can live in water for a long time if the routine is done correctly.
Why Grow Spider Plants in Water?
Growing spider plants in water is a clean and attractive way to enjoy this plant indoors. Instead of hiding the roots in soil, you can display them in a glass jar. The white roots create a natural decorative look, especially when paired with striped leaves and trailing baby plants.
This method is also useful for propagation. Spider plant babies root very easily in water. Once they grow roots, you can keep them in water or transfer them into soil. Mature spider plants can also be refreshed in water, but they need more attention than small cuttings.
Benefits of Growing Spider Plants in Water
- Clean indoor display without soil mess
- Easy root monitoring
- Beautiful glass jar decoration
- Great for propagating baby spider plants
- Simple setup for beginners
- Good option for small spaces
- Easy to move and style
- Helps you see root health clearly
Can Spider Plants Live in Water Forever?
Spider plants can live in water for a long time, but they need clean water, bright indirect light, and occasional diluted nutrients. A plant growing in soil gets minerals from the potting mix. A plant growing only in water does not have that same supply, so it may eventually need weak liquid fertilizer.
Some spider plants grow beautifully in water for months or even years. Others may slow down, develop pale leaves, or produce fewer babies if nutrients are too low. The key is balance. Keep the water fresh, do not over-fertilize, and give the plant enough light.
What You Need
- Healthy spider plant or spider plant baby
- Clean glass jar
- Bowl of clean water
- Clean scissors
- Filtered water, rainwater, or tap water left out overnight
- Very diluted liquid houseplant fertilizer
- Soft cloth for cleaning leaves
- Small plant stand, optional
- Bright indirect light
Step 1: Choose a Healthy Spider Plant
Start with a healthy spider plant or a strong baby plantlet. The leaves should be firm, striped, and green. Avoid plants with mushy crowns, black roots, strong sour smells, or heavy pest problems. A weak plant can still be rescued, but water culture works best when the roots and crown are still healthy.
If you are using a spider plant baby, choose one with small root bumps at the base. These bumps grow into roots quickly when placed in water. If the baby already has roots, it will settle even faster.
Step 2: Remove Dry or Weak Runners
The first image step shows trimming long weak runners. Spider plants often produce long stems with baby plantlets. Some runners dry out, turn brown, or become messy. Trim dry or damaged stems with clean scissors.
Do not remove every baby plant unless you want a cleaner shape. Baby spider plants are part of the plant’s charm. If you keep some runners, make sure they are healthy and not draining too much energy from a weak mother plant.
Step 3: Remove the Plant From the Jar or Pot
If your spider plant is already growing in water, remove it gently from the jar. If it is growing in soil, take it out of the pot and loosen the soil around the roots. Work slowly so you do not break too many roots.
Spider plant roots are thick and fleshy. They store water and nutrients. A few broken roots are not a disaster, but rough handling can stress the plant.
Step 4: Rinse the Roots
The image shows the roots being rinsed in a bowl of water. This is a very important step, especially if the plant was grown in soil. Soil left on roots can muddy the water and encourage bacteria. Rinse the roots gently until most soil is removed.
Do not scrub the roots harshly. Use your fingers to loosen soil slowly. If some small bits remain, that is fine. The goal is to make the roots clean enough for clear water growth.
Step 5: Trim Rotten or Damaged Roots
After rinsing, inspect the roots. Healthy spider plant roots are firm, white, cream, or light tan. Rotten roots are brown, black, mushy, slimy, or smelly. Trim damaged roots with clean scissors.
Do not cut healthy thick roots just because they look large. Those roots help the plant survive. Only remove roots that are clearly rotten or dead.
Step 6: Choose the Right Jar
A clear glass jar is perfect for spider plants in water because it lets you see the roots. Choose a jar that supports the plant without crushing the crown. The leaves should sit above the rim, while the roots hang down into the water.
The jar should be clean. Wash it with warm water before use. If it had old algae or slime inside, scrub it well and rinse completely.
Step 7: Place the Spider Plant in the Jar
Place the plant carefully into the jar. The roots should go into the water, but the crown should stay above the waterline. The crown is the center where the leaves grow. If the crown sits underwater, it may rot.
This is one of the most important rules for growing spider plants in water. Roots can stay in water. The crown should stay dry.
Step 8: Add Fresh Water
Pour clean water into the jar until the roots are covered. Do not fill the jar all the way to the leaves. Leave air space near the top. Roots need oxygen, and the water should not cover the plant’s center.
Filtered water, rainwater, or tap water that has rested overnight is often better than very hard or chlorinated water. Spider plants can be sensitive to chemicals and minerals in some tap water, which may cause brown tips.
Best Water for Spider Plants
- Filtered water
- Rainwater
- Distilled water mixed occasionally with weak fertilizer
- Tap water left out overnight
- Avoid salty softened water
If your spider plant has brown tips, your water quality may be part of the problem. Try switching to filtered or rainwater.
Step 9: Add Very Diluted Fertilizer
The image shows a dropper adding liquid plant food. This can help water-grown spider plants because plain water has very few nutrients. But fertilizer must be weak. Too much fertilizer can burn roots and make the water dirty.
Safe Fertilizer Strength
- Use a balanced liquid houseplant fertilizer.
- Dilute it to one-quarter strength or weaker.
- Use only a few drops for a small jar.
- Feed once every 4 to 6 weeks during active growth.
- Do not fertilize every water change.
Less fertilizer is better than too much. If the water becomes cloudy after feeding, change it and use a weaker amount next time.
Step 10: Clean the Leaves
The image shows the leaves being wiped with a soft cloth. This helps the plant look shinier and healthier. Dust blocks light and makes the leaves dull. Clean leaves absorb light better and support stronger growth.
Use a soft damp cloth. Wipe each leaf gently from base to tip. Do not use oily leaf shine products. Spider plants look best with naturally clean leaves.
Step 11: Display the Plant
Once the roots are clean, the water is fresh, and the leaves are wiped, place the jar in a bright indoor spot. A small plant stand can make the display look elegant and allow trailing baby plants to hang down naturally.
Choose a location with bright indirect light. Avoid harsh direct sun, which can heat the water and burn leaves. Also avoid dark corners, because growth will slow and variegation may fade.
Best Light for Spider Plants in Water
Spider plants grow best in bright indirect light. They can tolerate lower light, but they will grow slower and may produce fewer babies. Variegated spider plants need good light to keep their green and white stripes strong.
A bright window with filtered light is ideal. Morning sun is usually safe. Strong afternoon sun can scorch leaves and make water warm too quickly.
Signs Your Spider Plant Needs More Light
- Slow growth
- Pale leaves
- Weak floppy stems
- Fewer baby plantlets
- Variegation becoming dull
- Plant leaning toward the window
How Often to Change the Water
Change the water every 7 to 10 days. If the water becomes cloudy, smells bad, or develops algae, change it sooner. Fresh water keeps oxygen available and reduces bacteria.
When changing water, rinse the jar and check the roots. Remove any slimy or dead roots. Refill with clean water and place the plant back with the crown above the waterline.
How to Prevent Algae in the Jar
Algae grows when light hits water for long periods. Clear jars are beautiful, but they can grow algae faster than dark containers. A little green algae is not always dangerous, but too much can make the display look dirty and reduce oxygen.
Algae Prevention Tips
- Change water weekly.
- Clean the jar regularly.
- Keep the jar out of harsh direct sun.
- Use a tinted glass jar if algae is constant.
- Do not over-fertilize.
- Remove dead leaves quickly.
How to Prevent Root Rot in Water
Root rot can happen in water if the water becomes dirty, stagnant, or low in oxygen. It can also happen if the crown is submerged. Keep the roots clean and the crown dry.
- Change water often.
- Rinse the jar.
- Keep only roots underwater.
- Remove rotting roots.
- Use weak fertilizer only.
- Do not let old leaves sit in the water.
- Give bright indirect light.
Signs of Healthy Water Roots
- Roots are white or cream colored.
- Roots feel firm.
- New root tips appear.
- Water stays mostly clear.
- Leaves remain firm and bright.
- New baby plantlets may grow.
Signs of Unhealthy Roots
- Roots are black and mushy.
- Water smells bad.
- Roots feel slimy.
- Leaves yellow quickly.
- Crown feels soft.
- Water becomes cloudy soon after changing.
If this happens, remove the plant, trim rotten roots, clean the jar, and restart with fresh water.
Common Spider Plant Problems in Water
Brown Leaf Tips
Brown tips are common in spider plants. They can come from hard water, fluoride, dry air, too much fertilizer, or inconsistent care. Trim the tips if needed and switch to filtered or rainwater.
Yellow Leaves
Yellow leaves may come from old age, low light, dirty water, root problems, or too much fertilizer. Check the roots and water quality first.
Soft Crown
A soft crown is serious. It usually means the crown has stayed too wet. Keep the crown above water and remove any rotting parts.
No Baby Plants
Spider plants produce babies when mature and healthy. They need bright indirect light, steady care, and enough energy. Low light may reduce baby production.
Cloudy Water
Cloudy water often means bacteria, too much fertilizer, or decaying plant matter. Change the water and clean the jar.
Can Spider Plant Babies Grow in Water?
Yes. Spider plant babies root very easily in water. This is one of the easiest propagation methods for beginners. Place the base of the baby plantlet in water while keeping the leaves above the water. Roots often appear within 1 to 3 weeks.
How to Propagate Spider Plant Babies in Water
- Choose a baby plantlet with small root bumps.
- Cut it from the runner with clean scissors.
- Place the base in a small jar of water.
- Keep leaves above water.
- Place in bright indirect light.
- Change water every few days.
- Plant in soil or keep in water once roots grow.
Should You Keep Spider Plant in Water or Move to Soil?
Both options work. Water culture is decorative and clean. Soil culture usually supports stronger long-term growth because the plant has more mineral access and root support. If you want a large, full, fast-growing spider plant, soil may be better. If you want a stylish glass display, water is perfect.
How to Move a Water-Grown Spider Plant to Soil
If you decide to transfer the plant to soil, do it gently. Water roots are more delicate than soil roots. Use a light potting mix and keep it slightly moist for the first couple of weeks while the plant adjusts.
- Choose a pot with drainage holes.
- Use light indoor potting mix with perlite.
- Place the roots gently into the soil.
- Cover roots without burying the crown.
- Water lightly.
- Keep in bright indirect light.
- Do not fertilize immediately.
How to Move a Soil-Grown Spider Plant to Water
Moving from soil to water takes patience. Soil roots may not all adapt to water. Some old roots may die while new water roots grow. This is normal.
- Remove the plant from soil.
- Rinse roots gently.
- Trim damaged roots.
- Place roots in clean water.
- Keep crown above water.
- Change water often at first.
- Watch for new white roots.
Best Jar Styling Ideas
Spider plants look beautiful in glass jars because their white roots are part of the display. You can use simple jars, vintage jars, tall cylinders, or decorative glass containers.
- Use a clear mason jar for a rustic look.
- Use a tall glass cylinder for a modern look.
- Place the jar on a gold or wooden stand.
- Group several small jars together.
- Let baby plants trail down the sides.
- Add smooth stones at the bottom for decoration.
- Use filtered water for a clean clear look.
Continue to Page 2
Continue to page 2 for more details about this article and the key points many readers miss on the first page.