A seashell garden water station is a simple outdoor project that turns a small bucket, stones, a garden pole, and natural shells into a charming garden feature. It looks rustic, coastal, handmade, and useful at the same time. The stones create a stable base, the pole adds height, and the shells become tiny landing spots where small garden visitors can rest, drink, or simply add movement to your outdoor space.
This project is perfect for patios, balconies, flower beds, cottage gardens, herb corners, pollinator gardens, and small backyard spaces. It uses easy materials and does not need expensive tools. With a metal bucket, river pebbles, strong outdoor glue, seashells, and a sturdy rod, you can create a decorative garden water station that looks beautiful among green plants and flowers.
The best part is that it can match many garden styles. It can look beachy with white shells, rustic with natural stones, farmhouse-style with a galvanized bucket, or whimsical when placed near tall flowers and leafy plants.
Why This Garden Project Works
A shallow water station is helpful in warm weather because small birds, bees, butterflies, and other pollinators often need safe places to drink. Deep bowls can be risky for tiny insects, but stones and shells give them places to land safely.
The upright shell pole also adds vertical interest. Instead of placing only a flat dish on the ground, this design creates a sculptural piece that rises above the bucket. It becomes both a water feature and a garden ornament.
It is also a great way to reuse shells collected from beach trips, old craft boxes, or decorative home displays.
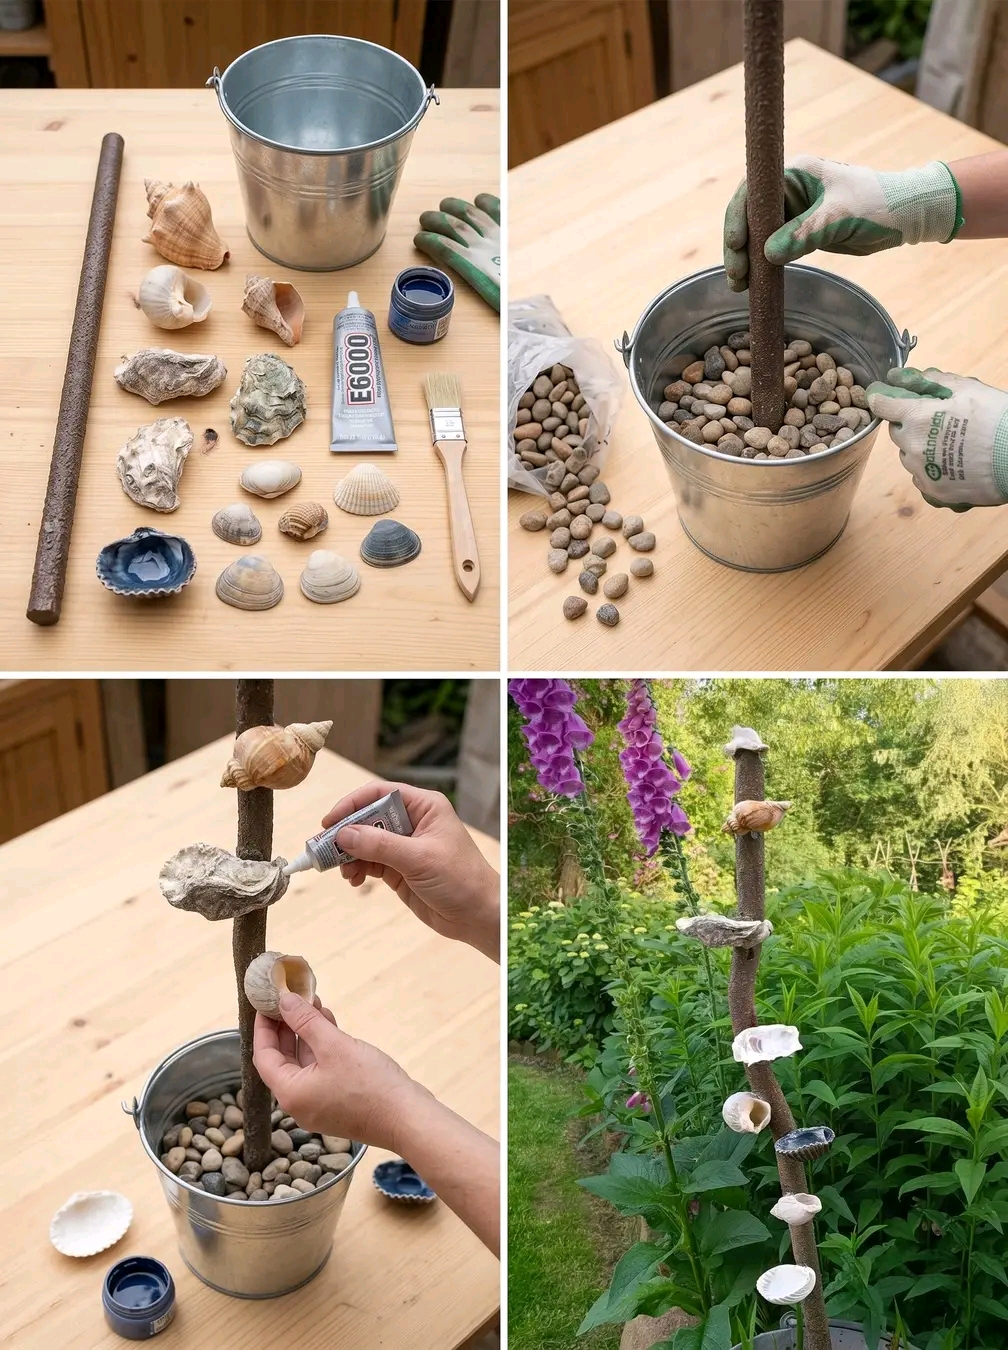
Materials You Need
- Small galvanized bucket or sturdy garden container
- Strong rod, branch, stake, or metal pole
- Clean river pebbles or garden stones
- Seashells in different shapes
- Outdoor waterproof glue
- Small brush, optional
- Gardening gloves
- Water
- Optional decorative moss or small plants nearby
Step 1: Choose a Stable Bucket
Use a bucket that is wide enough to hold stones and support the pole. A galvanized metal bucket works beautifully because it looks rustic and stands up well outdoors. A terracotta pot, ceramic bowl, or heavy planter can also work.
The container should be heavy enough that it will not tip over in wind. If the bucket is too light, add more stones to the bottom.
Step 2: Add Pebbles for Weight
Fill the bottom of the bucket with clean pebbles. The stones hold the pole upright and create a shallow landing area when water is added. They also make the water station safer for bees and butterflies because insects can land on stones instead of falling into deep water.
Use smooth stones if possible. Sharp stones may look rough and can make cleaning harder.
Step 3: Place the Pole in the Center
Push the pole into the middle of the bucket and pack stones tightly around it. Hold it straight while adding more stones around the base. The pole should feel firm and stable.
You can use a garden stake, metal rod, driftwood stick, bamboo pole, or strong branch. For a natural look, a textured branch or rough garden stake works especially well.
Step 4: Attach Shells to the Pole
Use outdoor waterproof glue to attach shells along the pole. Place them at different heights so the design looks natural. Some shells can face upward like tiny cups, while others can face outward as decoration.
Press each shell firmly and let the glue dry fully before moving the station outside. Follow the drying time on the glue label. Outdoor glue needs time to cure properly.
Step 5: Add Water
Pour water into the bucket until it reaches just below or slightly around the stones. The water should be shallow. Bees and butterflies need landing places, so stones should remain partly above the waterline.
Do not make the bucket too deep. A shallow water level is easier to clean and safer for small pollinators.
Step 6: Place It in the Garden
Set the water station near flowering plants, herbs, shrubs, or a quiet garden corner. Bees and butterflies are more likely to visit if it is near nectar plants such as lavender, mint, basil flowers, zinnias, marigolds, salvia, foxgloves, or cosmos.
Choose a spot with morning sun and afternoon shade if possible. Full hot sun can warm the water too quickly.
How to Keep It Clean
Change the water every 1 to 2 days in warm weather. This keeps the station fresh and helps prevent mosquitoes. Rinse the stones often and scrub the bucket if algae appears.
Fresh water is important. A dirty water station can become unattractive and unhealthy for garden visitors.
Safety Tips
- Keep the water shallow.
- Leave stones above the waterline.
- Use only clean shells and stones.
- Do not add sugar water or honey.
- Use outdoor-safe glue only after it has fully dried.
- Place the station where it will not tip over.
- Refresh the water often to avoid mosquitoes.
Decor Ideas
This project can be styled in many ways. For a coastal garden look, use white shells, pale stones, and a silver bucket. For a rustic cottage style, use mixed shells, natural pebbles, and a weathered branch. For a colorful pollinator corner, place it near purple, pink, and yellow flowers.
You can also add small solar lights nearby for an evening glow. Do not place lights inside the water unless they are made for outdoor water use.
Best Plants to Place Around It
- Lavender
- Mint
- Basil
- Rosemary
- Salvia
- Zinnias
- Marigolds
- Cosmos
- Foxgloves
- Verbena
- Thyme
- Catmint
These plants help create a pollinator-friendly area and make the water station look more natural in the garden.
Common Mistakes to Avoid
- Using a container that tips easily
- Adding too much water
- Leaving no landing stones
- Using weak indoor glue outdoors
- Forgetting to change the water
- Placing it in harsh all-day sun
- Using dirty shells or stones
- Letting algae build up
Continue to Page 2
Continue to page 2 for more details about this article and the key points many readers miss on the first page.