Orchids are elegant indoor plants that can make any home feel bright, calm, and luxurious. Their thick green leaves, graceful flower spikes, and long-lasting blooms make them one of the most loved houseplants for windowsills, coffee tables, bedrooms, offices, and plant shelves. A healthy orchid can bloom for weeks, sometimes months, and with the right care it can flower again year after year.
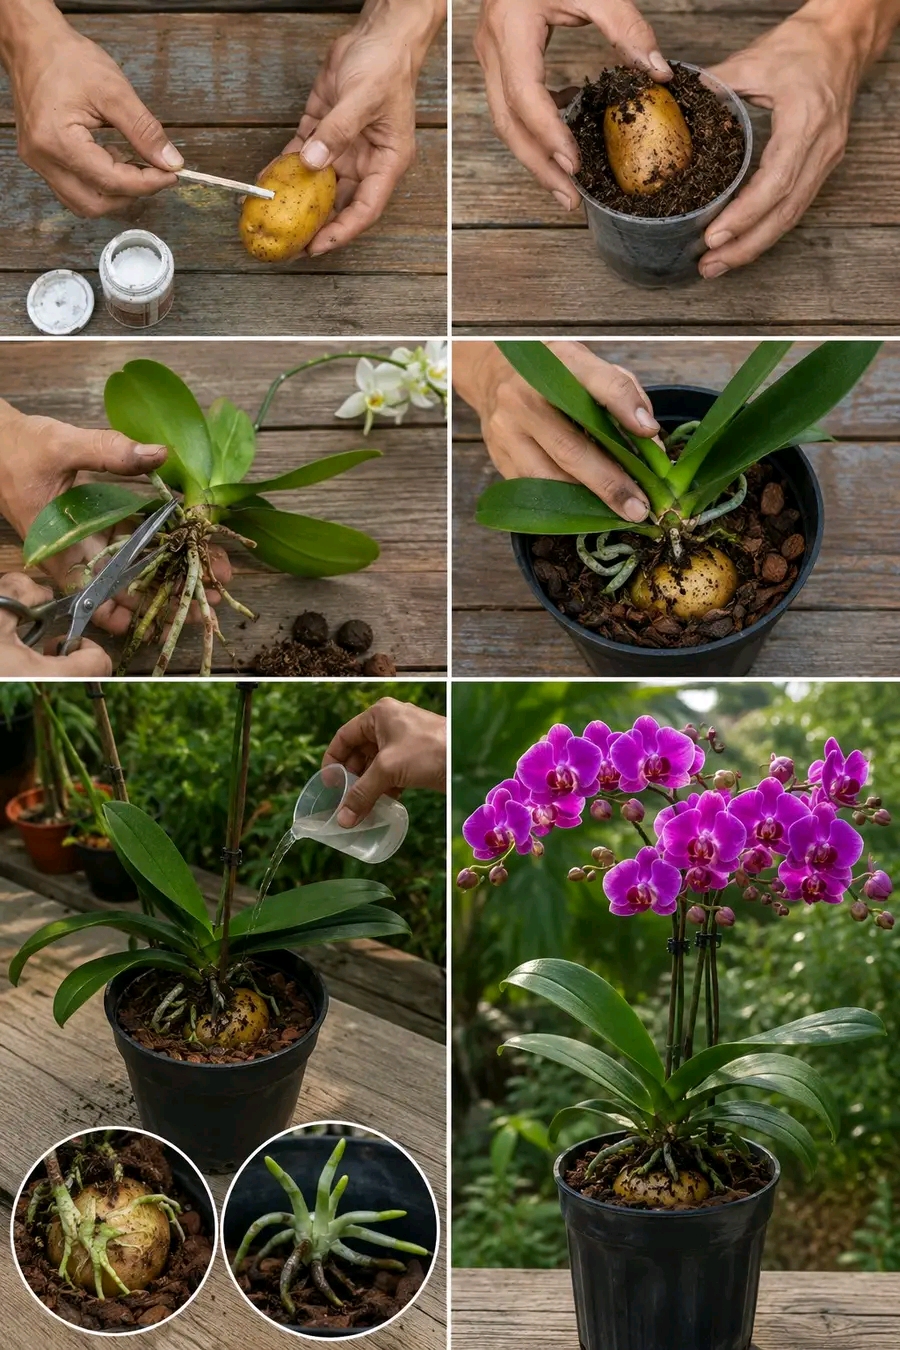
One unusual orchid-care idea many plant lovers talk about is the potato trick. The idea is simple: using potato as a natural support ingredient when repotting or encouraging orchid roots. Some people use potato water, some use a tiny piece of potato as a short-term rooting aid, and others talk about placing potato near the root area. The reason this trick attracts attention is because potatoes contain starches, moisture, and small amounts of minerals that may support beneficial microbial activity when used carefully.
But orchids are sensitive. They do not grow like regular soil plants. Most common indoor orchids, especially Phalaenopsis orchids, grow naturally with their roots exposed to air on tree bark. Their roots need oxygen, drainage, and airflow. Anything soft and wet left around orchid roots for too long can rot, smell bad, attract fungus gnats, and damage the plant. That means the potato trick must be used with caution.
This guide explains how to use the orchid potato trick safely, what to avoid, how to repot an orchid correctly, how to trim roots, how to support new root growth, how to water properly, how to encourage blooms, and how to style orchids beautifully indoors. The goal is not to bury a potato and hope for magic. The goal is to use a gentle natural method while keeping orchid roots clean, airy, and healthy.
What Is the Orchid Potato Trick?
The orchid potato trick is a natural plant-care method where potato is used as a temporary root-support ingredient. The safest version is not placing a large potato inside the orchid pot for a long time. The safer method is using mild potato water or a very small fresh potato piece for a short period during propagation or root stimulation, then removing it before it rots.
Potato contains starch and moisture. Some gardeners believe that a mild potato soak can help support root activity. However, orchids do not need heavy organic matter around their roots. Their roots prefer bark, air, and moisture that drains quickly.
For this reason, the potato trick should be treated as an optional extra step, not a main orchid-care routine. Healthy roots, proper bark mix, correct watering, bright indirect light, and steady humidity are much more important.
Important Safety Warning About Potatoes and Orchids
Potato can rot quickly in warm, damp conditions. Orchid pots are often moist after watering, and bark mix has air pockets. If a potato piece sits inside the pot too long, it can soften, ferment, smell sour, grow mold, and attract pests. Rotten potato near orchid roots can damage the plant instead of helping it.
Never leave a large potato buried inside an orchid pot for weeks. Never use cooked potato with salt, oil, butter, or seasoning. Never use moldy potato. Never place potato directly against the orchid crown. Never let potato block airflow around the roots.
The safest approach is to use potato water lightly, or use a small temporary piece only during a controlled rooting experiment, then remove it quickly.
Best Orchid Types for This Care Routine
This guide is mainly for common indoor orchids such as Phalaenopsis, often called moth orchids. These orchids have thick leaves and aerial roots. They are usually grown in bark mix, not regular soil.
Other orchids, such as Dendrobium, Cattleya, Oncidium, and Vanda, may have different care needs. The basic safety rule is the same: orchid roots need air. Do not pack soft organic material tightly around them.
What Potato Can and Cannot Do for Orchids
What It May Help With
- It may provide a mild natural rooting support when used as diluted potato water.
- It may help create a gentle homemade tonic during active growth.
- It may support a short-term root rescue routine when combined with proper repotting.
- It may encourage plant owners to inspect roots and refresh old potting media.
What It Cannot Do
- It cannot save rotten orchid roots by itself.
- It cannot replace orchid bark mix.
- It cannot force instant blooms.
- It cannot fix poor light.
- It cannot repair crown rot.
- It cannot replace balanced orchid fertilizer.
- It cannot work safely if left to rot in the pot.
The real orchid rescue happens when damaged roots are trimmed, the potting mix is refreshed, and the plant is placed in the right light and watering routine.
Safe Potato Water Method for Orchids
The safest way to use potato for orchids is as a very mild potato water rinse during active growth. This method avoids leaving solid potato in the pot.
Ingredients
- 1 small raw potato
- 2 cups clean water
- Clean knife
- Strainer
- Small cup or watering container
How to Make Potato Water
- Wash the potato very well.
- Peel it if the skin is dirty or treated.
- Cut a few thin slices.
- Soak the slices in clean water for 2 to 4 hours.
- Strain the liquid completely.
- Dilute the potato water with equal parts plain water.
- Use immediately.
Do not store potato water for days. It can ferment quickly. Use it fresh, and discard leftovers.
How to Apply Potato Water Safely
- Use only on a healthy or recovering orchid with no active rot.
- Make sure the orchid is in a pot with drainage.
- Pour a small amount through the bark mix.
- Let it drain fully.
- Do not let the pot sit in the liquid.
- Use plain water for the next several waterings.
- Repeat no more than once every 6 to 8 weeks during active growth.
Potato water should never become the main watering routine. It is a mild occasional tonic, not a replacement for clean water.
Temporary Potato Piece Method
A small potato piece can be used only as a temporary rooting experiment. This is riskier than potato water, so it must be done carefully.
Safe Rules
- Use a tiny fresh piece, not a whole potato.
- Keep it away from the orchid crown.
- Do not press it against roots tightly.
- Remove it after 24 to 48 hours.
- Never leave it buried long term.
- Check for smell, softness, or mold.
If the potato piece becomes soft, slimy, or smells sour, remove it immediately and rinse the area with clean water.
Best Way to Repot an Orchid
Repotting is one of the most important steps for orchid health. Old bark breaks down over time and becomes dense. When bark becomes compacted, roots receive less air and may rot. A fresh orchid mix gives roots the airflow they need.
What You Need
- Fresh orchid bark mix
- Clear orchid pot with drainage holes
- Clean scissors or pruning shears
- Clean water
- Optional: cinnamon for cut areas, used carefully
- Optional: diluted potato water, used lightly
Repotting Steps
- Remove the orchid gently from the old pot.
- Shake away old bark.
- Inspect the roots carefully.
- Trim black, mushy, hollow, or rotten roots.
- Keep firm green, silver, or white roots.
- Place fresh bark in the new pot.
- Set the orchid so the crown stays above the bark.
- Fill around roots with bark, keeping airflow spaces.
- Water lightly and let drain.
Do not bury the crown. The crown is the center where leaves meet. If water or wet material sits there, crown rot can develop.
How to Identify Healthy Orchid Roots
Healthy orchid roots are firm. When dry, they often look silver or pale gray. When wet, they turn green. Firm white roots inside the pot can also be healthy.
Unhealthy roots are mushy, black, brown, hollow, slimy, or smelly. These roots should be removed with clean scissors. Leaving rotten roots in the pot can spread decay.
Root Trimming Safety
Always use clean tools when trimming orchid roots. Wipe scissors with rubbing alcohol before cutting. Cut only dead or rotten roots. Do not remove firm roots just because they look dry. Many dry-looking orchid roots are still alive.
After trimming, let the plant sit for a short time before repotting. This allows cut areas to dry slightly.
Best Potting Mix for Orchids
Most Phalaenopsis orchids grow best in chunky orchid bark, not regular soil. Regular potting soil holds too much water and can suffocate the roots.
Simple Orchid Mix
- Medium orchid bark
- Perlite
- Charcoal, optional
- Sphagnum moss, optional and used lightly
If your home is very dry, a small amount of moss can help hold moisture. If your home is humid or you tend to overwater, use mostly bark.
Best Pot for Orchids
A clear plastic orchid pot with drainage holes is ideal. Clear pots let you see the roots and moisture level. They also allow some light to reach the roots, which many orchids appreciate.
The pot should not be too large. A huge pot holds too much wet media. Choose a pot that fits the root system with a little extra space.
How to Water Orchids Correctly
Water orchids when the roots turn silver and the bark feels almost dry. Pour water through the bark until it runs out of the drainage holes. Let the pot drain completely before placing it back in a decorative cover pot.
Do not water every day. Do not leave the orchid sitting in water. Do not let water collect in the crown.
In many homes, watering once every 7 to 10 days works, but the schedule depends on light, temperature, humidity, pot size, and bark type.
Signs Your Orchid Needs Water
- Roots look silver or pale gray.
- Bark feels dry.
- Pot feels light.
- Leaves look slightly less firm.
- No condensation appears inside the clear pot.
Water thoroughly when needed, then allow full drainage.
Signs of Overwatering
- Roots turn brown or black.
- Roots feel mushy.
- Bark smells sour.
- Leaves become limp even when the pot is wet.
- Crown becomes soft.
- Fungus gnats appear.
- Mold grows in the pot.
If overwatering happens, repot into fresh bark and remove rotten roots. Do not use potato water until the orchid is stable again.
How to Encourage New Orchid Roots
New roots grow when the orchid has warmth, humidity, fresh bark, and gentle light. Roots often appear from the base of the plant as green or white tips.
Root Growth Tips
- Use fresh airy bark.
- Keep the plant in bright indirect light.
- Maintain moderate humidity.
- Water when roots are dry.
- Avoid cold drafts.
- Do not overfertilize.
- Do not disturb the plant constantly.
A mild potato water rinse can be used occasionally, but the strongest root support comes from proper growing conditions.
How to Encourage Orchid Blooms
Orchids bloom best when they have strong roots and enough light. Phalaenopsis orchids often need a slight temperature drop at night for several weeks to trigger flower spikes.
Bloom Support Checklist
- Bright indirect light
- Healthy firm roots
- Fresh bark mix
- Balanced orchid fertilizer
- Slightly cooler nights
- Stable watering routine
- No rotten organic material in the pot
Potato alone cannot create blooms. It may support the plant gently, but light and root health are the true bloom triggers.
Best Light for Orchids
Phalaenopsis orchids prefer bright indirect light. An east-facing window is often perfect. A south or west window may need a sheer curtain to prevent leaf burn. A north window can work if it is bright enough.
Leaves should be medium green. Dark green leaves may mean not enough light. Yellow-green or scorched leaves may mean too much light.
Humidity for Orchids
Orchids appreciate moderate humidity. A humidity level around 40% to 60% is helpful. If your home is dry, use a pebble tray, humidifier, or group plants together.
Humidity should come with airflow. Still, damp air can encourage fungal problems. Keep the orchid in a bright spot with gentle air movement.
Fertilizing Orchids
Use a balanced orchid fertilizer during active growth. Dilute it to half or quarter strength. Many orchid growers use the phrase “weakly, weekly,” but for beginners, feeding every 2 to 4 weeks during active growth is often safer.
Do not fertilize a weak orchid with rotten roots. Do not combine strong fertilizer with homemade potato tonic. Keep feeding gentle.
Potato Water vs Orchid Fertilizer
Potato water is not a complete fertilizer. It may contain small amounts of organic compounds, but it does not provide a balanced nutrient profile. Orchid fertilizer is more reliable because it contains measured nutrients.
Use potato water only as a mild occasional extra. Use proper orchid fertilizer for actual feeding.
Common Orchid Problems
Limp Leaves
Limp leaves can come from underwatering or root rot. Check the roots before watering more.
Yellow Leaves
One old lower yellow leaf can be normal. Several yellow leaves may mean overwatering, too much sun, or root stress.
No Blooms
The orchid may need more bright indirect light or cooler nights to trigger flowering.
Root Rot
Root rot happens when the potting mix stays wet too long. Remove rotten roots and repot in fresh bark.
Bud Drop
Bud drop can happen from sudden temperature changes, dry air, underwatering, or moving the plant too much.
How to Clean Orchid Leaves
Dust can collect on orchid leaves and reduce shine. Wipe leaves gently with a damp cloth. Support the leaf with one hand while cleaning with the other. Do not use oily leaf shine products.
Clean leaves help the orchid look healthier and absorb light better.
Indoor Styling With Orchids
Orchids are beautiful decor plants because they look elegant even in simple pots. Their blooms add height, color, and softness to any room.
- Place orchids on a bright windowsill with filtered light.
- Use a ceramic cachepot for a polished look.
- Style a blooming orchid on a coffee table.
- Place near botanical artwork for a soft natural corner.
- Use orchids in bathrooms with bright natural light.
- Group with ferns, peace lilies, and pothos.
- Use a wooden tray for a warm organic look.
- Place a white orchid in a minimal modern room.
Orchids can make a space feel calm, refined, and fresh.
Best Rooms for Orchids
- Living room with bright indirect light
- Bedroom near a window
- Bathroom with natural light
- Home office
- Dining room
- Kitchen windowsill away from heat
- Sunroom with filtered light
- Entry table with enough brightness
A beautiful orchid display starts with the right light. Decor matters, but light keeps the plant alive.
Continue to Page 2
Continue to page 2 for more details about this article and the key points many readers miss on the first page.