Signs the Method Is Failing – Troubleshooting
Stop and restart if you notice:
- Blackening stem base
- Soft mushy tissue
- Rotten potato smell
- White fuzzy mold spreading
- Leaves collapsing
- Roots turning brown and slimy
- Crown becoming wet or soft
If failure begins, remove the orchid piece from the potato and inspect it. Trim rotten tissue if possible, let it dry briefly, and move it into clean damp sphagnum moss instead.
Why Potato Can Cause Problems – Understanding the Risks
Potato contains a lot of water and starch. In a warm humid propagation box, starch becomes food for microorganisms. That is why potato can mold so quickly. This common orchid propagation problem is easily avoided.
This is not always visible at first. The surface may look fine while the underside is softening. That is why daily checking is necessary.
If you want a safer version, skip the potato and use damp sphagnum moss alone. Moss provides moisture and airflow without the same heavy starch load.
A Safer Alternative: Aloe Vera Instead of Potato – Natural Rooting Aid
If your goal is to support a small orchid keiki naturally, aloe vera may be safer than potato. Aloe gel can be used lightly on cut ends, but it should not be poured heavily into the pot. This aloe vera orchid propagation method is a gentler alternative.
A simple method:
- Cut the keiki with clean scissors.
- Let the cut dry for 15 minutes.
- Touch the cut spike end with a small amount of fresh aloe gel.
- Plant the keiki in fine bark and damp moss.
- Keep humid and bright.
This avoids the rotting starch problem of potato.
A Safer Alternative: Sphagnum Moss Propagation Box – Reliable Method
For many orchids, a sphagnum moss box is more reliable than potato slices. This best orchid propagation method for beginners is simple and effective.
How to Make One
- Soak sphagnum moss in clean water.
- Squeeze until just damp.
- Place it in a clear container.
- Lay cane sections or keikis on the moss.
- Cover loosely for humidity.
- Open daily for airflow.
- Keep in bright indirect light.
This provides moisture without burying the orchid in rotting food material.
Can Potato Water Be Used for Orchids? – Not Recommended
Some gardeners use potato water for plants, but orchids require caution. Water from boiled potatoes may contain starch and can sour quickly. It may also attract pests if poured into orchid bark. For safe natural orchid feeding, stick to balanced orchid fertilizers.
For orchids, potato water is not recommended as a regular fertilizer. Orchids need balanced, weak feeding and airy roots. Starchy water can encourage microbial buildup in the bark.
If you want to feed orchids naturally, use a very weak orchid fertilizer or properly diluted compost tea made for plants, not kitchen water full of starch.
Can You Put Potato Slices in an Orchid Pot? – Never as Permanent Medium
No, not as a long-term fertilizer. Potato slices inside an orchid pot are likely to rot. Orchid bark is airy because orchid roots need oxygen. A potato slice breaks down into soft organic matter and can create wet pockets.
If you use a potato slice at all, keep it on the surface temporarily and remove it quickly.
Can This Trick Make Orchids Bloom Faster? – No, It’s for Propagation
No. The potato trick is not a bloom booster. It is a propagation support method. Blooming depends on plant maturity, roots, light, temperature, and nutrition. For orchid reblooming tips, focus on overall care instead.
A young orchid produced from a keiki or cutting may take a long time to bloom. Some may need one to three years before they flower, depending on size and variety.
To encourage blooms later, focus on:
- Strong root growth
- Bright indirect light
- Proper watering
- Weak regular feeding
- Good airflow
- Seasonal temperature cues
How to Care for the Young Orchid After Propagation – Long-Term Success
Once the young orchid is in proper medium, care must be steady and gentle. This how to care for propagated orchids guide will help you.
Light
Give bright indirect light. Avoid direct hot sun. Young leaves burn easily.
Water
Keep the medium lightly moist but not soggy. Let air reach the roots.
Humidity
Young orchids like humidity. Use a dome or clear bag if needed, but ventilate daily.
Feeding
Wait until new root growth appears. Then use very weak orchid fertilizer, about quarter strength.
Airflow
Good airflow prevents mold. Do not seal the plant in a wet container permanently.
How to Separate an Orchid Keiki Properly – Best Propagation Opportunity
If your orchid has produced a keiki, this is the best and most realistic propagation opportunity. This how to separate orchid keikis for potting guide is essential.
Step-by-Step
- Wait until the keiki has at least 2 to 3 roots.
- Make sure roots are around 2 inches long.
- Use sterilized scissors.
- Cut the flower spike about half an inch below and above the keiki.
- Do not damage the keiki crown.
- Pot it into fine bark and damp sphagnum moss.
- Keep humid and shaded for the first few weeks.
You can use a potato slice briefly to support the keiki if needed, but it is not required.
How to Propagate Dendrobium Cane Sections – Node-Based Method
Dendrobium orchids may respond better to node-based propagation than Phalaenopsis flower stems. This dendrobium cane propagation technique is worth trying.
Steps
- Choose a mature, firm cane.
- Cut it into sections with 2 to 3 nodes each.
- Let cut ends dry briefly.
- Place sections on damp sphagnum moss.
- Keep warm and humid.
- Wait for nodes to swell and produce shoots.
Potato slices can hold cane sections upright, but laying them on moss is often cleaner and safer.
Common Mistakes With the Potato Orchid Trick – What to Avoid
Using Random Flower Stems
A flower stem without active nodes usually will not become a new orchid. You need living nodes, keikis, or viable cane sections.
Leaving Potato Too Long
Potato rots quickly. Remove it within a few days.
Using Wet Soil
Orchids should not be rooted in dense wet soil. Use bark, moss, perlite, or orchid medium.
Sealing the Container Completely
Humidity helps, but stagnant air creates mold. Ventilate daily.
Putting It in Sun
A covered propagation setup in sun can overheat and kill the orchid.
Expecting Instant Blooms
Propagation is slow. A new orchid plant may take years to bloom.
Burying the Crown
The orchid crown must stay above the medium. A buried crown can rot.
What to Do If Mold Appears – Emergency Fix
If you see mold on the potato or medium, act quickly. This how to fix mold in orchid propagation guide will help.
- Remove the potato slice immediately.
- Check the orchid stem for softness.
- Trim any rotten tissue with sterile scissors.
- Let the orchid piece air-dry for 20 minutes.
- Move it to fresh damp sphagnum moss.
- Increase ventilation.
- Reduce moisture.
Do not simply spray more water. Mold means the setup is already too wet or too stagnant.
What to Do If the Cutting Shrivels – Reviving Stressed Cuttings
Shriveling means the cutting is losing moisture or cannot absorb enough. Increase humidity around the plant, but do not soak the base.
Try:
- Using a humidity dome
- Moving to slightly cooler bright shade
- Keeping moss lightly damp
- Reducing airflow that is too dry
- Avoiding direct sun
If the cutting has no viable node or root, it may not survive no matter what method is used.
What to Do If the Stem Turns Black – Dead Tissue Removal
Blackening usually means rot. Remove it from the potato or medium. Cut back to healthy green tissue if possible. If rot has reached the crown or node, the cutting may be lost.
For future attempts, use less moisture, cleaner tools, and no potato after the first few days.
Should You Use Cinnamon With the Potato Method? – Only on Cuts
Cinnamon can be used only on cut ends, not all over roots. A tiny dab on the cut surface may help dry it. But do not sprinkle cinnamon over the entire orchid, potato, or potting medium.
Too much cinnamon can dry orchid tissue. Use it sparingly.
Should You Use Garlic Water With This Method? – Keep It Simple
It is better not to combine too many tricks. Garlic water, potato, cinnamon, aloe, and fertilizer all at once can overwhelm the cutting. Keep the method simple.
If you use potato, skip garlic water. If you use cinnamon, use only a tiny amount on cuts. Do not create a strong mixture of many kitchen ingredients.
Should You Fertilize the Cutting? – Wait for Roots
Do not fertilize immediately. A cutting or keiki with few roots cannot use fertilizer well. Fertilizer may burn tender tissue.
Wait until you see active new root growth. Then use a very weak orchid fertilizer, about quarter strength, once every few weeks during active growth.
Best Temperature for Orchid Propagation – Warmth Matters
Most common orchids root better in warm conditions. Aim for a comfortable indoor temperature. Maintaining the ideal temperature for orchid propagation improves success rates.
Ideal range:
- 70°F to 80°F during the day
- Slightly cooler at night
- No cold drafts
- No extreme heat under a dome
Cold, wet conditions encourage rot. Warm, bright, airy humidity encourages growth.
How to Know When the Young Orchid Is Ready for a Normal Pot – Transplant Time
A young orchid is ready for a small normal pot when it has enough roots to hold itself and absorb water. This when to pot orchid keikis in bark guide helps you decide.
Look for:
- Several firm roots
- New green root tips
- Stable leaves
- No rot at the base
- Active new growth
Use a small clear pot. Do not move a tiny keiki into a large pot. Large pots hold too much moisture.
Long-Term Care After Success – Growing Strong Orchids
Once the orchid is established, care for it like a young orchid plant. This orchid care after propagation guide will keep it thriving.
Light
Bright indirect light is best. Morning sun is usually safe, but hot afternoon sun can burn leaves.
Water
Water when the bark is nearly dry. Roots often turn green when wet and silver when dry.
Fertilizer
Use weak orchid fertilizer during active growth. Flush with plain water between feedings.
Repotting
Repot when bark breaks down or the plant outgrows the pot.
Patience
Young orchids need time. Do not force blooms too early.
Realistic Expectations – The Potato Trick Is an Experiment
The potato orchid trick looks exciting, but it should be treated as an experiment, not a guaranteed method. Some orchid pieces will not grow. Some will rot. Some may survive if they already had enough roots or nodes.
Your best chance comes from using the right orchid material, keeping everything clean, using potato only briefly, and moving the plant into proper orchid medium quickly.
If you want the most reliable orchid propagation method, use keikis or divisions. If you want to experiment with potato slices, do it carefully and expect mixed results.
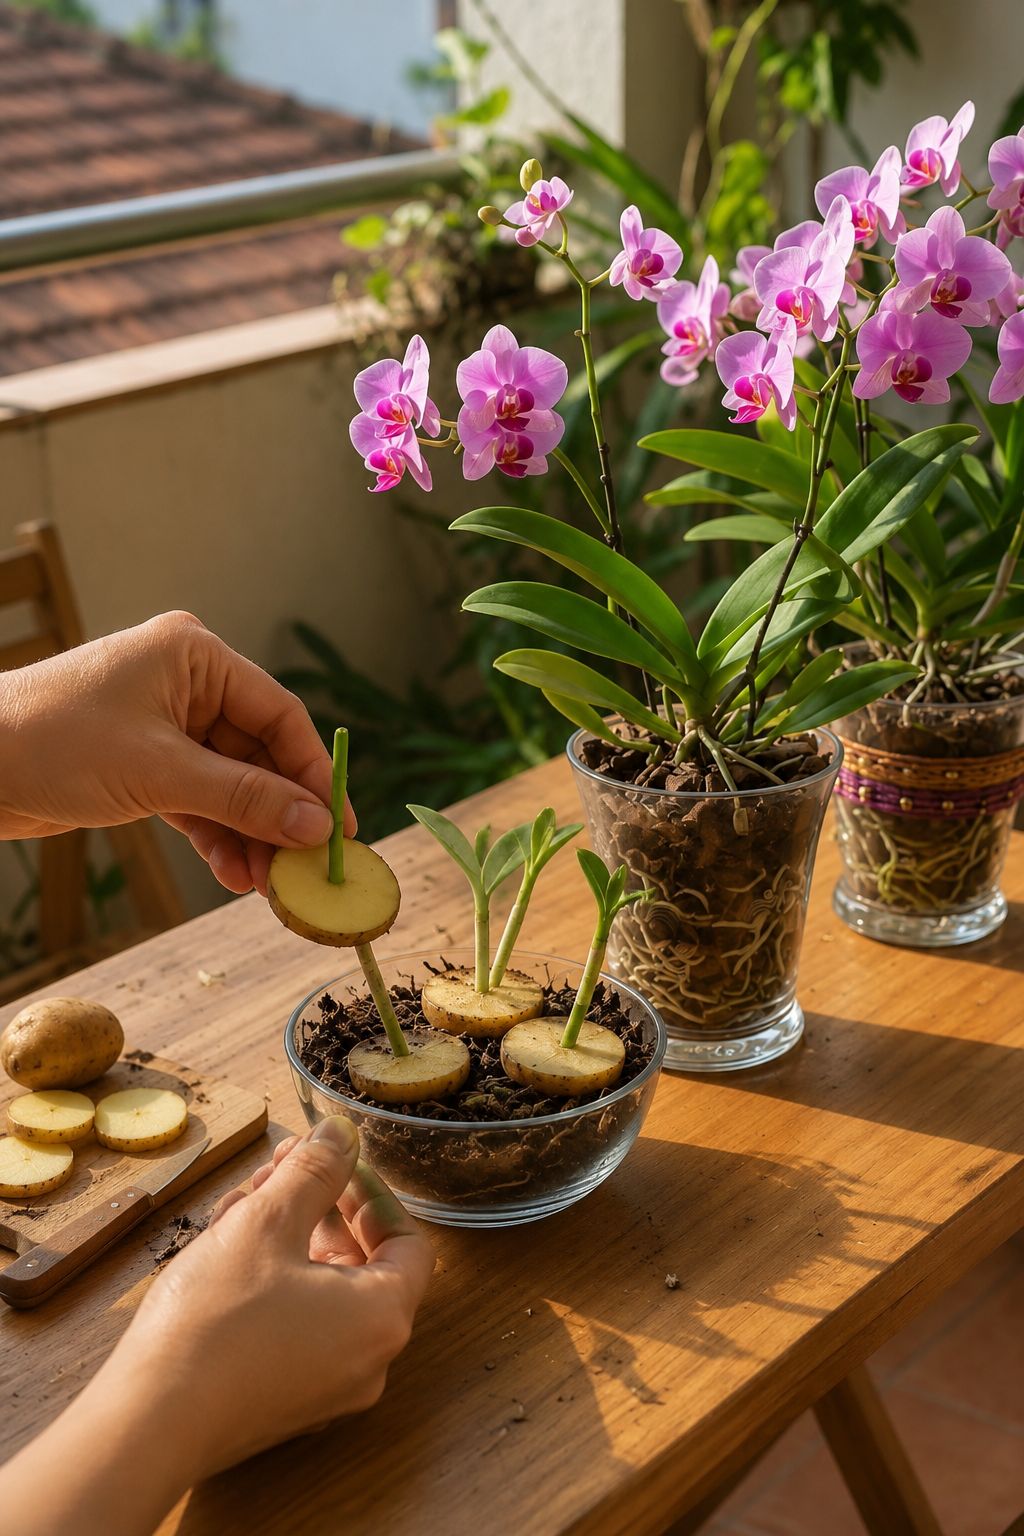
Quick Potato Orchid Propagation Recipe Card – Step-by-Step Summary
Materials
- 1 fresh raw potato
- Orchid keiki or viable cane section
- Clean knife
- Sterilized scissors
- Damp sphagnum moss
- Fine orchid bark
- Clear cover or humidity dome
Steps
- Choose a living orchid keiki, cane section, or shoot with a node or growth point.
- Sterilize all cutting tools.
- Cut the orchid piece carefully.
- Let fresh cuts dry for 15 to 30 minutes.
- Slice a fresh potato into half-inch rounds.
- Make a small hole in the potato slice.
- Insert the orchid piece gently without burying the crown.
- Place the potato slice on damp sphagnum moss or bark.
- Cover loosely for humidity.
- Keep in bright indirect light.
- Open daily for airflow.
- Remove the potato after 2 to 7 days, or sooner if soft.
- Move the orchid into proper bark and moss medium.
- Water lightly and wait for new roots.
Short Caption for This Trick
“To try the potato orchid propagation trick safely, use only a healthy orchid keiki or viable stem section with nodes, insert it gently into a clean raw potato slice, place it on damp sphagnum moss for humidity, and remove the potato within a few days before it rots. Then pot the young orchid into fresh bark and moss. Never leave potato buried in an orchid pot long-term – this natural orchid keiki support method works best as a temporary experiment.”
Frequently Asked Questions – Potato Orchid Propagation Q&A
Can you grow an orchid from a potato?
No, the potato does not create the orchid. It can only act as a temporary support for a viable orchid piece, such as a keiki or stem section with nodes.
Can I grow an orchid from a flower stem?
Only if the stem has viable nodes, and even then success is not guaranteed. A dried or dead flower stem will not grow into a new orchid.
How long should I leave the orchid in the potato?
Only a few days. Remove the potato after 2 to 7 days, or immediately if it becomes soft, moldy, or smelly.
Can I bury potato in orchid bark?
No. Potato can rot and damage orchid roots. Keep it on the surface temporarily and remove it quickly.
Is potato a fertilizer for orchids?
No. Potato is not a balanced orchid fertilizer. It is too starchy and can sour in the pot.
What is the best way to propagate Phalaenopsis orchids?
The best way is by separating a keiki once it has enough roots. Phalaenopsis orchids do not grow from single leaves.
Can I use sweet potato instead?
Sweet potato also rots and is not recommended as a permanent medium. If used experimentally, it should also be temporary.
Why did my orchid cutting rot?
Rot usually happens because the setup was too wet, the potato was left too long, the cutting had no viable node, or tools were not clean.
Can I use cinnamon with this method?
You can use a tiny amount of cinnamon on cut ends only. Do not coat healthy roots or the whole cutting.
When will the new orchid bloom?
A young orchid may take one to three years to bloom, depending on size, species, and care.
Final Thoughts – The Best Natural Orchid Propagation Experiment
The potato slice orchid propagation trick is visually fascinating and fun to try, but it must be used with realistic expectations. Potato can hold moisture and support a small orchid piece temporarily, but it is not a miracle rooting hormone and not a proper orchid medium. This natural orchid propagation experiment is best done as a supplement to proven methods.
The most important rule is to use the potato briefly. Keep it clean, keep it on the surface, monitor it daily, and remove it before it begins to rot. Then move the young orchid into a real orchid mix with bark, sphagnum moss, and airflow. Following this complete orchid keiki care guide will give you the best chance of success.
For the best chance of success, use a real orchid keiki with roots, a viable Dendrobium cane section, or a small division with a living growth point. Do not expect a single orchid leaf or dead flower stem to become a new plant. These professional orchid propagation secrets will help you grow beautiful new orchids.
Orchid propagation rewards patience. The potato trick may help during the first stage, but the real success comes from clean tools, correct plant material, bright indirect light, humidity, airflow, and proper orchid care. If you use this method gently and carefully, it can become an interesting natural experiment in your orchid-growing routine. Start your orchid propagation journey today with the right fundamentals.