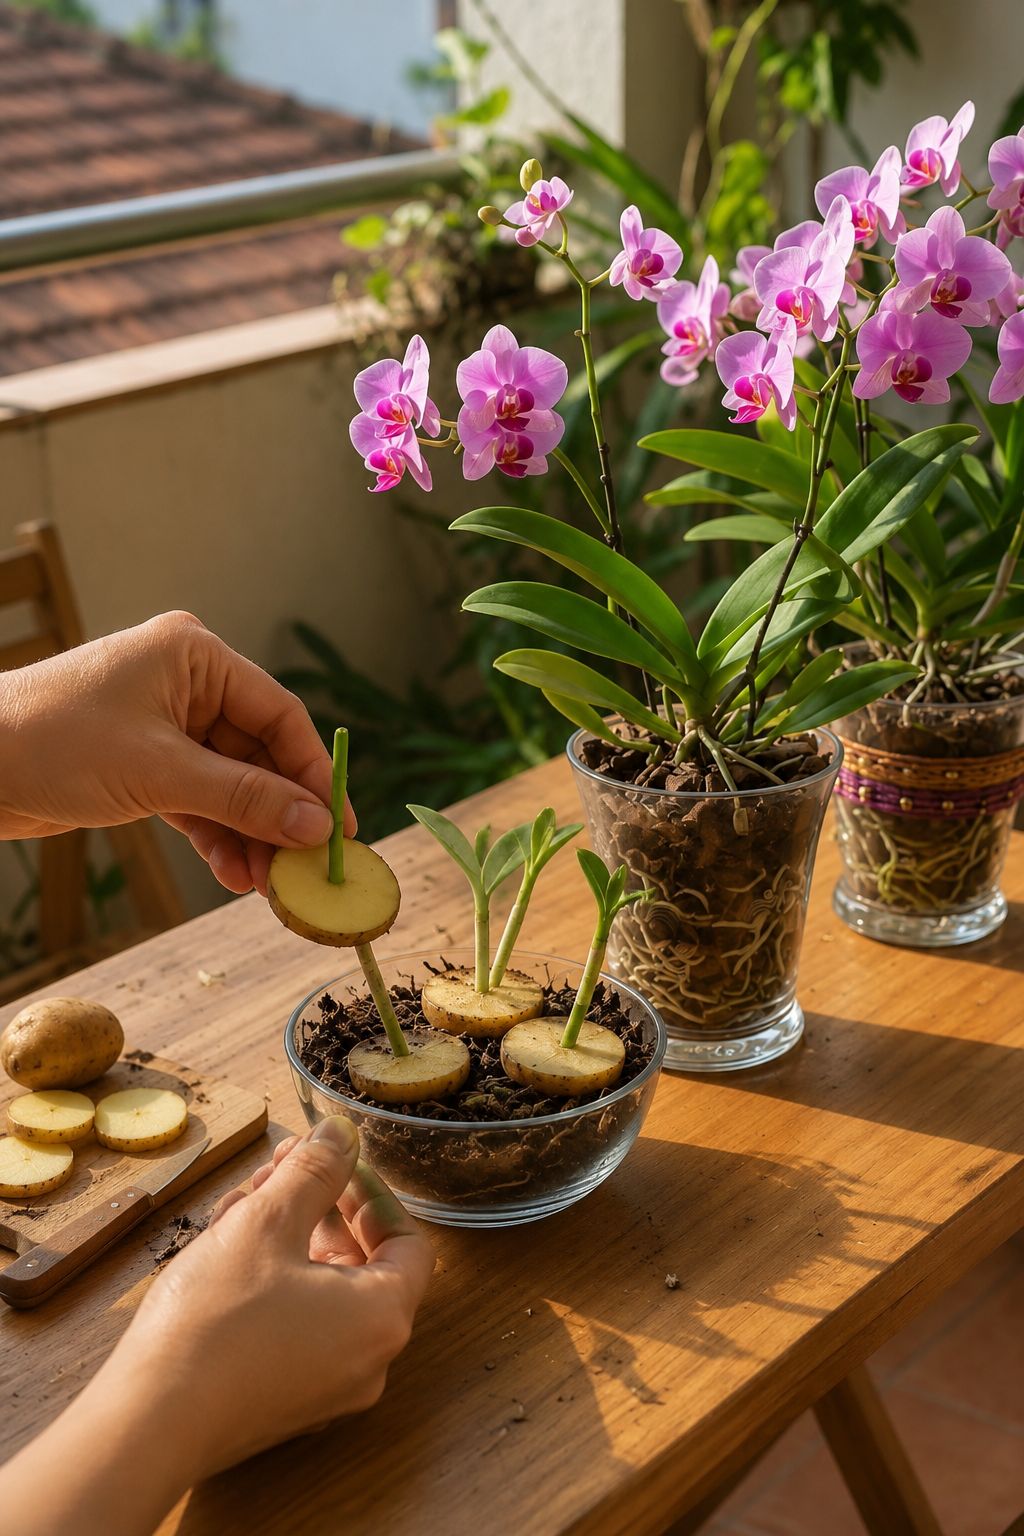
Orchids are some of the most beautiful plants you can grow at home. Their flowers look delicate, luxurious, and almost impossible to reproduce, yet many orchids can be multiplied with patience and the right technique. In the image, you can see small orchid stems or young orchid shoots placed through slices of potato in a shallow container of growing medium, with mature blooming orchids nearby. This creates a powerful visual idea: using potato slices as a natural moisture-supporting base while trying to encourage young orchid pieces to survive and grow. If you are looking for the best natural orchid propagation method or a homemade orchid keiki booster, this potato slice trick is an interesting experiment for home growers.
This method is often described online as the “potato orchid propagation trick.” The promise sounds exciting: place orchid stems into potato slices, keep them moist, and watch new orchids grow. But like many natural plant tricks, it needs careful explanation. Potatoes can provide moisture and starch, but they can also rot quickly, attract fungus, and create bacteria if used incorrectly. Orchids are not like ordinary garden plants. Most common indoor orchids, especially Phalaenopsis orchids, grow from a crown and aerial roots. You cannot simply stick a random orchid flower stem into a potato and expect a full orchid plant to appear. This how to grow orchids from keikis naturally guide will help you understand what actually works.
However, there is a safer and more realistic way to use this idea. Potato can be used as a temporary moisture-supporting holder for small orchid keikis, young plantlets, or viable stem sections that already have growth nodes. It should not be treated as permanent soil. It should not be left to decay around orchid roots. The best version of this method uses potato only briefly, then moves the young orchid into a clean orchid medium such as bark, sphagnum moss, perlite, or coco chips. This easy orchid cutting support trick is best for short-term use only.
This guide will show you how to use the potato slice method safely, what type of orchid material can actually grow, what mistakes to avoid, how to care for the young orchid afterward, and how to understand the difference between a real propagation method and a decorative gardening trick. Follow these professional orchid propagation secrets for the best results.
What Is the Potato Slice Orchid Trick? – Natural Moisture Support for Keikis
The potato slice orchid trick is a homemade propagation method where small orchid stems, shoots, or keikis are inserted into slices of raw potato and placed in a humid environment. The idea is that the potato helps hold the cutting upright and provides temporary moisture around the base. This DIY orchid keiki propagation technique is popular among budget-conscious growers.
In the image, slices of potato are placed on top of a growing medium in a shallow glass container. Small green orchid-like shoots are inserted through the potato slices. Mature orchids are nearby, showing what the final goal could look like after successful growth. Visually, it suggests a simple step-by-step method: slice potato, insert orchid pieces, keep moist, and grow new orchids.
The real method needs more care than that. Potato is rich in moisture and starch. That means it can break down fast. If left too long, it can rot, smell bad, attract fungus gnats, and damage tender orchid tissue. So the potato must be used only as a temporary support, not as a permanent potting medium.
The safest goal is this:
Use a clean potato slice for a short time to hold young orchid pieces steady and moist, then move them into proper orchid medium before the potato begins to rot.
This how to support orchid cuttings naturally method is a useful experiment when done correctly.
Can You Really Grow Orchids From Potato Slices? – Realistic Expectations
You can sometimes support young orchid growth using a potato slice, but the potato does not magically create a new orchid. The orchid piece itself must have living growth potential. This orchid propagation from keikis guide explains what material actually works.
For example, the method may work better with:
- Orchid keikis that already have tiny roots
- Small divisions from sympodial orchids
- Viable cane sections from orchids like Dendrobium
- Stem nodes from certain orchids under very controlled humidity
- Young orchid shoots that already have a growing point
It usually will not work with:
- A random cut flower spike with no node activity
- A single orchid leaf
- A dead flower stem
- A dried stem with no living tissue
- A rootless orchid crown that is rotting
- A piece of orchid with no node, crown, or growth point
This is important because many people become disappointed when a “trick” fails. The problem is not always the potato. The problem is often that the orchid piece had no ability to grow into a new plant. The best natural orchid propagation experiment starts with viable plant material.
Understanding Orchid Propagation Before Using This Trick – Orchid Types Explained
To use this method wisely, it helps to understand how orchids multiply. Not all orchids propagate the same way. This orchid propagation for beginners guide will help you choose the right approach.
Phalaenopsis Orchids
Phalaenopsis orchids are the common moth orchids seen in many homes. They have broad leaves, thick aerial roots, and long flower spikes. These orchids usually grow from one central crown. They do not multiply from leaf cuttings. They can sometimes produce baby plants called keikis on their flower spikes or at the base of the plant.
If a Phalaenopsis produces a keiki, you can separate it once it has enough roots. A potato slice may be used as a temporary support for a very small keiki, but the keiki still needs real roots and proper orchid medium.
Dendrobium Orchids
Dendrobium orchids grow canes. Some types can be propagated from cane sections if the nodes are healthy. These may be better candidates for experimental natural propagation methods because nodes along the cane can produce new growth under warm, humid conditions.
Cattleya and Oncidium Orchids
These orchids grow from pseudobulbs and rhizomes. They are usually propagated by division, not by potato slices. Each division needs enough pseudobulbs and roots to survive.
Vanda Orchids
Vandas have thick aerial roots and upright stems. They are usually propagated by top cuttings or keikis, not by simple leaf or potato methods.
So before trying the potato trick, identify your orchid type. The method is not equally useful for every orchid.
Why Potato Is Used in This Trick – Natural Moisture and Support
Potato is used because it is moist, firm, easy to slice, and easy to pierce with small stems. It can hold a cutting upright like a natural holder. It also contains starch and small amounts of minerals. Some gardeners believe this helps young plant material stay hydrated during the early stage. This gentle orchid keiki support method relies on potato as a temporary medium.
Possible benefits of potato slices include:
- Holding small cuttings upright
- Providing temporary moisture contact
- Preventing delicate stems from falling over
- Creating a simple support base
- Making propagation visually easy to follow
But potato also has serious risks.
Possible problems include:
- Rotting quickly
- Growing mold
- Attracting fungus gnats
- Creating sour smells
- Softening delicate orchid tissue
- Encouraging bacterial growth
- Keeping the base too wet
That is why this method must be done cleanly, briefly, and carefully.
Important Safety Warning: Potato Is Not Orchid Soil – Critical Mistake to Avoid
Never treat potato as a permanent growing medium for orchids. Orchids need air around their roots. Raw potato is dense, wet, and organic. As it decomposes, it can suffocate roots and invite rot. Avoiding this common orchid propagation mistake is essential.
Do not bury large potato chunks inside an orchid pot. Do not leave potato slices pressed against orchid roots for weeks. Do not mix mashed potato into orchid bark. Do not use cooked potato, salted potato, or potato mixed with milk, butter, spices, or oil.
Use only raw, clean potato slices temporarily. Remove them before they become soft, smelly, or moldy.
Best Orchid Material for the Potato Slice Method – What Actually Works
This method has the best chance when the orchid piece already has a living growth point. A simple green stick with no node may not work. This how to select orchid keikis for propagation guide will help you choose wisely.
Best Choices
- A Phalaenopsis keiki with at least 2 small roots
- A Dendrobium cane section with visible nodes
- A small orchid division with a growth eye
- A young shoot that broke off with a small base attached
- A struggling orchid plantlet that needs support before potting
Poor Choices
- Orchid flowers
- Single leaves
- Flower stems after all nodes are dry
- Dead brown stems
- Rotten crowns
- Rootless pieces with no nodes
If you are unsure, look for nodes. Nodes are small bumps or joints on a stem where new growth can emerge. Without a node or crown, most orchid pieces cannot produce a new plant.
What You Need – Supplies for the Potato Orchid Experiment
Prepare your materials before cutting anything. Cleanliness matters because potato can rot quickly. This orchid propagation supplies list will help you gather what you need.
Materials
- 1 fresh raw potato
- Small orchid keiki, cane section, or viable stem piece
- Sterilized knife
- Sterilized scissors or pruning shears
- Shallow container with drainage or airflow
- Fresh sphagnum moss
- Orchid bark
- Perlite, optional
- Clean water
- Clear plastic cover or humidity dome
- Cinnamon powder, optional for cut ends only
- Labels, optional
Use a clean potato with no soft spots, mold, sprouting eyes, or rotten areas. A firm fresh potato is safer.
Step 1: Choose a Healthy Orchid Piece – Viable Plant Material
Start with the orchid, not the potato. The success of this trick depends on the quality of the plant material. This how to choose orchid keikis for rooting step is critical.
If you are using a keiki, wait until it has at least 2 to 3 roots that are about 2 inches long. This is often called the “rule of three”: at least three leaves and three roots, or at least enough roots to support the young plant.
If you are using a Dendrobium cane section, choose a cane that is mature but not dead. It should be firm, not hollow or dry. Cut sections with at least two nodes each.
If the orchid piece is soft, black, mushy, or dry, do not use it. It will likely rot before rooting.
Step 2: Sterilize Your Tools – Preventing Infection
Before cutting orchids, always sterilize your knife or scissors. Orchids are vulnerable to infection through fresh cuts. Clean tools are essential for successful orchid propagation at home.
You can wipe the blades with rubbing alcohol or wash them with hot soapy water and dry them well. If you are cutting multiple plants, clean the blade between plants.
This simple step can prevent many problems.
Step 3: Cut the Orchid Piece Properly – Correct Technique
If separating a keiki from a flower spike, cut about half an inch to one inch of spike on each side of the keiki. Do not cut into the baby plant itself.
If using a cane section, cut cleanly between nodes. Keep track of which end is up and which end is down. Planting upside down may reduce success.
If using a small division, make sure it has a growing point and some root tissue if possible.
Step 4: Let Fresh Cuts Dry Briefly – Callusing Before Planting
After cutting, let the orchid piece rest for 15 to 30 minutes in a shaded airy place. This allows the cut surface to dry slightly. This how to prepare orchid cuttings for rooting step reduces rot risk.
If you want to use cinnamon, apply only a tiny amount to the cut end. Do not cover living roots with cinnamon. Cinnamon can be drying, and orchid roots are sensitive.
For keikis with roots, avoid putting cinnamon on the roots. Only touch the cut spike or cane end if needed.
Step 5: Prepare the Potato Slices – Clean and Fresh
Wash the potato well. Slice it into rounds about half an inch thick. The slices should be thick enough to hold the orchid piece upright but not so thick that they stay wet for too long.
Use only one potato slice per orchid piece. Do not fill the container with too much potato. More potato means more organic matter that can rot.
If desired, you can rinse the slices briefly in clean water and pat them dry. Do not use salt, vinegar, lemon juice, sugar, or any kitchen seasoning.
Step 6: Make a Small Hole in the Potato – Gentle Insertion Point
Use a clean skewer, chopstick, or knife tip to make a small hole in the center of the potato slice. This hole should be just large enough to hold the orchid stem gently.
Do not force the orchid into the potato. If the hole is too tight, it can crush the stem. If the hole is too loose, the cutting may wobble.
Step 7: Insert the Orchid Piece – Proper Placement
Place the lower part of the orchid piece into the hole. The potato should hold it upright, but the living crown or growing point should stay above the potato.
If using a keiki, do not bury the crown in the potato. Keep the crown exposed and airy. The roots can rest near the potato surface, but they should not be trapped inside wet potato flesh.
If using a cane section, place only the lower part into the potato support. Make sure at least one node remains exposed to air and humidity.
Step 8: Prepare the Container – Proper Setup for Humidity
The image shows a shallow glass container filled with a dark medium. For real propagation, use a container that allows some airflow and drainage. A sealed glass bowl with soggy medium can cause rot. This best container for orchid propagation tip will help.
A better setup is:
- Bottom layer: perlite or small bark
- Middle layer: slightly damp sphagnum moss
- Top area: potato slice holding the orchid piece
The medium should be moist but not soaked. If you squeeze sphagnum moss and water drips out heavily, it is too wet. It should feel damp like a wrung-out sponge.
Step 9: Place the Potato Slice on the Medium – Surface Placement
Place the potato slice on top of the damp medium. Do not bury the potato deep. Keeping it on the surface makes it easier to remove before it rots.
This is very important. If you bury potato in the medium, you may not notice when it begins to decay. Surface placement allows you to check it daily.
Step 10: Add Humidity – Creating a Mini Greenhouse
Orchid plantlets and cane sections need humidity to survive. You can cover the container with a clear plastic dome, plastic bag, or transparent lid. But do not seal it tightly forever. This how to create humidity for orchid propagation guide is essential.
Humidity helps prevent drying, but stagnant air causes mold. Open the cover every day for fresh air.
A good humidity setup should be:
- Warm
- Bright but not sunny
- Moist but not wet
- Covered but ventilated daily
- Clean and monitored
Never place a covered propagation container in direct sun. It can heat up like a mini greenhouse and cook the plant.
Step 11: Place in Bright Indirect Light – Optimal Lighting
Light is important, but direct sun is dangerous for young orchid pieces. Place the container in bright indirect light. Providing optimal light for orchid keikis encourages healthy growth.
Good locations include:
- Near an east-facing window
- Bright shaded balcony
- Greenhouse shelf with shade cloth
- Under a grow light at a safe distance
- Near a window with a sheer curtain
Avoid hot afternoon sun. Young orchid tissue can burn quickly.
Step 12: Check Daily for Mold or Rot – Monitoring the Potato
This is the most important part of the potato method. Potato can rot fast, especially in warmth and humidity. Daily checks are essential for successful potato orchid propagation.
Check every day for:
- Soft potato texture
- Bad smell
- White fuzzy mold
- Black spots on the stem
- Slime around the base
- Fungus gnats
If any of these appear, remove the potato immediately. Do not wait. A rotting potato can ruin the orchid cutting.
Step 13: Remove the Potato After a Short Time – Temporary Support Only
The potato should not stay there for weeks. It is only a temporary support.
Recommended timing:
- Remove after 2 to 4 days in warm weather
- Remove after 5 to 7 days in cooler indoor conditions
- Remove immediately if soft or moldy
After removing the potato, transfer the orchid piece into proper orchid medium if it is stable.
Step 14: Move the Orchid Into Proper Medium – Potting Up Young Orchids
Once the potato has done its job as a temporary support, move the orchid piece into a small pot with orchid-friendly medium. This how to pot orchid keikis after propagation guide is essential.
For Keikis
Use small orchid bark mixed with a little sphagnum moss. Place the keiki so the crown sits above the medium and the roots are gently nestled around bark and moss. Do not bury the crown.
For Cane Sections
Lay the cane section horizontally on damp sphagnum moss, with nodes facing upward. Keep it humid and warm. New shoots may appear from nodes if the cane is viable.
For Small Divisions
Use bark and moss in a small pot. Keep the division stable but airy. Do not overpot. A small pot dries more evenly.
Best Potting Mix for Young Orchids – Well-Draining Medium
Young orchids need moisture, but they also need air. A heavy soil mix will suffocate them. Using the best potting mix for orchid keikis is half the battle.
Simple Young Orchid Mix
- 50% fine orchid bark
- 30% sphagnum moss
- 20% perlite
If your home is very humid, use less moss. If your environment is dry, use a little more moss. The medium should never stay soggy for days.
How to Water After Using the Potato Trick – Gentle Moisture
After moving the orchid into proper medium, water carefully. Young orchids do not have large root systems yet, so they cannot handle wet conditions for long. This how to water propagated orchids guide will prevent overwatering.
Water lightly when the medium is nearly dry. Mist the surface if needed, but do not keep it constantly wet.
A good rule:
Moist air is better than soggy roots.
Keep humidity around the plant, but allow the medium to breathe.
How Long Until New Growth Appears? – Realistic Timeline
Orchid propagation is slow. Do not expect overnight results. Even when conditions are perfect, orchids take time. This orchid keiki growth timeline sets realistic expectations.
Typical timeline:
- First week: cutting adjusts
- Weeks 2 to 4: tissue either stays firm or begins to fail
- Weeks 4 to 8: small root tips or node swelling may appear
- Months 2 to 4: stronger growth may develop
- Months 6 and beyond: plant becomes more established
If you are working with a keiki that already has roots, establishment is faster. If you are trying to activate a cane node, it may take much longer.
Signs the Potato Method Is Working – Positive Indicators
Look for slow signs of life. Do not pull the cutting out repeatedly. These are signs of successful orchid propagation.
Good signs include:
- The stem stays firm and green
- The crown remains dry and healthy
- Roots remain firm
- New root tips appear
- Nodes begin to swell
- Small new leaves emerge
- No sour smell or mold appears
The best sign is new root growth. Leaves are encouraging, but roots are what make the new orchid independent.
Continue to Page 2
Continue to page 2 for more details about this article and the key points many readers miss on the first page.