Orchids are the kind of plants that can make a room feel elegant in seconds. Their tall flower stems, smooth green leaves, and delicate blooms look luxurious on a windowsill, coffee table, shelf, or sunny corner. But when orchids begin to fade, they can look very sad very fast. The flowers dry out, the stems turn brown, the leaves lose their shine, and the whole plant can seem like it has given up.
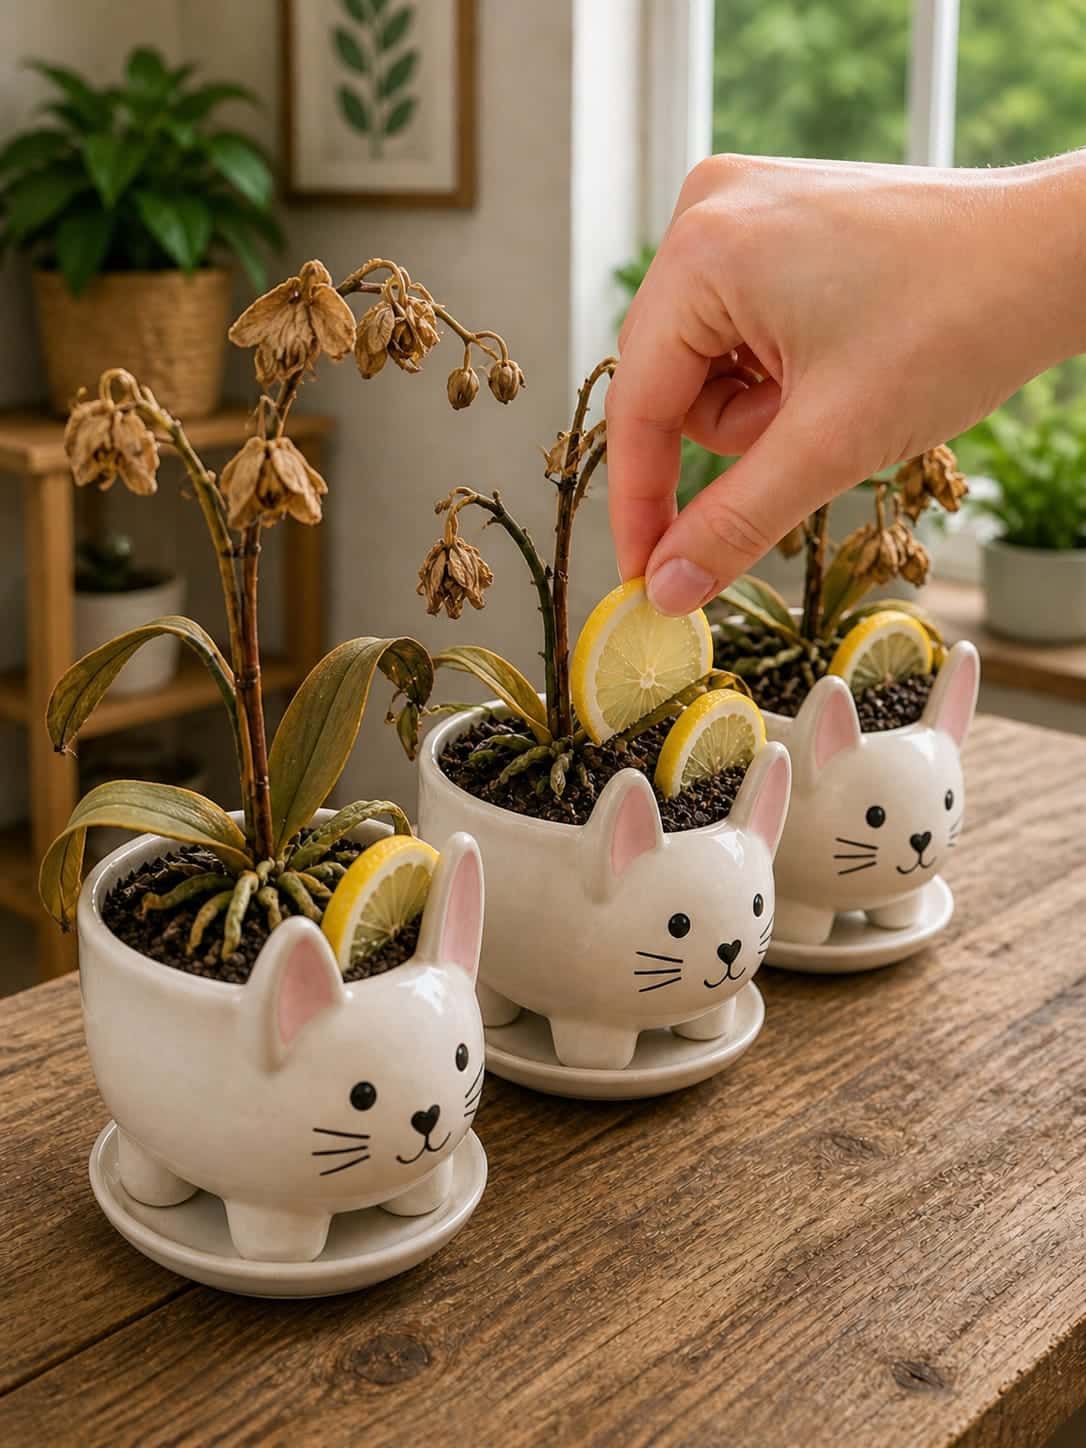
That is why this simple lemon slice trick has become such an eye-catching plant-care idea. In the image, several tired orchids sit in adorable white cat-shaped pots. Their old flower stems are dry and brown, but fresh lemon slices are being placed around the base of the plants. The scene feels hopeful, bright, and easy. It looks like a small kitchen ingredient is being used to refresh a plant that needs a second chance.
This trick is all about giving your orchid a quick “wake-up” routine using the fresh, clean energy of lemon. Lemon is bright, fragrant, and naturally refreshing. When used carefully, it can become part of a simple orchid-care ritual that makes the pot look cleaner, helps you pay attention to the plant, and encourages you to reset the growing area around tired roots.
The key is not to overload the pot. You only need a small amount, used for a short time, as part of a gentle care routine. Think of it as a freshening trick, not a heavy fertilizer. Orchids are delicate, so the best results come from combining the lemon slice idea with proper watering, light, trimming, and fresh orchid care.
Why Lemon Looks So Perfect for Orchid Revival
Lemon has always been associated with freshness. Its bright yellow color instantly makes a tired plant arrangement look more alive. When an orchid has old brown stems and dull potting mix, a few thin lemon slices can visually brighten the pot and make the whole plant look cared for again.
There is also something very satisfying about using a simple kitchen ingredient around houseplants. Instead of reaching for complicated products, you can create a gentle plant-care moment with something you probably already have at home. That is what makes this trick so appealing. It feels natural, affordable, and easy.
For orchids that look neglected, the lemon trick can also remind you to do the full refresh routine: remove old blooms, check the roots, clean the pot, adjust watering, and give the plant better light. The lemon slices become part of a bigger care reset.
What This Lemon Slice Trick Is Meant to Do
The lemon slice trick is best used as a short-term refreshing routine. It is not about burying fruit deep into the orchid roots or leaving it there forever. Instead, it is about placing thin lemon slices on the top of the potting medium for a short period while you refresh the plant.
This can help create a cleaner-looking pot surface, bring a fresh scent, and make the plant-care routine feel more intentional. It is also a nice visual trick for plant photos, indoor garden styling, and decorative orchid displays.
When paired with correct orchid care, the routine can make a tired orchid look neater and more ready for recovery. The real magic comes from the full process: trimming, cleaning, checking the root zone, watering properly, and giving the plant bright indirect light.
What You Need for the Lemon Orchid Refresh
You do not need many supplies. Keep the routine simple and gentle.
- One fresh lemon
- A clean knife
- Clean scissors or pruning shears
- Fresh orchid bark if repotting is needed
- Room-temperature water
- A pot with drainage
- A soft cloth
- A bright spot with indirect light
Use fresh lemon slices, not old dried slices. Cut them thin so they sit neatly on the surface of the pot. Thick lemon chunks are too heavy and too wet for small orchid pots.
Step 1: Remove Completely Dead Flowers
Before placing lemon slices in the pot, begin by cleaning up the orchid. If the flowers are brown, crispy, and fully finished, gently remove them. Old flowers can make the plant look worse than it is.
Use clean fingers or clean scissors. Do not pull hard on anything that is still attached firmly. If a flower drops easily, remove it. If it resists, leave it for another day.
This first step instantly makes the orchid look tidier. It also helps you see the stems and leaves more clearly.
Step 2: Trim Dry Brown Flower Spikes
The orchids in the image have dry brown flower stems. This is common after blooming. Once a flower spike has turned completely brown and dry, it will not bloom again from that section.
Use sterilized scissors and cut the dry spike close to the base, leaving a small clean stub. This helps the orchid focus its energy on roots and leaves instead of holding onto old dried stems.
If part of a spike is still green, you can leave it. But for weak orchids, removing old dry stems often makes the plant look cleaner and gives it a fresh start.
Step 3: Check the Leaves
Look carefully at the leaves. Orchid leaves should feel firm and slightly thick. If one lower leaf is yellowing, that can be normal. If many leaves are limp, wrinkled, or yellow, the plant may need root attention.
Wipe dusty leaves with a soft damp cloth. Clean leaves absorb light better and instantly look healthier. Avoid soaking the crown, which is the center point where leaves meet.
This simple leaf-cleaning step can make a tired orchid look much fresher before you even add the lemon slices.
Step 4: Slice the Lemon Thinly
Cut a fresh lemon into thin half-moon slices. Thin slices are best because they are light and easy to remove. You only need one or two slices per small pot.
Do not squeeze lemon juice directly into the pot. The trick works best as a surface refresh, not as a strong liquid treatment. The goal is a light touch.
If your orchid is very small, use only half a slice. For a larger orchid pot, you can use two thin slices around the edge of the potting medium.
Step 5: Place Lemon Slices Around the Edge
Place the lemon slices on the surface of the orchid bark or potting medium, near the edge of the pot. Avoid pressing them tightly against the crown or roots.
The image shows lemon slices tucked into the pot surface. For the safest version of this trick, keep them shallow and easy to remove. They should rest on top rather than be buried deeply.
This creates a fresh, decorative look and gives the orchid pot a clean, styled appearance. The bright yellow slices contrast beautifully with dark bark, white pots, and green leaves.
Step 6: Leave Them Briefly
This is the most important part of the trick: use the lemon slices briefly. Leave them in place for a short refresh period, such as a few hours or up to one day, then remove them.
This keeps the routine clean and simple. The lemon slices are there to freshen and style the pot, not to decompose inside it.
After removing the slices, lightly check the potting surface. If any lemon pulp falls into the medium, pick it out. The orchid pot should remain clean and airy.
Step 7: Water the Orchid Properly
After the lemon refresh, give the orchid the care it actually needs. If the potting medium is dry and the roots look silvery, water with room-temperature water. Let water run through the pot and drain completely.
Never let the orchid sit in standing water. If your cute decorative pot does not have drainage, keep the orchid in a plastic inner pot with holes and place that inside the decorative container.
Watering correctly is what helps orchids recover. The lemon slice is the visual refresh, but proper hydration supports the plant from the roots.
Step 8: Move the Orchid to Bright Indirect Light
Orchids need light to rebuild strength. Place your orchid near a bright window where it receives indirect light. An east-facing window is often perfect. A south or west window can work if filtered by a sheer curtain.
A weak orchid in a dark corner will struggle to recover. After cleaning and refreshing the pot, give the plant a better location.
Bright indirect light helps the leaves stay firm, encourages root activity, and supports future blooming.
Step 9: Give the Orchid Time
Orchids do not recover overnight. After the old flowers fade, the plant may spend weeks or months focusing on roots and leaves. This is normal.
The lemon slice trick makes the orchid pot look fresh right away, but the deeper recovery happens slowly. Watch for new root tips, firmer leaves, and eventually a new flower spike.
Patience is part of the routine. A quiet orchid is not always a dead orchid. Sometimes it is simply resting.
Why This Trick Looks So Beautiful in Decorative Pots
The cat-shaped pots in the image make the lemon trick even more charming. The white ceramic, yellow lemon slices, brown orchid stems, and natural wood table create a cozy indoor garden look.
If you create content for a gardening blog, Pinterest post, or social media page, this kind of visual trick is very attractive. It makes plant care feel approachable and fun. People love simple routines that combine beauty with practical care.
You can style the pot with lemon slices while also teaching readers to trim old stems, check drainage, and care for orchids correctly.
Best Orchids for This Refresh Routine
This trick is especially suited for common moth orchids, also known as Phalaenopsis orchids. These are the orchids most people keep indoors. They have broad leaves, thick roots, and long flower spikes.
The routine can also be used as a temporary decorative refresh for other potted orchids, but always keep the lemon slices shallow and remove them quickly.
For very delicate, rare, or expensive orchids, skip homemade tricks and use a simple cleaning and repotting routine instead.
How Often Should You Use the Lemon Slice Trick?
Use this trick occasionally, not every week. It is best for moments when your orchid looks tired after blooming and you want to refresh the display.
A good schedule is once after the flowers fade, or when you are cleaning and restyling the pot. Do not keep adding lemon slices again and again. Orchids prefer stable conditions.
The best ongoing care is still proper watering, drainage, light, and occasional diluted orchid fertilizer.
What to Do After the Lemon Refresh
After removing the lemon slices, continue with simple orchid care. Check the roots every few weeks. Water only when the medium is nearly dry. Keep the plant in bright indirect light. Remove any dead material. Avoid heavy feeding while the orchid is weak.
Once you see new roots or a new leaf, you can begin feeding lightly with diluted orchid fertilizer. This helps support future blooming.
The lemon trick begins the refresh. Consistent care finishes the recovery.
How to Tell If Your Orchid Is Recovering
A recovering orchid may not bloom right away. Look for smaller signs first.
- Leaves feel firmer
- Roots turn green when watered
- New root tips appear
- A new leaf begins growing
- The crown stays firm
- No sour smell comes from the pot
- The plant stops declining
These signs mean the orchid is still alive and responding. Flowers come later, after the plant has enough energy.
How to Encourage Future Blooms
Once your orchid has recovered, you can encourage blooming with stable care. Give it bright indirect light, water correctly, and feed lightly during active growth.
Many Phalaenopsis orchids also respond to a gentle nighttime temperature drop for a few weeks. This can encourage a new flower spike when the plant is mature and healthy enough.
Do not rush the process. A healthy orchid may bloom once or twice a year, depending on care and environment.
Why Old Orchid Spikes Should Not Discourage You
Dry flower spikes can make an orchid look dead, but they are often just part of the normal bloom cycle. The plant may be finished flowering, not finished living.
That is why this lemon refresh is so satisfying. By removing the old dry parts and adding a clean decorative touch, you can see the plant differently. It becomes a resting orchid, not a failed orchid.
Many orchids recover beautifully after their old spikes are removed.
Can You Combine Lemon With Orchid Fertilizer?
Do not use lemon and fertilizer at the exact same time. Keep the routine simple. Use the lemon slices as a temporary refresh, remove them, then return to normal care.
If the orchid is actively growing and healthy, you can fertilize later with a diluted orchid fertilizer. Use a weak solution and avoid feeding a dry or severely stressed plant.
Simple spacing keeps the routine gentle.
Continue to Page 2
Continue to page 2 for more details about this article and the key points many readers miss on the first page.