Orchids are breathtaking when they are healthy. Their thick green leaves, long flower spikes, and delicate blooms make them look elegant and expensive, even when they are sitting in a simple pot on a windowsill. But anyone who has grown orchids for more than a few months knows the truth: orchids can look perfect above the pot while their roots are quietly struggling below. If you are looking for the best natural orchid root treatment or a homemade orchid rescue method, this gentle cinnamon water technique is a safe and effective option.
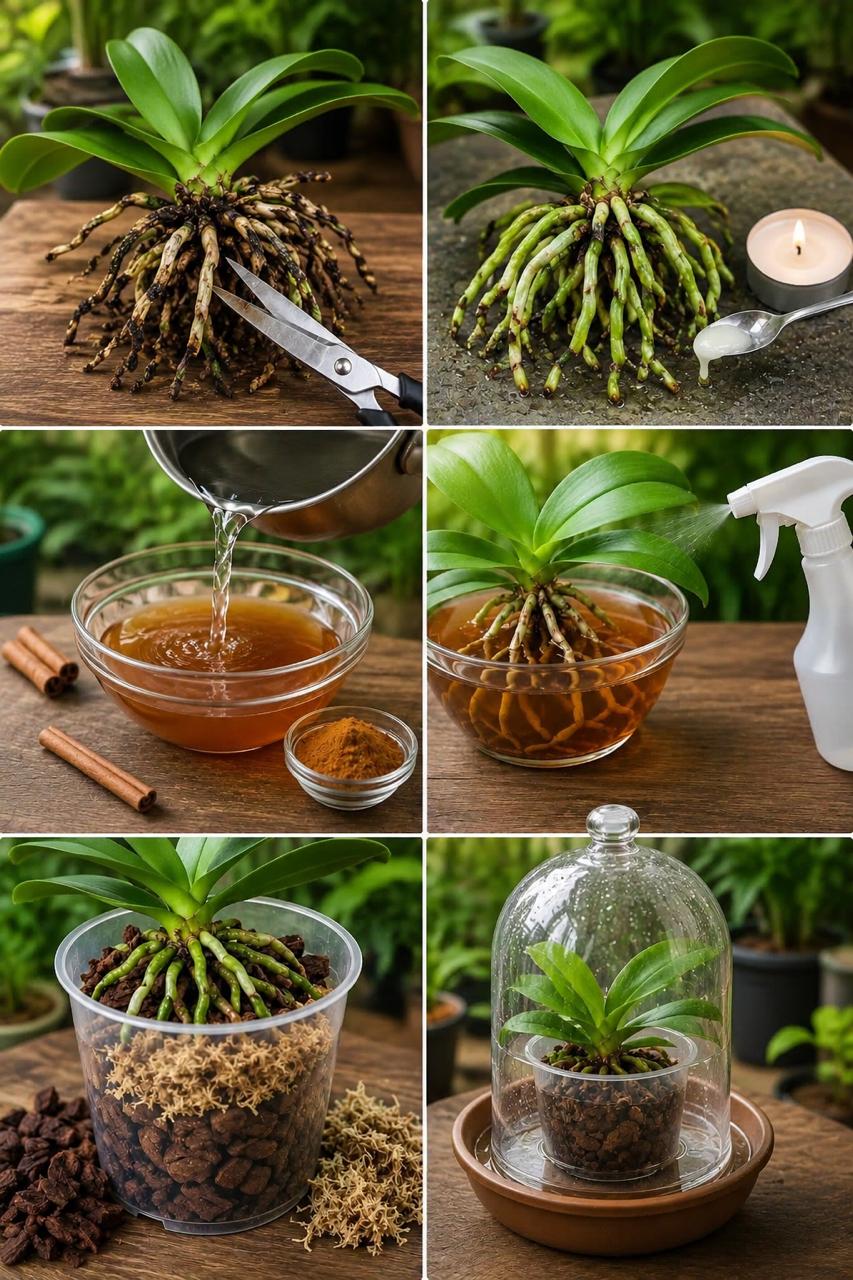
The image shows a step-by-step orchid care method. First, the orchid is removed from its pot and the old roots are inspected. Then damaged roots are trimmed away with scissors. A thick white protective paste or liquid is applied to the roots. After that, cinnamon water is prepared, the orchid roots are soaked or sprayed, and the plant is repotted into fresh bark with sphagnum moss. Finally, the orchid is placed under a clear humidity dome to recover. This how to save an orchid with root rot guide will show you exactly what to do.
This is often called the cinnamon water orchid rescue trick. It is a natural method many home gardeners use when an orchid has tired roots, old potting mix, fungal concerns, or stress after repotting. Cinnamon is popular in plant care because it is commonly used as a drying, protective ingredient on cut plant tissue. When used correctly, it can help keep freshly trimmed areas cleaner and drier. But orchids are sensitive, so cinnamon must be used carefully. This safest homemade orchid root disinfectant requires proper preparation.
This guide explains how to use cinnamon safely for orchids, how to trim damaged roots, how to make a very mild cinnamon rinse, how to repot the plant, and how to help it recover without burning or drying the roots. Follow these professional orchid care secrets for stunning results.
What Is the Cinnamon Orchid Trick? – Natural Root Protection Method
The cinnamon orchid trick is a natural orchid rescue method that uses cinnamon in a controlled way after trimming damaged roots. The goal is not to feed the orchid. Cinnamon is not fertilizer. It does not replace orchid food, sunlight, airflow, or proper watering. This best natural antifungal for orchids is used for protection, not nutrition.
The real purpose of cinnamon in orchid care is to help dry and protect freshly cut areas. Many gardeners use a tiny amount of ground cinnamon on trimmed stems, cut flower spikes, or damaged plant tissue. In the image, cinnamon powder and cinnamon sticks are shown with water, suggesting a cinnamon water rinse or soak.
For orchids, there is one very important rule:
Never coat healthy orchid roots heavily with dry cinnamon powder.
Cinnamon can be drying. Orchid roots need moisture and airflow. If too much cinnamon powder sticks to living green or silver roots, it may dry them out. This is why the safest method is to use cinnamon very lightly, only on cuts, or to make a weak cinnamon rinse that is diluted and used briefly.
Why Orchid Roots Matter So Much – Foundation of Orchid Health
Orchid roots are different from the roots of many common houseplants. Most popular indoor orchids, especially Phalaenopsis orchids, grow naturally attached to trees in tropical environments. Their roots are designed to receive air, humidity, and quick moisture, not to sit buried in dense soil. This how to check orchid root health guide is essential for diagnosis.
Healthy orchid roots are usually firm. They may look green when wet and silvery-gray when dry. Some roots may grow outside the pot, and that is completely normal. These are aerial roots. They help the plant absorb moisture from the air and anchor itself.
When orchid roots are healthy, the whole plant is stronger. The leaves stay firm. New roots grow. Flower spikes are more likely. The plant can recover after blooming. But when roots rot, dry out, or suffocate in old bark, the orchid begins to decline.
Common signs of root problems include:
- Wrinkled leaves
- Yellow leaves
- Soft black roots
- Hollow papery roots
- Sour smell from the pot
- Old bark that stays wet too long
- No new growth
- Flower buds dropping early
- Plant wobbling in the pot
If your orchid looks weak even though you water it, the roots may be the real problem.
When Should You Use This Cinnamon Root Rescue Method? – Appropriate Situations
This method is useful when an orchid needs root inspection, cleaning, trimming, or repotting. It is not something you should do every week. Orchids do not like constant disturbance. This best time to repot orchids guide helps you decide.
You can use this method when:
- The orchid has rotten roots
- The potting bark is old and broken down
- The pot smells sour or musty
- The orchid is unstable in the pot
- The roots are mostly brown, mushy, or hollow
- The plant has finished blooming and needs repotting
- You accidentally damaged roots during repotting
- You want to protect fresh cuts after trimming
You should not use this method on a perfectly healthy orchid just for fun. If the plant is growing well, blooming, and producing green root tips, leave it alone. Orchids prefer stable care.
Important Warning Before Using Cinnamon on Orchids – Critical Safety Rules
Cinnamon is useful, but it can also be harmful if used incorrectly. The most common mistake is applying dry cinnamon powder all over the roots. This can dry out healthy roots and slow recovery. Avoiding this common orchid care mistake is essential.
Use cinnamon only in these safe ways:
- A tiny dab on freshly cut rotten root ends
- A very weak cinnamon water rinse used briefly
- A light spray on problem areas, not a heavy coating
Do not use cinnamon like fertilizer. Do not mix large spoonfuls into orchid bark. Do not pack cinnamon around the crown. Do not make a thick cinnamon paste and cover living roots with it.
Also, never use cinnamon sugar. Never use cinnamon mixed with honey, milk, oil, or sweeteners. Use plain ground cinnamon only.
What You Need for This Orchid Rescue Method – Supplies Checklist
Prepare everything before removing the orchid from its pot. Once roots are exposed, you do not want the plant sitting around for hours while you search for tools. This orchid root rescue supplies list will help you gather what you need.
Supplies
- A stressed orchid
- Sterilized scissors or pruning shears
- Plain ground cinnamon
- Clean water
- A small bowl
- A spray bottle, optional
- Fresh orchid bark
- Sphagnum moss, optional
- A clear orchid pot with drainage holes
- A humidity dome or clear plastic cover, optional
- Paper towels or newspaper
- Rubbing alcohol for sterilizing tools
A clear orchid pot is especially helpful because it allows you to see the roots and moisture level. Orchids also benefit from airflow around the root zone, so pots with side holes are excellent.
Step 1: Remove the Orchid From Its Pot – Gentle Extraction
Gently squeeze the pot if it is plastic. Loosen the bark around the roots and slowly slide the orchid out. Do not yank the plant. Orchid roots can cling tightly to bark and pot walls.
If the roots are stuck, soak the pot in plain room-temperature water for 10 minutes. This softens the roots and makes them less likely to break.
Once removed, place the orchid on a clean surface. Newspaper, a tray, or a wooden table works well.
Step 2: Remove Old Potting Mix – Cleaning the Root Zone
Carefully pick away old bark, moss, and debris from the roots. If pieces are stuck tightly to healthy roots, do not force them. It is better to leave a small piece of bark attached than to rip a living root.
Old potting mix often causes orchid decline. Bark naturally breaks down over time. When it decomposes, it becomes soft and dense. Instead of allowing airflow, it holds too much moisture. This can suffocate roots and encourage rot.
Signs old bark needs replacement:
- It crumbles easily
- It smells sour
- It stays wet for many days
- It looks like dark soil instead of chunky bark
- Roots inside the pot are brown or mushy
If the bark looks old, repotting is necessary. Cinnamon alone will not fix broken-down potting media.
Step 3: Inspect the Roots – Orchid Root Health Check
Look closely at every root. This is the most important part of the rescue process. This how to tell if orchid roots are healthy guide will help you.
Healthy Roots
Healthy orchid roots are firm. They may be green, silver, white, or pale yellow depending on moisture and light. Some roots may have brown marks but still be firm. Firm roots should usually be kept.
Rotten Roots
Rotten roots are soft, mushy, black, brown, or slimy. Sometimes the outer layer slips off when touched, leaving a thin string inside. These roots should be removed.
Dead Dry Roots
Dead dry roots are hollow, papery, brittle, and shriveled. These can also be removed because they no longer help the plant.
Do not remove every root just because it is not bright green. Many dry healthy roots look silver or pale gray. The key is firmness.
Step 4: Sterilize Your Scissors – Preventing Infection
Before cutting, sterilize your scissors. This helps prevent spreading disease from one root to another. Clean tools are essential for successful orchid root surgery.
You can sterilize scissors by wiping the blades with rubbing alcohol. Let them dry for a moment before cutting. If you are removing many rotten roots, wipe the blades again during the process.
Clean tools matter. A dirty blade can introduce bacteria or fungus into fresh wounds.
Step 5: Trim Dead or Rotten Roots – Proper Pruning Technique
Cut away only the roots that are clearly dead, hollow, slimy, or mushy. Make clean cuts. Avoid crushing the root tissue.
If a root is partly rotten but partly firm, cut back to healthy firm tissue. If the whole root is mushy, remove it near the base, but be careful not to damage the orchid crown.
After trimming, the root system may look smaller. That is okay. It is better to have fewer healthy roots than many rotten ones sitting in the pot.
Step 6: Apply Cinnamon Only to Cut Ends – Safe Application
This is where many people make mistakes. Do not sprinkle cinnamon over the whole root system. Instead, apply a tiny amount only to freshly cut ends. This how to use cinnamon on orchid roots tip is critical.
How to apply:
- Dip a cotton swab, fingertip, or small brush into plain cinnamon powder.
- Tap off the excess.
- Touch only the cut end of the trimmed root.
- Do not coat long sections of living root.
- Do not pack cinnamon into the crown.
A tiny amount is enough. The goal is to dry and protect the cut surface, not to cover the orchid.
Step 7: Make a Very Mild Cinnamon Water Rinse – Homemade Recipe
The image shows cinnamon powder and cinnamon sticks being mixed with water. This can be used as a weak rinse, but it must be diluted. Strong cinnamon water can dry orchid roots. This gentle cinnamon water for orchids recipe is safe when made correctly.
Gentle Cinnamon Water Recipe
- ¼ teaspoon plain ground cinnamon
- 1 liter warm water
- Extra plain water for dilution
How to Make It
- Add ¼ teaspoon cinnamon to 1 liter of warm water.
- Stir well.
- Let it sit for 20 to 30 minutes.
- Strain through a coffee filter or cloth.
- Mix 1 cup cinnamon water with 3 cups plain water.
The final liquid should be weak and lightly tinted, not thick or muddy. Always strain it. Cinnamon powder can stick to roots and bark if not filtered.
Step 8: Use Cinnamon Water as a Brief Rinse, Not a Long Soak – Proper Application
If you choose to use cinnamon water, use it briefly. Do not leave orchid roots soaking for hours. A short rinse is enough. This how to soak orchid roots in cinnamon water guide prevents overexposure.
Safe use:
- Dip roots for 2 to 5 minutes only
- Or spray lightly on the root zone
- Let roots drain afterward
- Do not soak the crown
- Do not repeat frequently
If your orchid has very few roots left, be even more careful. Weak orchids can dehydrate easily, and too much cinnamon can be drying.
Step 9: Let the Orchid Rest Briefly – Allowing Cuts to Dry
After trimming and treating cut ends, let the orchid sit for 20 to 30 minutes in a shaded, airy place. This helps the cuts dry slightly before repotting.
Do not leave it in hot sun. Do not leave it overnight unless you are experienced and the plant is stable. A short rest is enough.
Step 10: Choose the Right Orchid Pot – Drainage and Airflow
Orchids need drainage and airflow. A pot without drainage holes is risky. Clear plastic orchid pots are popular because they allow light to reach roots and make moisture easier to monitor. Using the best pot for orchids is essential for recovery.
A good orchid pot should have:
- Drainage holes at the bottom
- Side holes if possible
- Enough space for roots
- Not too much extra room
Do not choose a huge pot. A pot that is too large holds too much moisture, which can cause root rot. Choose a pot that fits the root system comfortably.
Step 11: Prepare Fresh Orchid Bark – Best Potting Mix for Recovery
Use fresh chunky orchid bark. You can also add a little sphagnum moss if your environment is dry. The image shows bark and moss layered in a clear pot, which is a common orchid setup. This best orchid potting mix for root recovery combination works well.
A good mix for Phalaenopsis orchids:
- 70% medium orchid bark
- 20% sphagnum moss
- 10% perlite or charcoal
If your home is humid, use less moss. If your home is dry, a little moss helps hold moisture. The key is balance: moist but airy.
Step 12: Repot the Orchid – Correct Planting Depth
Hold the orchid in the pot so the crown sits above the bark. The crown should never be buried. Add bark around the roots, gently tapping the pot to settle pieces between them.
Do not pack the bark too tightly. Orchid roots need air. The plant should be stable but not suffocated.
If some aerial roots remain outside the pot, that is fine. Do not force every root inside. Aerial roots are natural.
Step 13: Water Lightly After Repotting – First Moisture
After repotting, water lightly with plain water. Let the pot drain completely. Do not fertilize immediately. Do not pour strong cinnamon water through the pot again.
Freshly repotted orchids need gentle care. Their roots are adjusting, and any cuts need time to seal.
After watering, make sure no water remains trapped in the crown. If water sits between the leaves, blot it with tissue.
Step 14: Use a Humidity Dome for Recovery – Creating a Healing Environment
The final panel in the image shows the orchid under a clear dome. This can help if the orchid has lost many roots and needs humidity while recovering. This how to use humidity dome for orchids tip is essential for weak plants.
A humidity dome keeps moisture around the leaves and roots, reducing stress. But it must be used carefully because too much trapped moisture can cause mold or crown rot.
How to Use a Humidity Dome Safely
- Use it for a few hours a day or overnight
- Open it daily for fresh air
- Keep the orchid out of direct sun
- Do not let water drip into the crown
- Remove the dome if mold appears
Never place a domed orchid in direct sunlight. The dome can trap heat and cook the plant.
How Often Should You Use Cinnamon on Orchids? – Best Frequency
Cinnamon should be used only when needed. It is not a routine fertilizer or weekly spray. Following a natural orchid care schedule prevents overuse.
Situation – Cinnamon Use
- After trimming rotten roots: Tiny amount on cut ends
- After cutting a flower spike: Tiny amount on cut spike end
- Healthy roots: Do not coat with cinnamon
- Routine watering: Do not add cinnamon regularly
- Root rescue rinse: Very weak, brief, occasional only
Too much cinnamon can dry plant tissue, so moderation is essential.
What Results Can You Expect? – Realistic Orchid Recovery
This cinnamon method does not create instant flowers. It is a rescue and protection method. The results appear slowly as the orchid grows new roots and adjusts to fresh bark. This orchid recovery timeline sets realistic expectations.
Over the next weeks or months, you may notice:
- Less sour smell from the pot
- Firmer root system
- New green root tips
- Leaves becoming more stable
- Less wobbling in the pot
- New leaf growth
- Future flower spikes when the plant is strong again
Old damaged roots will not heal. Yellow leaves may not turn green again. The real sign of success is new root growth.
How Long Does Orchid Recovery Take? – Patient Expectations
Orchids recover slowly. A plant with mild root damage may show improvement in a few weeks. A plant with major root loss may take several months.
Typical recovery timeline:
- First week: plant adjusts after repotting
- Weeks 2 to 4: leaves may stabilize
- Weeks 4 to 8: new root tips may appear
- Months 2 to 4: stronger root growth develops
- Later: blooms may return if conditions are good
Do not keep disturbing the orchid to check roots. Use a clear pot so you can monitor without removing the plant.
Continue to Page 2
Continue to page 2 for more details about this article and the key points many readers miss on the first page.