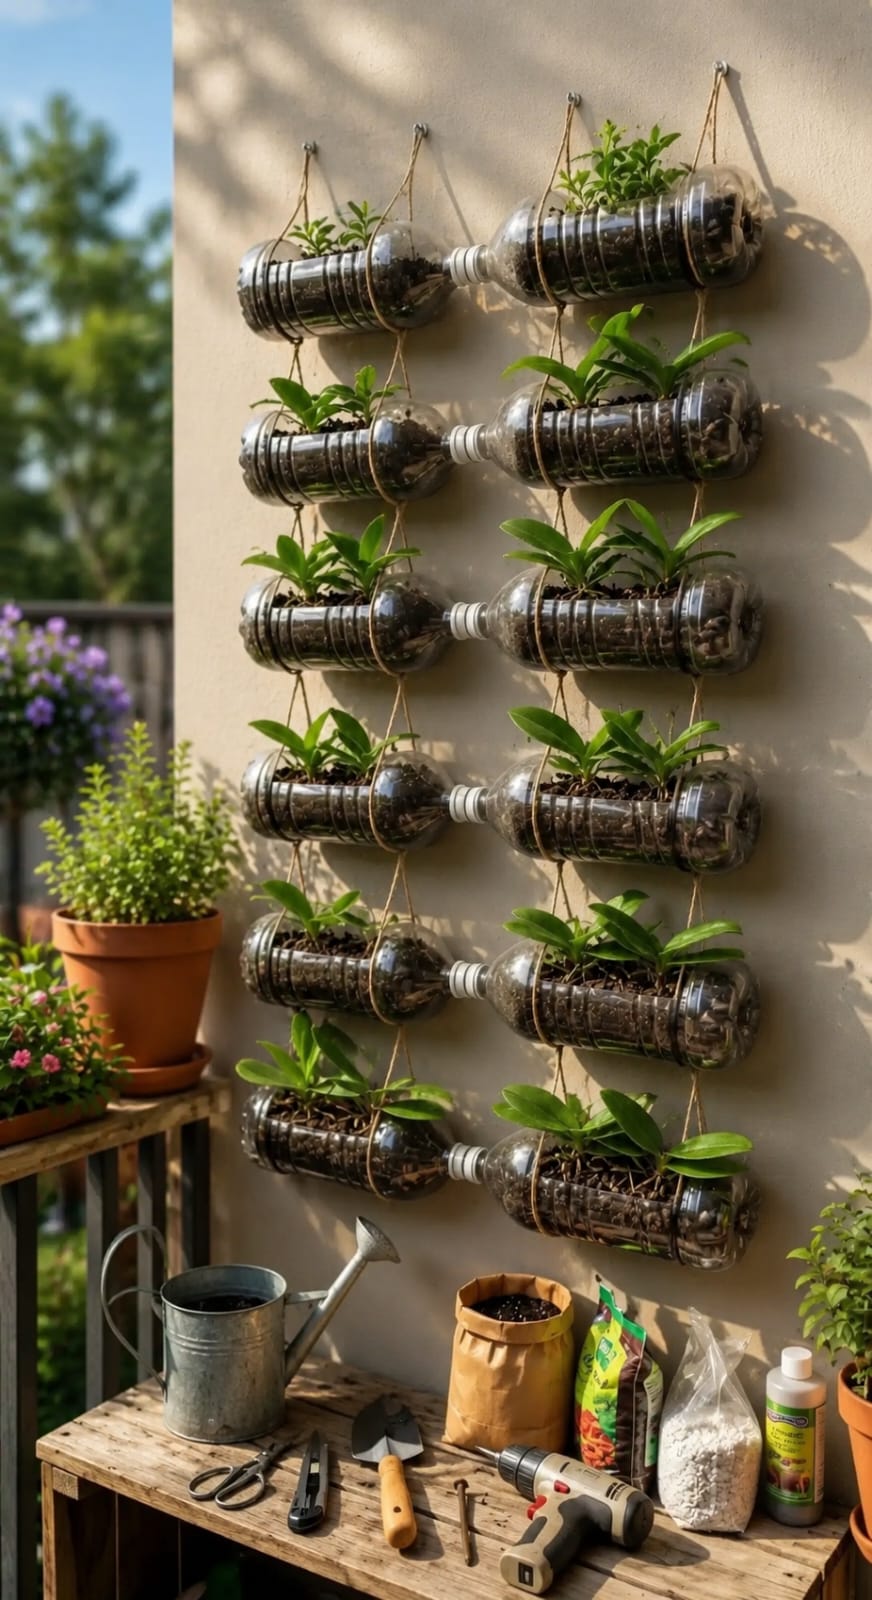
A vertical orchid bottle wall planter is one of the smartest ways to turn a small balcony, patio wall, or outdoor corner into a fresh green display without spending much money. Instead of filling the floor with heavy pots, this trick uses empty plastic bottles as horizontal planting pockets, then hangs them in neat rows against a wall. The result is a space-saving garden that looks organized, creative, and surprisingly expensive when arranged correctly.
This idea works especially well for balconies because vertical space is often wasted. Many homes have narrow outdoor areas where the floor is too small for large planters, but the wall is wide and empty. By placing lightweight bottle planters on the wall, you can grow orchids, small tropical plants, leafy cuttings, herbs, or compact decorative plants while keeping the floor clean and easy to walk through.
The beauty of this method is that it combines recycling, plant care, and outdoor styling in one project. A simple bottle becomes a mini planter. A plain wall becomes a living garden. A cluttered balcony becomes a designed plant display. With the right spacing, clean cuts, drainage holes, and matching rows, the finished look can feel like a boutique balcony garden rather than a homemade experiment.
Why a Vertical Bottle Wall Planter Works So Well
The main advantage of this trick is space. Plants do not always need to sit on the floor. Many small plants grow beautifully in shallow containers, especially when their roots are given enough airflow and drainage. Plastic bottles are light, easy to cut, easy to hang, and simple to replace if one becomes damaged.
A vertical bottle wall planter helps you:
- Save balcony floor space
- Reuse empty plastic bottles
- Create a clean plant wall
- Display orchids and small plants at eye level
- Improve airflow around roots
- Make watering easier and more organized
- Turn a plain wall into a decorative garden feature
It is also a good project for renters because the setup can be made lightweight and removable. Instead of building a permanent raised bed or drilling many large fixtures, you can create a simple hanging system using strong hooks, rope, wire, or a lightweight frame.
Why Orchids Can Look Beautiful in Bottle Planters
Orchids have a refined, elegant look, but they do not always need traditional ceramic pots. Many orchids naturally grow with roots exposed to air, especially epiphytic orchids. That means they often appreciate airy conditions rather than heavy compact soil.
A horizontal bottle planter can support orchid roots while allowing lightness and airflow. When filled with the right orchid medium, such as bark chips, coconut husk pieces, charcoal, or lightweight orchid mix, the bottle becomes a simple container that holds the plant without suffocating the roots.
Orchids can look especially attractive in a vertical wall display because their leaves grow outward and their flower spikes can rise upward. When several small orchids are arranged in repeated rows, the wall begins to look like a living installation.
Best Plants for a Bottle Wall Planter
Although this project can be used for orchids, it can also support other small plants. The best choices are plants that do not need deep soil and can tolerate the conditions on your balcony.
Good options include:
- Small orchids
- Pothos cuttings
- Spider plant babies
- Small ferns in shaded balconies
- Succulents in sunny balconies
- Herbs such as thyme or oregano
- Small leafy tropical plants
- Compact flowering annuals
For orchids, use an orchid medium instead of regular garden soil. For herbs or leafy plants, use a light potting mix with good drainage. For succulents, use a cactus-style mix. Matching the plant to the medium is what makes the display last.
Materials You Need
This project does not require expensive materials. Most of the main structure can be made from reused bottles and basic supplies.
- Empty plastic bottles of the same size
- Sharp scissors or a craft knife
- Small drill, heated nail, or hole punch for drainage
- Strong rope, wire, or garden twine
- Hooks, screws, or a hanging frame
- Orchid bark or suitable potting medium
- Small orchid plants or chosen plants
- Watering can or spray bottle
- Optional decorative stones or moss
Using bottles of the same size makes the wall look much cleaner. A repeated shape creates order. If the bottles are all different sizes, the display may look messy unless you intentionally design it in a playful recycled style.
Step 1: Clean the Bottles
Before cutting, wash the bottles well. Remove labels, glue, and any sticky residue. A clean bottle looks better and is safer for plants. If the plastic still smells like the drink it contained, rinse it with warm water and mild soap, then let it dry completely.
Clear bottles create a lighter look, while dark bottles can hide soil and root mess. For a balcony display, smoked or dark plastic can look more modern because it makes the planter line feel consistent. Clear bottles, however, help you see moisture levels and root growth more easily.
Step 2: Cut a Planting Window
Place the bottle horizontally and cut a long rectangular opening along the top side. This becomes the planting pocket. The opening should be large enough for you to add medium and place the plant, but not so large that the bottle loses structure.
Leave the rounded ends intact because they help hold the medium inside. The bottle should look like a small trough. Smooth any sharp edges with scissors so they do not cut your hands or damage leaves.
For a cleaner look, keep the openings the same size on every bottle. Measuring the first bottle and using it as a guide for the rest will make the wall look more professional.
Step 3: Add Drainage Holes
Drainage is extremely important. Without drainage holes, water can sit inside the bottle and rot the roots. Make several small holes along the bottom side of each bottle. If the planter is for orchids, drainage and airflow matter even more.
Good drainage holes help:
- Prevent water from collecting
- Reduce root rot risk
- Improve oxygen around roots
- Keep the growing medium fresher
- Make watering more forgiving
Do not make only one large hole. Several small holes are better because they distribute drainage evenly. If the bottles are hanging above one another, think about where the water will drip. You may want to align them so excess water falls into lower planters or into a tray at the bottom.
Step 4: Create Hanging Holes
Make holes near both ends of the bottle so rope or wire can pass through. The holes should be strong enough to hold the weight of the bottle, wet medium, and plant. If the plastic is thin, reinforce the hanging points with extra holes, washers, or a small strip of stronger material.
Each bottle needs to hang level. If one side sits lower than the other, water and medium may collect unevenly. Before planting, test the bottle with a little water to make sure it hangs straight.
Step 5: Build the Wall Layout
The layout is what makes the final display look expensive. Instead of hanging bottles randomly, arrange them in straight rows. Keep equal spacing between each planter. Leave enough vertical space for plant leaves to grow without being crushed by the row above.
A good layout may include:
- Three to six rows
- Two or three bottles per row
- Equal spacing between rows
- Plants arranged by size
- Trailing plants on the edges
- Orchids centered for visual impact
If your balcony wall is narrow, use one vertical column. If the wall is wide, use a grid. A clean grid always looks more designed than a crowded cluster.
Step 6: Add the Right Growing Medium
The growing medium depends on the plant. For orchids, avoid heavy garden soil. Orchids usually need an airy medium that drains quickly. Bark chips, coconut husk, charcoal, and perlite can work well depending on the orchid type.
For orchids, a good mix may include:
- Orchid bark
- Charcoal pieces
- Coconut husk chips
- Perlite
- A little sphagnum moss for moisture control
Do not pack the medium too tightly. Roots need air. A loose mix helps water pass through and prevents the bottle from becoming a soggy container.
Step 7: Plant the Orchids or Small Plants
Place the plant gently into the bottle opening. Spread the roots over the medium and add more bark or soil around them. The plant should sit stable but not buried too deeply. For orchids, keep the crown above the medium to prevent rot.
For leafy plants or herbs, place the roots into the potting mix and press lightly around the base. Do not compact the soil too much. The planter should hold the plant, but the roots still need oxygen.
After planting, gently shake the bottle. If the plant wobbles too much, add a little more medium around the base or use soft garden ties for support.
Step 8: Hang the Planters Securely
Once planted, hang the bottles on the wall using strong rope, hooks, or a frame. Make sure the wall support can handle the weight after watering. Wet medium is much heavier than dry medium.
If using rope, tie strong knots and check them regularly. If using wire, avoid sharp edges that can cut into plastic. If using wall hooks, choose hooks suitable for outdoor conditions.
Safety matters, especially on balconies. A falling planter can damage plants, furniture, or people below. Keep the system secure and avoid placing heavy planters where they could fall outward.
Watering the Bottle Wall Planter
Watering should be gentle. Because the planters are shallow, they can dry faster than normal pots. However, they can also collect water if drainage is poor. The key is to water slowly and observe how quickly the medium drains.
For orchids, water when the bark begins to dry. Do not keep the bark constantly wet. For herbs and leafy plants, water when the top layer feels dry. For succulents, water much less often.
A small watering can with a narrow spout works well. A spray bottle can help refresh orchid roots and moss, but it should not replace deep watering when the medium is dry.
Light Conditions for Balcony Bottle Planters
Light is one of the most important parts of this project. A balcony can have very different conditions depending on direction, season, and building shade.
For orchids, bright indirect light is usually best. Avoid harsh afternoon sun that can burn leaves and heat the plastic bottles. Morning sun is often safer. If your balcony gets strong sun, use shade cloth or place the planter where it receives filtered light.
For leafy plants, bright indirect light works well. For succulents, more direct sun may be suitable. For ferns, choose a shaded wall with humidity and soft light.
How to Make the Display Look More Expensive
The trick to making recycled bottle planters look premium is consistency. Use the same bottle style, same hanging method, same spacing, and similar plant sizes. A repeated design makes recycled materials look intentional.
To upgrade the look:
- Use matching bottles
- Remove all labels cleanly
- Paint the bottles in one color if desired
- Use natural rope or black wire consistently
- Arrange the rows evenly
- Use the same medium on top
- Add matching plants for rhythm
- Keep the wall and balcony floor clean
For a modern look, use black rope and dark bottles. For a natural look, use jute rope and clear bottles. For a bright Mediterranean balcony, use white-painted bottles and terracotta accents.
Decor Ideas for a Balcony Garden Wall
A vertical bottle planter can become the main feature of a balcony. To make the whole area feel designed, style the surrounding space too.
Good decor pairings include:
- A small wooden bench below the wall
- Terracotta pots on one side
- A metal watering can as decor
- Outdoor string lights
- A woven outdoor rug
- Small lanterns
- Neutral cushions
- Matching plant labels
Keep the lower area simple. If the wall planter is full of greenery, the floor should not be overcrowded. Let the vertical garden be the main attraction.
Best Places to Use This Planter
This project is not only for balconies. It can work in many small outdoor areas where wall space is available.
- Apartment balconies
- Small patios
- Rooftop gardens
- Courtyard walls
- Outdoor kitchen walls
- Garden fences
- Greenhouse walls
- Sunny stairwell corners
The setup is especially useful in urban homes where outdoor space is limited. It gives you more plants without taking over the walking area.
Common Mistakes to Avoid
The most common mistake is forgetting drainage. A bottle without holes can quickly become a waterlogged container. Another mistake is using heavy soil for orchids. Orchids need air around their roots, so dense soil can cause rot.
Avoid these mistakes:
- Using bottles without drainage holes
- Hanging bottles with weak rope
- Placing orchids in heavy garden soil
- Overwatering every day
- Putting the wall in harsh direct sun
- Crowding plants too closely
- Using random bottle sizes with no layout plan
- Ignoring algae or dirty containers
- Letting dead leaves collect in the planters
- Forgetting to check knots and hooks
Continue to Page 2
Continue to page 2 for more details about this article and the key points many readers miss on the first page.