Snake plants are already one of the most stylish indoor plants you can grow. Their tall sword-shaped leaves, bold green patterns, and clean architectural lines make them perfect for modern homes, apartments, offices, balconies, and cozy indoor corners. But there is a creative styling trick that can make a simple snake plant look even more artistic: gently shaping selected leaves with soft plant ties to create curled, heart-like, or spiral-inspired forms.
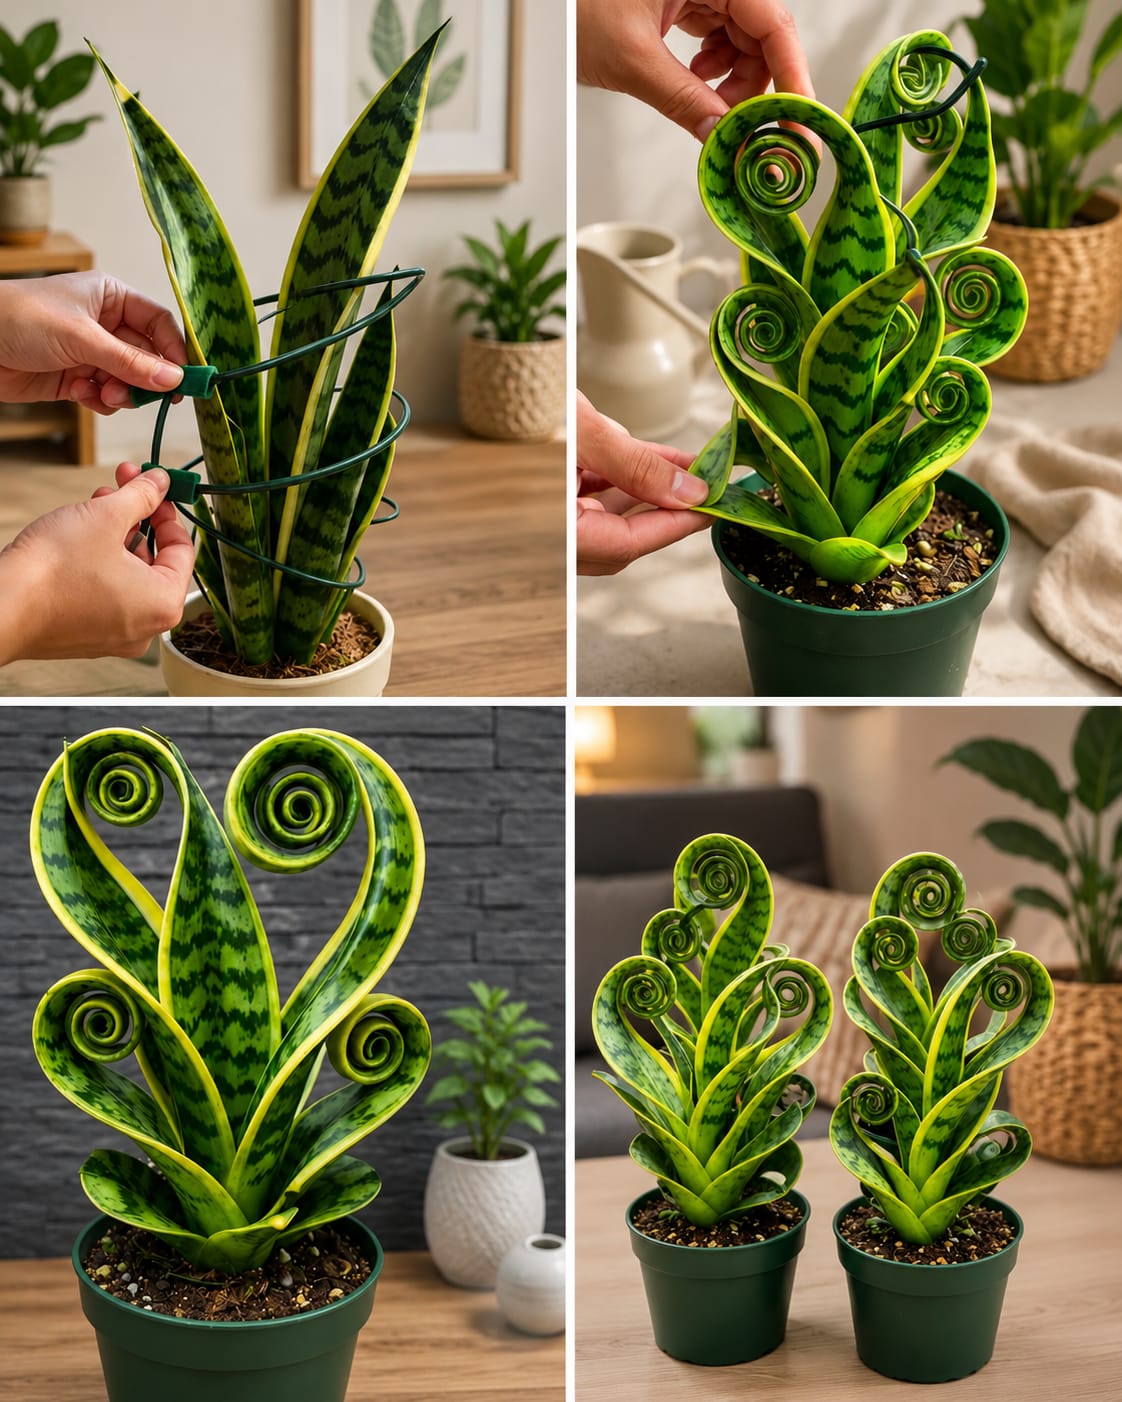
This idea is not about cutting the plant or damaging its natural beauty. In fact, the safest version of this technique is based on patience, softness, and respect for the plant’s structure. Instead of trimming leaves or forcing them into sharp bends, you guide flexible leaves gradually using soft ties, loose supports, and gentle curves. The result can look like living sculpture: a decorative snake plant with elegant loops, soft spirals, and a more expensive designer-plant appearance.
Snake plants, also known as Sansevieria or Dracaena trifasciata, are famous for being low-maintenance. They tolerate dry air, missed watering, and indoor conditions better than many houseplants. Their leaves are naturally firm, upright, and slightly flexible when healthy. This makes them ideal for simple shaping projects, as long as the method is done carefully. The most important rule is simple: do not cut healthy leaves just to create a shape. Work with the leaves the plant already has, choose younger or more flexible leaves, and shape slowly over time.
Why Shape a Snake Plant?
Most people grow snake plants in their natural upright form, and that look is beautiful. The vertical leaves create height, structure, and calm energy in a room. But shaping a snake plant can turn it into a unique decorative piece. Instead of looking like every other potted snake plant, it becomes a custom living design that feels handmade and intentional.
This technique works especially well for small snake plants, compact varieties, and plants with strong yellow-edged leaves. The yellow margins highlight the curves, making the spirals and loops more visible. When the leaves are gently curled inward, the plant can look like a green floral arrangement, a sculptural centerpiece, or a living heart-shaped display.
It is also a good idea for plant lovers who enjoy indoor styling. A shaped snake plant can become the focal point of a shelf, coffee table, desk, windowsill, plant stand, or entryway console. It adds personality without needing flowers. Because snake plants are durable, the display can last much longer than a cut flower arrangement.
The Most Important Rule: Do Not Cut Healthy Leaves
Some decorative plant tricks online involve cutting, folding, or heavily manipulating leaves. That is risky. Snake plant leaves do not heal like soft stems. If you cut a healthy leaf, the cut edge will remain visible, and the leaf will not grow a new tip. It may callus, dry, or become unattractive over time. Cutting can also expose the plant to infection if tools are not clean.
For this decorative method, do not cut the leaves. The goal is to bend and guide them gently. If a leaf is already damaged, broken, or heavily bent, you can remove it for plant health, but healthy leaves should remain whole. The beauty of this trick comes from shaping, not cutting.
Think of the process like training a vine or guiding a bonsai branch, but much softer. Snake plant leaves are thick and not as flexible as vines, so they must never be forced. A leaf that resists should be left alone. A leaf that bends naturally can be guided slowly.
Best Snake Plant Types for This Decor Trick
Not every snake plant is equally easy to shape. Tall, very mature leaves can be stiff and may crack if bent too much. Younger leaves are more flexible. Compact varieties and medium-height plants are usually easier to style.
Variegated snake plants with yellow edges are especially attractive for this project because the edge color outlines the curl. The spiral shape becomes more visible and decorative. Green-only varieties can also work, but the effect is more subtle.
Plants with many leaves growing from the base are ideal because you have more options. You can choose only a few leaves to shape while leaving others upright for balance. A plant with too few leaves may look sparse if you bend them all, so it is better to shape gradually and preserve a natural center.
What You Need
You do not need expensive tools to create this design. The best supplies are simple and gentle:
- Soft green plant ties, foam-coated wire, or flexible garden tape
- Small plant clips if needed
- A support ring, thin plant stake, or flexible wire frame
- A stable pot with drainage holes
- Well-draining soil mix
- Clean hands and patience
Avoid hard wire directly against the leaves. Hard wire can cut into the leaf surface and leave permanent marks. Soft-coated ties are safer because they hold the leaf without scraping it. If you use wire, cover it with soft tape or foam before it touches the plant.
Also avoid tight rubber bands. They can press too strongly and damage the leaf tissue. The tie should guide the leaf, not squeeze it.
Step 1: Choose a Healthy Snake Plant
Start with a plant that is healthy, firm, and well-rooted. The leaves should be upright, thick, and free from mushy spots. Do not shape a plant that is recovering from root rot, severe underwatering, pest damage, or transplant shock. A stressed plant needs recovery first.
Check the soil before beginning. If the plant is very dry and limp, water it a few days before shaping. Hydrated leaves are usually more flexible. However, do not shape immediately after heavy watering if the leaves feel overly swollen or brittle. Wait until the plant looks balanced and firm.
The best plant for this project is one that has several medium-length leaves and at least a few younger leaves near the center. Younger leaves tend to bend more easily than older outer leaves.
Step 2: Decide the Shape Before You Start
Before tying anything, imagine the final design. Do you want a heart shape? A fan shape? A soft spiral? A curled top? A sculptural arrangement with several loops? Planning helps you avoid overhandling the plant.
For beginners, the easiest style is a gentle heart shape using two flexible outer leaves. You curve one leaf toward the center from the left and another toward the center from the right. The tips can be guided inward, creating a soft heart outline. Another easy option is a simple curled tip, where only the upper part of the leaf is loosely rolled and held in place.
Do not try to shape every leaf at once. A beautiful plant design needs contrast. Leave some leaves upright so the plant keeps its natural strength and vertical structure. Shape only a few leaves to create movement.
Step 3: Bend Slowly and Gently
Hold the leaf near its base with one hand and use the other hand to guide the upper section. Do not bend sharply at one point. Instead, create a wide curve along the length of the leaf. A wide curve spreads the pressure and reduces the risk of cracking.
If the leaf resists, stop. Never force a stiff leaf. Snake plant leaves can snap or crease if pushed too far. A small crease may not kill the leaf, but it will leave a permanent mark and weaken the display.
The safest method is to shape in stages. On the first day, make only a small curve. After a week or two, adjust the tie slightly and create a deeper curve if the leaf still looks healthy. This gradual method gives the plant time to adapt.
Step 4: Use Soft Ties Without Tight Pressure
Once the leaf is in a gentle curve, secure it loosely with a soft plant tie. The tie should hold the shape but still allow slight movement. You should be able to slide a finger under the tie. If the tie cuts into the leaf, it is too tight.
Place the tie around the support, not just around the leaf. A support ring or flexible frame helps distribute tension. If you tie leaf to leaf too tightly, both leaves may be stressed. A separate support gives more control and looks cleaner.
Green ties blend nicely with the plant, but decorative ties can also be used if they are soft and not too tight. For a luxury look, keep the ties subtle. The plant should be the focus, not the materials holding it.
Step 5: Create Spiral Tips Carefully
Spiral tips are beautiful, but they require extra care. Only attempt a spiral on leaves that are flexible and long enough. Start by creating a loose curl at the tip. Do not roll it tightly. A tight roll can bruise the leaf and reduce airflow.
You can guide the tip around a soft circular object, such as a foam-covered support or a wide plant tie loop. Remove the object once the leaf holds the shape, or leave the support hidden if needed. The curve should look natural, not crushed.
Some leaves may never hold a perfect spiral, and that is fine. The design should look organic. A living plant does not need to be perfectly symmetrical to look beautiful.
Step 6: Keep the Base Strong and Natural
The base of the snake plant should remain stable. Avoid bending leaves too close to the soil line because that area supports the leaf’s weight. If the base cracks, the entire leaf may collapse. Always start shaping from the middle or upper part of the leaf.
Keep the center leaves mostly upright. The upright center creates height and keeps the plant looking full. The shaped outer leaves can frame the center like decorative ribbons. This balance makes the plant look intentional and elegant.
Step 7: Give the Plant Proper Light After Shaping
After shaping, place the snake plant in bright indirect light. Good light helps the plant maintain strong leaves and attractive color. A windowsill with filtered light is ideal. Morning sun can be fine, but harsh afternoon sun may scorch the leaves, especially if they are pressed against a window.
If the plant is kept too dark, new growth may become weak and stretched. The shaped design may also look less vibrant. Variegated snake plants need enough light to keep their yellow edges bright. Low light may not kill the plant, but it can reduce color contrast and slow growth.
Rotate the pot every few weeks so the plant grows evenly. If one side always faces the light, the leaves may lean in that direction and disturb the design.
Watering After Styling
Snake plants prefer to dry out between waterings. This is especially important after shaping because a stressed or overwatered plant is more likely to develop soft leaves. Let the soil dry at least halfway down before watering again. In many homes, this means watering every two to four weeks, depending on temperature, light, pot size, and soil mix.
Water thoroughly, then let the excess drain completely. Do not allow the pot to sit in standing water. Root rot is one of the biggest risks for snake plants. A beautiful decorative shape will not last if the roots are unhealthy.
During winter, water less often. Snake plants grow more slowly in cooler months and do not use moisture as quickly.
Best Soil for a Decorative Snake Plant
A shaped snake plant still needs excellent drainage. Use a cactus or succulent mix, or create your own by mixing potting soil with perlite, pumice, coarse sand, or orchid bark. The goal is a soil that drains quickly and does not stay soggy.
A heavy indoor potting mix can hold too much moisture. If the soil feels dense, compact, or muddy after watering, improve the mix. Healthy roots help the leaves stay firm, and firm leaves hold decorative shapes better.
A pot with drainage holes is essential. Decorative cover pots are fine, but the inner pot should drain properly. If using a cover pot, remove the inner pot after watering and let it drain before placing it back.
How Long Does the Shape Last?
The shape can last for weeks or months if the leaf adapts and the ties remain in place. Some leaves may slowly return toward their original position when ties are removed. Others may keep a gentle curve. The result depends on leaf age, thickness, hydration, light, and how gradually the shaping was done.
Check the ties every two weeks. As the plant grows, ties can become tight. Loosen or adjust them to prevent marks. If a leaf shows stress, remove the tie and let it relax.
This is not a one-time project. It is a living display that may need small adjustments over time.
Common Mistakes to Avoid
Forcing stiff leaves: This can cause cracks, creases, or breakage. Shape only flexible leaves.
Using tight ties: Tight ties can cut into the leaf and leave scars. Always tie loosely.
Shaping too many leaves: The plant may look crowded or stressed. Keep some leaves natural.
Cutting healthy leaves: This is unnecessary and can ruin the plant’s clean appearance.
Overwatering after styling: Too much moisture weakens roots and can make leaves soft.
Using heavy wire without protection: Hard materials can damage the leaf surface.
Continue to Page 2
Continue to page 2 for more details about this article and the key points many readers miss on the first page.