Monstera plants have become some of the most loved indoor plants in modern homes, and for good reason. Their large, glossy leaves, tropical appearance, and impressive growth habit make them a stunning addition to living rooms, offices, bedrooms, and indoor garden spaces. One of the most exciting things about growing a Monstera is that it can be propagated from healthy stem cuttings, allowing plant lovers to create entirely new plants from an existing one.
Water propagation is among the simplest and most rewarding ways to multiply a Monstera. With patience, proper care, and the right environment, healthy roots can develop from stem cuttings, eventually creating strong new plants ready for potting. This method has become especially popular because it allows gardeners to observe root development directly while creating beautiful decorative displays during the propagation process.
Whether you are new to indoor gardening or already have experience with tropical houseplants, understanding how to propagate Monstera successfully can help you expand your collection while enjoying the fascinating growth process from start to finish.
Why Monstera Plants Are So Popular
Monstera plants are prized for their dramatic foliage and relatively easy-care nature. Their distinctive split leaves create an elegant tropical look that complements both modern and traditional interior designs.
Unlike many houseplants that remain compact, Monsteras can become impressive statement plants over time. With proper care, they often produce larger leaves and stronger stems as they mature.
Their adaptability to indoor conditions makes them ideal for homes, apartments, offices, and indoor plant collections.
Understanding Monstera Growth
To propagate Monstera successfully, it helps to understand how the plant grows naturally.
Monstera plants grow from stems that contain nodes. These nodes are essential growth points where roots, leaves, and new stems can emerge. Without a node, a cutting may remain green for some time but will not develop into a complete plant.
Nodes are often easy to identify because they appear as slightly thicker areas along the stem. Aerial roots frequently emerge from these locations as well.
When propagating, selecting a healthy cutting with at least one node is the most important step.
Benefits of Water Propagation
Water propagation offers several advantages that make it especially appealing for indoor gardeners.
- You can easily monitor root development.
- It requires very little equipment.
- Cuttings often establish roots quickly.
- The process is visually rewarding.
- Propagated cuttings can serve as decorative displays.
- Root health is easier to observe compared to soil propagation.
Many plant enthusiasts enjoy watching roots gradually develop and expand inside clear glass containers.
Selecting the Right Cutting
Successful propagation begins with selecting healthy plant material.
Choose a mature stem that shows vigorous growth and healthy leaves. Avoid stems that appear damaged, diseased, or excessively stressed.
The ideal cutting should include:
- At least one healthy node.
- One or more leaves.
- A firm stem.
- No signs of rot or disease.
Healthy cuttings typically establish roots more quickly and transition successfully into new plants.
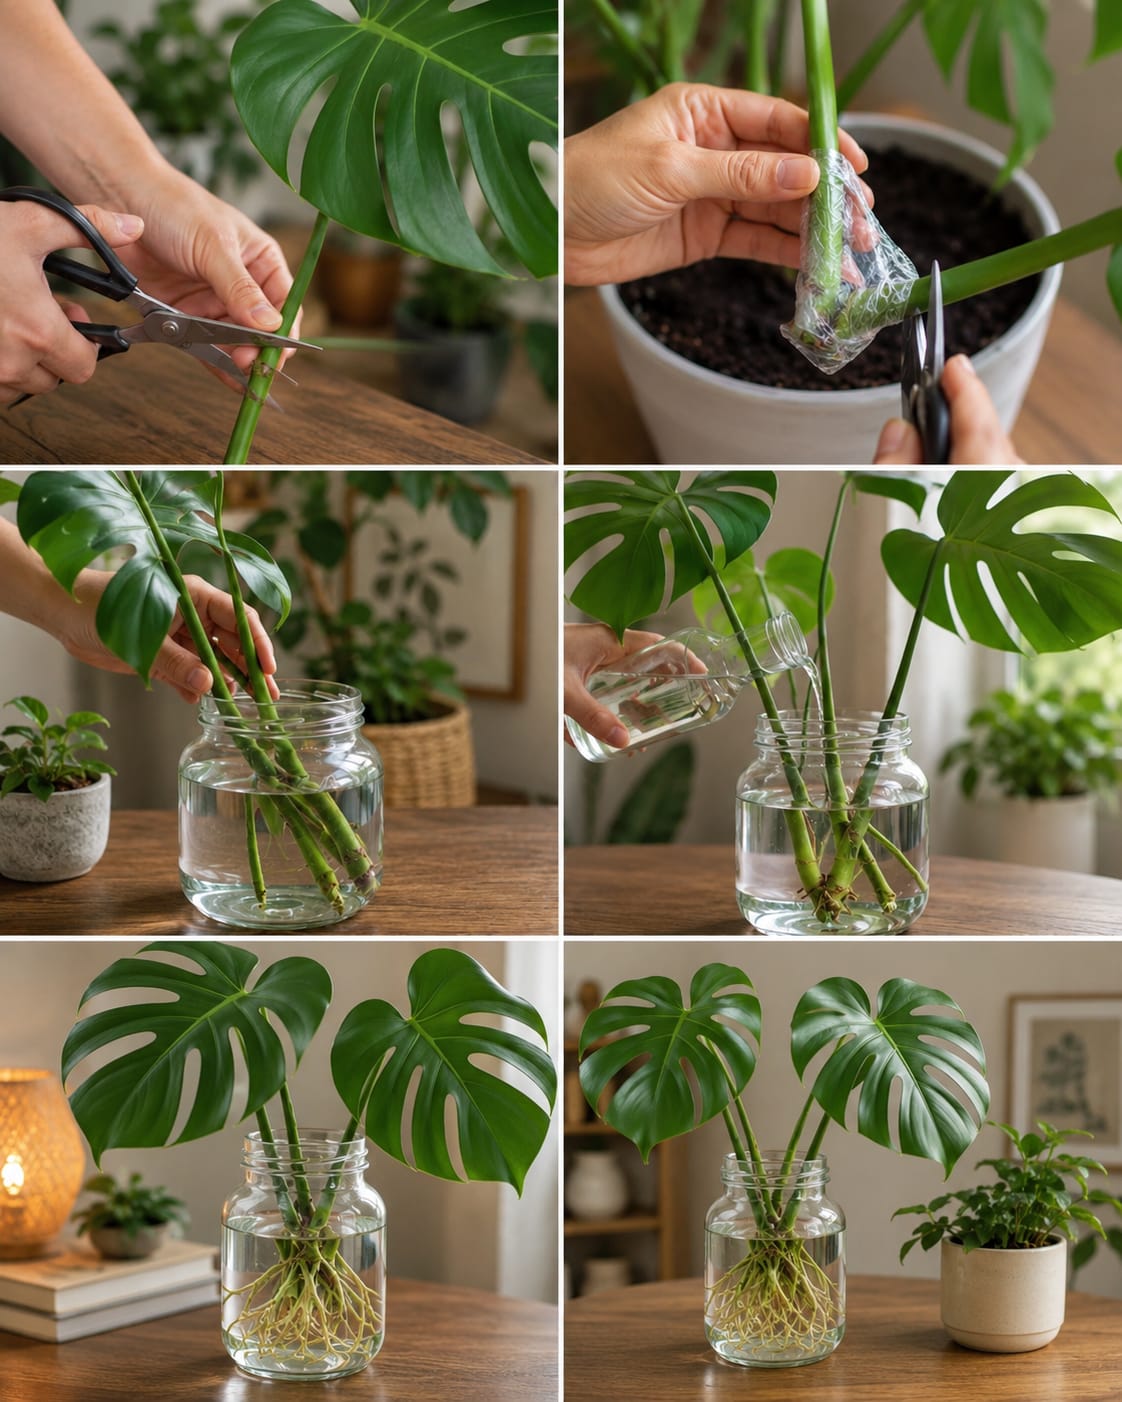
Making a Clean Cut
Always use clean, sharp pruning tools when taking cuttings.
A clean cut minimizes plant stress and reduces the risk of introducing disease-causing organisms.
Many gardeners disinfect their pruning tools before use to create the healthiest possible conditions for propagation.
After cutting, allow the stem to remain dry briefly before placing it into water.
Choosing the Right Container
Glass jars are popular choices for water propagation because they allow roots to be monitored easily.
Clear containers also create attractive decorative displays that showcase the entire propagation process.
Select a container large enough to support the cutting without crowding the developing roots.
The node should remain submerged while the leaves stay above the water surface.
Using Clean Water
Fresh clean water is essential during propagation.
Many indoor gardeners use filtered water, rainwater, or tap water that has been allowed to sit for several hours before use.
The goal is simply to provide a clean environment where roots can develop comfortably.
Water quality often influences the overall success of the propagation process.
Providing Proper Light
Light plays a major role in rooting success.
Monstera cuttings generally perform best in bright indirect light. This type of lighting supports photosynthesis without exposing the cutting to harsh direct sunlight.
Strong direct sun can overheat the water, stress the cutting, and potentially damage leaves.
A location near a bright window with filtered light often provides excellent conditions.
Maintaining Stable Temperatures
Warm temperatures encourage root formation.
Monstera plants originate from tropical environments and generally appreciate temperatures between 65°F and 85°F (18°C to 29°C).
Avoid placing cuttings near air-conditioning vents, drafty windows, or heating units.
Stable temperatures help maintain consistent growth conditions.
How Long Root Development Takes
Patience is important during water propagation.
Root formation may begin within a few weeks, but development speed varies depending on temperature, light levels, and cutting health.
Some cuttings produce roots quickly, while others require additional time.
Consistency usually matters more than speed.
Changing the Water
Regular water changes help maintain a healthy environment.
Replacing the water every few days helps reduce stagnation and keeps oxygen levels higher around developing roots.
Fresh water also minimizes the buildup of unwanted microorganisms.
This simple maintenance step often improves propagation success.
Recognizing Healthy Roots
Healthy Monstera roots generally appear white, cream-colored, or light tan.
They should look firm and vigorous rather than dark, mushy, or slimy.
As roots grow longer and begin branching, the cutting becomes increasingly capable of supporting itself.
Strong root systems provide a solid foundation for future growth.
When to Transfer to Soil
Many gardeners choose to transfer propagated Monsteras into soil once multiple roots have developed.
Roots several inches long often indicate that the cutting is ready for the next stage.
Moving too early may stress the cutting, while waiting slightly longer can provide additional stability.
The timing depends largely on root development rather than a specific calendar date.
Choosing the Right Potting Mix
Monsteras prefer well-draining growing media that provide both moisture retention and airflow.
A quality indoor tropical plant mix often includes ingredients such as:
- Potting soil
- Perlite
- Orchid bark
- Coco coir
- Pumice
This combination helps create an environment where roots can thrive.
Transitioning From Water to Soil
Newly rooted cuttings require a gentle transition.
After planting, keep the soil lightly moist while the roots adjust to their new environment.
Avoid allowing the soil to become waterlogged.
Gradually, the cutting will adapt and begin functioning as a fully established plant.
Continue to Page 2
Continue to page 2 for more details about this article and the key points many readers miss on the first page.