Snake plants are among the easiest and most stylish houseplants you can grow indoors. Their tall sword-like leaves, bold green patterns, yellow edges, and upright shape make them perfect for living rooms, bedrooms, offices, kitchens, hallways, shelves, and cozy plant corners. They look modern, clean, and dramatic without needing constant attention.
Even though snake plants are known for being low-maintenance, they still need the right potting setup to stay healthy. Over time, the soil can become compacted, roots can become crowded, and the plant can outgrow its container. When this happens, repotting gives the plant a fresh start. A good repotting routine can improve drainage, reduce root stress, prevent rot, and help the plant grow stronger leaves.
Repotting a snake plant is not difficult, but it must be done carefully. Snake plants have thick roots and underground rhizomes that store water. Because of this, they do not like heavy wet soil. The most common mistake is moving a snake plant into a large decorative pot with dense soil and too much water. That can cause yellow leaves, soft bases, and root rot.
This guide explains how to repot a snake plant step by step, how to choose the best pot, how to prepare the best soil mix, how to divide crowded plants, how to water after repotting, how to avoid root rot, and how to style snake plants beautifully indoors. The goal is simple: give the plant fresh support without disturbing it more than necessary.
Why Snake Plants Need Repotting
Snake plants grow slowly, but their roots and rhizomes can become crowded over time. A crowded snake plant may push against the sides of the pot, crack plastic containers, or become difficult to water properly. Old soil can also lose structure and stop draining well.
Repotting gives the plant fresh soil, more airflow around the roots, and enough room for healthy new growth. It also gives you a chance to inspect the roots and remove any damaged sections before problems spread.
Signs Your Snake Plant Needs Repotting
- Roots are coming out of drainage holes.
- The pot is cracked or bulging.
- The plant dries out very quickly after watering.
- The soil has become hard and compacted.
- The plant is top-heavy and unstable.
- Leaves are crowded tightly together.
- Water runs straight through without soaking the soil.
- The plant has not been repotted for several years.
- There are soft or damaged roots that need inspection.
- You want to divide the plant into smaller sections.
You do not need to repot a snake plant every year. In fact, snake plants often enjoy being slightly snug in their pots. Repot only when the plant clearly needs it or when the soil has become unhealthy.
Best Time to Repot a Snake Plant
The best time to repot a snake plant is spring or early summer. This is when the plant is entering active growth and can recover more quickly. Warm temperatures and stronger light help roots settle into the new soil.
You can repot in fall or winter if the plant has root rot or an emergency problem, but avoid unnecessary repotting during cold months. Growth is slower then, and wet soil can stay damp longer.
What You Need Before Repotting
- A new pot with drainage holes
- Fresh well-draining soil mix
- Perlite, pumice, or coarse sand
- Clean scissors or pruning shears
- A small trowel or spoon
- Gloves, optional
- A clean work surface
- A saucer for the pot
- Water for later use
Prepare everything before removing the plant from its old pot. This keeps the process smooth and reduces stress on the roots.
Best Pot for Snake Plants
The best pot for a snake plant has drainage holes. This is not optional. Snake plants hate sitting in water, and a pot without drainage can quickly cause root rot.
Terracotta pots are excellent because they allow moisture to evaporate faster. Ceramic pots are beautiful for indoor decor, but they must have drainage. Plastic pots are lightweight and affordable, but they hold moisture longer, so you need to water more carefully.
Choose a pot only 1 to 2 inches wider than the current root ball. A pot that is too large holds extra soil, and extra soil holds extra moisture. That can be dangerous for snake plants.
Best Soil for Snake Plants
Snake plants need loose, fast-draining soil. Regular indoor potting soil alone can stay too wet, especially in large pots or low-light rooms. A better mix includes gritty materials that help water drain and keep air around the roots.
Simple Snake Plant Soil Mix
- 2 parts cactus or succulent soil
- 1 part perlite or pumice
- 1 part coarse sand or orchid bark
The soil should feel light, crumbly, and airy. It should not feel sticky, muddy, or dense. If water sits on top for too long, the soil is too heavy.
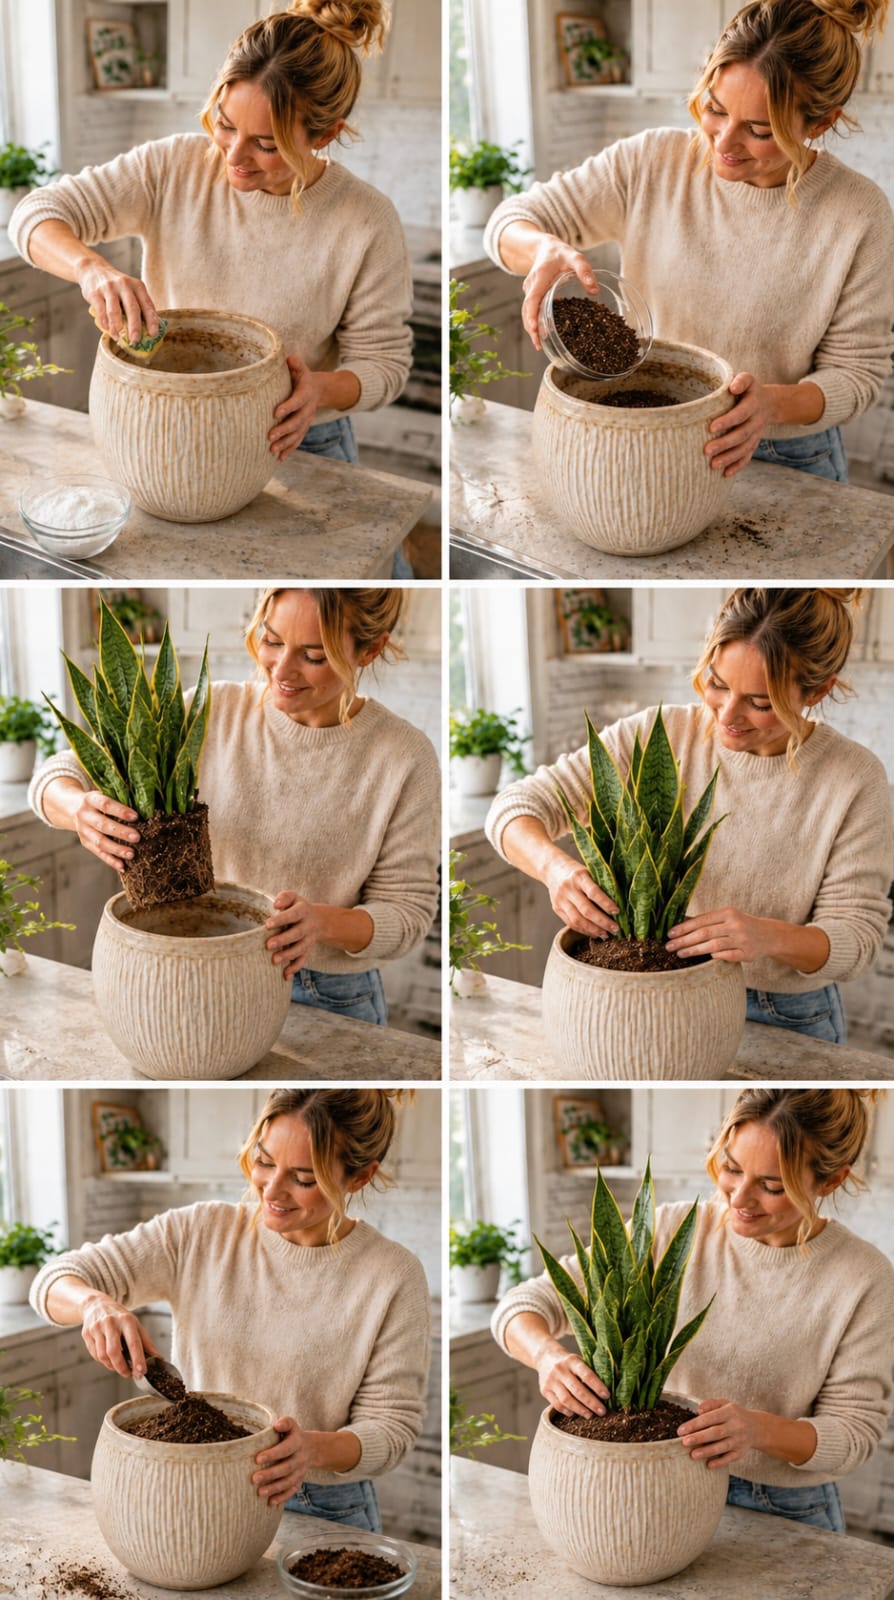
Step 1: Prepare the New Pot
Start by choosing a clean pot with drainage holes. Add a small layer of fresh soil to the bottom. Do not fill the pot too high yet. You need enough space to place the snake plant root ball at the correct depth.
The plant should sit at the same level it was growing before. Do not bury the leaves deeply. Soil packed around the leaf bases can trap moisture and lead to rot.
Step 2: Add Fresh Soil Mix
Pour some fresh soil into the pot. If you are using a decorative pot, make sure the inner pot can drain freely. Do not place rocks at the bottom as a drainage replacement. Rocks do not fix drainage problems if the pot has no hole.
Good drainage comes from the pot opening and the soil mix itself.
Step 3: Remove the Snake Plant From the Old Pot
Hold the base of the plant gently and tilt the pot. If the plant does not slide out, squeeze the pot slightly or tap the sides. For ceramic pots, loosen the edges with a small tool. Avoid pulling hard on the leaves because they can break away from the roots.
If the plant is extremely root-bound, you may need to cut a plastic pot away. This is better than tearing the roots.
Step 4: Inspect the Roots
Once the plant is out, look carefully at the roots and rhizomes. Healthy roots are firm and usually white, tan, or light orange. Healthy rhizomes are thick and firm.
Rotten roots are soft, black, brown, mushy, or smelly. Remove any damaged roots with clean scissors. If the base of a leaf is soft or rotten, remove that damaged section too.
Step 5: Loosen the Root Ball
If the roots are tightly wrapped around the soil, loosen them gently with your fingers. You do not need to remove every bit of old soil unless the soil is rotten or compacted. Remove enough old soil to help the roots spread into the new mix.
Be gentle. Snake plants are tough, but rough handling can break roots and delay recovery.
Step 6: Place the Plant in the New Pot
Set the snake plant into the new pot. Hold it upright while adding soil around the sides. Keep the leaves straight and the root ball centered.
The top of the root ball should sit slightly below the rim of the pot. This leaves room for watering without soil spilling over.
Step 7: Fill Around the Roots
Add soil around the plant little by little. Press gently to remove large air pockets, but do not pack the soil tightly. Roots need oxygen.
Make sure the plant feels stable. If the plant leans, add soil around the base and press lightly. Do not bury the leaves too deeply just to make the plant stand upright.
Step 8: Wait Before Watering
This is one of the most important steps. After repotting, wait 3 to 7 days before watering if the roots were disturbed or trimmed. This gives small root injuries time to dry and reduces the risk of rot.
If the root ball was moved gently and the soil was very dry, you can water lightly after a day or two. But for most snake plants, waiting is safer.
Step 9: Water Carefully After Repotting
When it is time to water, water slowly and evenly until excess drains from the bottom. Empty the saucer after watering. Do not water again until the soil dries completely or almost completely.
Snake plants prefer a deep watering followed by a dry period. They do not like frequent small sips.
How Often to Water After Repotting
After repotting, water less often than you think. The plant needs time to settle. In bright warm conditions, it may need water every 2 to 4 weeks. In cooler or darker rooms, it may need water every 4 to 6 weeks or longer.
Always check the soil first. If the soil is still damp, wait.
Signs Your Snake Plant Needs Water
- The soil is dry all the way down.
- The pot feels light.
- Leaves look slightly thinner.
- Leaves may curl inward slightly.
- The plant has not been watered for several weeks.
Do not wait until the plant is severely wrinkled every time. But do let the soil dry well before watering again.
Signs of Overwatering After Repotting
- Leaves turn yellow.
- Leaf bases become soft.
- The plant smells sour.
- Soil stays wet for many days.
- Leaves fall over suddenly.
- Roots become black or mushy.
- Small flies appear around the soil.
If these signs appear, stop watering immediately and check the roots. Repot into dry fresh soil if rot is present.
How to Divide a Snake Plant During Repotting
Repotting is a good time to divide a large snake plant. Division means separating the plant into smaller sections, each with roots and leaves.
Division Steps
- Remove the plant from the pot.
- Brush away loose soil.
- Find natural sections connected by rhizomes.
- Separate gently with your hands.
- Use a clean knife if the rhizomes are tough.
- Make sure each section has roots.
- Let cut areas dry for a day if needed.
- Plant each section in its own pot.
Do not divide into pieces that are too small. Larger sections recover faster.
How to Handle Damaged Leaves
If a snake plant has damaged, cracked, or yellow leaves, you can remove them during repotting. Cut damaged leaves near the soil line using clean scissors. Do not remove too many healthy leaves at once because the plant needs them for energy.
If a leaf is only slightly damaged, you can leave it. Snake plants grow slowly, so every healthy leaf helps.
Can You Propagate Leaves After Repotting?
Yes. Healthy leaf cuttings can be propagated in water or soil. However, variegated snake plants with yellow edges may lose their yellow edges when propagated from leaf cuttings. Division is better if you want to keep the same variegation.
To propagate by leaf cutting, cut a healthy leaf into sections, let the cut ends dry for a day or two, then place them in well-draining soil. Keep the soil lightly moist, not wet.
Best Light After Repotting
After repotting, place the snake plant in bright indirect light. Avoid harsh direct sun for the first week or two. Bright indirect light helps recovery without stressing the leaves.
Snake plants can tolerate low light, but they grow better in brighter conditions. More light also helps soil dry faster, which lowers the risk of root rot.
Should You Fertilize After Repotting?
Do not fertilize immediately after repotting. Fresh soil already gives the roots a new environment, and fertilizer can stress damaged roots. Wait at least 4 to 6 weeks before feeding.
During spring and summer, you can use a diluted cactus or houseplant fertilizer once every 6 to 8 weeks. Do not fertilize in winter when growth slows.
How to Prevent Transplant Shock
Snake plants usually handle repotting well, but they can still experience stress. To reduce transplant shock, avoid overwatering, keep the plant warm, provide bright indirect light, and do not move it around too much.
Some leaves may lean slightly after repotting. Give the plant time to settle. If needed, support tall leaves gently until the soil firms around the roots.
Common Repotting Mistakes
- Using a pot without drainage holes
- Choosing a pot that is too large
- Using heavy wet soil
- Watering immediately after root trimming
- Burying leaves too deeply
- Packing soil too tightly
- Fertilizing right away
- Keeping the plant in a dark corner after repotting
- Ignoring rotten roots
- Dividing the plant into weak tiny pieces
How to Fix a Snake Plant That Leans After Repotting
If the plant leans, the root ball may not be stable yet. Add more soil around the base and press gently. Make sure the plant is not buried too deeply. You can also use a small stake temporarily, but remove it once the plant is stable.
If the leaves are soft and leaning, check for overwatering or root damage.
How to Fix Yellow Leaves After Repotting
Yellow leaves after repotting may come from root stress, overwatering, old damage, or low light. Check the soil first. If it is wet, stop watering. If the plant is in a dark spot, move it to brighter indirect light.
Fully yellow leaves will not turn green again. Remove them if they are soft or unattractive.
Continue to Page 2
Continue to page 2 for more details about this article and the key points many readers miss on the first page.