Peace lilies are beautiful indoor plants, but they can quickly look tired when their roots are crowded, the soil is old, or the watering routine is not right. A peace lily with yellow leaves, pale growth, weak flowers, dry tips, or drooping stems is usually not asking for one magic ingredient. It is asking for better root care, fresh soil, proper drainage, softer watering, and brighter indirect light.
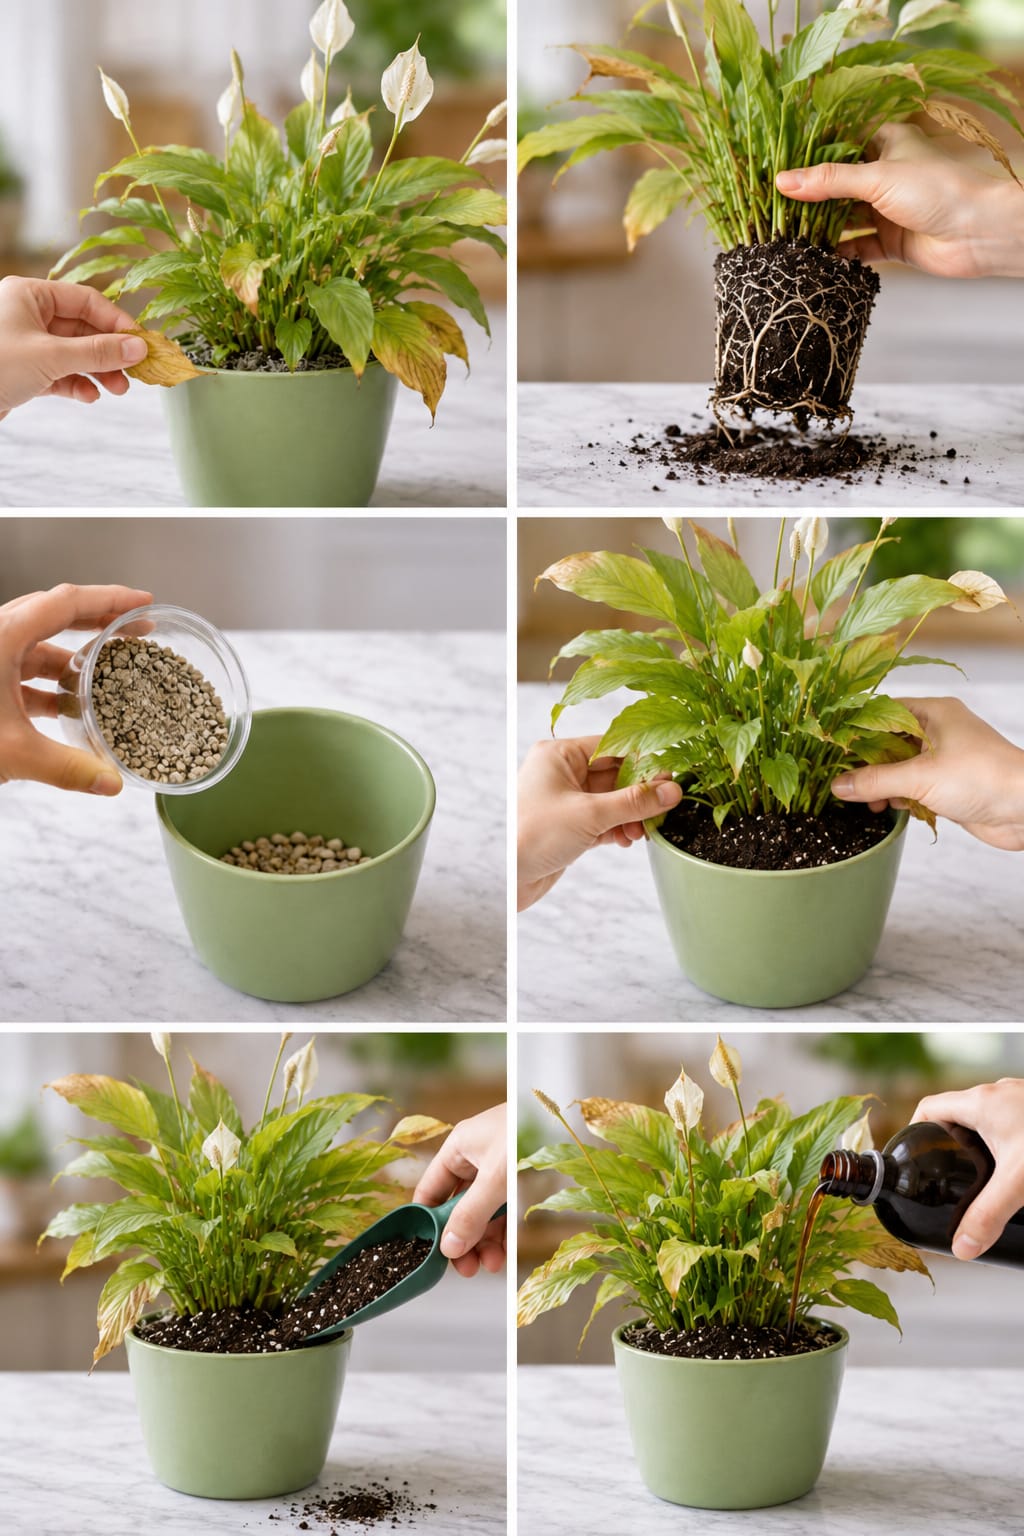
The image shows a complete peace lily rescue and repotting routine. First, the plant is checked for yellowing leaves. Then it is removed from the old pot so the root ball can be inspected. A new pot is prepared with a drainage layer. The plant is placed back into fresh soil. More potting mix is added around the roots. Finally, a liquid plant supplement is poured carefully into the soil to help the plant recover.
This guide explains how to repot a weak peace lily safely, how to handle yellow leaves, how to inspect roots, how to choose the right pot, how to use pebbles correctly, how to refresh the soil, how to water after repotting, and how to help the plant return to glossy green growth and white blooms.
Why Peace Lilies Start Looking Weak
A peace lily can decline for many reasons. The most common causes are overwatering, poor drainage, compacted soil, low light, crowded roots, dry air, fertilizer buildup, or sudden temperature changes. Yellow leaves are often the first sign that something is wrong below the surface.
Many people add fertilizer when they see yellow leaves, but that is not always the right solution. If the roots are sitting in wet soil, fertilizer can make the problem worse. If the soil is compacted, water cannot move properly. If the pot has no drainage, the roots may be suffocating. Repotting gives you a chance to check the roots and rebuild the plant’s growing environment.
Signs Your Peace Lily Needs Repotting
- Leaves are turning yellow even with normal watering.
- The plant droops often.
- Roots are circling tightly around the soil ball.
- The soil stays wet for too many days.
- The pot smells sour or musty.
- Water runs straight through without soaking evenly.
- The plant has stopped blooming.
- The soil looks compacted or old.
- Roots are growing from the drainage holes.
- The plant dries out too quickly after watering.
Step 1: Check the Yellow Leaves
Before repotting, look closely at the yellow leaves. A few older yellow leaves are normal. Peace lilies naturally shed older leaves as new growth appears. But if many leaves are yellowing at once, the plant may be stressed.
Yellow leaves near the bottom often come from age, underwatering, or root stress. Yellow leaves all over the plant usually point to overwatering, poor soil, or lack of nutrients. Brown tips may come from dry air, fertilizer buildup, hard water, or inconsistent watering.
Remove fully yellow or brown leaves with clean scissors. Cut near the base, but do not pull hard. Pulling can damage healthy stems.
Step 2: Remove the Peace Lily From the Pot
Hold the plant gently near the base and slide it out of the old pot. If the plant is stuck, squeeze the sides of the pot or tap the bottom. Do not yank the leaves. Peace lily stems can snap easily.
Once the plant is out, inspect the root ball. This is the most important part of the rescue process. The roots tell you what the plant really needs.
Healthy Roots vs Rotten Roots
Healthy peace lily roots are firm and usually white, cream, tan, or light brown. They may wrap around the soil ball if the plant is root-bound. Rotten roots are black, mushy, slimy, and may smell bad.
If you find rotten roots, trim them with clean scissors. Remove any sour, wet, or compacted soil. Do not repot rotten roots back into the same old mix.
Step 3: Prepare the New Pot
Choose a pot with drainage holes. This is very important. Peace lilies like moisture, but they cannot sit in standing water. A pot without drainage can cause root rot even if you water carefully.
The new pot should be only slightly larger than the root ball. A huge pot holds too much soil, and extra soil holds extra water. This can keep the roots wet for too long.
Should You Add Pebbles to the Bottom?
The image shows pebbles being added to the pot. Pebbles can add weight and help keep the pot stable. They can also stop soil from falling out of large drainage holes. But pebbles do not replace drainage holes.
If your pot has drainage holes, a small pebble layer is fine. If your pot has no drainage holes, pebbles will not fix the problem. Water will still collect at the bottom. For peace lilies, drainage holes are safer than relying on stones.
Step 4: Choose the Right Soil
Peace lilies need soil that holds light moisture but still drains well. Heavy garden soil is not good for indoor peace lilies. It can become compacted and suffocate the roots.
Best Peace Lily Soil Mix
- 2 parts indoor potting mix
- 1 part perlite
- 1 part coco coir or peat moss
- A small handful of orchid bark, optional
This mix gives the roots both moisture and air. The soil should feel soft and loose, not muddy or sticky.
Step 5: Place the Peace Lily in the New Pot
Add a little soil over the pebble layer, then place the peace lily into the pot. Keep the crown of the plant slightly above the soil line. The crown is where the stems meet the roots. Do not bury it deeply because trapped moisture around the crown can cause rot.
Hold the plant upright while adding fresh soil around the root ball. Press gently, but do not pack the soil tightly. Roots need oxygen.
Step 6: Add Fresh Soil Around the Roots
Use a scoop or small trowel to add fresh soil around the sides of the plant. Fill empty spaces carefully. Tap the pot lightly to settle the soil, but avoid hard pressing.
Leave a little space at the top of the pot so watering is easier. If soil is filled to the rim, water may spill over before soaking in.
Step 7: Water After Repotting
After repotting, water gently. The goal is to settle the soil around the roots, not flood the pot. Water until some liquid drains from the bottom. Then empty the saucer.
If you trimmed many rotten roots, water lightly rather than heavily. Damaged roots need oxygen and time to heal.
About the Brown Liquid in the Image
The brown liquid in the image could represent a diluted plant supplement, compost tea, worm casting tea, seaweed extract, or liquid fertilizer. These can help a peace lily after it has recovered, but they should be used carefully.
Do not pour strong fertilizer on a freshly stressed peace lily. If the roots were damaged, wait 4 to 6 weeks before feeding. If the plant was simply repotted with healthy roots, you can use a very diluted supplement, but plain water is usually enough at first.
Safe Feeding After Repotting
- Wait 4 to 6 weeks after repotting before regular feeding.
- Use half-strength or quarter-strength fertilizer.
- Feed only during spring and summer.
- Do not fertilize wet soil.
- Do not fertilize a plant with root rot.
- Flush soil occasionally if salt buildup appears.
How to Encourage New Green Leaves
After repotting, the peace lily may pause for a short time. This is normal. The roots are adjusting. Give steady care and avoid moving the plant too much.
To encourage new leaves, place the plant in bright indirect light, keep the soil lightly moist, avoid cold drafts, and clean the leaves. New growth usually appears once the roots feel stable again.
Best Light for a Recovering Peace Lily
Peace lilies can tolerate low light, but they recover and bloom better in bright indirect light. Place the plant near a bright window with filtered sunlight. Avoid harsh direct sun because it can burn weak leaves.
An east-facing window is ideal. A bright north-facing window can also work. If you have a south or west window, use a sheer curtain.
How Often to Water After Repotting
Water when the top inch of soil feels slightly dry. Do not follow a strict calendar. The pot size, soil mix, room temperature, and light level all affect watering.
Peace lilies like evenly moist soil, but not soggy soil. If the plant droops and the soil is dry, water it. If the plant droops and the soil is wet, check the roots.
Signs of Underwatering
- Leaves droop dramatically.
- Soil is dry and pulling away from the pot.
- Pot feels very light.
- Leaves look limp but not yellow.
- Plant perks up after watering.
Signs of Overwatering
- Yellow leaves
- Soft stems
- Wet soil for many days
- Sour smell
- Fungus gnats
- Black mushy roots
- Drooping even when soil is wet
How to Prevent Root Rot
- Use a pot with drainage holes.
- Use loose, airy soil.
- Water only when the top inch begins to dry.
- Empty the saucer after watering.
- Do not bury the crown.
- Keep the plant in bright indirect light.
- Do not let the pot sit in water.
- Repot if soil becomes sour or compacted.
How to Make Peace Lily Bloom Again
Repotting alone does not guarantee blooms. White flowers appear when the plant has enough light and energy. After the plant recovers, move it to a brighter indirect-light location if it has not bloomed in months.
Bloom Support Tips
- Give bright indirect light.
- Keep roots healthy.
- Use a pot with drainage.
- Feed lightly during active growth.
- Remove old flowers.
- Clean dusty leaves.
- Keep humidity moderate.
- Avoid cold drafts.
Should You Remove Old Peace Lily Flowers?
Yes. Old flowers turn green, brown, or dry over time. Cut old flower stems near the base with clean scissors. This helps the plant focus energy on new leaves and future blooms.
How to Clean Peace Lily Leaves
Peace lily leaves collect dust easily. Dust blocks light and makes leaves look dull. Wipe them with a soft damp cloth every few weeks. Support each leaf while wiping so it does not tear.
Clean leaves help the plant absorb light better. Better light means better growth and stronger blooming potential.
Continue to Page 2
Continue to page 2 for more details about this article and the key points many readers miss on the first page.