Orchids are some of the most elegant flowering plants you can grow indoors. Their smooth green leaves, graceful flower spikes, and long-lasting blooms make them a favorite for windowsills, plant shelves, living rooms, kitchens, offices, and bright indoor corners. A healthy orchid can bloom for weeks, sometimes months, when the care routine is right. But when an orchid stops blooming, loses roots, or looks tired, many home gardeners begin searching for a simple natural trick to bring it back.
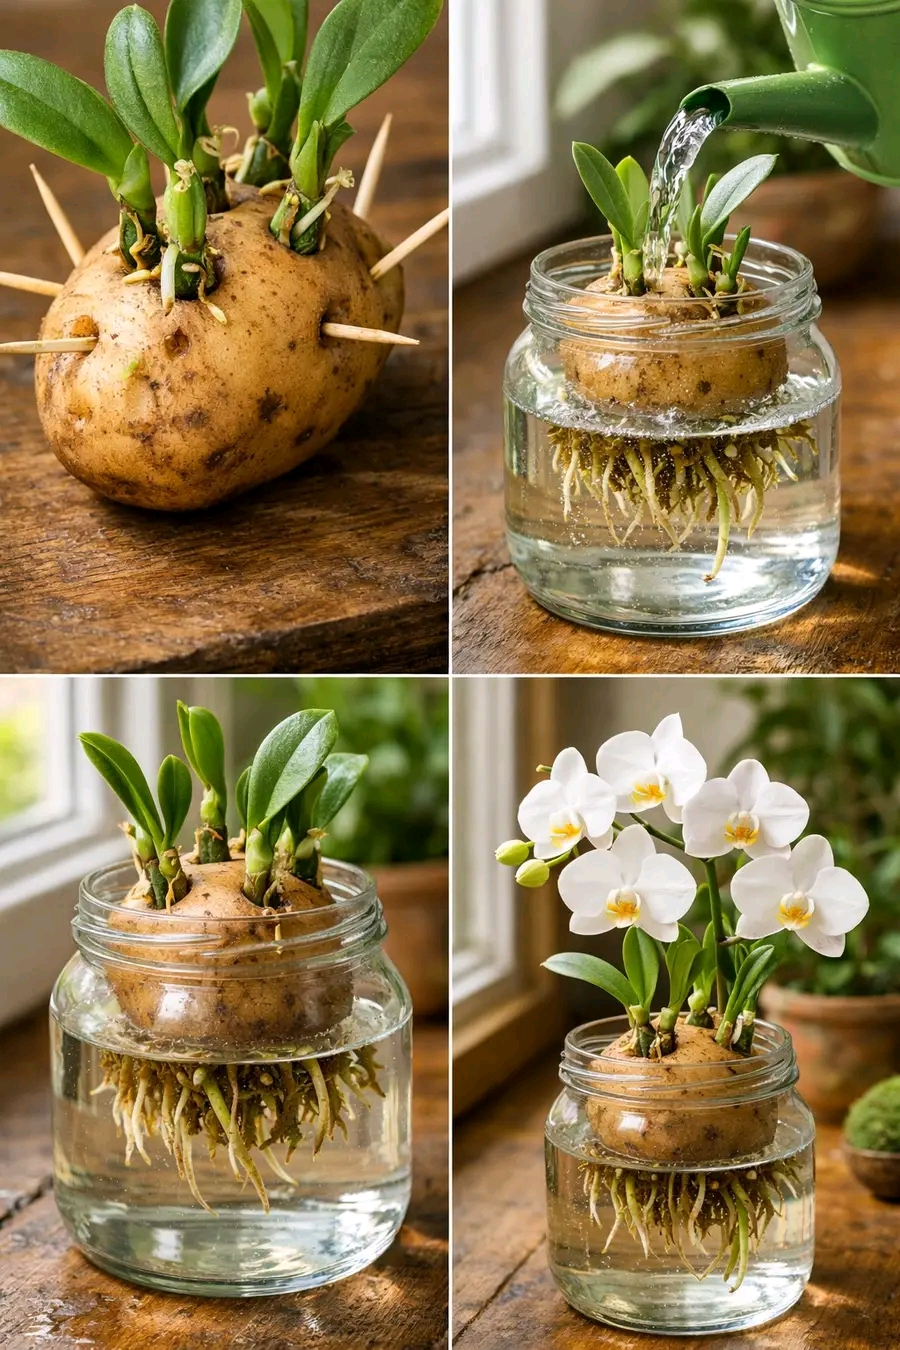
The image shows a creative orchid-growing idea using a potato, toothpicks, water, and a glass jar. The orchid pieces appear attached to a potato, the potato is held above water, roots grow downward, and eventually white orchid flowers appear. This kind of method looks exciting because it suggests that a simple potato can help orchids root faster and bloom beautifully. It is a popular visual plant hack, but it must be understood carefully. Orchids are sensitive plants, and not every viral method is safe for long-term orchid health.
A potato can hold moisture and contains starch, but it is not a true orchid potting medium. If a potato stays wet too long, it can rot, smell bad, attract fungus gnats, grow mold, and damage orchid roots. For that reason, this method should be treated as a short-term rooting experiment, not a permanent orchid-growing system. The safest long-term way to grow orchids is still fresh orchid bark, good airflow, proper watering, bright indirect light, and gentle orchid fertilizer.
This complete guide explains what the potato method is, how to try it safely, when to avoid it, how to protect orchid roots from rot, how to move the orchid into proper bark, how to encourage more flowers, and how to keep orchids healthy indoors for years.
What Is the Potato Method for Orchids?
The potato method is a homemade rooting idea where small orchid divisions, keikis, or weak orchid pieces are placed into or near a potato. The potato is usually suspended above water using toothpicks, similar to the classic avocado seed method. The idea is that the potato provides moisture support while roots grow downward into the water or humid air.
Some people believe the potato helps because it contains natural moisture and carbohydrates. However, orchids do not normally grow inside potatoes. Most common indoor orchids, especially Phalaenopsis orchids, are epiphytes. This means they naturally grow attached to trees, not buried in soil or soft vegetable material. Their roots need air. If the roots are smothered by wet potato flesh, they can rot quickly.
Important Reality Check
The image is beautiful, but the method should not be copied blindly. A potato can rot faster than orchid bark. It can also ferment in water. If you try this method, keep it very clean, watch it daily, and use it only as a temporary rooting support. Once the orchid has healthy roots, move it into a proper orchid potting mix.
The goal is not to grow an orchid forever on a potato. The goal is to support root development for a short time, then transition the orchid into safe long-term care.
Can a Potato Make an Orchid Bloom?
No. A potato alone cannot force an orchid to bloom. Orchid blooming depends on healthy roots, plant maturity, bright indirect light, proper watering, balanced feeding, and seasonal temperature changes. A potato may create a moist rooting environment, but it does not replace light, airflow, or correct orchid care.
If your orchid has weak roots, it must first rebuild strength. Flowers come later. A stressed orchid should focus on roots and leaves before blooming.
The Real Secret to Orchid Blooms
- Healthy firm roots
- Fresh orchid bark
- Bright indirect light
- Good airflow around roots
- Correct watering routine
- Warm daytime temperatures
- Slightly cooler nights for flower spike triggers
- Gentle orchid fertilizer
- Dry crown and clean leaves
- Patience after root recovery
Best Orchids for Rooting Experiments
The potato method is not ideal for all orchids. If used at all, it is best for small orchid keikis or divisions that already have some roots or active growth points. It is not good for severely rotten plants or orchids with no crown.
- Phalaenopsis keikis
- Small orchid divisions with healthy nodes
- Orchid pieces with visible root nubs
- Plants with firm green leaves
- Orchids that need short-term humidity support
Do not use this method for orchids that are already mushy, black, infected, or badly rotted.
What You Need
- Healthy small orchid division or keiki
- Clean firm potato
- Clean toothpicks or wooden skewers
- Clean glass jar
- Filtered water or rainwater
- Clean scissors
- Optional cinnamon powder for cut areas
- Fresh orchid bark for later repotting
- Clear orchid pot with drainage holes
- Bright indirect light
Step 1: Choose a Clean Firm Potato
Use a fresh, firm potato with no soft spots, mold, green skin, bad smell, or sprouting rot. Wash it well under running water. Do not use a potato that is already old or wrinkled because it will rot faster.
The potato should be used only as temporary support. If it starts smelling sour, turning soft, or growing mold, remove the orchid immediately.
Step 2: Prepare the Orchid Piece
Choose a healthy orchid piece with firm leaves and at least a few root nubs or roots. Trim away any black, mushy, hollow, or rotten roots using clean scissors. Keep firm roots, even if they look silver or pale. Dry silver roots can be normal when not watered.
If you cut damaged roots, let the cut areas dry for a short time before placing the plant near the potato. Some growers dust cut areas lightly with cinnamon, but keep cinnamon away from living root tips because it can dry them too much.
Step 3: Attach the Orchid Carefully
Do not bury the orchid crown deeply inside the potato. This can trap moisture and cause rot. Instead, make a shallow contact point or small hole where the orchid base can rest. The crown should remain above the potato surface and exposed to air.
The orchid should feel stable, but not squeezed. Use toothpicks only to support the potato above the jar, not to pierce living orchid tissue.
Step 4: Suspend the Potato Over Water
Insert toothpicks around the potato so it can rest on the rim of a glass jar. Add water to the jar so the bottom area is humid and the lower roots can reach moisture. Do not submerge the entire potato deeply in water. A fully wet potato can rot quickly.
Ideally, only the bottom part of the potato or the developing roots should be near the water. Keep the orchid crown dry and above the waterline.
Step 5: Place in Bright Indirect Light
Put the jar near a bright window with indirect light. Avoid harsh direct sun because it can heat the jar, cook the roots, and speed up potato rot. Also avoid dark corners because orchids need light to grow new roots and leaves.
A bright east-facing window is often excellent. A south or west-facing window may need a sheer curtain.
Step 6: Change the Water Often
Clean water is important. Change the water every 2 to 3 days. Rinse the jar each time. If the water becomes cloudy, smells bad, or develops slime, change it immediately.
Do not add sugar, milk, coffee, fertilizer, or kitchen scraps to the water. These can cause bacteria and rot.
Step 7: Watch for Root Growth
Healthy new orchid roots are usually green, silver, or white with firm tips. They should not smell bad or feel slimy. Root growth can take several weeks. Do not pull on the plant to check roots. Be patient and observe gently.
If roots begin growing into the water, keep the water clean. If roots grow in humid air but not directly into water, that is also fine. Orchid roots like air as much as moisture.
Step 8: Remove the Orchid Before the Potato Rots
This is the most important step. A potato is organic vegetable tissue. It will eventually break down. Do not wait until it becomes soft, rotten, or smelly. Once the orchid has several healthy roots, remove it from the potato and move it into orchid bark.
If the potato begins to smell or soften before roots are strong, stop the experiment and transfer the orchid to a safer humidity setup with sphagnum moss or bark.
Step 9: Move the Orchid Into Bark
After roots develop, plant the orchid into fresh orchid bark. Use a clear orchid pot with drainage holes and side ventilation if possible. Do not use regular potting soil. Orchid roots need airflow.
Simple Orchid Mix
- Medium orchid bark
- A small amount of sphagnum moss, optional
- Perlite, optional
- Horticultural charcoal, optional
Place the orchid gently in the pot and fill around the roots with bark. Do not bury the crown. The crown must stay above the medium.
Step 10: Water Correctly After Repotting
After transferring to bark, water lightly and let everything drain. Do not leave the pot sitting in water. Keep the orchid in bright indirect light and avoid fertilizer for the first couple of weeks while the roots adjust.
Once the orchid begins growing normally, you can start a gentle feeding routine.
Why Potato Can Be Risky for Orchids
Potatoes are moist and starchy. This makes them easy for bacteria, mold, and fungus to break down. In a closed indoor setting, that can create problems fast. Orchids are not designed to have their crown sitting in wet vegetable material.
Main Risks
- Potato rot
- Bad smell
- Mold growth
- Fungus gnats
- Bacterial growth
- Orchid crown rot
- Root suffocation
- Weak roots after transfer
For these reasons, the potato method should be used only with caution.
Safer Alternative: Sphagnum Moss Recovery
If your goal is to rescue an orchid with weak roots, damp sphagnum moss is often safer than a potato. Sphagnum moss holds moisture while still allowing some airflow when used correctly.
Simple Moss Recovery Method
- Trim rotten roots.
- Keep firm roots and healthy leaves.
- Moisten sphagnum moss and squeeze out extra water.
- Place the orchid above the moss, not buried deeply.
- Keep the crown dry.
- Place in bright indirect light.
- Air out regularly to prevent mold.
Safer Alternative: Water Culture
Some growers use water culture for orchids, but it also requires care. The roots may sit in water part of the time and dry part of the time. This method works best for experienced growers who can monitor roots closely.
For beginners, fresh orchid bark is usually safer and easier long term.
Best Light for Orchid Growth
Orchids need bright indirect light to grow strong roots and bloom. Too little light is one of the most common reasons orchids do not rebloom. Too much direct sun can burn leaves.
Good Light Signs
- Leaves are medium green
- Roots grow actively
- New leaves appear
- Flower spikes form in season
Low Light Signs
- Very dark green leaves
- No flowers
- Slow root growth
- Weak floppy leaves
Too Much Sun Signs
- Yellow-green leaves
- Brown burned patches
- Wrinkled leaves
- Dry root tips
Continue to Page 2
Continue to page 2 for more details about this article and the key points many readers miss on the first page.