Poinsettias are one of the most beautiful plants you can grow indoors. Their bold red leaves, deep green foliage, and festive shape make them perfect for windowsills, living rooms, holiday tables, bright corners, and cozy home decoration. Many people buy poinsettias during the holiday season, enjoy them for a few weeks, then throw them away when the red color fades. But poinsettias can live for years when cared for properly. Even better, you can grow new poinsettia plants from cuttings.
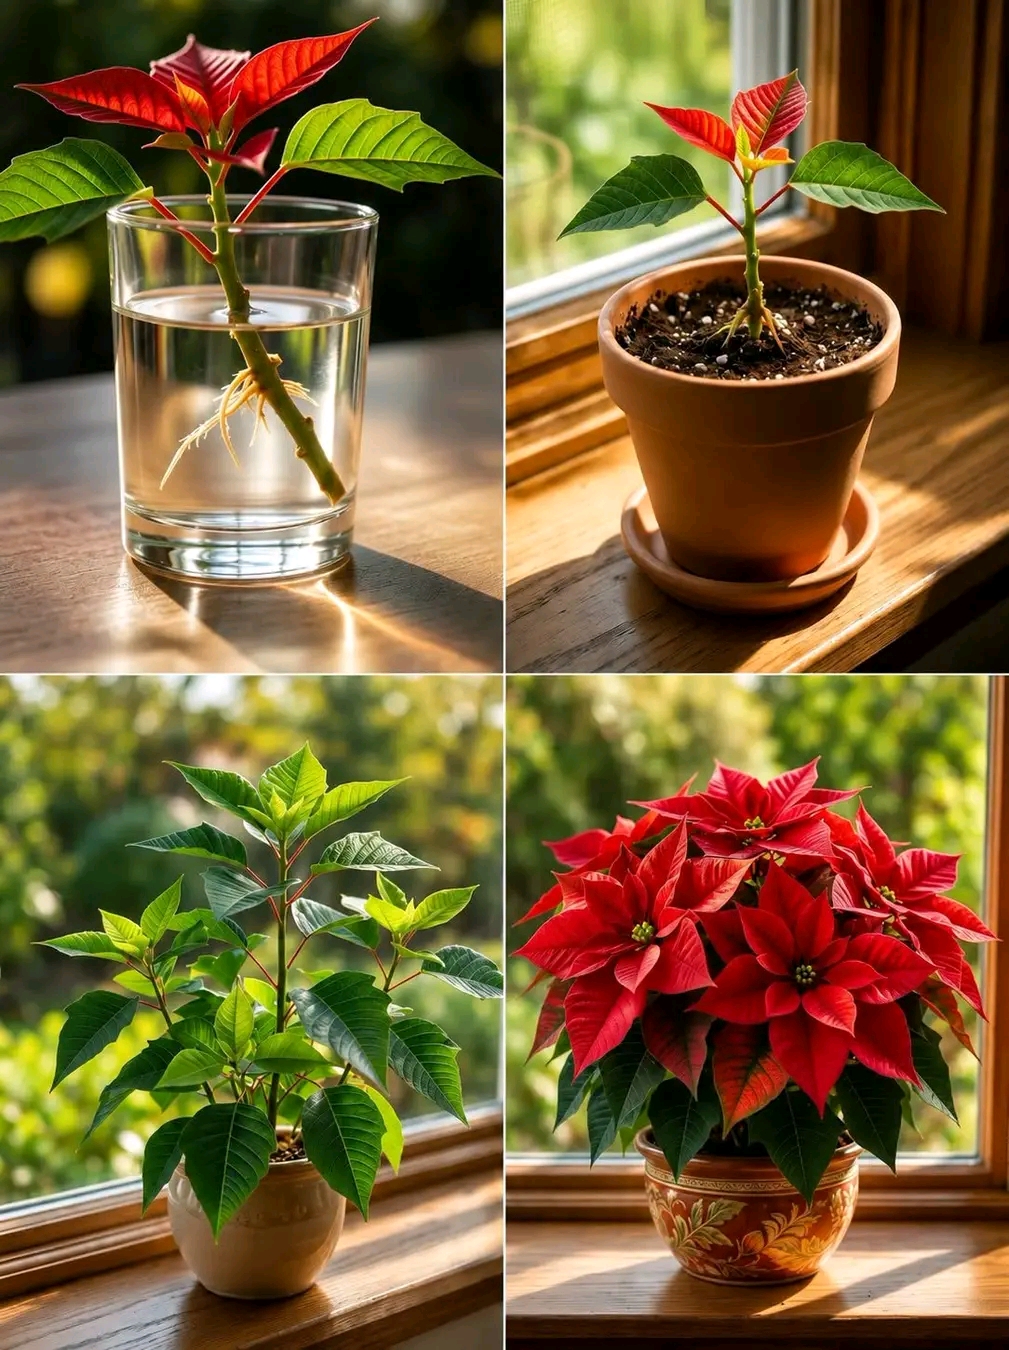
The image shows a simple poinsettia growing process. A healthy cutting is placed in water until roots appear. Then it is planted in soil, grown near a bright window, allowed to develop strong green leaves, and finally encouraged to produce the famous red holiday color. This method looks simple, but poinsettias need the right balance of warmth, light, moisture, pruning, and darkness to grow well and turn red again.
This complete guide explains how to grow poinsettias from cuttings, how to root them safely, how to move them into soil, how to care for young plants, how to make the leaves turn red, how to prevent yellow leaves and root rot, and how to keep your poinsettia beautiful long after the holiday season.
What Is a Poinsettia?
A poinsettia is a tropical plant known for its colorful bracts. Many people call the red parts “flowers,” but they are not true flowers. The real flowers are the tiny yellow structures in the center. The bright red parts are modified leaves called bracts. These bracts turn red when the plant receives the correct seasonal light conditions.
Poinsettias can also come in pink, white, cream, salmon, burgundy, variegated, and speckled colors. The classic red poinsettia is the most popular because it is strongly connected with Christmas and winter decoration.
Can You Grow Poinsettia From a Cutting?
Yes. Poinsettias can be grown from stem cuttings. A healthy cutting can root in water or in a light rooting mix. Once roots form, the cutting can be planted into soil and grown as a new plant.
Water rooting is easy to watch because you can see the roots develop. Soil rooting can sometimes create stronger roots from the start. Both methods can work if the cutting is healthy and the conditions are warm and bright.
Best Time to Take Poinsettia Cuttings
The best time to take poinsettia cuttings is spring or early summer. This is when the plant is entering active growth. Cuttings root better when temperatures are warm and the parent plant is healthy.
Avoid taking cuttings from a weak, stressed, cold-damaged, or heavily blooming poinsettia. Let the plant recover first. Healthy new growth roots much better than old woody stems.
What You Need
- A healthy poinsettia plant
- Clean sharp scissors or pruning shears
- A clear glass of water
- Small pot with drainage holes
- Light indoor potting mix
- Perlite or coarse sand
- Clean water
- Optional rooting hormone
- Warm bright location
- Gloves, optional
Important Safety Note About Poinsettia Sap
Poinsettias release a white milky sap when cut. This sap can irritate sensitive skin. It can also bother pets or children if the plant is chewed. Poinsettias are often described as highly poisonous, but that idea is exaggerated. Still, it is best to handle them with care.
Wear gloves if your skin is sensitive. Wash your hands after pruning. Keep cuttings and leaves away from pets and small children.
Step 1: Choose a Healthy Cutting
Choose a strong stem from a healthy poinsettia plant. The cutting should be about 4 to 6 inches long. It should have several healthy leaves and no signs of rot, pests, yellowing, or disease.
The best cutting comes from fresh green growth, not very hard woody stems. Fresh stems root faster and adapt better.
Step 2: Cut the Stem Cleanly
Use clean sharp scissors to cut the stem just below a leaf node. A node is the small point where a leaf grows from the stem. Roots often develop near nodes, so cutting below a node gives the plant a better chance to root.
After cutting, you may see white sap. Let the cutting sit for a few minutes. You can gently rinse the cut end with lukewarm water to remove excess sap.
Step 3: Remove Lower Leaves
Remove the leaves from the lower part of the cutting. Keep a few leaves at the top. The lower part of the stem should be clean because it will go into water or soil.
Do not leave leaves underwater. Leaves sitting in water can rot and make the water cloudy.
Step 4: Root the Cutting in Water
Place the cutting in a clean glass of water. The lower nodes should be underwater, but the leaves should stay above the waterline. Put the glass in bright indirect light. Do not place it in harsh direct sun because the cutting can wilt or the water can heat up.
Change the water every few days. Fresh water helps prevent bacteria and keeps oxygen available around the stem.
How Long Does It Take to Root?
Poinsettia cuttings usually take 2 to 6 weeks to root, depending on warmth, light, and cutting health. Some cuttings root faster. Others take longer. Be patient.
Roots should be white or cream colored and firm. Once the roots are about 1 to 2 inches long, the cutting can be moved into soil.
Step 5: Plant the Rooted Cutting in Soil
Prepare a small pot with drainage holes. Fill it with a light, well-draining mix. A young poinsettia does not need a large pot. A pot that is too big can hold too much moisture and cause root rot.
Simple Poinsettia Soil Mix
- 2 parts indoor potting mix
- 1 part perlite
- 1 part coco coir or peat moss
- A small amount of coarse sand, optional
Make a small hole in the soil, place the rooted cutting gently inside, and cover the roots. Press lightly, but do not compact the soil too much.
Step 6: Water After Planting
Water gently after planting. The goal is to settle the soil around the new roots. Let extra water drain from the pot. Empty the saucer after watering.
For the first few weeks, keep the soil lightly moist but not soggy. New roots are delicate. Too much water can cause rot, while too little water can dry them out.
Step 7: Place Near Bright Indirect Light
Put the young poinsettia near a bright window. It needs plenty of light to grow strong leaves. Bright indirect light is best. Morning sun can be helpful, but harsh afternoon sun may burn the leaves.
If the plant becomes tall and weak, it may need more light. If the leaves scorch or curl, it may be getting too much direct sun.
Best Light for Poinsettias
- Bright indirect light
- Gentle morning sun
- Filtered window light
- Grow light if natural light is low
- Avoid harsh hot afternoon sun
Step 8: Keep the Plant Warm
Poinsettias are tropical plants. They like warmth and dislike cold drafts. Keep them away from cold windows, air conditioners, heaters, fireplaces, and doorways where temperatures change quickly.
A stable indoor temperature helps the plant grow evenly. Cold stress can cause leaf drop.
How to Water Poinsettias Correctly
Water when the top inch of soil feels dry. Do not keep the soil constantly wet. Poinsettias like moisture, but they do not like soggy roots.
Always check the soil before watering. If the pot feels heavy and the soil is damp, wait. If the soil feels dry and the pot is lighter, water thoroughly and let it drain.
Signs Your Poinsettia Needs Water
- Top inch of soil feels dry
- Leaves look slightly limp
- Pot feels light
- Soil pulls slightly from the pot edge
Signs of Overwatering
- Yellow leaves
- Drooping while soil is wet
- Soft stems
- Sour soil smell
- Fungus gnats
- Black mushy roots
- Leaf drop
Why Poinsettia Leaves Drop
Leaf drop is common with poinsettias. It can happen from cold drafts, sudden temperature changes, underwatering, overwatering, low light, or stress after moving the plant.
If your poinsettia drops leaves, check the soil first. Then check the location. A cold window or hot heater nearby can cause sudden stress.
How to Encourage Bushy Growth
Young poinsettias can become tall and thin if they are not pruned. Pinching or pruning helps create a fuller plant. When the plant has grown several sets of leaves, pinch off the growing tip. This encourages side branches.
Repeat light pruning during spring and early summer. Stop heavy pruning by late summer so the plant can prepare for color later.
How to Feed Poinsettia Plants
Feed poinsettias during active growth with a balanced houseplant fertilizer diluted to half strength. Do not feed a fresh cutting immediately after planting. Wait until it shows new growth.
Safe Feeding Schedule
- Spring: feed every 4 to 6 weeks
- Summer: feed every 4 to 6 weeks
- Fall: reduce feeding before color treatment
- Winter: avoid feeding while blooming or resting
Too much fertilizer can burn roots and cause leaf problems. Light feeding is safer.
How to Make Poinsettia Turn Red
This is the part many people want to know. Poinsettias turn red because of long nights. The plant needs about 14 hours of complete darkness every night for several weeks. This dark period tells the plant to begin forming colorful bracts.
If the plant receives light at night from lamps, TVs, streetlights, kitchen lights, or hallway lights, the red color process can be interrupted.
Darkness Routine for Red Bracts
- Start about 8 to 10 weeks before you want red color.
- Give the plant bright indirect light during the day.
- Give 14 hours of complete darkness every night.
- Keep the plant warm and away from drafts.
- Water when the top inch dries.
- Continue the routine daily until bracts turn red.
For Christmas color, many gardeners begin the darkness routine in early fall.
How to Give Complete Darkness
You can place the plant in a dark closet each evening and bring it back to bright light each morning. You can also cover it with a box that blocks light. The darkness must be uninterrupted.
Do not forget the plant in a closet for days. It still needs daylight during the day to stay healthy.
Common Mistakes During Red Color Treatment
- Leaving the plant near night lights
- Forgetting to give daytime light
- Starting the routine too late
- Moving the plant too often after color starts
- Letting the plant dry completely
- Keeping it near cold drafts
- Using too much fertilizer during the treatment
Why Poinsettia Bracts Stay Green
If the bracts do not turn red, the plant may not be getting enough uninterrupted darkness. Even small amounts of nighttime light can affect the process. Another reason may be low daytime light. The plant needs both bright days and dark nights.
Temperature also matters. If the plant is stressed by cold or heat, color may be weaker.
Repotting Poinsettias
Repot poinsettias when roots fill the pot or when the soil becomes compacted. Spring is the best time. Use a pot only slightly larger than the current one.
Repotting Steps
- Choose a pot with drainage holes.
- Prepare fresh well-draining soil.
- Remove the plant gently.
- Loosen crowded roots slightly.
- Place at the same depth.
- Fill around roots with soil.
- Water lightly and let drain.
Poinsettia Soil Problems
If soil stays wet for too long, roots can rot. If soil dries too fast, the plant may wilt often. Good soil should hold light moisture but still drain well. Adding perlite helps improve airflow and drainage.
Humidity for Poinsettias
Poinsettias like moderate humidity. Very dry indoor air can cause crispy edges and leaf drop. This is common in winter when heaters are running.
Humidity Tips
- Group plants together
- Use a pebble tray
- Place near a humidifier
- Keep away from heat vents
- Avoid cold drafts
How to Keep Leaves Clean
Dusty leaves cannot absorb light well. Wipe leaves with a soft damp cloth every few weeks. Be gentle with young plants because stems can break.
Clean leaves help the plant grow stronger and look more attractive.
Pests on Poinsettias
Poinsettias can attract whiteflies, aphids, spider mites, mealybugs, and fungus gnats. Check under leaves and around stems regularly.
Signs of Pests
- Sticky leaves
- Small white flying insects
- Tiny webbing
- White cottony patches
- Yellow speckled leaves
- Weak new growth
Simple Pest Care
- Isolate the plant.
- Rinse leaves gently.
- Wipe pests away with a damp cloth.
- Use insecticidal soap if needed.
- Repeat weekly until pests are gone.
- Improve airflow.
Continue to Page 2
Continue to page 2 for more details about this article and the key points many readers miss on the first page.