Anthuriums are among the most beautiful tropical houseplants you can grow indoors. Their glossy heart-shaped leaves, bold red flowers, and elegant upright stems make them perfect for living rooms, bright kitchens, offices, bedrooms, plant shelves, and indoor garden corners. A healthy Anthurium can look expensive and luxurious, even when it is grown in a simple pot near a window.
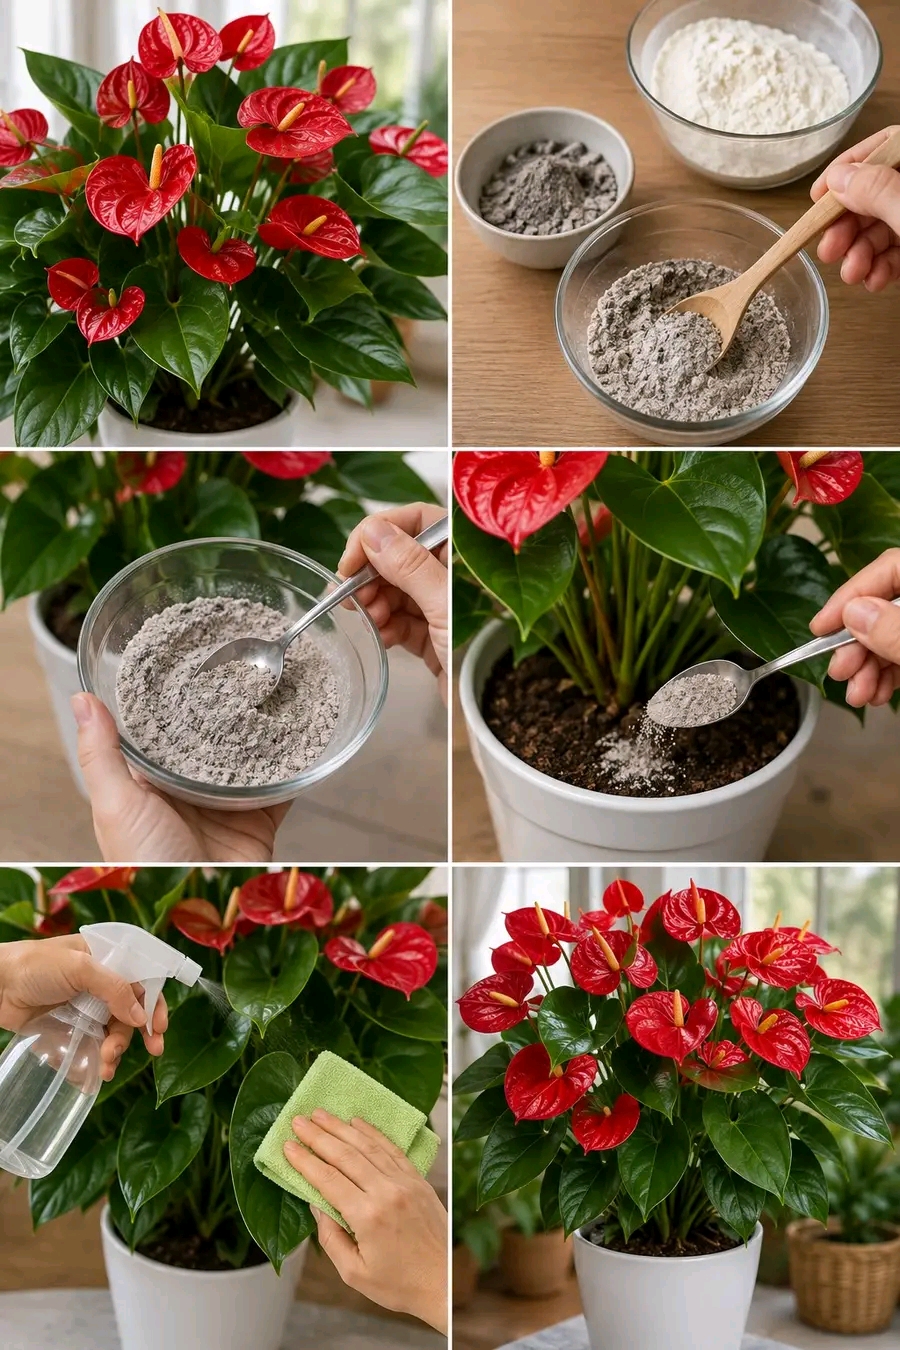
The image shows a popular homemade plant-care method. A red Anthurium is shown beside a gray powder mixture. The powder is mixed in a bowl, sprinkled lightly on the soil, and the leaves are cleaned with water and a soft cloth. The final plant looks full, shiny, and covered with bright red flowers. This kind of image suggests that one simple powder can make Anthuriums bloom heavily and stay glossy.
The gray powder in this kind of plant hack often represents wood ash, fireplace ash, or a mineral-rich homemade powder. Wood ash can contain potassium, calcium, and trace minerals. Potassium is connected to flowering and general plant strength. Calcium can support plant structure. But wood ash is also alkaline, which means it can raise soil pH. If used too much, it can damage Anthurium roots, lock nutrients in the soil, cause yellow leaves, burn sensitive roots, or create long-term problems.
So this guide will explain the safe way to understand this method. Wood ash can be used only in tiny amounts, only occasionally, and only if the plant truly needs it. It should never be dumped heavily into the pot. For most indoor Anthuriums, proper light, airy soil, correct watering, humidity, gentle fertilizer, and clean leaves matter much more than any powder trick.
What Is the Gray Powder in the Image?
The gray powder can be understood as fine wood ash or a mineral powder used as a homemade plant supplement. Wood ash comes from burned untreated wood. It is often used in outdoor gardens to add potassium and raise acidic soil pH. Some gardeners use it around flowering plants because potassium can support blooms.
However, indoor potted plants are different from outdoor garden beds. A small pot has limited soil. Anything added to the pot becomes concentrated quickly. What may be safe in a large garden bed can become too strong in a houseplant pot.
For Anthuriums, wood ash must be handled with extra caution because they prefer a loose, airy, slightly acidic to neutral growing mix. Too much ash can make the soil too alkaline and reduce nutrient availability.
Can Wood Ash Make Anthuriums Bloom?
Wood ash alone cannot force an Anthurium to bloom. Anthuriums bloom when they have enough energy and healthy roots. That energy comes mainly from bright indirect light, warm temperatures, stable humidity, proper watering, and balanced feeding.
If an Anthurium is sitting in a dark corner, has soggy soil, or has damaged roots, sprinkling ash on top will not solve the problem. In fact, it may make the problem worse. The ash method should only be considered a very small supplement, not the main bloom secret.
The Real Anthurium Bloom Formula
- Bright indirect light every day
- Loose chunky soil around the roots
- A pot with drainage holes
- Watering only when the top layer begins to dry
- Warm indoor temperatures
- Moderate to high humidity
- Gentle balanced fertilizer during active growth
- Clean dust-free leaves
- Removal of old faded flowers
- No cold drafts or harsh direct sun
Possible Benefits of Wood Ash
When used correctly and rarely, wood ash may provide a small amount of potassium and calcium. These can support plant growth in some situations. It may also help if a potting mix is very acidic, but this is not common for every Anthurium.
Possible Benefits
- May add a small amount of potassium
- May add calcium and trace minerals
- May support flowering when the plant is already healthy
- May help balance overly acidic soil in tiny amounts
- Can be used as a natural garden amendment when handled carefully
These possible benefits only matter when the plant is already growing in good conditions. Ash will not rescue a weak plant with root rot or poor light.
Risks of Using Too Much Ash
The biggest danger is overuse. Wood ash is alkaline and can quickly change soil chemistry in a small pot. Anthuriums have sensitive roots. If the soil becomes too alkaline, the plant may struggle to absorb nutrients like iron and magnesium. This can cause yellow leaves even when nutrients are present in the soil.
Possible Problems
- Root burn from strong concentration
- Soil pH becoming too alkaline
- Yellow leaves from nutrient lockout
- Brown leaf tips
- Salt buildup in the pot
- Weak blooms instead of stronger blooms
- Stress to young roots
- Damage if ash touches wet stems directly
For this reason, never cover the soil with a thick layer of ash. Never mix large amounts into a small houseplant pot.
Safe Wood Ash Rule for Anthuriums
Use only a tiny pinch, not a spoonful, for a small indoor pot. For a medium Anthurium pot, use no more than 1/4 teaspoon sprinkled across the soil surface, and only once every few months. Even that is optional.
If you are not sure your plant needs it, skip it. A balanced liquid houseplant fertilizer is safer and more predictable.
What Kind of Ash Is Safe?
Only ash from clean, untreated, natural wood should ever be considered for plants. Do not use ash from charcoal briquettes, painted wood, treated wood, glossy paper, trash, plastic, chemicals, or fireplace logs with additives.
Use Only
- Clean untreated wood ash
- Cool ash that is fully extinguished
- Fine sifted ash
- Very small amounts
Never Use
- Charcoal briquette ash
- Ash from painted wood
- Ash from treated lumber
- Ash from plastic or trash
- Ash from chemical fire starters
- Ash that is still warm
- Large amounts in small pots
How to Prepare the Ash Powder
The image shows powder being mixed in a bowl. For safe plant use, ash should be sifted so large chunks are removed. Fine ash spreads more evenly and reduces the risk of concentrated clumps.
Preparation Steps
- Make sure the ash is completely cool.
- Use only clean untreated wood ash.
- Sift the ash through a fine strainer.
- Remove charcoal chunks and debris.
- Store in a dry container away from moisture.
- Label it clearly so it is not confused with food powder.
How to Apply Ash to Anthurium Soil
Apply ash only when the plant is healthy and the soil is slightly moist but not wet. A small amount can be sprinkled around the outer soil surface. Keep it away from the stems and crown.
Safe Application Steps
- Check that the plant is healthy.
- Make sure the soil is not soggy.
- Use only a tiny pinch or up to 1/4 teaspoon for a medium pot.
- Sprinkle it lightly around the outer soil surface.
- Keep it away from stems and leaves.
- Do not pile it in one place.
- Water lightly later to move minerals slowly into the mix.
- Do not repeat for several months.
The goal is a light dusting, not a coating. Less is safer.
When Not to Use Ash
- When the plant has yellow leaves
- When the soil is wet or sour-smelling
- When roots are damaged
- When the plant was recently repotted
- When using strong fertilizer already
- When the pot has no drainage
- When the plant is in low light
- When the soil pH is already high
- When leaves have brown tips from buildup
- When you are unsure what kind of ash it is
Better Alternative: Balanced Liquid Fertilizer
For indoor Anthuriums, a balanced liquid houseplant fertilizer is usually safer than ash. It gives nutrients in a measured way. You can dilute it to half strength or quarter strength and apply during active growth.
Safe Fertilizer Routine
- Use a balanced houseplant fertilizer
- Dilute to half or quarter strength
- Feed every 4 to 6 weeks in spring and summer
- Reduce feeding in fall
- Avoid feeding heavily in winter
- Flush soil with plain water occasionally
Do not fertilize a sick Anthurium until you know what is wrong. Fertilizer cannot fix root rot.
Best Light for Anthurium Blooms
Light is the biggest bloom factor. Anthuriums need bright indirect light to flower well. Low light may keep the plant alive, but it often reduces blooms. Direct hot sun can burn the leaves.
Good Light Locations
- Near an east-facing window
- Near a bright north-facing window
- A few feet from a south-facing window with a sheer curtain
- Near a west-facing window with filtered light
- Under a grow light if the room is dark
Signs Your Anthurium Needs More Light
- No flowers for many months
- Small leaves
- Long weak stems
- Slow growth
- Dark green leaves but no blooms
- Plant leaning toward the window
Signs of Too Much Light
- Brown dry patches
- Yellow scorched areas
- Faded red flowers
- Crispy leaf edges
- Leaves curling away from the sun
Best Soil for Anthuriums
Anthuriums are tropical plants that like airy soil. They do not like dense, heavy, soggy soil. Their roots need oxygen. A chunky mix helps water drain while holding enough moisture for growth.
Simple Anthurium Mix
- 1 part indoor potting mix
- 1 part orchid bark
- 1 part perlite
- 1 part coco coir or peat moss
- A small amount of horticultural charcoal, optional
This type of mix is much more important than adding ash. If the soil is wrong, the plant will struggle no matter what powder you add.
Best Pot for Anthuriums
Use a pot with drainage holes. A decorative cover pot is fine, but the inner pot must drain. Standing water can cause root rot quickly.
Choose a pot only slightly larger than the root ball. A very large pot holds too much wet soil and can slow growth.
How to Water Anthuriums Correctly
Water when the top inch of soil begins to dry. Pour slowly until water drains from the bottom. Empty the saucer. Do not let the plant sit in water.
Anthuriums like light moisture, but not soggy soil. The roots need both water and air.
Signs Your Anthurium Needs Water
- Top inch of soil feels dry
- Pot feels lighter
- Leaves look slightly less firm
- Soil begins pulling from the pot edge
- Leaves lose some shine
Signs of Overwatering
- Yellow leaves
- Wet soil for many days
- Soft stems
- Sour smell from the pot
- Black mushy roots
- Fungus gnats
- Drooping while soil is wet
If the soil is wet and the plant looks droopy, do not add ash, fertilizer, or more water. Check the roots first.
How to Keep Anthurium Leaves Glossy
The image shows the leaves being sprayed and wiped with a soft cloth. This is a very useful care step. Anthurium leaves are naturally glossy, but dust can make them look dull and block light.
Leaf Cleaning Steps
- Spray plain water lightly on the leaves.
- Support each leaf with one hand.
- Wipe gently with a soft cloth.
- Clean both sides of the leaves.
- Avoid spraying the flowers heavily.
- Let the leaves dry in good airflow.
Do not use oily leaf shine products. They can clog leaf surfaces and attract dust. Plain water and a soft cloth are safer.
How Often to Clean Leaves
Clean the leaves every 2 to 4 weeks. If your home is dusty, clean them more often. Clean leaves absorb light better, look healthier, and help the plant maintain its polished tropical look.
Humidity for Anthuriums
Anthuriums enjoy moderate to high humidity. Dry air can cause brown tips, curling leaves, and slower growth. Humidity around 50 percent or higher is helpful.
Humidity Tips
- Group plants together
- Use a pebble tray
- Place a humidifier nearby
- Keep the plant in a bright bathroom
- Avoid heaters and dry vents
- Keep gentle airflow
Humidity helps the leaves, but it does not mean the soil should stay wet. Roots still need drainage.
Temperature for Anthuriums
Anthuriums prefer warm, stable indoor temperatures. They do not like cold drafts or sudden temperature changes. Keep them away from open windows in winter, air conditioners, heaters, and fireplaces.
Warmth supports steady growth and flowering.
How to Encourage More Red Flowers
To encourage flowers, focus on plant energy. Flowers require healthy roots, light, nutrients, and stable conditions.
- Move the plant to bright indirect light.
- Use chunky airy soil.
- Water only when the top inch begins to dry.
- Keep humidity moderate.
- Feed lightly during active growth.
- Remove faded flowers.
- Clean the leaves regularly.
- Keep the plant warm.
- Avoid root stress.
- Use ash only rarely, if at all.
Removing Old Anthurium Flowers
Anthurium flowers eventually fade, turn brown, or lose color. Remove old flowers by cutting the flower stem near the base with clean scissors. This keeps the plant tidy and encourages energy toward new growth.
Do not pull flowers by hand because you may damage the crown.
How to Repot Anthurium
Repot every 2 to 3 years or when the soil becomes compacted. Spring is the best time. Use fresh airy mix and a pot with drainage.
Repotting Steps
- Remove the plant gently from the old pot.
- Shake away old compact soil.
- Inspect the roots.
- Cut off black or mushy roots.
- Prepare a chunky Anthurium mix.
- Place the plant at the same depth.
- Fill around roots gently.
- Water lightly and let drain.
Do not add ash right after repotting. Let the roots settle first.
Root Rot Rescue
If your Anthurium has root rot, ash will not help. Root rot needs fresh soil, root trimming, and better watering habits.
- Remove the plant from the pot.
- Wash away wet soil.
- Trim black mushy roots.
- Keep firm healthy roots.
- Repot into fresh chunky mix.
- Use a pot with drainage holes.
- Water lightly.
- Keep in bright indirect light.
Do not fertilize or use ash while the plant is recovering.
Yellow Leaves After Using Ash
If leaves begin yellowing after ash use, the soil may have become too alkaline or too concentrated with minerals. Stop using ash immediately. Flush the soil with plain water if the pot drains well. If the problem continues, repot into fresh airy mix.
Brown Tips After Using Ash
Brown tips may come from mineral buildup, fertilizer burn, dry air, or inconsistent watering. If brown tips appear after ash, stop using it and flush the pot with clean water.
Can You Mix Ash With Water?
It is better not to make a strong ash water for Anthuriums. Ash water can become very alkaline. If used too strong, it may damage roots. A tiny dry sprinkle is safer than a concentrated liquid, but even that should be rare.
Can You Use Baking Soda Instead?
No. Baking soda is not a fertilizer and should not be used as a bloom booster for Anthuriums. It can change soil chemistry and stress the plant. Do not replace ash with baking soda.
Can You Use Eggshell Powder?
Eggshell powder is mostly calcium carbonate. It breaks down slowly and can also affect soil pH. It is not a quick bloom booster. Use it cautiously, if at all, and avoid adding too many powders to indoor pots.
Better Natural Options
If you want a natural plant support, safer options include worm castings, compost tea used very weakly, or a balanced organic liquid fertilizer. These are usually easier to control than ash.
Safer Natural Supports
- Small amount of worm castings
- Very diluted compost tea
- Diluted seaweed extract
- Balanced organic houseplant fertilizer
- Fresh airy soil mix
Monthly Anthurium Care Routine
- Check light levels.
- Clean leaves with a damp cloth.
- Inspect for pests.
- Check soil moisture habits.
- Remove faded flowers.
- Rotate the pot for even growth.
- Feed lightly during active growth.
Weekly Anthurium Care Routine
- Touch the top inch of soil.
- Water only if needed.
- Check for yellow leaves.
- Look under leaves for pests.
- Empty saucer water.
- Keep away from drafts.
Continue to Page 2
Continue to page 2 for more details about this article and the key points many readers miss on the first page.