Spider plants (Chlorophytum comosum) are already known for their soft, flowing leaves and easy‑care nature. They are forgiving, fast‑growing, and among the best houseplants for beginners. But when you combine healthy growth techniques with creative home decor, they become something much more powerful — a living design piece.
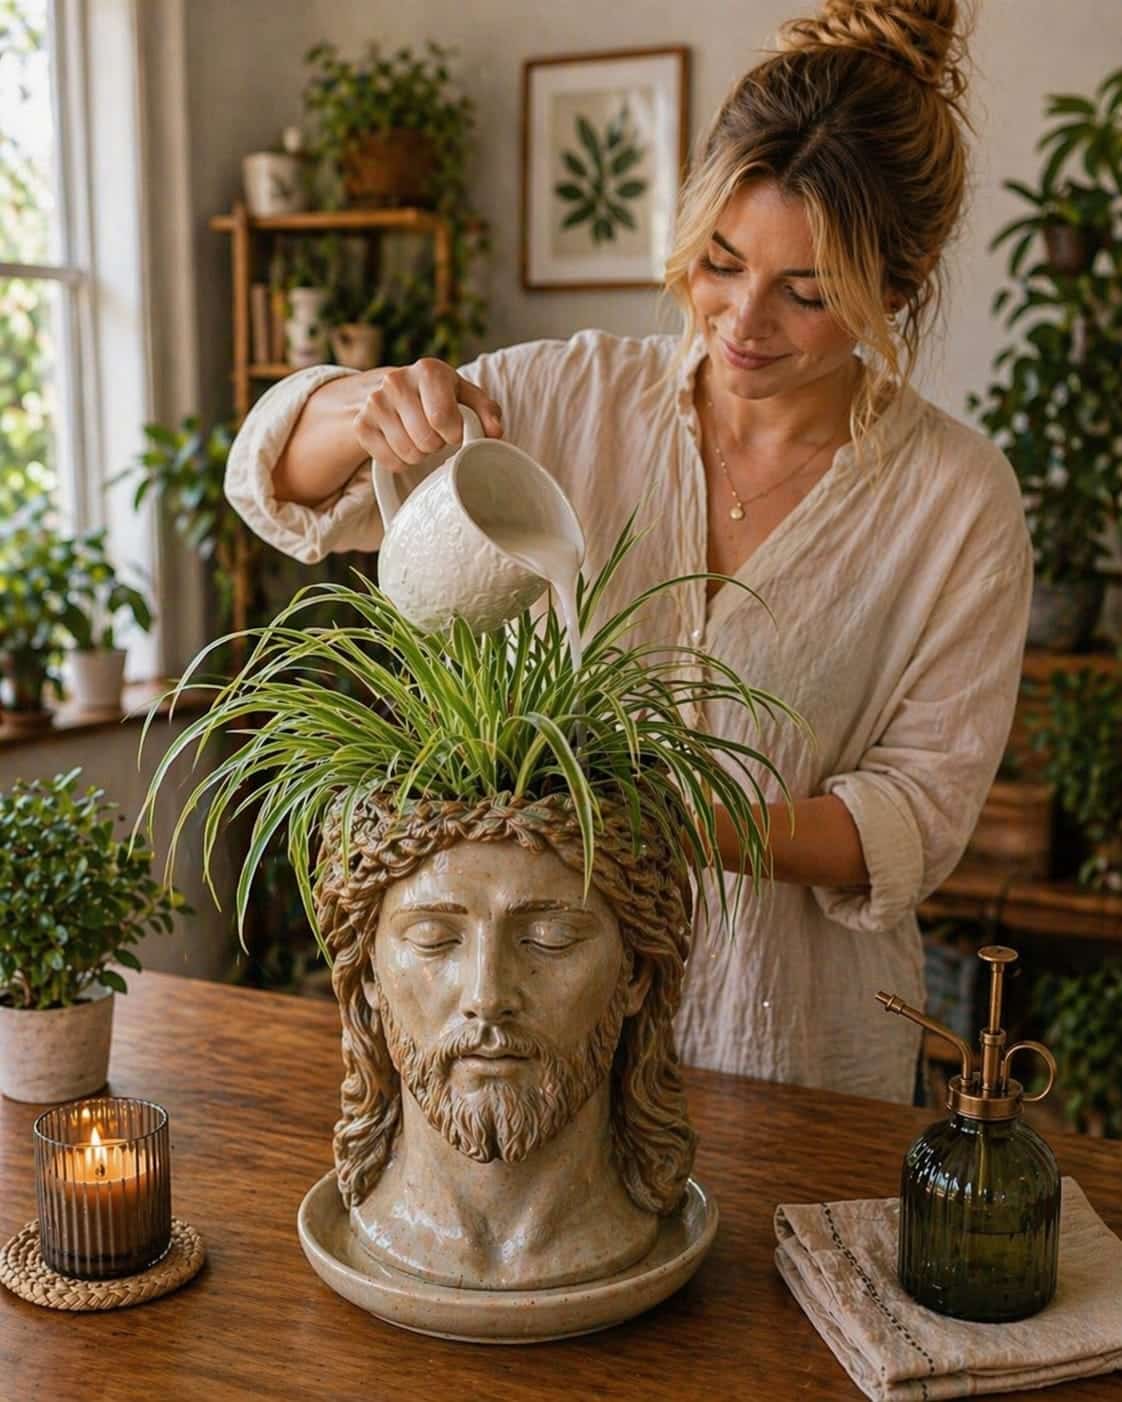
Recently, a trend has been gaining attention: pouring a white liquid onto spider plants to boost growth, especially when displayed in artistic planters like human head vases. The result is eye‑catching: the cascading leaves resemble flowing hair, and the planter turns a simple plant into a sculpture.
It looks beautiful. It feels natural. But what is really happening here? Does the white liquid actually help, or is it just for show? And how do you style a spider plant in a head planter to achieve that high‑end look?
In this guide, we will explore both the plant care truth and the decor magic behind this trend. You will learn what that white liquid really is, how to grow a truly lush spider plant, and how to turn it into a stunning statement piece for your home.
Why Spider Plants Look So Good in Head‑Shaped Planters
Before we even talk about the liquid, let us talk about the visual impact. Head‑shaped planters — ceramic or concrete busts, sculptural faces, and abstract head vases — have become a major trend in home decor. When paired with a trailing plant like a spider plant, the effect is striking.
A spider plant in a human head planter creates a unique effect:
· The leaves resemble flowing hair – Long, arching green and white leaves spill out like a natural mane, giving the sculpture life and movement.
· The plant adds movement and softness – Unlike a bare sculpture, the living plant introduces organic flow.
· The sculpture becomes “alive” – The combination of art and nature feels fresh, whimsical, and deeply human.
This combination works beautifully in:
· Modern living rooms – As a conversation piece on a console table or bookshelf.
· Boho interiors – Paired with macrame, woven baskets, and warm textures.
· Cozy kitchens – On a windowsill or open shelf.
· Creative workspaces – Adds personality and reduces stress.
It is not just a plant — it is a statement piece. And when the spider plant is full, healthy, and vibrant, the effect is even more powerful.
The “White Liquid” Trend: What Is It?
If you have scrolled through plant videos lately, you have probably seen people pouring a white liquid — often milk‑like in appearance — onto spider plants. The liquid looks rich and nourishing, and the plant in the “after” shot often appears greener and fuller.
In most viral videos, this white liquid represents:
· Diluted milk – A common home remedy for plants, often used outdoors for powdery mildew.
· A mild homemade nutrient mix – Such as diluted rice water, weak compost tea, or a calcium solution.
· A visual demonstration for engagement – Sometimes the liquid is just water with a drop of white paint or food coloring; the “results” come from better light or a different plant.
But here is the important part: the plant does not need white liquid to grow well. Spider plants are not heavy feeders. They do not require special tonics or colorful drinks. In fact, using the wrong liquid — or too much of it — can cause more harm than good.
Can White Liquid Help a Spider Plant?
In very small, diluted amounts, certain organic liquids may provide trace benefits. For example:
· Diluted milk (1 part milk to 4 parts water) contains small amounts of calcium and proteins. Used very sparingly (once a month), it may offer a mild boost.
· Diluted rice water (1:1 with fresh water) contains trace minerals and starches that can feed beneficial soil microbes.
· Weak compost tea can add beneficial bacteria.
However, there are significant risks:
· Bad smell in the soil – Milk and other organic liquids can sour, especially in warm indoor conditions.
· Mold or bacterial growth – Excess organic matter on the soil surface encourages fungus and gnats.
· Root damage – Sugars and proteins can rot roots if overused.
· Pest attraction – Fruit flies, fungus gnats, and ants are drawn to sweet or fermented residues.
⚠️ So it is not a magic solution — and definitely not something to use frequently. For every success story you see online, there are likely many failed attempts that are never posted.
What Actually Makes a Spider Plant Grow Fast and Full
If you want your spider plant to look like the one in the photo — lush, full, and vibrant — focus on these fundamentals. These are the real, proven factors that turn a surviving spider plant into a thriving one.
- Bright Indirect Light (The #1 Factor)
Spider plants grow best in bright, indirect light. An east‑facing window is ideal. A south or west window with a sheer curtain also works. Too little light causes leaves to become pale, thin, and leggy. Too much direct sun scorches the leaves.
· Place near a window – Within 2–3 feet is best.
· Avoid deep shade – Dark corners keep the plant alive but stunt growth.
· More light = stronger, fuller growth – If your plant has never produced babies or looks sparse, move it closer to light.
- Proper Watering (Not Too Wet, Not Too Dry)
Spider plants like to be slightly moist but not soggy. The most common mistake is overwatering.
· Water when the top inch of soil feels dry – Stick your finger in.
· Let the top layer dry between watering – In most homes, this means every 5–7 days in spring/summer, every 10–14 days in winter.
· Avoid soggy roots – Use a pot with drainage holes and empty the saucer.
- Well‑Draining Soil
Use a light indoor potting mix with added perlite. This ensures water flows through and roots get oxygen.
· Standard mix: 2 parts all‑purpose potting soil + 1 part perlite.
· Avoid heavy, moisture‑retentive soil – It leads to root rot.
· Repot every 1–2 years to refresh the soil.
- Occasional Feeding (Lightly, Not Heavily)
Spider plants are not heavy feeders, but they benefit from light nutrition during spring and summer.
· Use a balanced liquid fertilizer (10‑10‑10 or 20‑20‑20) diluted to half strength.
· Feed once every 3–4 weeks – Only during the growing season.
· Do not fertilize in fall and winter – The plant rests.
· Avoid overfeeding – Brown tips and stalled growth are signs of too much fertilizer.
- Healthy Root System (The Foundation)
Everything comes from the roots. Healthy roots produce healthy leaves, runners, and baby plantlets.
· Check roots annually – When repotting, look for white, firm roots. Trim any brown or mushy roots.
· A slightly snug pot encourages baby production. Do not oversize the pot.
· Healthy roots = ✔ greener leaves ✔ more babies ✔ fuller appearance
When these five factors are in place, your spider plant will naturally become lush, full, and vigorous. No white liquid required.
How Decor Enhances Plant Beauty (The Head Planter Magic)
Once your spider plant is healthy, styling makes all the difference. A beautiful plant in a plain plastic nursery pot looks ordinary. The same plant in a sculptural head planter becomes art.
A head planter works because:
· It adds personality – A human face or abstract bust brings emotion and character.
· It turns the plant into art – The composition becomes a focal point, not just a pot in the corner.
· It draws attention naturally – Guests will stop and admire.
To elevate the look:
· Keep the leaves trimmed and clean – Remove brown tips and dead leaves. Wipe dust off with a damp cloth.
· Place it near natural light – The planter should be in a well‑lit spot so the plant thrives and the sculpture is visible.
· Pair with neutral tones – Wood, ceramic, linen, and soft earth colors complement the green leaves and white planter.
· Avoid clutter around it – Let the head planter stand alone on a console table, shelf, or pedestal.
Where to Place a Spider Plant Head Planter:
· Entryway console – Welcoming and artistic.
· Living room bookshelf – Adds life between books.
· Bedroom dresser – Calming and sculptural.
· Home office desk – Boosts creativity.
· Bathroom counter – Spider plants tolerate humidity well.
Why This Combination Works So Well (The “Wow” Effect)
The success of this trend is not just about the liquid — it is about the full picture:
· A healthy plant – Bright light, proper watering, good soil, and occasional feeding.
· A creative container – A head planter that turns the plant into a living sculpture.
· A warm, styled environment – Intentional placement, clean leaves, and complementary decor.
That is what creates the “wow” effect that makes people stop and take photos. The white liquid is, at best, a minor supporting actor — and often just a visual prop.
How to Style a Spider Plant Head Planter (Step‑by‑Step)
Ready to create your own statement piece? Follow these steps.
Step 1 – Choose the Right Head Planter
· Material: Ceramic, stoneware, or concrete. Matte finishes look more modern than glossy.
· Color: White, cream, terracotta, or soft gray. Avoid bright colors that compete with the plant.
· Size: The planter should be proportional to the spider plant. A 6‑inch head planter works well for a small to medium spider plant.
· Drainage: Ensure there is a drainage hole, or use a nursery pot inside the head planter.
Step 2 – Grow a Healthy Spider Plant
Use the care routine above. A full, cascading plant with many leaves and baby plantlets is ideal. If your plant is sparse, give it more light and time.
Step 3 – Pot or Nestle the Plant
· If the head planter has drainage: Pot the spider plant directly in it using well‑draining soil.
· If it has no drainage: Keep the spider plant in a plastic nursery pot. Place that pot inside the head planter. Remove it for watering, let it drain, then replace.
Step 4 – Arrange the Leaves
Gently position the leaves so they cascade naturally. You can use soft ties or clips to train leaves if needed, but spider plants naturally arch outward.
Step 5 – Add Finishing Touches
· Top dressing: Cover the soil with small pebbles, moss, or decorative gravel for a polished look.
· Clean leaves: Wipe each leaf with a damp cloth to remove dust and enhance shine.
· Rotate weekly – Ensures even growth around the planter.
Continue to Page 2
Continue to page 2 for more details about this article and the key points many readers miss on the first page.