Roses are one of the most loved garden plants because they bring color, softness, fragrance, and elegance to almost any outdoor space. A single rose bush can make a balcony corner feel romantic, a patio look more expensive, and a small garden appear fuller and more intentional. But many homeowners believe roses are difficult to multiply. They think new rose plants always require professional nursery starts, special rooting equipment, or complicated gardening products.
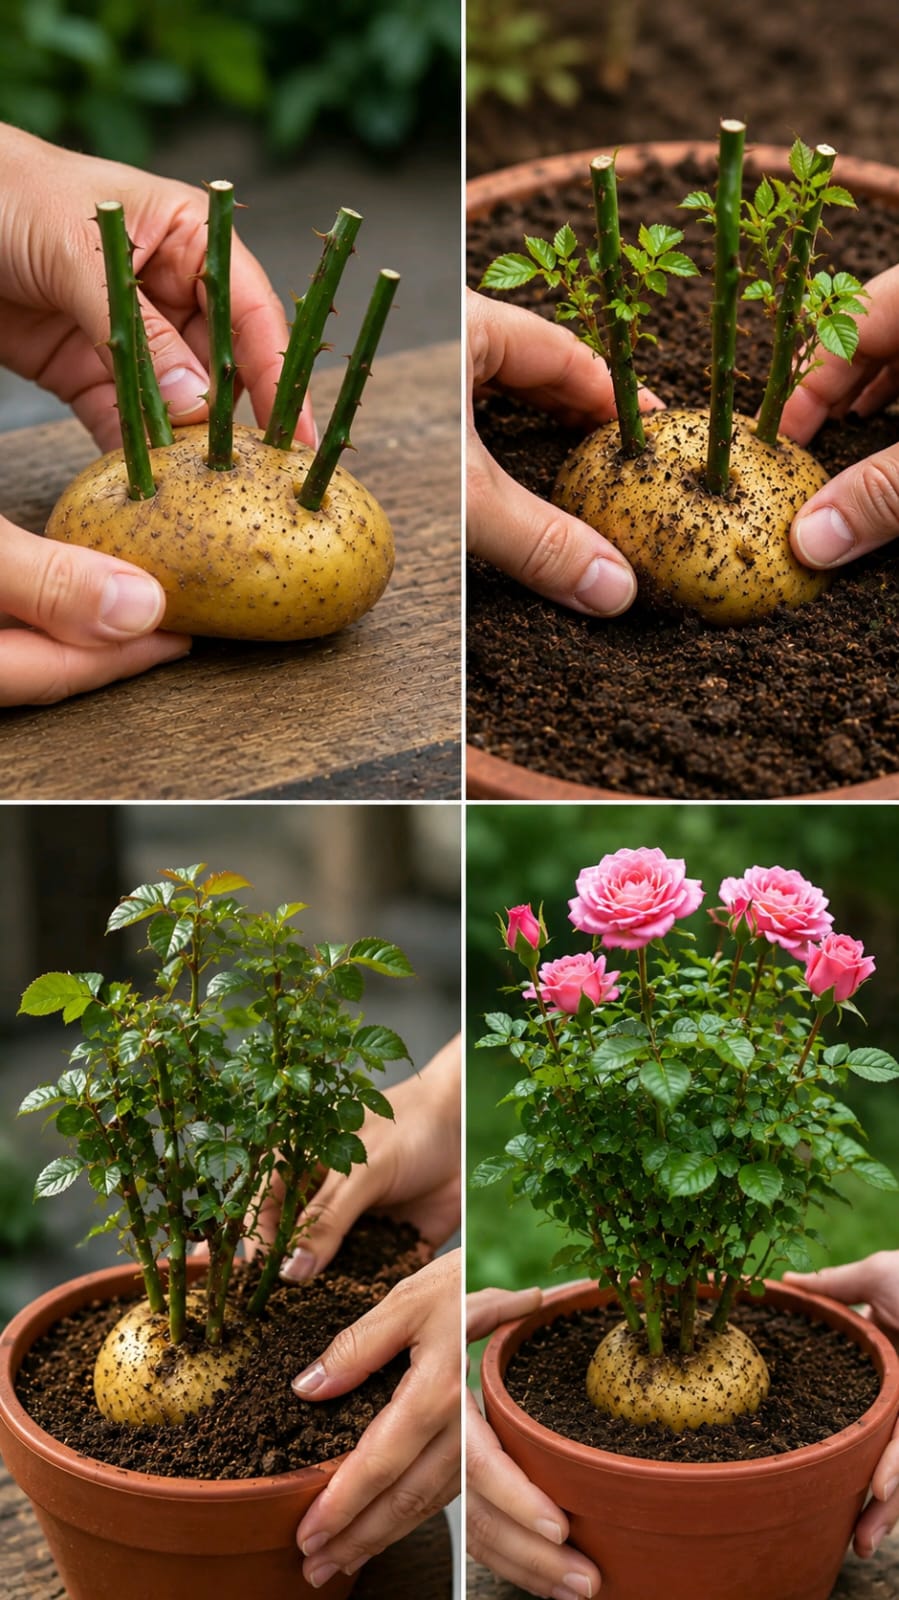
One simple propagation trick that continues to attract attention is the potato method. The idea is easy: take healthy rose cuttings, insert them into a fresh potato, place the potato in soil, and keep the setup lightly moist while the cuttings begin to form roots and new leaves. The potato acts like a temporary moisture-support base around the cut stem, helping the cutting stay hydrated during the early rooting stage.
This is not a magic shortcut that guarantees every rose cutting will survive. Roses can be sensitive, and success depends on the cutting quality, temperature, humidity, light, soil, and watering routine. But when done carefully, the potato rose cutting method can be a creative and beginner-friendly way to start new rose plants at home.
What Is the Potato Rose Cutting Trick?
The potato rose cutting trick is a propagation method where short rose stems are placed into a potato before being planted in soil. The potato holds moisture around the base of the cutting and may help reduce drying during the first stage of root development.
The method is usually done with several rose cuttings at once. A clean potato is used as a natural holder, the cuttings are pushed into small holes, and the potato is buried partly or fully in a pot of loose soil. Over time, if conditions are right, the rose stems may produce new leaf growth and eventually roots.
The main goal is to help the cutting survive the stressful period before it has its own root system. Without roots, a rose cutting can dry out quickly. The potato provides a moist base while the soil around it creates the growing environment.
Why Gardeners Use a Potato for Rose Cuttings
A potato is naturally firm, moist, and easy to pierce. This makes it useful as a temporary support for cut stems. It holds the rose cuttings upright and helps keep moisture near the cut end.
The potato may help with:
Keeping the cutting base from drying too fast
Holding several rose stems upright
Creating a stable propagation base
Supporting moisture around the cut stem
Making the planting process easier for beginners
Reducing early stress during propagation
The potato is not the true source of rose roots. The rose cutting must still produce roots from its own stem tissue. The potato simply supports the environment during that process.
Best Rose Cuttings for This Method
The best rose cuttings are taken from healthy stems that are not too soft and not too woody. Very young soft stems may rot easily, while old hard stems may root slowly. The ideal cutting is semi-hardwood: firm, green-brown, and taken from a healthy rose plant.
Look for stems that are:
Healthy and disease-free
About pencil thickness
Firm but not completely woody
Free from black spots or mold
Taken from a strong parent plant
Long enough to include several nodes
A node is the point on the stem where leaves grow. Roots often form near nodes, so each cutting should include at least two or three nodes.
How to Prepare Rose Cuttings
Use clean scissors or pruning shears. Dirty tools can introduce bacteria or fungus into the cutting, which may cause rot before roots develop.
- Choose a healthy rose stem.
- Cut a section about 6 to 8 inches long.
- Make the bottom cut just below a node.
- Remove flowers and buds.
- Remove most lower leaves.
- Keep one or two small leaves at the top if desired.
- Trim thorns carefully if they make handling difficult.
Removing extra leaves helps reduce moisture loss. A cutting without roots cannot support many leaves, so keeping the top simple gives it a better chance to focus on root development.
How to Prepare the Potato
Use a fresh, firm potato. Avoid potatoes that are rotten, soft, moldy, or already sprouting heavily. A damaged potato can break down too fast in the soil and encourage rot.
To prepare it:
- Wash the potato gently.
- Dry the surface.
- Make small holes using a clean pencil, skewer, or screwdriver.
- Make each hole deep enough to hold a rose cutting firmly.
- Do not push cuttings in without a starter hole, because the stem can be damaged.
The holes should be snug but not crushing. If the stem is scraped too hard, it may rot instead of rooting.
Step-by-Step Potato Rose Cutting Method
This method works best when everything is clean, controlled, and not too wet.
- Fill a pot with loose, well-draining soil.
- Prepare healthy rose cuttings.
- Make holes in a fresh potato.
- Insert the cut end of each rose stem into the potato.
- Place the potato on or slightly into the soil.
- Cover part of the potato with soil so it stays stable.
- Water lightly.
- Place the pot in bright indirect light.
- Keep the soil lightly moist, not soggy.
- Watch for new leaf growth over the next few weeks.
New leaves can be a good sign, but they do not always mean roots are fully developed. Some cuttings produce leaves using stored energy before roots are strong. Be patient and avoid pulling the cutting too early.
Should You Use Rooting Hormone?
Rooting hormone is optional. Some gardeners use it to improve success rates. If available, dip the lower end of the rose cutting into rooting hormone before inserting it into the potato.
However, the method can still be tried without rooting hormone. The most important factors are stem quality, moisture balance, cleanliness, and warmth.
Best Soil for Potato Rose Cuttings
The soil should be light and well-draining. Heavy garden soil may stay too wet and cause the potato or rose stems to rot. A balanced propagation mix works better.
A good mix may include:
- Potting soil
- Perlite
- Coarse sand
- Coco coir
- A small amount of compost
The goal is moisture without suffocation. The cutting needs humidity and dampness, but it also needs oxygen around the stem base.
Watering Routine for Rose Cuttings
Watering is one of the most important parts of this trick. Too little water dries the cuttings. Too much water rots the potato and stems.
Use this routine:
- Water lightly after planting
- Keep soil slightly moist
- Do not soak the pot every day
- Check the soil before watering again
- Avoid standing water under the pot
- Use a pot with drainage holes
If the soil smells sour, looks slimy, or attracts flies, it is too wet or the potato may be decomposing too quickly.
Best Light for Rooting Rose Cuttings
Rose cuttings need bright light, but harsh direct sun can dry them before roots form. Bright indirect light is best during the rooting stage.
Good locations include:
- A bright patio with filtered light
- A balcony with morning sun
- A shaded greenhouse corner
- A windowsill with soft light
- A garden spot protected from hot afternoon sun
Once the cuttings have rooted and started growing strongly, they can gradually be introduced to more sunlight.
How Long Does It Take?
Rose cuttings can take several weeks to root. Some may show new leaves within two to four weeks, while stronger root systems may take longer. Weather, rose variety, and cutting quality all affect timing.
Be patient. Pulling the cutting to check roots can break delicate new growth. Instead, watch for steady leaf development and firm stems.
Signs the Rose Cutting Is Working
Positive signs include:
- Stems staying green
- New leaf buds appearing
- Fresh small leaves opening
- No black mushy stem base
- No bad smell from the soil
- The cutting staying upright and firm
If the cutting turns black, shrivels, or becomes soft at the base, it likely failed. This is normal. Propagation always has some losses, so starting several cuttings improves your chances.
Continue to Page 2
Continue to page 2 for more details about this article and the key points many readers miss on the first page.