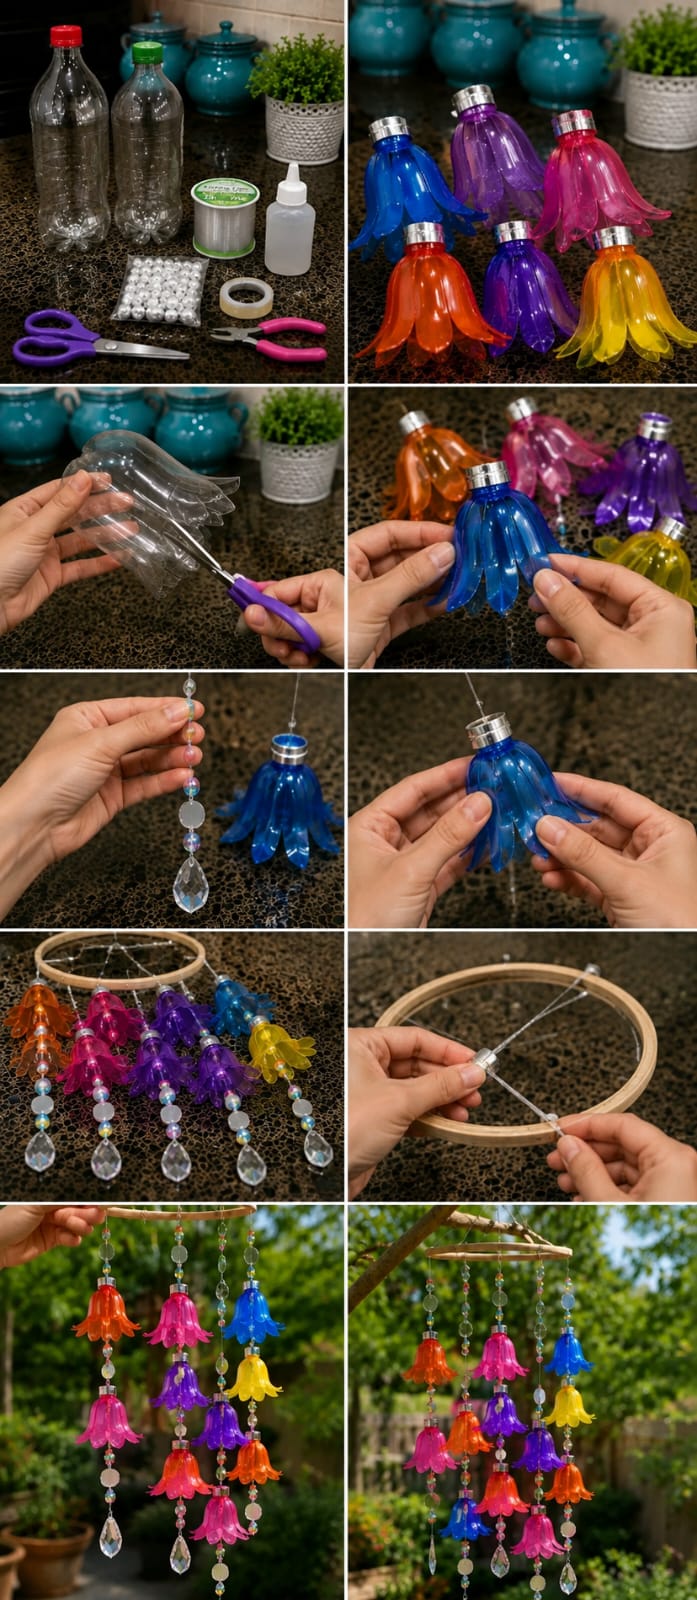
Plastic bottles can become much more than waste. With a little cutting, color, string, beads, and creativity, they can be turned into beautiful hanging flower wind chimes for the garden, balcony, patio, porch, or sunny window. This project is bright, cheerful, inexpensive, and perfect for anyone who loves recycled crafts and handmade outdoor decor.
The idea is simple: use the bottom part of plastic bottles to create flower-shaped bells, paint or tint them in vibrant colors, hang them from a circular frame, and decorate each strand with beads or crystal-style drops. When the pieces move in the breeze, the whole decoration looks like a floating flower garden. It adds color, movement, and charm to any outdoor space.
This DIY is especially useful because it turns common household materials into something decorative. You do not need expensive craft supplies. Empty water bottles, soda bottles, beads, fishing line, a hoop, and a pair of scissors can create a beautiful piece that looks playful and artistic.
Why Plastic Bottles Work So Well for Flower Wind Chimes
Plastic bottles are lightweight, easy to cut, and naturally curved. The lower part of many bottles already has a petal-like shape, which makes it perfect for flower crafts. When trimmed carefully, the bottle base can look like a bell flower, tulip, lily, or hanging blossom.
The plastic is also weather-friendly. It can handle outdoor use better than paper crafts, especially if protected from extreme heat and strong storms. Because it is light, it moves easily in the wind and creates a soft floating effect.
Clear plastic can be painted in many colors. Blue, pink, purple, yellow, orange, and red all look beautiful in sunlight. When light passes through the colored plastic, the flowers can look almost like stained glass.
Materials You Need
- Empty plastic bottles
- Sharp scissors
- Craft knife, optional
- Acrylic paint or glass paint
- Paintbrush or sponge brush
- Fishing line, nylon thread, or strong clear string
- Beads, pearls, or crystal-style drops
- Small metal rings or jump rings
- Embroidery hoop, wooden hoop, or metal ring
- Small drill, heated needle, or hole punch
- Tape, optional
- Glue, optional
- Outdoor sealant, optional
Use clean bottles before starting. Wash them, remove labels, and let them dry fully. Clean plastic is easier to cut and paint.
Best Bottles to Use
Small and medium plastic bottles work best. Bottles with curved bottoms are ideal because they naturally form flower shapes. Soda bottles often have strong bases that can create bold petals. Water bottles are easier to cut but may be softer.
Try collecting bottles of different sizes. Small bottles make delicate flowers, while larger bottles create dramatic hanging blooms. Using several sizes gives the wind chime more depth and personality.
Clear bottles are easiest to color, but lightly tinted bottles can also look beautiful.
Step 1: Clean and Prepare the Bottles
Remove the labels and caps. Wash the bottles with warm soapy water. If sticky label residue remains, rub it off with a little oil or gentle cleaner, then wash again.
Let the bottles dry completely before cutting. Wet plastic can be slippery and harder to handle.
Keep the bottle caps if you want to use them as decorative tops for the flower bells.
Step 2: Cut the Bottle Into Flower Sections
Use scissors or a craft knife to cut off the bottom part of the bottle. The height depends on the flower shape you want. A shorter cut creates a shallow flower, while a longer cut creates a bell-shaped flower.
After removing the bottom section, cut vertical slits upward to form petals. Space the cuts evenly around the bottle. Round the petal edges with scissors so they look softer and more natural.
Be careful while cutting. Plastic edges can be sharp. Trim slowly and smooth any rough edges.
Step 3: Shape the Petals
Once the slits are cut, gently bend the petals outward. This makes the plastic look more like a flower. You can create wide open petals, narrow bell petals, or pointed lily-style petals.
If the plastic is stiff, bend it slowly. Do not force it too hard or it may crack. Some crafters lightly warm the plastic to shape it, but this should be done with care and good ventilation. For most simple crafts, hand shaping is enough.
Each flower does not need to look identical. Slight differences make the final wind chime look more handmade and lively.
Step 4: Paint the Plastic Flowers
Paint the outside or inside of each flower using acrylic paint, glass paint, or transparent craft paint. Bright colors work beautifully outdoors. You can use one color per flower or blend two colors for a soft gradient.
Good color ideas include:
- Blue and turquoise
- Pink and magenta
- Purple and violet
- Orange and red
- Yellow and gold
- Clear with glitter
Let each flower dry completely before handling. If you want a glossy finish, add a clear sealant after the paint dries.
Step 5: Make Holes for Hanging
Make a small hole at the top center of each flower. You can use a small drill, hot needle, awl, or hole punch depending on the thickness of the plastic.
The hole should be large enough for fishing line or string to pass through, but not so large that the flower slides unevenly.
If using bottle caps as the top of the flowers, make a hole through each cap and thread the line through it.
Step 6: Add Beads and Crystal Drops
Beads make the wind chime look more decorative. Thread beads above and below each flower. Add crystal-style drops at the bottom of some strands for sparkle and weight.
Using beads also helps separate the flowers so they hang nicely. You can choose clear beads for a light look or colorful beads for a playful garden style.
Try mixing pearl beads, glass beads, plastic beads, and teardrop charms. The movement will catch light beautifully.
Step 7: Prepare the Hanging Hoop
An embroidery hoop, wooden ring, metal ring, or recycled circular frame can be used as the top support. The hoop should be strong enough to hold all the flower strands.
If using a wooden hoop, you can leave it natural for a rustic look or paint it to match the flowers. A natural wood hoop looks warm and simple, while a painted hoop creates a brighter craft style.
Attach three or four strings to the hoop for hanging. Bring them together at the top and tie a strong knot or attach a metal ring.
Step 8: Attach the Flower Strands
Tie each flower strand to the hoop. Space the strands evenly around the circle. Use different lengths to create a layered hanging effect.
Place longer strands near the center or around the outside depending on the look you want. A staggered design creates more movement and makes the wind chime look fuller.
After tying the strands, lift the hoop and check the balance. Adjust any strands that hang too low or too close together.
Step 9: Add Final Decorations
You can add extra beads, small bells, ribbons, shells, or charms to the hoop. Small bells will create a gentle sound when the wind moves the chime. Crystal drops create sparkle. Ribbons add softness and color.
Keep the decoration balanced. Too many heavy pieces can pull the hoop unevenly.
Once finished, hang the wind chime and watch how it moves in the light.
Where to Hang It
This recycled flower wind chime can be used in many places:
- Garden tree branches
- Porch beams
- Balcony hooks
- Patio pergolas
- Window corners
- Outdoor seating areas
- Children’s garden corners
- Sunroom windows
- Craft room decor
Choose a spot where the wind can move the strands gently. Avoid placing it where strong storms could damage it.
Garden Styling Ideas
In the garden, colorful bottle flowers look beautiful near green plants. Hang the chime above potted herbs, flowers, ferns, or a small seating area. The bright colors contrast nicely with natural leaves.
If your garden has a cottage style, use pink, purple, and yellow flowers with pearl beads. For a modern style, use blue, clear, and white beads. For a tropical look, mix orange, red, pink, and purple.
The chime can become a cheerful focal point without taking up ground space.
Balcony Styling Ideas
A balcony is a perfect place for this project. Hang the chime from the ceiling, railing hook, or wall bracket. It adds color even if you do not have many plants.
Pair it with small potted herbs, trailing pothos, petunias, geraniums, or succulents. The plastic flowers will move in the breeze and create a playful handmade look.
For small balconies, one colorful wind chime can make the whole area feel more personal and bright.
Porch Styling Ideas
On a porch, hang the wind chime near the entrance, beside hanging baskets, or above a small table. It can welcome guests with color and movement.
Use warm colors like orange, red, and yellow for a sunny porch. Use purple, blue, and pink for a softer evening look. If your porch has rustic furniture, a natural wooden hoop works beautifully.
The recycled materials give the porch a creative handmade charm.
How to Make It Look More Elegant
To make the craft look more polished, keep the color palette controlled. Instead of using every color, choose three or four colors that work well together. For example, blue, purple, and clear beads can look elegant. Pink, orange, and yellow can look cheerful. White, gold, and clear can look soft and modern.
Trim the plastic petals evenly. Use matching beads. Hide knots neatly. Clean the hoop before hanging.
Small details make recycled crafts look high-end.
How to Make It Safe for Outdoor Use
Use strong fishing line or nylon thread. Regular sewing thread may weaken outdoors. Make sure all knots are tight. If the chime will hang outside, use waterproof glue or outdoor sealant if needed.
Check the hanging string regularly. Sun and rain can weaken materials over time.
Bring the chime indoors during storms or strong wind to make it last longer.
Can Kids Help With This Project?
Yes, but adults should handle cutting and hole-making. Plastic can have sharp edges, and scissors or craft knives require care. Kids can help with painting, choosing beads, arranging colors, and decorating the hoop.
This can be a great family craft for weekends, school projects, garden days, or summer activities.
It also teaches recycling in a fun and creative way.
Creative Variations
- Use only clear plastic and add glitter for an icy crystal look.
- Paint flowers in rainbow colors for a cheerful garden display.
- Add small bells inside each flower for sound.
- Use bottle caps as flower centers.
- Hang the flowers from a branch instead of a hoop.
- Make a vertical wall hanging instead of a round wind chime.
- Add solar fairy lights around the hoop for evening glow.
- Use pearl beads for a soft romantic look.
Once you understand the basic method, you can create many different designs.
Common Mistakes to Avoid
- Cutting petals too thin so they tear easily
- Using weak string that breaks outdoors
- Painting before the bottle is clean
- Hanging too many heavy beads on one strand
- Forgetting to balance the hoop
- Leaving sharp plastic edges
- Using paint that washes off easily
- Hanging it in strong wind without protection
- Making the strands too close together
A careful build makes the wind chime stronger and prettier.
Continue to Page 2
Continue to page 2 for more details about this article and the key points many readers miss on the first page.