Orchids are some of the most graceful indoor plants for homeowners who want elegant flowers, sculptural stems, glossy leaves, silver-green roots, and a refined decorative display that fits beautifully in living rooms, bedrooms, bright kitchens, home offices, apartments, plant shelves, windowsills, commercial interiors, luxury home staging, and premium indoor plant styling. Their blooms can last for weeks when the plant is healthy, and even when the flowers fade, a strong orchid still looks beautiful because of its clean leaves, firm crown, and living roots that wrap naturally through airy bark.
Many plant lovers become interested when they see a clear cleansing mixture being poured through an orchid pot for a so-called root-reviving effect. The idea sounds simple. The liquid runs through the bark, touches the exposed roots, washes away old residue, and gives the plant a fresher start. This method may look like a quick orchid rescue trick, especially when roots look tired, bark looks old, or the plant has stopped blooming. However, orchids are sensitive plants. Their roots need air as much as water, and pouring the wrong mixture into the pot can make the problem worse instead of better.
The safest way to understand an orchid cleansing mixture is to treat it as a gentle rinse, not a miracle cure. A weak orchid does not recover because of one dramatic pour. It recovers when the root system is inspected, old bark is refreshed, rotten roots are removed, drainage is corrected, the crown stays dry, light is improved, and watering becomes balanced. A cleansing rinse may help remove light buildup or refresh the bark temporarily, but it cannot repair dead roots, fix compacted media, or force flowers overnight.
Why Orchid Roots Need Special Care
Most common indoor orchids, especially Phalaenopsis orchids, grow with thick roots covered by a spongy outer layer called velamen. This layer helps the roots absorb water quickly and breathe between waterings. Healthy orchid roots often look silver, gray, or pale green when dry. After watering, they usually turn green. This color change is normal and helpful because it shows when the roots have absorbed moisture.
Damaged orchid roots look different. Rotten roots may be brown, black, mushy, hollow, or slippery. Dry dead roots may look papery and empty. If the plant has many dead roots, pouring any cleansing liquid through the pot will not bring them back. Dead roots need to be removed with clean tools, and the plant needs fresh airy bark so new roots can grow.
Orchid roots should never sit in stagnant water. They need moisture, but they also need oxygen. This is why orchids are commonly grown in bark, leca, charcoal, or other airy materials rather than dense potting soil. A cleansing mixture can be useful only when it drains freely. If the pot does not drain well, any liquid becomes a problem.
What a Cleansing Mixture Might Be
A cleansing mixture for orchids can mean different things depending on the person using it. It may be plain room-temperature water used to flush the pot. It may be water with a very small amount of hydrogen peroxide. It may be diluted orchid fertilizer used as a light rinse. It may be rainwater, filtered water, or water with a mild root-support solution. In some homemade plant-care posts, it may even be rice water, onion water, garlic water, cinnamon water, or another kitchen mixture. Because the liquid may look clear, it is important to know what it contains before using it.
The safest cleansing mixture is usually plain room-temperature water. If the goal is to remove old fertilizer salts, dust, or residue, clean water is often enough. It can pass through the pot, refresh the bark, and drain out without leaving unknown organic material behind. This simple flush is much safer than pouring strong kitchen liquids into orchid bark.
Hydrogen peroxide is sometimes used by plant owners on damaged roots, but it must be used carefully. Strong peroxide can irritate living root tissue. It should not be used repeatedly as a routine. If root rot is severe, trimming dead roots and repotting into fresh bark is more important than relying on peroxide.
Why Some Cleansing Mixtures Can Be Risky
The biggest risk with homemade cleansing mixtures is residue. Orchid bark has many spaces where liquids can settle. If a mixture contains sugar, starch, milk, fruit juice, vegetable extract, or unstrained organic particles, those materials can stay in the bark and break down. This can create odor, attract fungus gnats, encourage mold, and make the root zone unhealthy.
Another risk is strength. Some liquids may be too acidic, too alkaline, too salty, or too concentrated. Orchid roots are sensitive. A mixture that seems mild to a person can still burn roots, especially if the orchid is already stressed. Strong fertilizer, vinegar, lemon water, baking soda water, salty water, and fermented kitchen liquids should not be used as orchid cleansers.
The crown is another danger point. In Phalaenopsis orchids, the crown is the central area where leaves meet. If liquid collects there and does not dry quickly, crown rot can develop. A cleansing rinse should be directed through the bark and roots, not poured into the crown or leaf joints. After any watering, the crown should be checked and dried with a soft tissue if needed.
When an Orchid Might Benefit From a Gentle Flush
A gentle flush may be helpful when the orchid potting media has light fertilizer buildup, when the bark surface looks dusty, when water has left mineral marks, or when the plant has been fed regularly and needs a clean rinse. A flush can also help after accidental overfertilizing, as long as the pot drains well. The goal is not to soak the plant for a long time, but to let clean water move through the pot and carry excess residue away.
A gentle flush may also be helpful before repotting. Running plain water through the bark can soften old media and make roots easier to separate. However, if the bark is already broken down, sour-smelling, or compacted, flushing is only temporary. The plant still needs fresh potting media.
If an orchid looks weak because roots are damaged, a flush alone is not enough. Root inspection is necessary. A plant with mushy roots needs cleaning, trimming, and repotting. A plant with dry dead roots needs old root tissue removed. A plant with healthy roots but poor blooming may need better light rather than a cleansing mixture.
When a Cleansing Mixture Should Be Avoided
A cleansing mixture should be avoided if the orchid is sitting in a pot without drainage, if the bark is already soaked, if the crown is wet, if the room is cold, or if the liquid contains unknown ingredients. It should also be avoided if the mixture smells sour, fermented, alcoholic, rotten, or strongly unpleasant. Any liquid that smells spoiled should never be poured into orchid bark.
A cleansing rinse should also be avoided when the plant is actively suffering from crown rot or severe stem rot. In that case, extra liquid can spread moisture into damaged tissue. The plant needs careful drying, removal of rotten material where possible, and a proper rescue approach.
Do not pour milk, sugary water, lemon water, vinegar water, baking soda water, coffee, oil mixtures, onion pulp, garlic pulp, or fermented rice water into orchid pots. These mixtures can create more problems than they solve. Orchids need clean moisture and air, not heavy kitchen residue.
How to Prepare the Safest Cleansing Rinse
The safest cleansing rinse is simple room-temperature water. Filtered water, rainwater, or low-mineral water can be useful if your tap water is hard. The water should not be icy cold or hot. Orchids prefer gentle temperatures. Cold water can stress roots, while hot water can damage them quickly.
If the goal is to flush fertilizer salts, plain water is enough. Pour slowly through the pot and allow the water to drain out fully. Do not let the orchid sit in the runoff. The runoff may contain old fertilizer salts and should be discarded.
If a very mild plant-safe additive is used, it should be diluted carefully and used rarely. The exact ingredient must be known. Unknown liquids should not be used. For most home orchid care, plain water flushing is safer than experimenting with homemade mixtures.
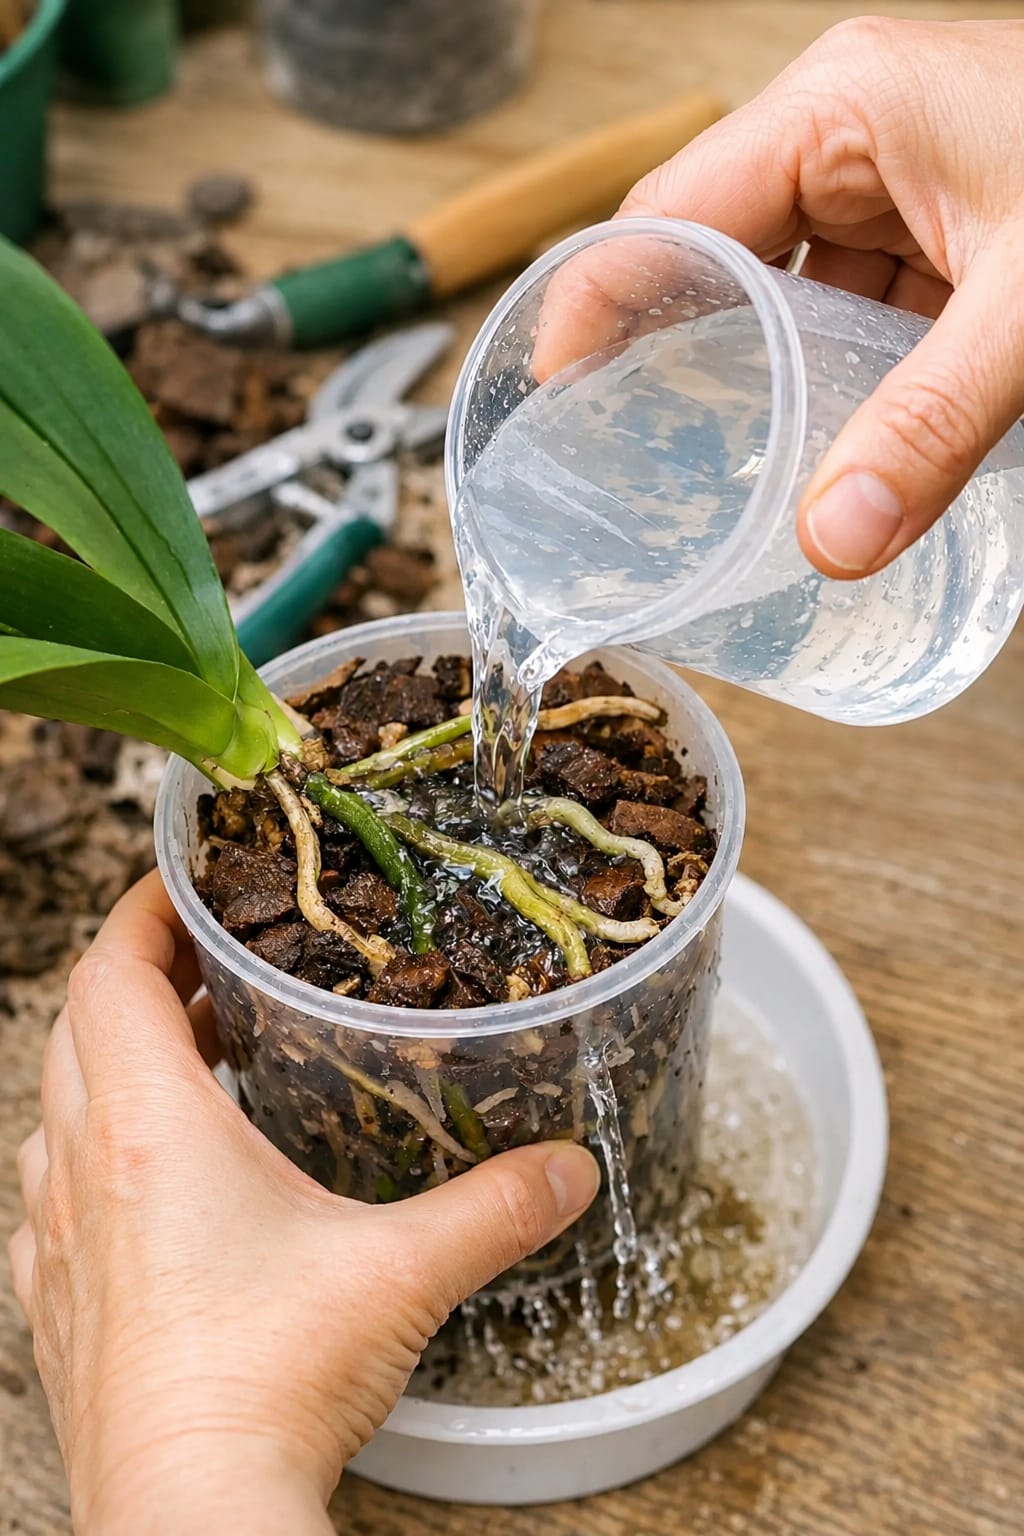
How to Use a Cleansing Rinse Safely
Start by removing the orchid from any decorative cover pot. Place the inner pot over a sink, basin, or tray where water can drain freely. Check the bark before watering. If it is already soaked, wait. If it is dry or has visible buildup, a rinse may be useful.
Pour the water slowly over the bark and exposed roots, avoiding the crown. Let the water move through the pot and drain from the bottom. Do not hold the pot in standing water unless you are doing a short controlled soak with plain water, and even then, do not leave it for too long. After rinsing, allow the pot to drain completely.
After the rinse, check the crown and leaf joints. If water has collected there, blot it gently with a tissue or paper towel. This small step can prevent serious problems. Once drained, return the orchid to its usual bright indirect light position.
Why Drainage Is Essential
Drainage is one of the most important parts of orchid care. A cleansing mixture only helps if it can pass through the pot and leave. If the pot traps water, the roots may sit in moisture too long. This can cause rot, especially in old bark or cool rooms.
Clear orchid pots with side and bottom holes are useful because they let you see roots and moisture levels. Decorative pots can still be used, but they should be cover pots only. The orchid should be watered separately, drained fully, and then placed back into the decorative container.
If water collects in the bottom of the decorative pot, empty it. Standing water under an orchid is one of the most common causes of root decline. No cleansing mixture can protect roots from constant wetness.
Why Old Bark Often Causes Root Problems
Orchid bark breaks down over time. Fresh bark is chunky and airy. Old bark becomes smaller, softer, and more compact. As it decomposes, it holds more moisture and allows less air around the roots. This can lead to root rot even if the watering schedule has not changed.
If the bark looks dark, crumbly, muddy, sour-smelling, or dense, flushing is not enough. The orchid should be repotted into fresh orchid bark. A good mix may include bark, perlite, charcoal, coconut chips, or a little sphagnum moss depending on your environment.
Many orchids decline not because they need a tonic, but because they are trapped in old media. Fresh bark can create a better root environment than any cleansing liquid. If the orchid has not been repotted in a long time, repotting should be considered before repeated flushing.
Inspecting Roots During Repotting
When repotting a weak orchid, remove the plant gently from the pot and loosen the old bark. Healthy roots should be kept. Rotten roots should be trimmed with sterilized scissors. Do not cut firm silver roots just because they look dry. Many healthy roots turn silver when dry and green when wet.
After trimming, allow the root system to breathe for a short time. Repot into fresh airy orchid mix, placing the plant securely without burying the crown. The crown should sit above the media. Roots can be tucked gently into the bark, but they should not be forced or broken.
After repotting, watering should be gentle. If many roots were trimmed, avoid soaking the plant heavily right away. Keep it in bright indirect light and stable warmth while new roots begin to grow.
Best Light for Orchid Recovery
Bright indirect light is essential for orchid recovery. Orchids need enough light to produce energy for new roots, leaves, and flower spikes. A plant kept in very low light may survive, but it will recover slowly and bloom poorly. A bright window with filtered light is usually ideal.
Direct harsh sun can burn orchid leaves, especially if the plant is weak or has recently been moved. A sheer curtain can soften strong light. Morning light is often gentle, while afternoon sun through glass can be too intense in many homes.
If the orchid has healthy roots but does not bloom, light is often the missing piece. A cleansing mixture will not replace proper brightness. The plant needs energy before it can flower again.
Watering Orchids Correctly After a Cleanse
After a cleansing rinse, return to a normal orchid watering routine. Water when the bark is approaching dryness and the roots look silver. Then water thoroughly with room-temperature water and let everything drain. Do not water again while the bark is still wet.
The exact timing depends on pot size, bark type, room temperature, humidity, and light. Orchids in bark dry faster than orchids in sphagnum moss. Orchids in warm bright rooms dry faster than orchids in cool shaded corners.
Do not cleanse or flush every few days. Too much rinsing can keep the roots wet and stressed. A cleansing rinse should be occasional and purposeful, not a daily routine.
Feeding Orchids Safely
Orchids benefit from gentle feeding during active growth. A diluted orchid fertilizer can support root growth, leaf growth, and future blooms. The dose should be weak. Strong fertilizer can burn roots, especially when the root system is already damaged.
If the orchid has just been repotted or trimmed heavily, wait before fertilizing. Let the plant stabilize first. New root tips or fresh leaf growth are signs that the plant may be ready for gentle feeding again.
A cleansing mixture is not fertilizer unless it is specifically a diluted fertilizer solution. Plain water flushes the pot but does not feed the plant. Homemade kitchen liquids are not reliable replacements for measured orchid fertilizer.
Cleaning Orchid Leaves
Orchid leaves should be clean so they can absorb light well. Dust can dull the surface and reduce the plant’s ability to photosynthesize. Wipe leaves gently with a soft damp cloth. Support each leaf while wiping so it does not crack.
Do not use oily leaf shine products. They can block the leaf surface and attract dust. Plain water is usually enough. If water spots remain, wipe gently again with clean water.
Keep liquid away from the crown while cleaning. If water runs into the center, blot it dry. A clean orchid leaf should look naturally smooth, not coated or greasy.
Humidity and Airflow
Orchids appreciate moderate humidity, but they also need airflow. A humidifier, plant grouping, or pebble tray can help in dry homes. However, the leaves and crown should not stay wet for long periods. Damp stagnant air can encourage fungal problems.
After a cleansing rinse, airflow becomes especially important. The bark should dry at a normal pace. If the room is cool and still, the pot may stay wet too long. Gentle air movement helps prevent stagnant moisture around the roots.
Do not place a freshly rinsed orchid in a dark, cold corner. Give it bright indirect light and stable warmth. This helps the roots recover and the bark dry properly.
Indoor Styling After Root Care
Orchids look beautiful when styled cleanly. A clear inner pot inside a ceramic cover pot gives both function and elegance. The clear pot allows root inspection, while the outer pot creates a refined decorative look. A white, cream, clay, glass, or textured planter can make the orchid feel more premium.
Place the orchid near bright filtered light where the leaves and flower spikes can be seen. A windowsill, side table, kitchen counter, plant shelf, office desk, or bedroom dresser can work beautifully. Keep the potting media tidy and remove dead flower spikes when they dry fully.
A recovering orchid should not be hidden in a dark spot. It should be styled where it can receive good light and airflow while still looking elegant. Healthy roots and clean leaves are part of the display.
Continue to Page 2
Continue to page 2 for more details about this article and the key points many readers miss on the first page.