Orchids are one of the most beautiful plants you can bring into your home. Their flowers look elegant, soft, expensive, and almost unreal when they are in full bloom. A healthy orchid can instantly make a room feel brighter, cleaner, and more luxurious. It can sit on a kitchen counter, a coffee table, a bathroom shelf, a bedroom dresser, or a sunny windowsill and look like a professional floral arrangement.
But even though orchids look graceful, many people find them confusing.
They buy an orchid while it is blooming beautifully at the store. The flowers last for a few weeks. The plant looks perfect. Then, little by little, the flowers fade. The stem dries. The leaves stay green, but nothing else happens. Months pass, and the orchid does not bloom again. In some cases, the roots begin to look weak, the leaves become soft, and the whole plant starts looking tired.
That is why so many homeowners are curious about simple orchid care tricks.
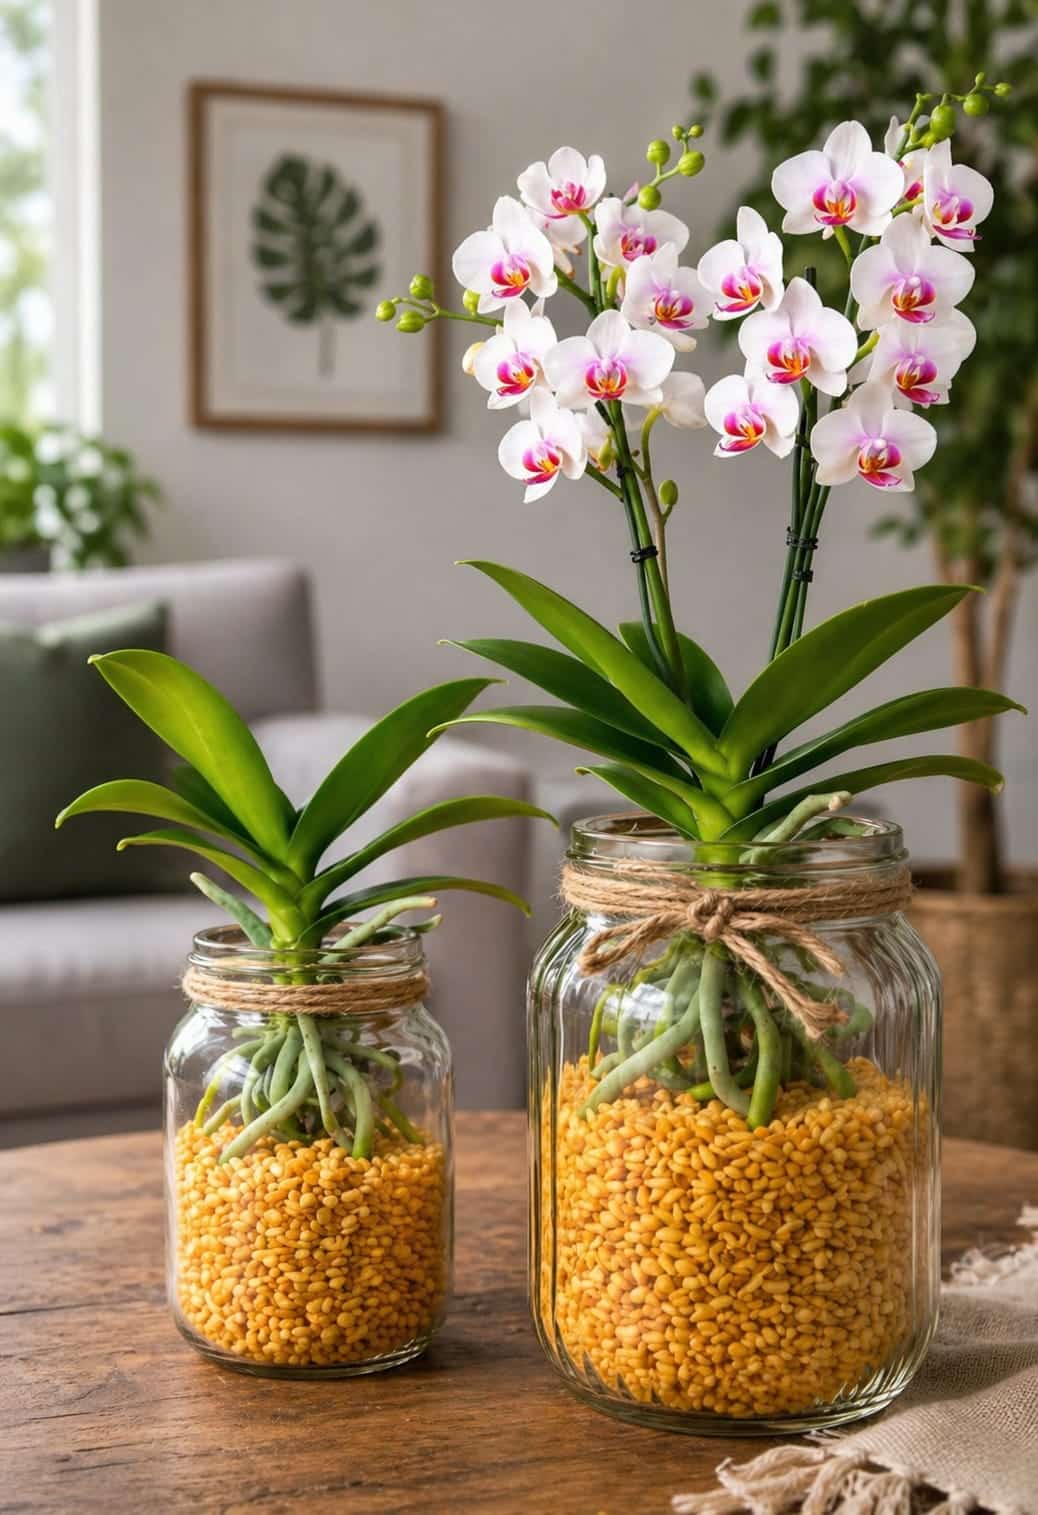
Recently, a method has been getting attention online: growing orchids in clear glass jars with small golden grains around the roots. The setup looks beautiful. The roots are visible. The plant looks clean and decorative. The flowers rise above the jar like a luxury indoor arrangement.
At first glance, it almost looks too simple.
A glass jar.
A handful of golden grains.
An orchid placed carefully inside.
Visible roots.
A clean, stylish look.
The result looks so different from the usual plastic orchid pot that many people immediately want to try it.
The idea behind this method is that orchids need a special kind of root environment. Unlike many houseplants, orchids do not like heavy soil around their roots. Their roots need air, light, and careful moisture. The jar method gives homeowners a way to watch the roots closely while creating a decorative display that fits beautifully into modern home decor.
If your orchid stopped blooming, has weak roots, or looks like it is just sitting there doing nothing, this simple jar method may be exactly the kind of routine that makes orchid care easier to understand.
Why Orchids Are So Popular in Modern Homes
Orchids have a completely different look from most indoor plants. While many houseplants are grown mainly for their leaves, orchids are admired for their flowers. Their blooms are delicate, long-lasting, and elegant. A blooming orchid looks refined without needing much styling.
This is why orchids are often used in:
Living rooms
Bathrooms
Bedrooms
Home offices
Kitchen counters
Entryway tables
Spa-style interiors
Minimalist apartments
Luxury home staging
Modern neutral decor
They add height, color, and softness without taking up much space. A single orchid in a glass jar or simple ceramic pot can look more polished than a large group of ordinary plants.
Orchids also have a peaceful quality. Their flowers bring a calm, graceful feeling into a room. This makes them perfect for homeowners who want indoor plants that feel clean, intentional, and stylish.
But the beauty of orchids also creates pressure. When an orchid stops blooming or begins to decline, it can feel disappointing. A plant that once looked expensive suddenly looks unfinished.
That is when people start searching for easy ways to bring it back.
Why Orchids Are Different From Regular Houseplants
The biggest mistake many beginners make is treating orchids like normal houseplants.
Most common indoor plants grow in soil. Their roots are designed to spread through potting mix, absorb moisture, and stay covered. Orchids are different. Many popular orchids, especially Phalaenopsis orchids, naturally grow attached to trees in tropical environments. Their roots are not buried in dense soil. Instead, they cling to surfaces and absorb moisture from the air, rain, and organic material around them.
This means orchid roots need more airflow than regular plant roots.
When orchid roots are packed into heavy, wet material, they can struggle. If moisture stays trapped for too long, the roots may become soft, brown, or rotten. Once the roots weaken, the whole plant suffers.
Healthy orchid roots are the secret behind strong leaves and repeat blooming.
That is why the jar method became so interesting to plant lovers. It focuses attention exactly where orchids need it most: the roots.
The Problem With Traditional Orchid Care
Most orchids sold in stores come in plastic pots filled with bark, moss, or a combination of materials. This can work well when managed properly, but many beginners struggle because they cannot clearly see what is happening inside the pot.
They may wonder:
Are the roots dry?
Are the roots wet?
Should I water now?
Is the bark still damp?
Are the roots healthy?
Is the plant rotting?
Why did it stop blooming?
Because the roots are hidden, it is easy to overwater or underwater.
Some orchids are sold with decorative outer pots that do not drain well. This makes the problem worse. Water can collect at the bottom, and the roots may sit in moisture without the owner realizing it.
The jar method feels appealing because it removes some of that mystery. A clear glass container allows you to see the roots, moisture level, and overall plant condition more easily.
What Is the Orchid Jar Method?
The orchid jar method is a decorative growing style where an orchid is placed inside a clear glass jar with a loose, airy material around the roots. In many viral videos and images, the material appears as small golden grains or pellets. These grains create a bright, clean, attractive base that supports the orchid while leaving spaces around the roots.
The method is popular because it looks both practical and beautiful.
The jar holds the orchid upright.
The grains support the roots.
The glass makes everything visible.
The whole setup becomes part of the home decor.
Instead of hiding the root system inside a plastic pot, this method turns the roots into part of the display.
This is one reason homeowners love it. It makes orchid care look less messy and more intentional.
Why the Golden Grains Look So Appealing
The golden grains are one of the main reasons this method catches attention online. They stand out immediately in a clear jar. Their warm color contrasts beautifully with the green leaves, pale roots, and soft orchid flowers.
The look is natural, clean, and decorative.
To viewers, the grains suggest:
Support
Warmth
Cleanliness
Root stability
A natural growing base
A stylish alternative to soil
The visual effect is powerful. A regular orchid in a plastic pot can look ordinary. An orchid in a glass jar with golden grains looks like something from a boutique plant shop.
That is why this method spreads so quickly. It does not only promise better plant care. It also creates a beautiful display.
What the Golden Grains Are Supposed to Do
In these types of orchid jar methods, the grains are usually presented as a loose growing medium that supports the plant while helping avoid the compacted, heavy conditions that orchids dislike.
The purpose is usually to:
Hold the orchid steady
Create air pockets around the roots
Prevent dense soil from suffocating the plant
Allow moisture to move through the jar
Make root condition easier to monitor
Create a clean decorative base
Support a stronger-looking orchid
The most important idea is airflow.
Orchid roots should not be trapped in heavy soil. They need a balance of moisture and air. A loose grain-like base gives the roots space instead of pressing tightly around them.
This is why the method feels so logical to many plant lovers.
Why Clear Glass Makes Orchid Care Easier
One of the best parts of the jar method is visibility.
With a clear jar, you can see what is happening below the leaves. This is helpful because orchid roots tell you a lot about the plant’s condition.
Healthy roots often look firm and plump. Depending on moisture level, they may appear green, silvery, or pale. Weak roots may look brown, mushy, flat, or dry.
When roots are visible, you can react faster.
You can see if moisture is sitting too long.
You can notice root changes early.
You can avoid watering blindly.
You can check whether roots are growing.
You can watch new root tips appear.
For beginners, this can make orchid care feel less confusing.
Instead of guessing, you observe.
Why This Method Looks Like It Makes Orchids Stronger
Many people who try the jar method notice their orchids appear cleaner, more stable, and easier to manage. The plant may also look more decorative because the entire setup is more attractive than a standard nursery pot.
When orchids are placed in a bright spot with controlled watering and visible roots, the owner often becomes more careful. They notice the plant more. They check moisture more often. They avoid leaving it soaked. They adjust light. They clean the jar. They pay attention to root color.
This increased attention can help the orchid perform better.
The jar method also encourages people to think about the root environment. That alone is a big improvement for many orchid owners.
An orchid with healthy roots is more likely to produce strong leaves, stable growth, and future blooms.
How to Set Up the Orchid Jar Method
The jar method should be done carefully. Orchids are beautiful, but they do not like being trapped in constantly wet conditions. The goal is to create a clean, airy display, not a sealed swamp.
Here is a simple version of the method.
Step 1: Choose a Clear Glass Jar
Select a jar that is tall enough to support the orchid but wide enough to allow air movement around the roots. The jar should not squeeze the plant tightly.
A good jar should be:
Clear
Clean
Wide enough for roots
Stable enough not to tip
Decorative enough for display
Mason jars, wide glass jars, and recycled decorative jars can work beautifully.
Step 2: Remove the Orchid Carefully
If your orchid is already in a plastic pot, remove it gently. Do not pull harshly. Orchid roots can cling to bark and pot walls.
Loosen the plant slowly and protect the roots as much as possible.
Step 3: Inspect the Roots
Before placing the orchid in the jar, check the roots. Trim away roots that are clearly dead, mushy, hollow, or rotten. Use clean scissors.
Healthy roots should be kept.
This step matters because weak roots can create problems inside the jar.
Step 4: Add a Layer of Golden Grains
Place a layer of grains at the bottom of the jar. This helps lift and support the orchid. The layer should not be packed tightly. It should remain loose and airy.
The goal is structure, not compression.
Step 5: Place the Orchid Inside
Position the orchid carefully so the leaves sit above the jar opening and the roots spread naturally inside.
Do not bury the crown of the orchid. The crown is the central point where the leaves meet. If moisture collects there, the plant can rot.
This is one of the most important rules.
Step 6: Add More Grains Around the Roots
Add the grains gently around the roots to hold the plant steady. Do not crush the roots. Do not pack the grains tightly. Leave small spaces so air can move.
The roots should feel supported but not suffocated.
Step 7: Water Lightly
Watering must be controlled. Add only enough water to moisten the medium slightly. Do not leave the roots sitting in deep water.
Some people prefer to soak briefly and then drain. Others add a very small amount and let it evaporate gradually.
The important thing is to avoid stagnant water.
Step 8: Place in Bright Indirect Light
Orchids need bright indirect light to grow and bloom. The jar method will not help if the orchid is placed in a dark corner.
Place it near a window with filtered light, but avoid harsh direct sun that can overheat the glass or burn the leaves.
Why You Should Never Bury the Orchid Crown
The crown is the heart of the orchid. It is where new leaves emerge. If water sits in this area for too long, the plant can decline quickly.
In the jar method, the crown should remain above the grains and away from trapped moisture.
This is extremely important.
A beautiful jar setup can fail if the orchid is planted too deeply.
Always keep the crown exposed and dry.
Watering Rules for Orchids in Glass Jars
Watering is the part of the jar method that requires the most care. A glass jar does not breathe the same way as a traditional orchid pot with side holes. This means moisture can stay longer inside the container.
To avoid problems, water lightly and watch the roots.
A good watering routine may include:
Check the roots before watering.
Water only when the roots look dry or silvery.
Avoid keeping water pooled at the bottom.
Let the medium dry between waterings.
Never let the crown stay wet.
Reduce watering in cooler months.
The biggest mistake is treating the jar like a normal pot and pouring in too much water.
Orchids need moisture, but they also need air.
Continue to Page 2
Continue to page 2 for more details about this article and the key points many readers miss on the first page.