Snake plants are some of the best indoor plants for modern homes. They are strong, stylish, low-maintenance, and perfect for people who want greenery without a complicated care routine. Their tall sword-shaped leaves, bold green patterns, and yellow edges make them look clean and elegant in almost any room. Whether you place them on a windowsill, desk, shelf, coffee table, kitchen counter, or plant stand, snake plants instantly add structure and freshness.
One creative way to grow snake plants is by using recycled plastic bottles. This method is simple, affordable, and sustainable. Instead of throwing away a plastic bottle, you can turn it into a decorative planter. With a few cuts, a pebble layer, fast-draining soil, and a little natural twine, an ordinary bottle becomes a stylish indoor plant display.
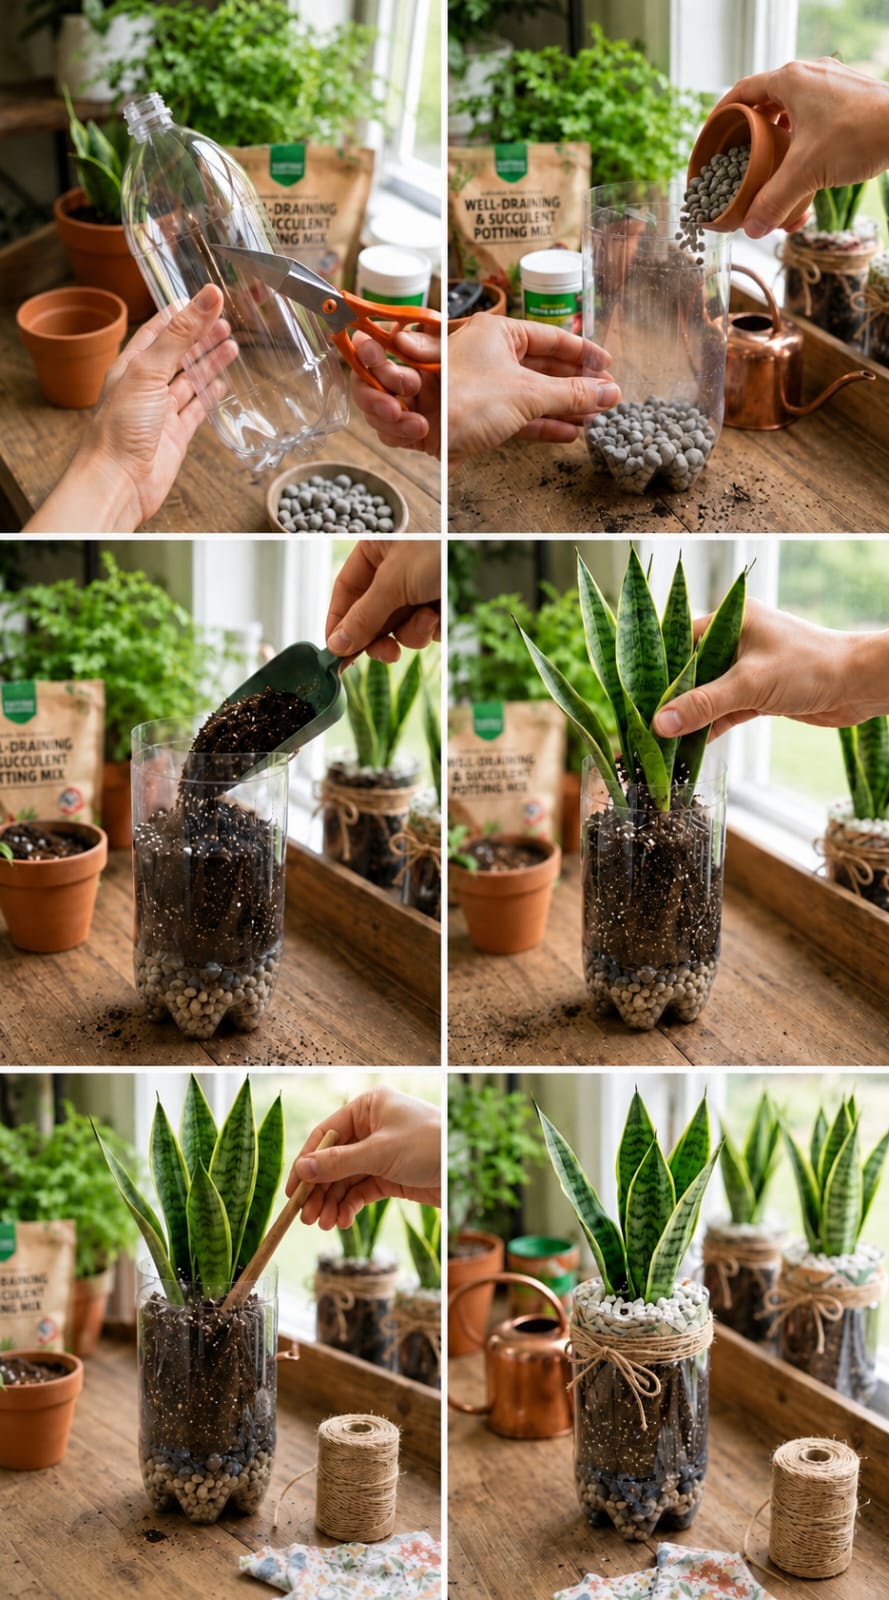
The image shows a beautiful six-step DIY snake plant bottle garden. First, the plastic bottle is cut. Then pebbles are added to the bottom. Next, a well-draining succulent mix is poured in. A snake plant is placed into the soil. The soil is settled around the roots. Finally, the bottle is decorated with white pebbles and jute twine for a rustic, cozy look.
This project is perfect for indoor gardeners, plant lovers, beginners, DIY decor fans, and anyone who wants an eco-friendly plant idea. But snake plants need the right setup. They are tough, but they can rot if the bottle holds too much water. The secret is drainage, loose soil, and careful watering.
Why Snake Plants Are Perfect for Bottle Gardens
Snake plants are ideal for recycled bottle planters because they grow slowly and do not need frequent watering. They store moisture in their thick leaves and rhizomes, which helps them survive dry periods. This makes them better suited to small DIY containers than many thirsty plants.
Snake plants also have upright growth. They do not spread wildly or trail heavily. Their vertical shape looks neat in a narrow container. A clear bottle also lets you see the decorative layers, roots, soil, and pebbles, which makes the project visually attractive.
However, a bottle garden should still be made with care. Snake plants hate soggy soil. If water collects at the bottom and cannot escape, the roots can become soft, black, and rotten. That is why this guide focuses on safe drainage and smart watering.
What You Need
- Clean plastic bottle
- Sharp scissors or craft knife
- Small pebbles or gravel
- Fast-draining cactus or succulent soil
- Perlite or pumice, optional
- Small snake plant or snake plant division
- Wooden stick or spoon
- White decorative pebbles, optional
- Jute twine or rope, optional
- Small saucer or tray
- Clean water
- Bright indirect light
Best Plastic Bottle to Use
A medium or large bottle works best. A small bottle may not give enough room for the root system. Choose a bottle that is wide enough to hold the plant upright. A bottle with a sturdy base is better because snake plants can become top-heavy.
Wash the bottle well before using it. Remove labels and sticky glue. Rinse away any soap residue. A clean bottle helps prevent odor, mold, and bacteria.
Important Drainage Warning
The most important part of this project is drainage. Pebbles at the bottom look beautiful, but they do not replace drainage holes. If the bottle has no holes, extra water stays trapped inside. This can cause root rot.
For the safest setup, make several small drainage holes in the bottom of the bottle. Place the bottle on a saucer or tray after planting. When you water, extra water can escape. Empty the saucer after watering.
If you want to keep the bottle without holes for display, water very lightly and rarely. But for long-term plant health, drainage holes are much better.
Step 1: Cut the Plastic Bottle
Start with a clean empty bottle. Use scissors or a craft knife to cut the top section off. The lower section becomes the planter. Cut slowly so the edge stays even.
If the cut edge is sharp, trim it carefully. You can also wrap the rim with twine, tape, or fabric later to make it safer and more decorative.
Make sure the opening is wide enough to place the snake plant inside without crushing the leaves.
Step 2: Add Pebbles to the Bottom
Add a layer of clean pebbles to the bottom of the bottle. Pebbles add weight, make the planter more stable, and create a decorative base. They also help separate the soil from any small amount of extra water.
Use clean stones, clay pebbles, or aquarium gravel. Rinse them first to remove dust. A clear bottle looks especially pretty when the pebble layer is clean and even.
Step 3: Add Fast-Draining Soil
Add cactus or succulent potting mix above the pebble layer. Snake plants need soil that drains quickly. Regular indoor potting soil alone may stay too wet, especially inside a plastic bottle.
Simple Snake Plant Bottle Soil Mix
- 2 parts cactus or succulent mix
- 1 part perlite or pumice
- 1 part coarse sand or orchid bark
The soil should feel light and crumbly. It should not feel sticky, muddy, or compacted. A loose mix gives the roots air and helps prevent rot.
Step 4: Place the Snake Plant
Gently remove the snake plant from its old pot. Hold the plant at the base and support the root ball. Shake away a little old soil if it is compacted, but do not damage the roots too much.
Place the plant into the bottle planter. Keep it upright and centered. The base of the leaves should sit just above the soil line. Do not bury the leaves deeply. Moist soil against the leaf bases can cause rot.
Step 5: Settle the Soil Around the Roots
Add more soil around the roots and press gently with your fingers or a wooden stick. Do not pack the soil too tightly. Snake plant roots need oxygen.
If the plant leans, add a little more soil around the base. Keep the plant stable, but do not bury it too deep.
Step 6: Decorate the Top
Once the plant is stable, add a thin layer of decorative white pebbles on top of the soil. This gives the planter a clean finished look. Do not make the pebble layer too thick because it can slow soil drying.
Wrap jute twine around the bottle for a rustic handmade style. Tie a simple bow or knot. This makes the recycled bottle look more like a decorative indoor planter.
How to Water a Snake Plant Bottle Garden
Water carefully. Snake plants do not need frequent watering. Let the soil dry out almost completely before watering again. In a plastic bottle, soil may stay moist longer than in terracotta, so always check first.
When watering, pour slowly around the soil. If you made drainage holes, allow water to drain out and empty the saucer. If your bottle has no drainage holes, use only a small amount of water and avoid soaking the soil.
Signs Your Snake Plant Needs Water
- The soil is completely dry.
- The bottle feels light.
- Leaves look slightly thinner.
- Leaves may curl inward a little.
- Several weeks have passed since watering.
Signs of Overwatering
- Leaves turn yellow.
- Leaf bases feel soft.
- The soil smells sour.
- The soil stays wet for many days.
- Roots look black or mushy.
- Leaves fall over suddenly.
- Fungus gnats appear.
If you see these signs, stop watering. Remove the plant, check the roots, trim rotten sections, and repot in dry fresh soil.
Best Light for Snake Plant Bottle Gardens
Snake plants tolerate low light, but they grow better in bright indirect light. A bright windowsill, plant shelf, desk near a window, or coffee table in a sunny room can work well.
Avoid harsh direct sun through the plastic bottle. Clear plastic can warm up quickly, and hot sun may stress the roots or burn the leaves. Gentle morning light is fine. Strong afternoon sun should be filtered.
Can Snake Plants Grow in Low Light?
Yes, snake plants can survive in low light, which is one reason they are so popular. But in low light, they grow more slowly and the soil dries more slowly. This means you must water less often.
If your bottle garden is in a low-light spot, check the soil carefully and avoid frequent watering.
How Often to Water
There is no perfect fixed schedule. Watering depends on light, temperature, bottle size, soil mix, and humidity. In bright warm rooms, you may water every 2 to 4 weeks. In cooler or darker rooms, watering may be needed only every 4 to 8 weeks.
The best rule is simple: water only when the soil is dry.
Why Pebbles Are Useful but Not Enough
Pebbles make the bottle garden look beautiful and add stability. They also keep the clear base visually clean. But pebbles do not remove water. If the bottle has no drainage holes, water can still sit in the bottom and create humidity around the roots.
Use pebbles for style and stability, but use drainage holes for plant safety.
Best Snake Plant Varieties for Bottle Gardens
- Sansevieria Laurentii
- Sansevieria Zeylanica
- Bird’s Nest Snake Plant
- Moonshine Snake Plant
- Black Gold Snake Plant
- Mini snake plant varieties
Small or medium snake plants are best for bottle planters. Large mature plants need heavier pots for stability.
When to Move the Plant to a Bigger Pot
A plastic bottle planter is great for small plants and decorative displays, but it may not be permanent. Move the snake plant to a larger pot when the roots fill the bottle or the plant becomes unstable.
Signs It Is Time to Repot
- Roots press against the bottle sides.
- The plant becomes top-heavy.
- Soil dries too fast.
- Leaves crowd tightly.
- The bottle starts bending or cracking.
- The plant stops growing.
Best Long-Term Pot for Snake Plant
For long-term growth, a terracotta pot with drainage holes is one of the best choices. Terracotta dries faster and helps prevent root rot. Ceramic pots also work well if they drain. Plastic pots are fine, but they hold moisture longer.
Choose a pot only slightly larger than the root ball. A huge pot holds too much soil and water.
How to Repot From Bottle to Pot
- Water lightly a few days before repotting if soil is very dry.
- Gently squeeze or cut the bottle if roots are stuck.
- Remove the plant carefully.
- Keep the root ball mostly intact.
- Place in a pot with fast-draining soil.
- Keep leaf bases above the soil line.
- Wait a few days before watering if roots were disturbed.
How to Make the Bottle Planter Look Stylish
The best part of this project is the decorative finish. A simple plastic bottle can look beautiful with a few natural materials.
- Wrap jute twine around the top.
- Add white pebbles for a clean finish.
- Use a wooden tray underneath.
- Place beside a copper watering can.
- Group with terracotta pots.
- Add a small plant label.
- Use burlap ribbon for rustic decor.
- Keep the bottle clear to show the layers.
DIY Decor Ideas
You can style the bottle garden in many ways. For a rustic look, use jute rope and terracotta accents. For a modern look, use white pebbles and a simple clear bottle. For a boho look, wrap the bottle with macrame cord. For a natural look, place it on a wooden shelf with other plants.
The goal is to make the recycled material look intentional, not messy.
Where to Place Snake Plant Bottle Gardens
- Kitchen windowsill
- Bedroom shelf
- Living room coffee table
- Home office desk
- Bathroom with natural light
- Entryway table
- Plant shelf
- Covered balcony
Choose a place with steady light and no cold drafts.
Can You Use Activated Charcoal?
Yes, you can add a thin layer of activated charcoal between the pebbles and soil. It may help reduce odor and keep the container fresher, especially in semi-closed planters.
But activated charcoal does not replace drainage. It is only a support layer.
Should You Fertilize a Snake Plant Bottle Garden?
Snake plants are not heavy feeders. Fertilize lightly during spring or summer only. Use a diluted cactus or houseplant fertilizer once every 6 to 8 weeks during active growth.
Do not fertilize right after repotting. Wait at least 4 to 6 weeks. Do not fertilize in winter if the plant is not actively growing.
How to Clean Snake Plant Leaves
Dust can collect on the leaves. Wipe them gently with a soft damp cloth. Clean leaves look brighter and absorb light better.
Do not use oily leaf shine products. Plain water is enough.
Common Mistakes to Avoid
- Using a bottle with no drainage holes
- Watering too often
- Using heavy regular soil
- Adding too thick a pebble layer on top
- Keeping the bottle in harsh direct sun
- Burying leaf bases too deeply
- Using a very narrow unstable bottle
- Fertilizing too much
- Letting water sit in the saucer
- Ignoring soft yellow leaves
How to Fix Yellow Leaves
Yellow leaves usually mean overwatering, poor drainage, or root stress. Check the soil first. If it is wet, stop watering. If the leaf base is soft, remove the plant and inspect the roots.
Trim rotten roots, let the plant dry briefly, and repot into dry fast-draining soil.
Continue to Page 2
Continue to page 2 for more details about this article and the key points many readers miss on the first page.