Anthuriums are among the most eye-catching indoor plants you can grow. Their glossy green leaves and bright heart-shaped spathes bring a tropical feeling into any home. Many people call the colorful part a flower, but it is actually a spathe, a modified leaf that surrounds the small flower spike called the spadix. Whether your anthurium blooms red, pink, white, orange, purple, or a mix of colors, the plant looks elegant, bold, and decorative.
The secret to a beautiful anthurium starts below the surface. Bright flowers and healthy leaves depend on healthy roots. If the roots are trapped in heavy wet soil, the plant may stop blooming, turn yellow, droop, or develop root rot. If the potting mix is light, chunky, and airy, the roots can breathe, absorb water properly, and support better growth.
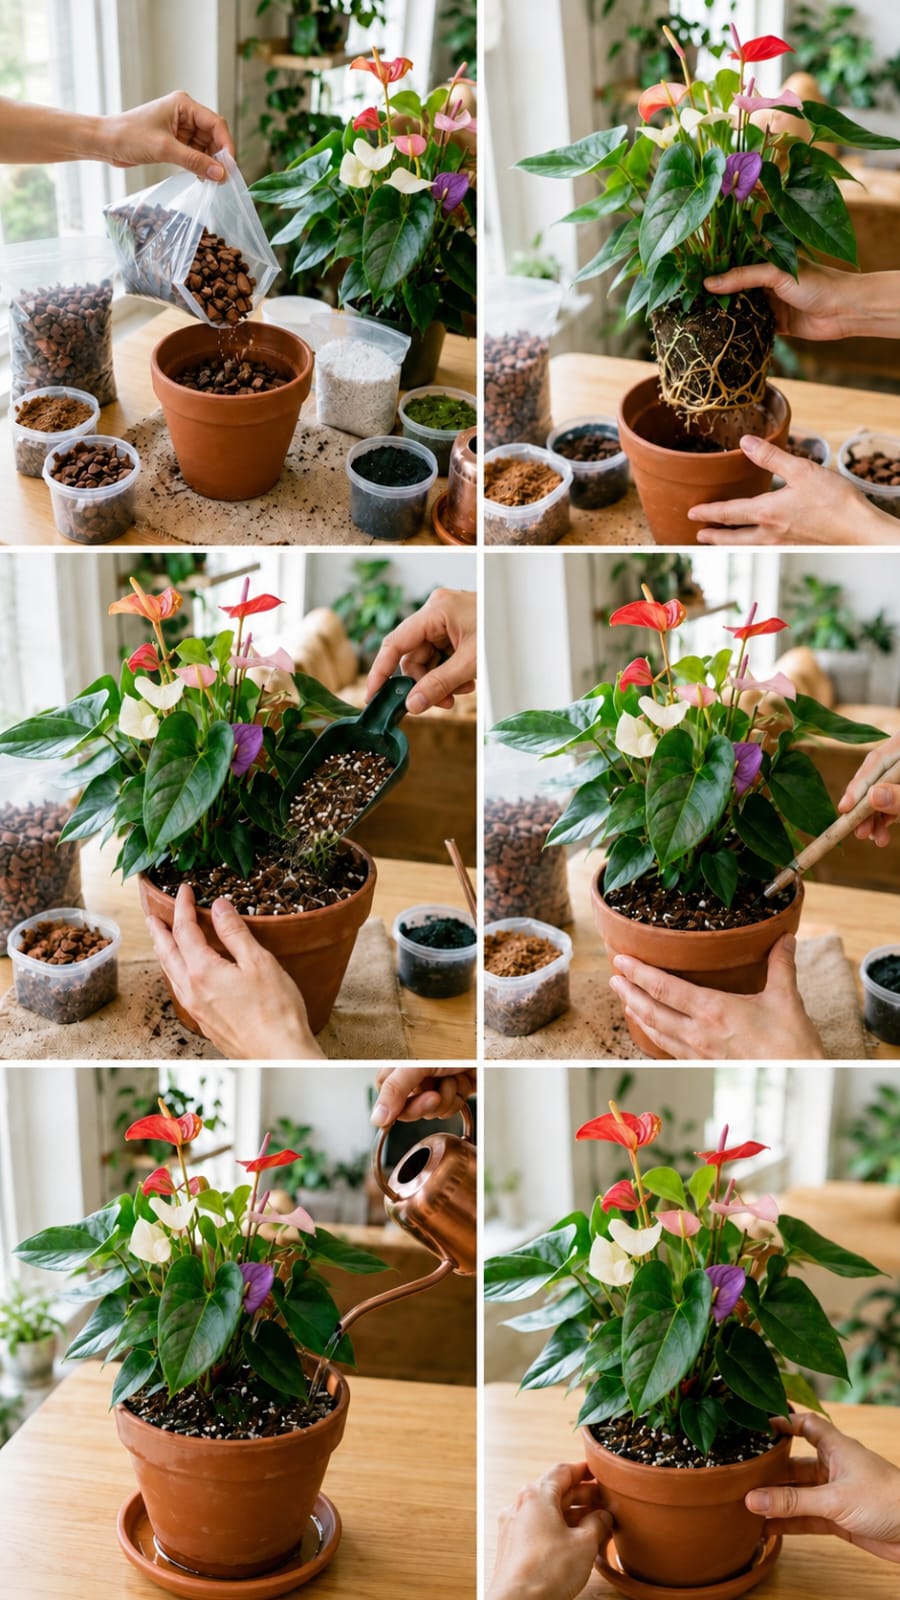
The image shows a simple six-step anthurium potting routine. A terracotta pot is prepared with chunky bark. The anthurium is removed from its old container. Fresh potting mix is added around the roots. The soil is settled gently with a stick. The plant is watered carefully. Finally, the potted anthurium is placed in a bright indoor spot where it can continue growing and blooming.
Why Potting Matters for Anthuriums
Anthuriums are tropical plants with roots that enjoy air as much as moisture. In nature, many anthuriums grow in loose organic material where water passes through quickly. Their roots are not designed to sit in dense, soggy soil for long periods. This is why the potting setup is so important.
A good potting mix supports the plant in three ways. It holds enough moisture so the roots do not dry too fast. It drains extra water so the roots do not rot. It also creates air pockets so roots can breathe. When these three things are balanced, the anthurium can grow shiny leaves and produce brighter blooms.
Signs Your Anthurium Needs Repotting
- Roots are circling tightly around the pot.
- Water runs through too quickly or sits on top too long.
- The soil smells sour or looks compacted.
- Leaves are yellowing even though light is good.
- The plant dries out very fast after watering.
- The pot has become too small or unstable.
- Roots are growing out of drainage holes.
- The plant has not bloomed for a long time.
- The soil has broken down into a heavy muddy texture.
- The plant looks tired after several years in the same pot.
Best Time to Repot Anthuriums
The best time to repot anthuriums is spring or early summer. During this time, the plant is entering active growth and can recover faster. Warm temperatures, stronger light, and better indoor conditions help the roots settle into the new mix.
You can repot at other times if the plant has root rot or a serious soil problem. If the plant is blooming heavily and looks healthy, it is better to wait until the flowers fade before disturbing the roots.
Best Pot for Anthuriums
The best pot for an anthurium must have drainage holes. This is the most important rule. A pot without drainage can trap water at the bottom and cause root rot. Terracotta pots are a great choice because they breathe and help the soil dry more evenly. Ceramic pots are also beautiful, but they must drain well. Plastic pots can work, but they hold moisture longer, so watering must be more careful.
Choose a pot only slightly larger than the root ball. A pot that is too large holds extra soil, and extra soil holds extra moisture. That can keep the roots wet for too long.
Best Soil Mix for Anthuriums
Anthuriums need a chunky, airy soil mix. Regular indoor potting soil alone is often too dense. A better mix includes bark, perlite, coco coir, and a small amount of potting soil.
Simple Anthurium Potting Mix
- 1 part indoor potting mix
- 1 part orchid bark
- 1 part perlite
- 1 part coco coir or peat moss
- A small amount of horticultural charcoal, optional
This mix gives the roots moisture and airflow. Orchid bark creates chunky spaces. Perlite improves drainage. Coco coir holds gentle moisture. A small amount of potting soil adds support and nutrients.
Step 1: Prepare the Pot With Chunky Material
Start with a clean pot that has drainage holes. Add a small amount of chunky bark or airy mix to the bottom. This helps create a light base for the roots. Do not block the drainage holes with dense material.
Many people add a thick layer of stones at the bottom of pots, but this does not solve drainage problems. Drainage comes from the hole and the soil mix. A chunky potting mix is more helpful than a heavy rock layer.
Step 2: Remove the Anthurium From the Old Pot
Hold the plant gently near the base and slide it from the old container. If the roots are stuck, squeeze the sides of the plastic pot or tap the pot gently. Do not pull hard on the leaves because stems can snap.
Once the plant is out, inspect the root ball. Healthy roots are firm and usually cream, tan, or light brown. Rotten roots are soft, black, mushy, and may smell bad. Trim damaged roots with clean scissors.
Step 3: Place the Plant in the New Pot
Set the anthurium into the new pot at the same depth it was growing before. The crown of the plant should not be buried deeply. If soil covers the crown, moisture can collect around the stems and cause rot.
Hold the plant upright while adding potting mix around the sides. Keep the plant centered so it grows evenly and looks balanced.
Step 4: Add Fresh Airy Soil Around the Roots
Add the fresh mix little by little. Let the chunky pieces fall around the roots naturally. Press lightly, but do not pack the mix tightly. Anthurium roots need oxygen.
If there are large empty spaces, use a small wooden stick to guide the mix into place. The goal is support, not compression. A loose mix is better than a hard packed pot.
Step 5: Water Carefully
After potting, water gently until water drains from the bottom. This helps settle the mix around the roots. Empty the saucer after watering. Never let the pot sit in standing water.
If you trimmed many roots or removed rot, wait a few days before watering heavily. This gives cut roots time to dry slightly and reduces the risk of more rot.
Step 6: Place in Bright Indirect Light
After repotting, place the anthurium in bright indirect light. Avoid harsh direct sun because it can burn the leaves. A bright window with filtered light is ideal. Good light helps the plant recover and supports future blooms.
Do not move the plant constantly after repotting. Give it time to settle into its new pot.
How to Water Anthuriums After Repotting
Water when the top inch of potting mix feels slightly dry. Anthuriums enjoy consistent moisture, but they do not like soggy roots. The soil should feel lightly moist, not wet and heavy.
In a chunky mix, water may drain faster. This is good. It means the roots are getting airflow. Check the mix with your finger before watering again.
Signs Your Anthurium Needs Water
- The top inch of mix feels dry.
- The pot feels lighter.
- Leaves look slightly less firm.
- The plant droops mildly.
- The mix pulls slightly from the pot edge.
Signs of Overwatering
- Yellow leaves
- Soft stems
- Sour soil smell
- Wet soil for many days
- Fungus gnats
- Mushy roots
- Drooping even when soil is wet
If your anthurium droops while the mix is wet, do not water again. Check the roots and improve drainage.
How to Encourage Bright Colorful Flowers
Bright blooms come from healthy care. Anthuriums need strong indirect light, warm temperatures, moderate humidity, and gentle feeding. A plant in a dark corner may survive, but it will usually bloom less.
- Give bright indirect light.
- Use chunky airy soil.
- Keep roots slightly moist but never soggy.
- Feed lightly during spring and summer.
- Keep humidity comfortable.
- Remove old faded flowers.
- Avoid cold drafts.
- Keep leaves clean.
Best Fertilizer for Anthuriums
Anthuriums do not need heavy fertilizer. A diluted balanced houseplant fertilizer works well during active growth. Use it at half strength or quarter strength every 4 to 6 weeks in spring and summer.
Do not fertilize immediately after repotting. Wait 4 to 6 weeks so the roots can settle. Too much fertilizer can burn roots and cause brown tips.
Humidity for Anthuriums
Anthuriums enjoy humidity. Dry indoor air can cause brown leaf tips and slower growth. A humidity level around 50 percent or higher is helpful. You can increase humidity by grouping plants, using a pebble tray, placing the plant in a bright bathroom, or using a humidifier.
Good airflow is still important. Humidity without airflow can cause fungal problems.
How to Clean Anthurium Leaves
Dust on leaves blocks light and makes the plant look dull. Wipe the leaves gently with a damp cloth. Support each leaf with one hand and wipe with the other. Clean leaves look glossy and help the plant absorb more light.
Avoid oily leaf shine products. Plain water is enough.
How to Remove Old Flowers
When an anthurium flower fades, cut the flower stem near the base with clean scissors. Removing old flowers helps the plant focus energy on new growth. Do not pull old stems hard because you may damage the crown.
Common Potting Mistakes
- Using heavy garden soil
- Choosing a pot without drainage
- Using a pot that is too large
- Burying the crown too deeply
- Packing the mix too tightly
- Watering too often after repotting
- Fertilizing immediately after repotting
- Keeping the plant in direct hot sun
- Ignoring rotten roots
- Letting water sit in the saucer
How to Fix Yellow Leaves After Repotting
Yellow leaves after repotting can come from stress, overwatering, old leaves, or root damage. Check the soil first. If it is wet, wait longer before watering. If the plant is in low light, move it to brighter indirect light.
Remove fully yellow leaves if they are unattractive or soft. The plant will focus on new growth once conditions improve.
How to Fix Brown Tips
Brown tips can come from dry air, fertilizer buildup, inconsistent watering, or hard water. Trim the dry tips with clean scissors if needed. Improve humidity and flush the potting mix occasionally with plain water to reduce mineral buildup.
How to Prevent Root Rot
- Use a pot with drainage holes.
- Use chunky airy potting mix.
- Water only when the top layer starts to dry.
- Empty saucer water after watering.
- Do not use a huge pot.
- Keep the crown above the soil line.
- Place in bright indirect light.
- Remove rotten roots quickly.
Repotting Frequency
Most anthuriums need repotting every 2 to 3 years. You may repot sooner if the soil breaks down, the roots become crowded, or the plant starts drying too quickly. If the plant is healthy and blooming, do not rush to repot.
How to Divide Anthuriums
If your anthurium has multiple crowns, you can divide it during repotting. Division is the easiest propagation method.
- Remove the plant from the pot.
- Brush away loose soil.
- Find natural clumps with roots attached.
- Separate gently with your hands or a clean knife.
- Plant each division in chunky mix.
- Water lightly.
- Keep in bright indirect light.
Do not divide a weak plant. Wait until it is healthy and actively growing.
Best Indoor Places for Anthuriums
- Bright living room
- Bedroom near a filtered window
- Bright bathroom
- Home office
- Dining room
- Kitchen corner away from heat
- Sunroom with filtered light
- Entry table with indirect light
Styling Ideas for Colorful Anthuriums
Anthuriums look beautiful in terracotta pots, white ceramic planters, woven baskets, black modern pots, and natural clay containers. Their glossy leaves and bright blooms make them perfect for simple home decor.
Use terracotta for a warm natural look.
Use white ceramic for a clean modern style.
Place on a wooden table for cozy contrast.
Group with ferns and peace lilies for a tropical corner.
Use a basket cover for soft rustic decor.
Place near books, candles, or neutral textiles.
Style red blooms against green houseplants.
Use several flower colors together for a bold display.
Continue to Page 2
Continue to page 2 for more details about this article and the key points many readers miss on the first page.