ZZ plant is one of the easiest indoor plants to grow in pots. It is strong, elegant, slow-growing, and very forgiving. Its shiny green leaves, upright stems, and clean tropical shape make it perfect for living rooms, bedrooms, offices, shelves, hallways, and cozy indoor plant corners. If you want a houseplant that looks beautiful without needing daily attention, the ZZ plant is one of the best choices.
The ZZ plant, also called Zamioculcas zamiifolia, grows from thick underground rhizomes. These rhizomes look like small potatoes under the soil. They store water and help the plant survive dry periods. This is why ZZ plants do not need frequent watering. In fact, the biggest mistake people make is giving too much water. A ZZ plant can handle dryness much better than soggy soil.
The easiest way to grow ZZ plant in pots is to give it the right container, fresh well-draining soil, bright indirect light, and a simple watering routine. You do not need complicated fertilizers or daily misting. You only need to understand how the roots work and avoid keeping the soil wet for too long.
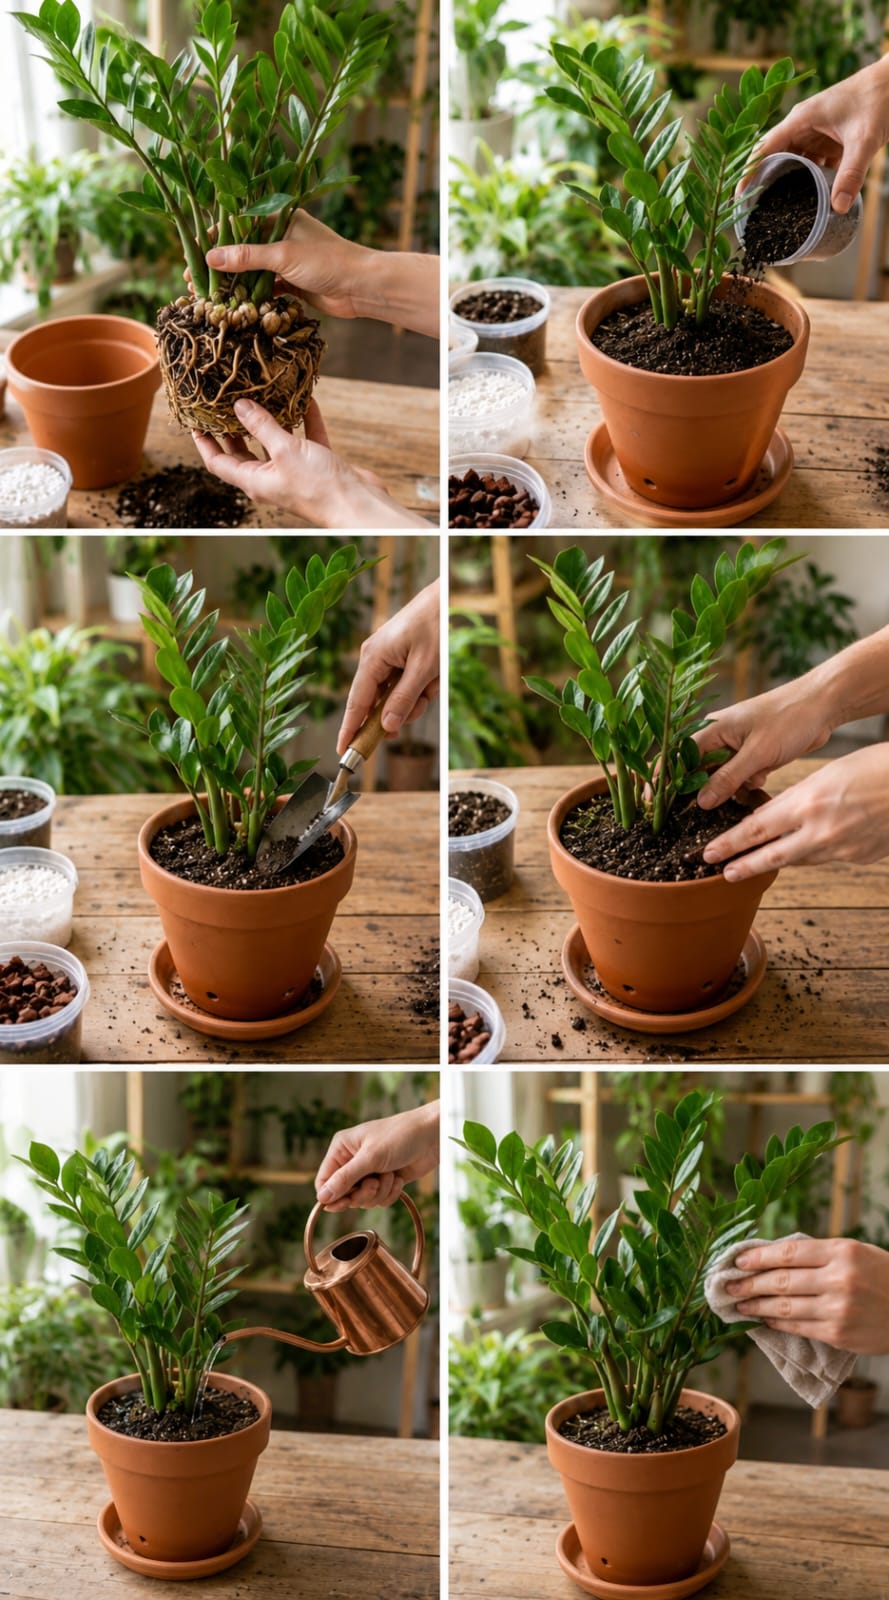
The image shows a clear potting routine. The plant is removed from its old container, placed into a terracotta pot, surrounded with fresh soil, watered gently, and cleaned with a soft cloth. These steps are simple, but they make a big difference. A fresh potting setup can help the ZZ plant grow stronger, stand upright, and keep its glossy leaves looking clean and healthy.
Why ZZ Plant Is So Easy to Grow
ZZ plants are popular because they tolerate many indoor conditions. They can grow in bright indirect light, medium light, and even lower light. They do not need constant watering. They do not demand high humidity. They can survive missed care days better than many other houseplants.
The reason is their rhizomes. These thick underground storage organs hold water and nutrients. When the plant goes through a dry period, it uses what is stored inside the rhizomes. This makes the plant perfect for beginners, busy people, offices, apartments, and anyone who forgets to water sometimes.
But easy does not mean impossible to damage. Too much water, dense soil, poor drainage, and oversized pots can still harm the plant. Once you avoid those problems, ZZ plant care becomes very simple.
Best Pot for ZZ Plant
The best pot for a ZZ plant must have drainage holes. This is the most important rule. ZZ plant roots and rhizomes can rot if water sits at the bottom of the pot. A decorative pot is fine, but the inner growing pot must drain freely.
Terracotta pots are excellent for ZZ plants because they allow moisture to evaporate faster. This helps protect the roots from staying wet too long. Ceramic pots also work well if they have drainage holes. Plastic pots are lighter and affordable, but they hold moisture longer, so watering must be less frequent.
Pot Size Rule
Choose a pot only 1 to 2 inches wider than the current root ball. Do not move a small ZZ plant into a huge pot. Extra soil holds extra water, and extra water increases the risk of root rot.
Best Soil for ZZ Plant
ZZ plants need soil that drains quickly. Regular indoor potting soil alone can stay too wet, especially in large pots or low-light rooms. A better mix includes gritty materials like perlite, pumice, coarse sand, or orchid bark.
Simple ZZ Plant Soil Mix
- 2 parts indoor potting mix
- 1 part cactus or succulent mix
- 1 part perlite or pumice
- A small amount of orchid bark, optional
This mix gives the roots air and prevents the soil from becoming heavy. The soil should feel loose, light, and crumbly. It should not feel muddy or sticky.
Step 1: Remove the ZZ Plant From the Old Pot
Hold the plant gently near the base and slide it out of the old pot. If the root ball is tight, squeeze the pot sides or tap the bottom. Avoid pulling hard on the stems because they can break.
Once the plant is out, look at the roots and rhizomes. Healthy rhizomes are firm and thick. Healthy roots are firm and light-colored. Rotten roots are soft, black, mushy, or smelly. If you see rotten parts, trim them with clean scissors before repotting.
Step 2: Prepare the New Pot
Add a layer of fresh soil mix to the bottom of the new pot. The plant should sit at the same depth as before. Do not bury the stems too deeply. Soil packed high around the stems can hold moisture and cause rot.
Make sure the pot has drainage holes. If the pot is decorative but has no holes, use it only as a cover pot with a draining nursery pot inside.
Step 3: Place the Plant in the Pot
Set the ZZ plant in the center of the pot. Hold it upright while adding soil around the root ball. Add soil little by little and press gently with your fingers. Do not pack the soil too tightly. Roots need oxygen.
The plant should feel stable, but the soil should still be airy. If the stems lean, add a little more soil around the base and press lightly.
Step 4: Fill Around the Roots
Add fresh soil around the sides until the root ball is covered. Leave a little space between the soil surface and the pot rim. This prevents water from spilling over when you water.
Do not cover the base too deeply. ZZ plant stems should rise cleanly from the soil surface.
Step 5: Water Gently
After repotting, water gently only if the soil is dry and the roots were not heavily trimmed. If you trimmed rotten roots, wait several days before watering. This gives cut areas time to dry and reduces the risk of rot.
When watering, pour slowly until water drains from the bottom. Then empty the saucer. Never let a ZZ plant sit in standing water.
Step 6: Clean the Leaves
ZZ plant leaves look best when they are clean. Dust can make the plant look dull and block light. Wipe the leaves gently with a soft damp cloth. Support each stem while cleaning so you do not bend or break it.
Do not use oily leaf shine products. Plain water and a soft cloth are enough to make the leaves naturally glossy.
How Often to Water ZZ Plant
Water only when the soil is dry several inches deep. In many homes, this means every 2 to 4 weeks during warm months and every 4 to 8 weeks during cooler months. The exact timing depends on light, pot size, soil type, temperature, and humidity.
Do not water on a fixed weekly schedule unless the soil truly dries that fast. The best method is to check the soil first.
Signs Your ZZ Plant Needs Water
- The soil is dry deep down.
- The pot feels light.
- The leaves look slightly less firm.
- The stems may lean a little from dryness.
- Several weeks have passed since the last watering.
Signs of Overwatering
- Yellow leaves
- Soft stems
- Mushy rhizomes
- Sour-smelling soil
- Wet soil for many days
- Fungus gnats
- Leaves dropping suddenly
If the soil is wet and the plant is yellowing, do not water again. Check the roots and let the soil dry.
Best Light for ZZ Plant
ZZ plants tolerate low light, but they grow best in bright indirect light. Low light makes the plant grow slowly and keeps soil wet longer. Bright indirect light helps the plant stay full, upright, and glossy.
A spot near an east-facing window is excellent. A north-facing window can work if it is bright. If the plant is near a south or west window, keep it away from harsh direct sun or use a sheer curtain.
Direct hot sun can burn the leaves. Soft filtered light is better.
How to Fertilize ZZ Plant
ZZ plants are not heavy feeders. Use a balanced houseplant fertilizer diluted to half strength once every 6 to 8 weeks during spring and summer. Do not fertilize in winter when growth slows.
Do not fertilize right after repotting. Wait at least 4 to 6 weeks. Fresh soil and root disturbance are enough for the plant to handle at first.
How to Make ZZ Plant Grow Faster
ZZ plants grow slowly by nature, but you can support better growth with the right care.
- Give bright indirect light.
- Use fast-draining soil.
- Water only when dry.
- Use a pot with drainage holes.
- Feed lightly during active growth.
- Keep the plant warm.
- Clean leaves regularly.
- Avoid moving it constantly.
Patience is important. ZZ plants are not fast vines like pothos. Their slow growth is part of what makes them easy.
How to Repot a Root-Bound ZZ Plant
If your ZZ plant has thick roots filling the pot, it may be root-bound. This is not always bad. ZZ plants can stay slightly snug for a long time. Repot when the pot is cracking, roots are pushing out, or the soil dries too quickly.
When repotting a root-bound plant, loosen the root ball gently. Do not break every rhizome apart unless you want to divide the plant.
How to Divide ZZ Plant
ZZ plants can be divided during repotting. This is the easiest way to create new plants.
- Remove the plant from the pot.
- Shake away loose soil.
- Find natural clusters with roots and rhizomes.
- Separate gently with your hands.
- Use a clean knife if needed.
- Let any cut areas dry for a day.
- Plant each division in a small pot.
- Wait before watering if roots were cut.
Each division should have healthy stems, rhizomes, and roots. Very small pieces take longer to recover.
Common ZZ Plant Problems
Yellow Leaves
Yellow leaves are usually caused by overwatering. Check the soil. If it is wet, stop watering and inspect the roots.
Brown Tips
Brown tips can come from dry air, inconsistent watering, fertilizer buildup, or harsh water. Trim damaged tips with clean scissors if needed.
Soft Stems
Soft stems often mean rot. Remove the plant from the pot and check the rhizomes.
Slow Growth
Slow growth is normal. If you want better growth, give brighter indirect light and feed lightly during spring and summer.
Dusty Leaves
Wipe leaves with a damp cloth. Clean leaves look shinier and absorb light better.
How to Prevent Root Rot
- Use a pot with drainage holes.
- Use loose fast-draining soil.
- Water only when soil is dry.
- Do not let the saucer hold water.
- Avoid oversized pots.
- Keep the plant in bright indirect light.
- Do not water weekly without checking soil.
Root rot is easier to prevent than fix. The best prevention is dry-down time between waterings.
Indoor Styling Ideas for ZZ Plant
ZZ plants are beautiful decor plants because their upright shape looks clean and modern. They work in many interior styles.
- Use a terracotta pot for warm natural decor.
- Use a white ceramic pot for modern styling.
- Place beside a sofa for vertical greenery.
- Use on a wooden table for a cozy look.
- Style in an entryway for a clean welcome.
- Group with snake plants and pothos.
- Place in a bedroom corner for calm greenery.
- Use a black pot for dramatic contrast.
Continue to Page 2
Continue to page 2 for more details about this article and the key points many readers miss on the first page.