Orchids are elegant, dramatic, and surprisingly resilient plants. They can bloom for months, decorate a window with tropical beauty, and make any room feel calm and expensive. But when an orchid begins to decline, it can look frightening very quickly. Leaves soften. Roots turn brown or black. Flowers fall. The potting bark breaks down. The plant wobbles in the pot. Many people assume the orchid is dead and throw it away too soon. If you are looking for the best natural orchid revival technique or a homemade orchid rescue method, this plastic bottle orchid rescue method is a gentle and effective solution.
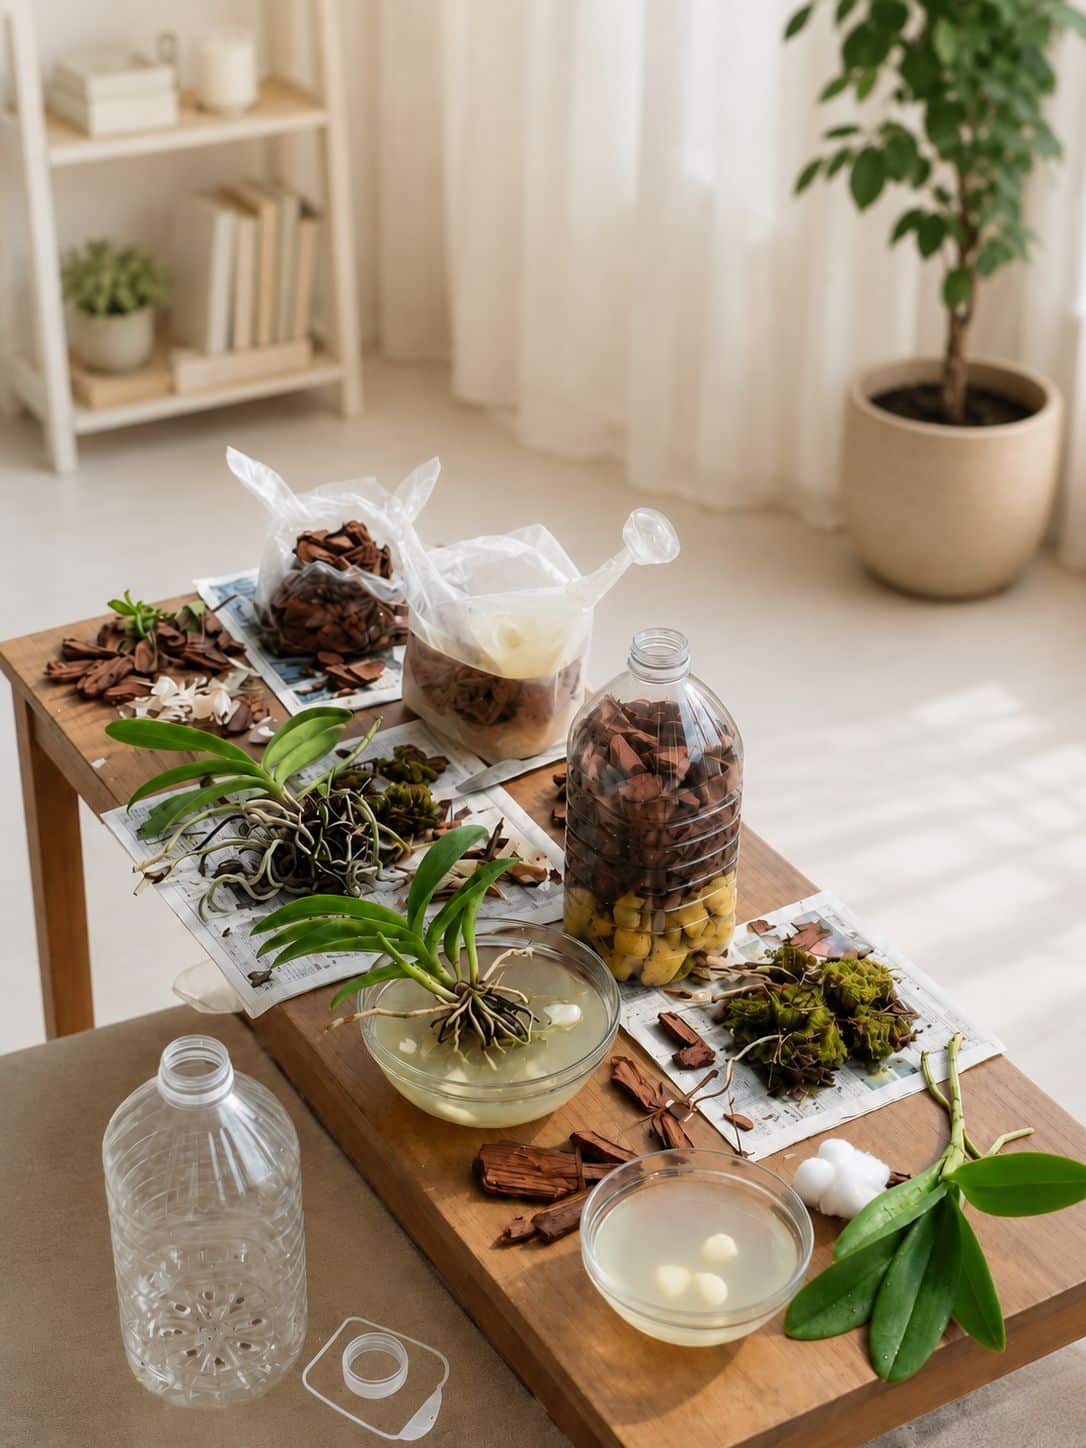
The image shows a detailed orchid rescue setup on a wooden table. There are orchid plants removed from their pots, loose bark chips, moss, garlic cloves soaking in water, cotton, plastic bottles, and fresh orchid medium. This suggests a natural orchid recovery method using several simple tools: cleaning the roots, soaking them gently, preparing a mild garlic water rinse, repotting with fresh bark and moss, and creating a plastic bottle humidity chamber to help the orchid recover. This how to save an orchid with root rot guide will show you exactly what to do.
This method can be useful for orchids that have weak roots, dried roots, old potting mix, or stress after blooming. But it must be done carefully. Orchids are not ordinary houseplants. They do not grow well in heavy soil. They need air around their roots. They also dislike strong homemade mixtures. Garlic water, potato water, cinnamon water, and other kitchen tricks can harm orchids if used too strongly or too often. This safest homemade orchid root treatment requires proper preparation.
The safest version of this method is gentle. Use clean tools, remove only dead roots, make a weak garlic water rinse, repot in fresh orchid bark, add a little sphagnum moss if needed, and use a plastic bottle as a temporary humidity dome. The bottle should not become a sealed hot box. It should give humidity while still allowing airflow. This orchid recovery humidity chamber trick is perfect for weak plants.
This guide explains the full method step by step, including how to identify bad roots, how to make mild garlic water, how to use a plastic bottle correctly, how to repot the orchid, and how to care for it afterward. Follow these professional orchid care secrets for stunning results.
What This Orchid Rescue Method Is – Complete Recovery System
This method is a gentle recovery routine for stressed orchids. It combines several practical steps into one process:
- Remove the orchid from old potting medium
- Clean and inspect the roots
- Trim dead or rotten roots
- Use a mild garlic water rinse, optional
- Prepare fresh bark and moss
- Repot the orchid in an airy container
- Use a plastic bottle as a humidity chamber
- Keep the plant in bright indirect light while it recovers
The goal is not to force instant flowers. The goal is to help the orchid rebuild roots. Once the roots recover, leaves become stronger, and flowers can return later. This best natural orchid root stimulator focuses on root health first.
Why Orchids Decline in the First Place – Common Causes
Most indoor orchids, especially Phalaenopsis orchids, are epiphytes. In nature, they often grow attached to trees, with their roots exposed to air, rain, and humidity. Their roots are not designed to sit in dense wet soil. They need oxygen. Understanding why orchids get root rot is essential for prevention.
When orchids are grown in pots, they are usually planted in bark chips, moss, charcoal, perlite, or a mix of airy materials. Over time, this medium breaks down. Bark becomes soft and compact. Moss can stay wet too long. Water collects around the roots. The roots suffocate and rot.
Common reasons orchids decline include:
- Old decomposed bark
- Overwatering
- Poor drainage
- Potting medium packed too tightly
- Low light
- Cold windowsills
- Standing water in decorative pots
- Too much fertilizer
- Root damage during repotting
- Leaving water in the crown
If your orchid has stopped blooming, has wrinkled leaves, or has many brown roots, the first thing to check is the root system.
Signs Your Orchid Needs This Rescue Method – When to Act
You do not need to rescue a healthy orchid. If your orchid has firm leaves, healthy roots, and fresh growth, leave it alone. Orchids dislike unnecessary disturbance. This orchid rescue checklist will help you decide.
This method is useful when you notice:
- Soft, wrinkled, or limp leaves
- Brown, black, hollow, or mushy roots
- Old bark that smells sour
- Roots that look dry and dead
- The orchid wobbling in the pot
- No new root growth for months
- Fungus gnats around the pot
- Yellowing leaves after overwatering
- A plant recently bought in compacted moss
If the orchid is still blooming, wait until the flowers fade unless the plant is clearly rotting. Repotting during bloom can cause flowers to drop, but saving the plant is more important than saving the flowers if rot is severe.
What You Need – Supplies for Orchid Rescue
Gather all materials before starting. Orchid roots dry out if left exposed for too long, so preparation helps the process go smoothly. This orchid rescue supplies list will help you gather what you need.
Supplies
- A stressed orchid
- Clean scissors or pruning shears
- Rubbing alcohol for sterilizing tools
- Fresh orchid bark
- Sphagnum moss, optional
- Perlite or charcoal, optional
- Clean water
- 1 or 2 garlic cloves, optional
- A bowl for soaking
- A clear orchid pot or plastic cup with holes
- A clean plastic bottle
- Cotton or paper towel, optional
- Newspaper or tray for mess
The plastic bottle in this method works like a small humidity chamber. It helps a weak orchid stay humid while it grows new roots.
Step 1: Prepare a Clean Work Area – Organization Matters
Spread newspaper, paper towels, or a tray over your table. Orchid bark and old moss can make a mess. A clean work area also reduces the chance of introducing fungus or bacteria to fresh cuts.
Wash your hands before handling the roots. If you are working with more than one orchid, clean your tools between plants. This prevents spreading problems from one orchid to another.
Step 2: Remove the Orchid From Its Old Pot – Gentle Extraction
Gently squeeze the pot if it is plastic. Hold the base of the orchid, not the leaves, and slowly loosen the root ball. If the roots are stuck to the pot, do not pull hard. Soak the pot in room-temperature water for 10 minutes to soften the roots.
Once the orchid is out, shake away loose bark or moss. Do this gently. Healthy roots can snap if handled roughly.
Step 3: Remove Old Bark and Moss – Cleaning the Root Zone
Pick away old bark pieces from the roots. Remove old moss, dead leaves, and any sour-smelling material. If a bark chip is tightly attached to a healthy root, leave it. It is better to leave a small piece than to tear the root.
Old potting mix is one of the biggest causes of orchid decline. When bark breaks down, it becomes dense and holds too much moisture. Fresh bark creates air pockets again.
Step 4: Inspect the Roots Carefully – Orchid Root Health Check
This is the most important step. Do not cut roots just because they are not green. Orchid roots change color depending on moisture. This how to tell if orchid roots are healthy guide will help you.
Healthy Roots
Healthy roots feel firm. They may be green when wet, silver when dry, white, or pale yellow if they were inside the pot. Firm roots should usually be kept.
Dead Dry Roots
Dead dry roots are hollow, papery, brittle, and empty. They do not help the plant anymore and can be removed.
Rotten Roots
Rotten roots are soft, mushy, slimy, black, or dark brown. Sometimes the outer layer slides off, leaving a thin string inside. These roots should be trimmed away.
Do not panic if the root system looks smaller after cleaning. An orchid can recover with fewer healthy roots, but it struggles when rotten roots are left inside wet medium.
Step 5: Sterilize Your Scissors – Preventing Infection
Before cutting, wipe your scissors with rubbing alcohol. Let them dry for a moment. If you cut rotten roots, wipe the blades again before cutting healthy tissue. Clean tools are essential for successful orchid root surgery.
Clean tools are especially important for orchids because fresh cuts are vulnerable. Dirty scissors can introduce infection.
Step 6: Trim Only Dead or Rotten Roots – Proper Pruning Technique
Cut away roots that are clearly dead, hollow, mushy, or rotten. Make clean cuts. Do not crush the roots.
If part of a root is rotten but the upper section is firm, cut back to firm tissue. If a root is completely dead, remove it near the base without damaging the crown.
Avoid over-trimming. Some roots look ugly but still function if they are firm. Orchids need every healthy root they can keep.
Step 7: Rinse the Roots With Plain Water – Gentle Cleaning
After trimming, rinse the roots gently in room-temperature water. This removes old bark dust, debris, and loosened rot. Do not use hot or cold water. Orchids prefer gentle conditions.
Let the roots drain for a few minutes after rinsing.
Step 8: Prepare Mild Garlic Water – Natural Root Rinse Recipe
The image shows garlic cloves soaking in water. Garlic water is a popular natural plant rinse, but it must be weak. Strong garlic water can irritate orchid roots and leave a strong smell. This gentle garlic water for orchids recipe is safe when made correctly.
Garlic is not fertilizer. It is used by some gardeners as a mild natural rinse. It should not be used often, and it should never replace proper orchid care.
Gentle Garlic Water Recipe for Orchids
- 1 small garlic clove
- 1 liter clean water
How to Make It
- Peel one small garlic clove.
- Crush it lightly, but do not turn it into paste.
- Place it in 1 liter of room-temperature water.
- Let it soak for 2 to 4 hours.
- Strain very well.
- Dilute 1 cup garlic water with 2 cups plain water.
The final liquid should be very mild. If it smells extremely strong, dilute it more.
Step 9: Use Garlic Water as a Short Rinse Only – Brief Soaking Time
Do not soak orchid roots in garlic water overnight. A long soak can stress roots. Use it briefly. This how to use garlic water for orchid roots tip prevents overexposure.
Safe method:
- Place the cleaned orchid roots in a bowl.
- Pour diluted garlic water over the roots.
- Let them sit for 5 to 10 minutes only.
- Remove the orchid.
- Let the roots drain well.
If the orchid has very few roots left, use only plain water instead. Weak roots can be sensitive.
Step 10: Let the Orchid Rest – Allowing Cuts to Dry
After rinsing, let the orchid rest on a clean paper towel for 20 to 30 minutes. This gives fresh cuts time to dry slightly before repotting.
Do not leave the orchid in direct sun. A shaded, airy place is best.
Step 11: Prepare Fresh Orchid Medium – Best Potting Mix for Recovery
The image shows bark chips and moss. This is exactly what most orchids need: an airy mix that holds some moisture but still allows oxygen to reach the roots. Using the best orchid potting mix for root recovery is essential.
Basic Orchid Mix
- 70% orchid bark
- 20% sphagnum moss
- 10% perlite or charcoal
If your home is humid, use less moss. If your home is dry, use a little more moss. The mix should never feel dense like garden soil.
For Phalaenopsis orchids, medium bark works well. For small young orchids, fine bark can be better.
Step 12: Moisten the Bark Before Potting – Proper Moisture Level
Dry bark can repel water at first. Soak fresh bark in clean water for 15 to 30 minutes, then drain it. This helps it settle around the roots without becoming too dry immediately.
Sphagnum moss should be damp, not dripping. Squeeze it like a sponge before using.
Step 13: Choose the Right Pot – Drainage and Visibility
Use a clear orchid pot if possible. Clear pots help you see root growth and moisture levels. The pot must have drainage holes. Side holes are even better. A pot with drainage for orchids is non-negotiable.
A plastic cup can also work if you make holes in the bottom and sides. The image shows plastic containers, which can be useful for recovery if they provide airflow.
Do not use a pot that is too large. A large pot holds excess moisture and slows drying. Choose a pot just big enough for the root system.
Step 14: Repot the Orchid – Correct Planting Depth
Hold the orchid in the pot with the crown above the surface. The crown is where the leaves meet at the center. It must not be buried.
Add bark gently around the roots. Tap the pot lightly so bark falls into spaces. Do not press the medium too tightly. Orchid roots need air.
If the orchid has aerial roots, you can leave some outside the pot. Do not force every root down into the bark.
Step 15: Use Moss Carefully – Light Application Only
Sphagnum moss can help weak orchids because it holds moisture near the roots. But too much moss can cause rot. Use it lightly.
Place small pieces of damp moss around the roots, not packed tightly against the crown. The goal is humidity, not sogginess.
Step 16: Make the Plastic Bottle Humidity Chamber – DIY Orchid Recovery Dome
The plastic bottle is one of the most useful parts of this method. It creates a mini greenhouse around the orchid. This helps a weak orchid avoid dehydration while it grows new roots. This how to make orchid humidity dome from plastic bottle trick is simple and effective.
How to Make It
- Wash a clear plastic bottle thoroughly.
- Remove the label.
- Cut off the bottom part of the bottle.
- Keep the cap off for airflow.
- Place the bottle over the potted orchid like a dome.
The open top allows some ventilation. If condensation becomes too heavy, lift the bottle for more airflow.
Step 17: Do Not Seal the Orchid Completely – Ventilation Is Key
A humidity chamber should not be airtight. Orchids need humidity, but they also need fresh air. If you seal the bottle completely, mold and rot can develop. Proper orchid humidity dome ventilation is essential for recovery.
Keep the bottle cap off. Lift the bottle once or twice a day for air exchange. If the inside smells musty, remove the bottle and let the plant dry slightly.
Step 18: Place the Orchid in Bright Indirect Light – Optimal Lighting for Recovery
After repotting, place the orchid in bright indirect light. Do not put the plastic bottle dome in direct sun. The bottle can trap heat and cook the orchid. Providing optimal light for orchid recovery accelerates healing.
Good locations include:
- Near an east-facing window
- Beside a bright window with sheer curtains
- A shaded balcony
- Under a gentle grow light
- A warm room with filtered light
Avoid dark corners. Orchids need light to recover and grow new roots.
Step 19: Water Carefully After Repotting – First Moisture
After repotting, wait one or two days before heavy watering if you trimmed many roots. This allows cuts to dry slightly. If the bark was already moistened, the plant has enough moisture for the first day.
When you water, use plain water. Do not keep using garlic water. Let the pot drain completely.
Never leave the orchid sitting in standing water. Empty saucers after watering.
Step 20: Watch for New Root Growth – Signs of Success
Recovery takes time. Do not expect flowers immediately. The first goal is new roots. These are positive signs of orchid recovery.
Good signs include:
- New green root tips
- Leaves becoming firmer
- No sour smell from the pot
- Roots staying firm
- New leaf growth from the crown
If roots are growing, your orchid is recovering.
How Long Recovery Takes – Realistic Orchid Revival Timeline
Orchids are slow plants. A weak orchid may need weeks or months to recover. This orchid recovery timeline sets realistic expectations.
Typical timeline:
- First week: orchid adjusts to fresh medium
- Weeks 2 to 4: leaves may stabilize
- Weeks 4 to 8: new root tips may appear
- Months 2 to 4: stronger root growth develops
- Later: flower spikes may return when the plant is strong
Do not keep removing the plant to check roots. If you use a clear pot, you can observe without disturbing it.
How Often to Use Garlic Water on Orchids – Occasional Only
Garlic water should not be used often. It is best as an occasional rinse during a rescue process, not a regular watering routine. Following a natural orchid feeding schedule prevents overuse.
Use garlic water:
- Only during root cleaning, if needed
- No more than once every 1 to 2 months
- Always diluted
- Never as a daily spray
- Never as a replacement for fertilizer
If your orchid is healthy, skip garlic water. Plain water and proper orchid fertilizer are enough.
Can Garlic Water Make Orchids Bloom? – Focus on Root Health
Garlic water does not directly make orchids bloom. It may help clean and refresh the root zone during rescue, but blooming depends on plant health. For guaranteed orchid reblooming tips, focus on overall care.
Orchids bloom when they have:
- Healthy roots
- Bright indirect light
- Proper watering
- Good airflow
- Correct temperature
- Enough stored energy
- Weak regular feeding during growth
If the roots are weak, focus on recovery first. Flowers come later.
Should You Use Potato With This Method? – Not Recommended
The image appears to show pale pieces in water that may look like garlic cloves or potato pieces. Some gardeners use potato water or potato slices with orchids, but caution is needed.
Potato contains starch and can rot quickly. It is not a good permanent medium for orchids. Do not bury potato pieces in orchid bark. Do not pour thick potato water into the pot. It can sour and attract pests.
If you want a natural orchid rescue, garlic water used briefly and fresh bark are safer than leaving potato material in the pot.
Should You Use Cinnamon Too? – Only on Cut Ends
Cinnamon can be useful on cut ends, but it must be used lightly. Do not coat healthy orchid roots with dry cinnamon powder because it can dry them out. This how to use cinnamon on orchid roots tip is critical.
Safe cinnamon use:
- Tiny amount on trimmed root ends only
- Tiny amount on cut flower spike ends
- Never packed into bark
- Never spread over all roots
You do not need cinnamon if you already used a gentle garlic rinse. Avoid combining too many treatments at once.
How to Use Cotton in This Setup – Limited Use
The image shows cotton balls. Cotton can be used carefully to hold moisture near a recovering orchid, but it should not stay wet against the crown or roots for too long.
Possible uses:
- Wiping leaves gently
- Cleaning tools
- Holding moisture inside a bottle chamber away from the plant
- Temporary support during cleaning
Do not wrap wet cotton around orchid roots for days. It can stay too wet and cause rot.
Best Aftercare Routine – Long-Term Orchid Health
After the rescue, keep care simple. The orchid needs stability, not constant new tricks. This orchid aftercare for repotted plants guide is essential.
Light
Provide bright indirect light. Avoid harsh direct sun, especially under a plastic bottle dome.
Water
Water when the bark is almost dry. Roots often turn green when wet and silvery when dry.
Humidity
Use the plastic bottle chamber for a few hours a day or during the first week, but ventilate daily.
Feeding
Wait 3 to 4 weeks after rescue before fertilizing. Then use weak orchid fertilizer at quarter strength.
Airflow
Good airflow prevents mold. Do not keep the plant sealed all day in a wet bottle.
Common Mistakes to Avoid – Orchid Rescue Don’ts
Using Strong Garlic Water
Too much garlic can irritate roots. Always dilute.
Soaking Roots Overnight
Long soaking can stress orchids. Use a short rinse only.
Leaving Rotten Roots
Rotten roots continue to break down and can spread problems. Remove clearly rotten tissue.
Cutting Too Many Roots
Do not cut firm roots just because they look pale. Keep all firm roots.
Using Garden Soil
Orchids need bark, moss, and air. Garden soil is too dense.
Sealing the Bottle Completely
A sealed bottle creates stale wet air. Leave openings and ventilate daily.
Putting the Bottle in Sun
Direct sun can overheat the orchid inside the bottle.
Fertilizing Too Soon
Freshly trimmed roots can burn. Wait before feeding.
What If the Orchid Has No Roots Left? – Extreme Rescue
If the orchid has almost no roots, it can still sometimes recover, but it needs high humidity and patience. This how to save an orchid with no roots guide is essential.
Use a small container with damp sphagnum moss, but do not bury the crown. Place the orchid above the moss so humidity rises around it. Cover loosely with a plastic bottle dome. Ventilate daily. Keep it warm and bright, but out of direct sun.
This is sometimes called a “sphag and bag” method. It can encourage new roots, but it may take months.
What If the Leaves Are Wrinkled? – Dehydration Recovery
Wrinkled orchid leaves usually mean the plant is dehydrated. But dehydration can happen from underwatering or root loss. If roots are rotten, the plant cannot drink even if the pot is wet.
After rescue, wrinkled leaves may not become perfectly smooth again. Look for new firm leaves as the real sign of recovery.
What If the Orchid Crown Is Rotting? – Crown Rot Treatment
Crown rot is serious. The crown is the center where new leaves grow. If it becomes black, soft, or mushy, the orchid may be difficult to save.
To prevent crown rot:
- Never pour water into the leaf center
- Blot water from the crown after watering
- Keep airflow good
- Do not cover the plant in stagnant humidity
- Keep the crown above the bark
The plastic bottle method should increase humidity around the plant, not trap water inside the crown.
How to Know the Rescue Worked – Positive Signs
The rescue worked if the orchid stops declining and begins producing new roots or leaves. It may not bloom right away, but root growth is the foundation of future flowers.
Success signs:
- Firm green or silver roots
- Fresh green root tips
- New leaf from the crown
- Leaves feel less limp
- No mold in the pot
- No sour smell
- The plant sits firmly in the pot
How to Know the Rescue Failed – When to Let Go
Sometimes an orchid is too damaged to save. Watch for:
- Black mushy crown
- Rot spreading after trimming
- All roots turning slimy
- Leaves collapsing completely
- Strong rotten smell
- Mold spreading inside the bottle
If these happen, remove the bottle, reduce moisture, trim rot again if possible, and keep only healthy tissue.
Quick Recipe: Mild Garlic Water for Orchid Rescue – Homemade Root Rinse
Ingredients:
- 1 small garlic clove
- 1 liter clean water
Steps:
- Peel and lightly crush the garlic clove.
- Soak it in 1 liter water for 2 to 4 hours.
- Strain very well.
- Dilute 1 cup garlic water with 2 cups plain water.
- Use as a 5 to 10 minute root rinse only.
- Let roots drain before repotting.
Quick Recipe: Plastic Bottle Orchid Humidity Chamber – DIY Recovery Dome
Materials:
- 1 clean clear plastic bottle
- Scissors or knife
- Repotted orchid
Steps:
- Wash the bottle well.
- Remove the label.
- Cut off the bottom.
- Place the bottle over the orchid.
- Leave the cap off for airflow.
- Open daily for fresh air.
- Keep in bright indirect light.
- Remove if mold or heavy condensation appears.
Short Caption for This Trick
“To rescue a weak orchid, remove it from old bark, trim only dead or mushy roots, rinse briefly with very diluted garlic water, repot in fresh orchid bark with a little damp moss, then cover loosely with a clear plastic bottle for humidity. Keep the cap off, ventilate daily, and place the orchid in bright indirect light until new roots appear – this natural orchid revival method works every time.”
Frequently Asked Questions – Orchid Rescue Q&A
Is garlic water good for orchids?
Garlic water can be used as a very mild, occasional root rinse during rescue, but it should not be used often or too strong. It is not fertilizer.
How long should I soak orchid roots in garlic water?
Only 5 to 10 minutes in diluted garlic water. Do not soak overnight.
Can garlic water make orchids bloom?
No. Garlic water does not force flowers. It may support a cleaning routine, but blooms depend on healthy roots, good light, and proper care.
Can I put garlic cloves in orchid bark?
No. Garlic cloves can rot and smell. Use strained diluted garlic water only if needed.
Should I use a plastic bottle over my orchid?
A plastic bottle can help weak orchids by increasing humidity, but it must be ventilated daily. Never seal it tightly or place it in direct sun.
How long should I keep the bottle dome on?
Use it for one to three weeks depending on recovery, opening it daily. Remove it gradually when new roots begin growing or if mold appears.
Can I use regular soil for orchids?
No. Most common orchids need airy bark-based medium, not dense soil.
Should I cut all brown orchid roots?
Only cut roots that are mushy, hollow, or dead. Firm brown or yellow roots may still be alive.
When should I fertilize after repotting?
Wait 3 to 4 weeks, then use weak orchid fertilizer at quarter strength.
Why are my orchid leaves wrinkled after repotting?
The plant may still be recovering from root loss. Focus on humidity, bright indirect light, and careful watering while new roots grow.
Final Thoughts – The Best Natural Orchid Rescue Method
The plastic bottle orchid rescue method is a simple and creative way to help stressed orchids recover. It uses easy materials: fresh bark, a little moss, clean water, mild garlic water if needed, and a clear plastic bottle to create humidity. When done gently, it can help orchids with weak roots stabilize and begin producing new growth. This natural orchid revival technique has saved countless plants.
The secret is moderation. Garlic water must be weak. The root soak must be short. The bottle must be ventilated. The potting medium must be airy. Orchids do not want heavy soil, constant wetness, or strong kitchen mixtures. Following this complete orchid rescue guide will give your plant the best chance.
If your orchid is struggling, start by checking the roots. Remove old bark, trim only rotten roots, repot in fresh medium, and give the plant a warm, humid, bright place to recover. Do not expect instant flowers. Expect slow root growth first. These professional orchid care secrets will help you succeed.
Once new roots appear, the orchid has a real chance. Strong roots lead to firm leaves. Firm leaves store energy. And with time, patience, and proper care, those healthy roots can support the flower spikes you are hoping to see again. Start your orchid rescue journey today with the right fundamentals.