Orchids have a way of making a home feel elegant, calm, and alive. A single blooming orchid on a windowsill can look like a luxury decoration, even when it is just sitting in a simple plastic pot. Their glossy green leaves, arching flower spikes, and delicate blooms bring softness to a room in a way few plants can match. But orchids also have a reputation for being mysterious. One month they are covered in flowers, and the next they seem still, quiet, and uncertain. The blooms fade. The leaves stop growing. The roots look dry or dull. The bark smells stale. The plant may remain alive, but it no longer feels fresh. If you are looking for the best natural orchid care trick or a gentle homemade orchid potting mix refresher, this lemon method is a safe and effective option when used correctly.
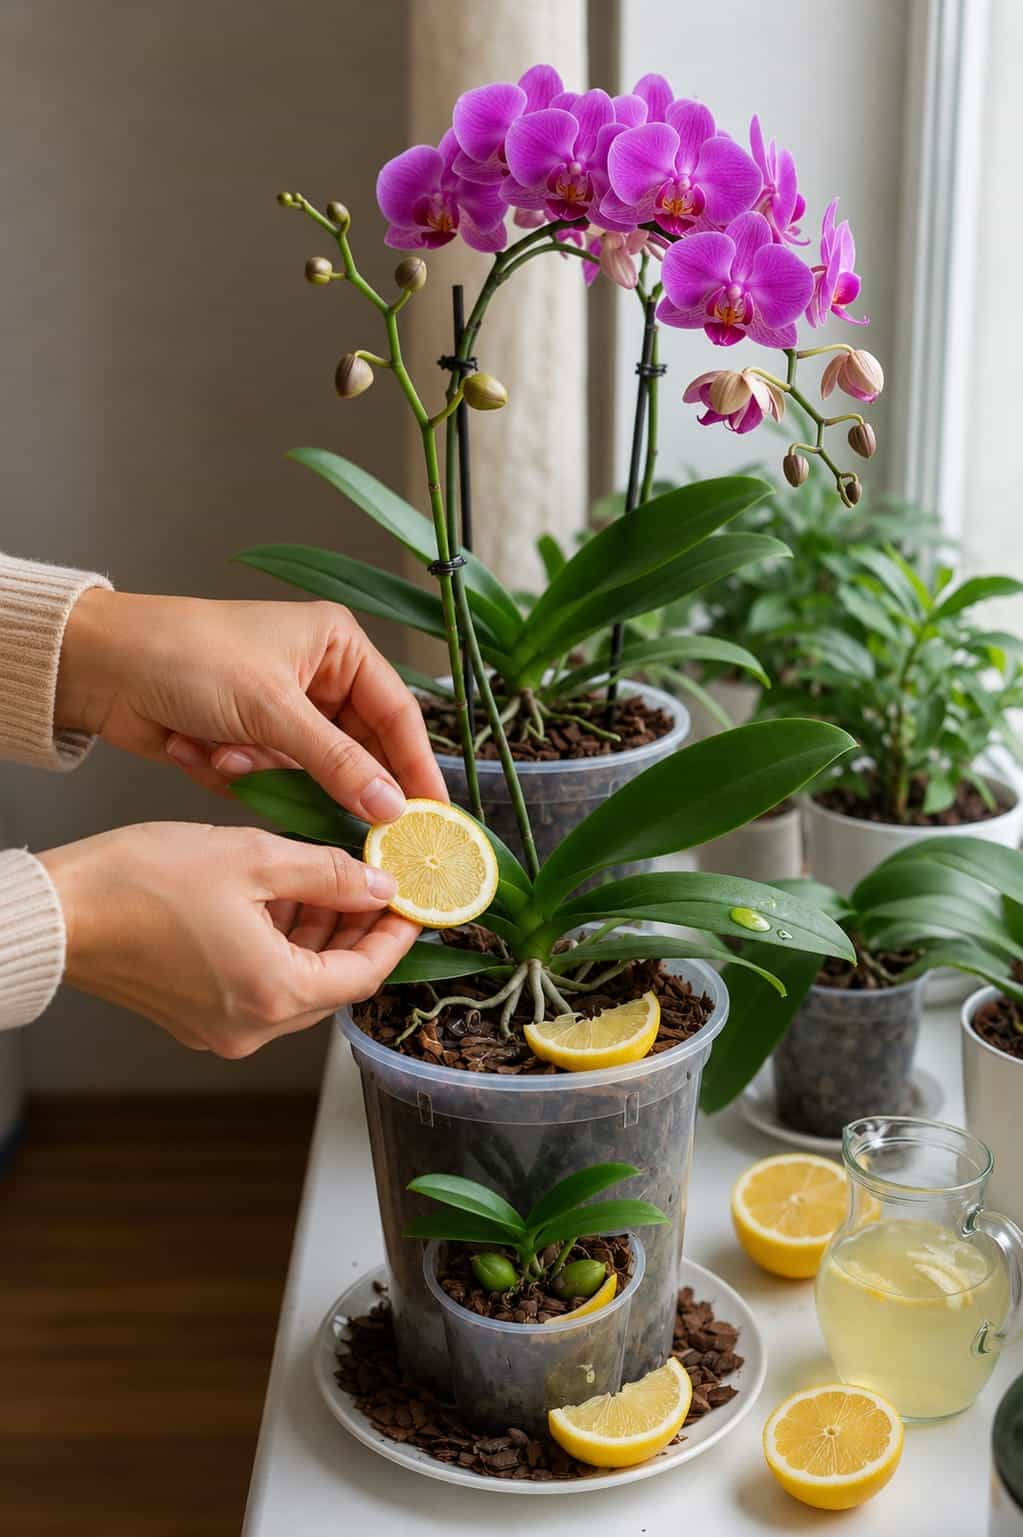
That is why many plant lovers experiment with gentle household tricks. In the image, lemon slices are being placed near a blooming orchid in a clear orchid pot. There is also a pale lemon-water mixture nearby. This creates a beautiful, natural-looking care method: using lemon carefully around the orchid area to freshen the environment and support a cleaner potting routine. This how to freshen orchid bark naturally guide will help you understand what works.
But orchids are sensitive plants, and lemon is powerful. Lemon juice is acidic. Lemon slices can rot. Citrus oils can irritate delicate tissues. If used the wrong way, lemon can harm orchid roots, damage leaves, attract pests, or sour the potting medium. The safe version of this trick is not burying lemon slices deep in the bark or pouring strong lemon juice onto roots. The safe version is using lemon lightly, briefly, and indirectly: as a short-term surface freshener, a very diluted rinse for mineral buildup in rare cases, or a temporary odor-control helper around the pot. This safest homemade orchid root care requires proper preparation.
This article explains how to use the lemon slice orchid trick safely, what it may help with, what it cannot do, how to prepare a mild lemon-water rinse, how to avoid root damage, and how to combine this trick with the real care routine that makes orchids thrive: bright indirect light, proper watering, airy bark, good drainage, humidity, gentle feeding, and patience. Follow these professional orchid care secrets for stunning results.
What Is the Lemon Slice Orchid Trick? – Natural Potting Mix Freshener
The lemon slice orchid trick is a natural plant-care method where lemon slices or diluted lemon water are used near an orchid to freshen the potting area. Some people place a lemon slice on top of the orchid bark for a short period. Others make very weak lemon water and use it as an occasional rinse. Some simply place lemon slices near the pot, not inside it, to reduce stale odors and create a fresh scent. This best natural deodorizer for orchid potting mix is popular among organic growers.
The idea comes from lemon’s natural acidity and clean scent. Many people associate lemon with freshness, cleaning, and reducing unpleasant smells. In plant care, a very mild acidic rinse is sometimes used to help counter mineral buildup from hard tap water. However, orchids are not kitchen counters. They are living plants with delicate roots. Lemon must be used carefully and rarely.
The trick may look simple, but the details matter. A fresh lemon slice placed on top of bark for one hour is very different from a lemon slice buried in the pot for a week. A few drops of lemon juice in a large amount of water is very different from pouring straight lemon juice into the root zone. One can be a mild temporary trick. The other can cause damage.
Why People Try Lemon on Orchids – Common Reasons
Many orchid owners try lemon because they notice one of three things: the potting bark smells old, the clear pot has mineral stains, or the orchid seems tired after blooming. Lemon seems like an easy natural solution. It is cheap, fresh, and already available in the kitchen. This natural orchid root zone refresher is appealing for its simplicity.
People may use lemon around orchids because they hope it will:
Freshen stale-smelling bark
Reduce unpleasant odors around the pot
Help with mineral deposits from hard water
Create a cleaner-looking orchid display
Discourage some surface pests temporarily
Support a slightly fresher root environment
Make the care routine feel more natural
There is nothing wrong with wanting a natural approach. But lemon should never be treated as a fertilizer or miracle bloom booster. Orchids do not need lemon to bloom. They need the right light, roots, watering rhythm, and recovery time after flowering.
What Lemon May Help With – Potential Benefits for Orchids
Used correctly and very lightly, lemon may have a few limited uses around orchids. The most realistic use is freshness. A lemon slice placed near the pot or briefly on top of the bark can make the area smell cleaner. A very diluted lemon-water rinse may help reduce some mineral residue caused by hard water, especially around pots or surfaces. This natural orchid potting mix conditioner works best as a rare supplement.
Possible gentle benefits include:
- Temporarily freshening the pot area
- Helping reduce stale smells from the surface
- Making the orchid display look bright and clean
- Supporting a slightly acidic rinse when heavily diluted
- Encouraging the owner to inspect roots and bark more closely
That last point matters more than it sounds. Many orchid problems are discovered because the owner finally takes a closer look at the pot. If using lemon makes you inspect the roots, check the bark, remove old debris, and improve the watering routine, the orchid benefits from your attention more than from the lemon itself.
What Lemon Cannot Do for Orchids – Realistic Expectations
Lemon cannot perform miracles. A weak orchid will not suddenly grow strong because a lemon slice was placed on the pot. A blooming orchid will not bloom forever because of citrus water. A root-rotted orchid will not recover from lemon juice. This orchid recovery reality check sets realistic expectations.
Lemon cannot:
- Force an orchid to bloom
- Replace orchid fertilizer
- Repair dead roots
- Reverse yellow leaves
- Fix crown rot
- Save an orchid in old decomposed bark
- Remove serious pests
- Replace repotting
- Make flowers last forever
- Correct poor lighting
If an orchid is struggling, lemon should not be the first solution. The first step should always be diagnosis: check the roots, bark, pot, light, and watering routine.
The Biggest Warning: Do Not Use Strong Lemon Juice on Orchid Roots – Critical Safety Rule
This is the most important rule. Never pour straight lemon juice onto orchid roots. Lemon juice is acidic and can irritate or damage roots, especially the silvery outer layer called velamen. Orchid roots are designed to absorb moisture and air from a loose environment. They are not built to sit in strong acidic liquids. Avoiding this common orchid care mistake is essential.
Strong lemon juice can cause:
- Root stress
- Burned root tips
- Damaged velamen
- Sour bark
- Flower drop from stress
- Leaf yellowing if roots are harmed
- Increased risk of rot if the pot stays wet
If you use lemon water at all, it must be extremely diluted. The water should taste barely lemony, not sharp. It should be used rarely, and the orchid should drain completely afterward.
The Safe Lemon Slice Method – Temporary Surface Freshener
The safest way to use lemon slices with orchids is as a short-term surface freshener, not as a buried ingredient. This means the lemon touches the top area briefly and is removed before it begins to rot. This how to use lemon slices on orchids safely method is perfect for beginners.
You Will Need
- 1 fresh lemon slice
- A clean orchid pot with drainage
- Fresh air movement
- A timer or reminder
Steps
- Cut a thin slice of fresh lemon.
- Remove any seeds.
- Place the slice on top of the bark near the edge of the pot.
- Keep it away from the orchid crown and leaf bases.
- Leave it for 30 minutes to 2 hours only.
- Remove the lemon slice completely.
- Check that no pulp or juice is sitting against roots.
- Do not repeat more than once every few weeks.
This method is mainly for freshness and surface care. It is not meant to feed the orchid. It should never become a permanent decoration in the pot.
Why You Should Not Leave Lemon Slices in the Pot – Rot and Pest Risks
Lemon slices look pretty in photos, but leaving them in an orchid pot for days is not a good idea. Citrus slices decay. As they break down, they can attract fruit flies, fungus gnats, ants, mold, and bacteria. They can also release too much acidity into one area of the bark.
Do not leave lemon slices in the pot overnight. Do not bury them. Do not place them directly against active root tips. Do not let them sit in a saucer of water under the orchid.
The slice should be temporary. Use it, then remove it.
The Safe Diluted Lemon Water Rinse – For Occasional Mineral Buildup
If your orchid pot or bark has mild mineral buildup from hard water, a very diluted lemon-water rinse may be used occasionally. This should be rare and gentle. This how to make lemon water for orchids recipe is safe when diluted properly.
Ingredients
- 4 cups room-temperature water
- 3 to 5 drops fresh lemon juice
That is all. Do not add sugar, honey, vinegar, salt, milk, fertilizer, or essential oil.
Steps
- Add 3 to 5 drops of lemon juice to 4 cups of water.
- Stir well.
- Water the orchid lightly through the bark.
- Let the liquid drain completely.
- After 10 minutes, flush once with plain water if you are concerned about acidity.
- Empty the saucer fully.
- Do not repeat often.
This rinse should be used only when needed, not as a routine weekly treatment. Once every 2 to 3 months is more than enough for most orchids, and many orchids do not need it at all.
When to Avoid Lemon Water Completely – Critical Warnings
There are many situations where lemon water is not appropriate. If your orchid is already stressed, do not add another stress factor. Knowing when to avoid homemade orchid tonics is as important as knowing how to use them.
Avoid lemon water if:
- The orchid has root rot
- The bark smells sour
- The plant was recently repotted
- The roots are freshly cut
- The orchid is dehydrated and weak
- The pot has no drainage
- The plant is sitting in moss that stays wet
- There are fungus gnats in the pot
- The orchid is dropping buds
- The room is cold and dark
In those situations, use plain water and correct the growing conditions first.
What Kind of Orchid Is in the Image? – Phalaenopsis Basics
The orchid in the image appears to be a Phalaenopsis orchid, often called a moth orchid. This is the most common indoor orchid. It has broad green leaves, thick aerial roots, and long flower spikes with rounded blooms. Phalaenopsis orchids are popular because they can bloom for months indoors when properly cared for. This best indoor orchid for beginners is perfect for trying natural tricks.
Phalaenopsis orchids are usually grown in bark or a loose orchid mix. Their roots need both moisture and air. This is why their potting medium must not become compacted, sour, or clogged with decaying kitchen scraps.
Why Phalaenopsis Orchids Need Airy Roots – Understanding Orchid Biology
In nature, many Phalaenopsis orchids grow attached to trees rather than buried in soil. Their roots cling to bark and absorb moisture from rain, humidity, and the surrounding air. Indoor orchids are placed in pots for convenience, but their roots still need airflow. This orchid root health guide is essential for success.
This is the reason orchid bark is chunky. It creates spaces for air. If you add fruit slices, pulp, heavy compost, or thick homemade tonics, those spaces can become clogged. When airflow disappears, roots can suffocate and rot.
Any natural trick for orchids must respect the roots. If it blocks air, stays wet, or decays, it is not orchid-friendly.
How to Check Orchid Roots Before Trying Lemon – Root Inspection Guide
Before using lemon slices or lemon water, inspect the roots through the clear pot if possible. Healthy Phalaenopsis roots are usually green when wet and silvery-gray when dry. They should feel firm, not mushy. This how to check orchid roots for rot step is critical.
Healthy Roots Look Like This
- Firm
- Silvery when dry
- Green when wet
- Plump
- Growing tips may be bright green
Unhealthy Roots Look Like This
- Brown and mushy
- Black and soft
- Hollow and papery
- Slimy
- Smelly
- Collapsed
If many roots are unhealthy, skip the lemon trick. The orchid needs root care and possibly repotting.
How to Freshen an Orchid Pot Without Lemon – Safer Alternatives
If your orchid pot smells stale, lemon is not always the best answer. Stale smell often means the bark is old or staying too wet. The correct solution may be repotting. This natural orchid potting mix care guide offers safer options.
To freshen an orchid pot safely:
- Remove old fallen flowers and dead leaves.
- Check for rotting bark.
- Flush the pot with plain water.
- Improve airflow around the plant.
- Empty the saucer after watering.
- Repot if the medium smells sour.
If the smell continues, do not cover it with lemon. Replace the potting medium.
When to Repot a Phalaenopsis Orchid – Signs of Old Bark
Repotting is one of the best ways to refresh an orchid. Phalaenopsis orchids usually need repotting every 1 to 2 years, depending on the bark. Bark breaks down over time. When it decomposes, it holds too much water and loses airflow. This when to repot orchids guide helps you decide.
Signs your orchid needs repotting include:
- Bark looks crumbly or soil-like
- Pot smells sour
- Roots are crowded and rotting
- Water does not drain well
- Fungus gnats appear
- Roots are suffocating
- The plant dries too slowly
If you see these signs, repotting will help more than lemon slices.
How to Repot a Phalaenopsis Orchid – Step-by-Step
Wait until blooming is finished if possible.
Remove the orchid from its pot.
Gently shake away old bark.
Trim dead or mushy roots with clean scissors.
Choose a pot with excellent drainage and airflow.
Use fresh orchid bark or orchid mix.
Place the orchid so the crown sits above the bark.
Fill around roots gently with bark.
Water lightly and drain fully.
Keep in bright indirect light while it adjusts.
Do not use lemon water right after repotting. Give the roots time to settle.
Continue to Page 2
Continue to page 2 for more details about this article and the key points many readers miss on the first page.