Is your orchid looking weak, limp, or refusing to bloom? Discover one natural, simple trick that can revive a dying orchid and encourage new flowers to grow. Perfect for beginners!
There’s a reason orchids are one of the most popular houseplants in the world. With their exotic, long-lasting blooms and elegant arching stems, they add a touch of sophistication to any room. But if you’ve ever owned an orchid—particularly the beloved Phalaenopsis (moth orchid)—you know that they can be heartbreakingly finicky.
One day, your orchid is thriving, covered in stunning flowers. The next, the blooms drop, the leaves turn yellow and limp, and the plant looks like it’s on its last legs. If this sounds familiar, take a deep breath. You are not alone, and more importantly, your orchid is not necessarily a lost cause.
In fact, with one simple, natural trick, you can often bring a dying orchid back to life and even encourage it to produce beautiful new flowers again. This method is used by experienced orchid enthusiasts and is gentle enough for complete beginners. It doesn’t require expensive products or complicated techniques—just a little patience and a common household item.
In this comprehensive guide, we’ll walk you through everything you need to know about orchid rescue. We’ll cover the one simple trick that can make all the difference, along with step-by-step instructions, pro tips, and answers to all your burning questions. Whether you’re a seasoned plant parent or a complete beginner, this guide will give you the confidence to revive your orchid and help it thrive for years to come.
Why Orchids Struggle: Understanding the Problem
Before we dive into the solution, it’s helpful to understand why orchids so often struggle in home environments. Orchids are not like typical houseplants. In nature, most orchids are epiphytes—they grow on trees, not in soil. Their roots are designed to absorb moisture and nutrients from the air and rainwater, which means they have very specific needs that can be hard to replicate indoors.
Common Signs of a Dying Orchid:
· Limp, wrinkled, or yellowing leaves: This often indicates dehydration or root rot.
· Shriveled or mushy roots: Healthy orchid roots are firm and green or silvery. Brown, mushy roots signal rot, while shriveled, papery roots indicate severe dehydration.
· No blooms for over a year: Orchids need specific conditions to trigger reblooming.
· Flowers dropping prematurely: While flowers naturally fall after a few weeks, if they drop immediately, something is wrong.
· Leaves that are floppy and leathery: This is a classic sign of thirst or root damage.
The good news? In many cases, these issues can be reversed with the right care and a little patience.
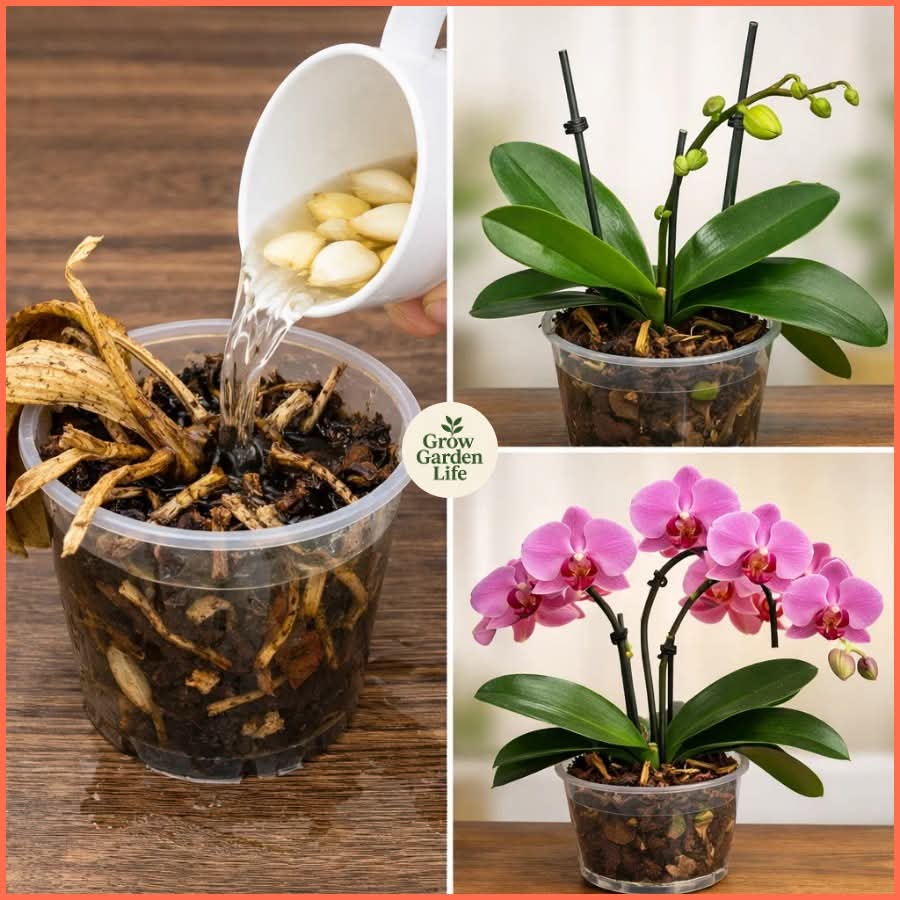
The One Simple Trick: The “Tea Soak” Method
So, what is this magical, natural trick that can bring a dying orchid back to life? It’s called the “Tea Soak” method, and it involves using weak, black tea to rehydrate and nourish your orchid’s roots.
This method works for two powerful reasons:
- Tannins: Black tea contains tannins, which are natural compounds that have mild antifungal and antibacterial properties. This can help combat root rot, a common killer of orchids.
- Gentle Fertilization: Tea provides a very mild, natural source of nitrogen and other nutrients that can give a struggling orchid a gentle boost without the risk of chemical burn from synthetic fertilizers.
This simple, cost-effective trick has saved countless orchids and is a favorite among plant enthusiasts for its gentle yet effective results.
What You’ll Need
Gathering your supplies is easy—you probably already have everything you need at home.
For the Tea Soak:
· 1 black tea bag (regular breakfast tea like Lipton, PG Tips, or English Breakfast works perfectly. Avoid herbal teas or those with added flavors.)
· 1 quart (4 cups) of room-temperature water (filtered or distilled water is best, as orchids can be sensitive to chemicals in tap water)
· A clean container or bowl large enough to hold your orchid pot
For the Orchid Assessment and Repotting (if needed):
· Your struggling orchid
· Sharp, sterilized scissors or pruning shears (wipe with rubbing alcohol to sterilize)
· Fresh orchid potting mix (a specialized mix of bark, charcoal, and perlite—never use regular potting soil)
· A clear plastic pot with drainage holes (clear pots allow you to monitor root health)
Step-by-Step Instructions: How to Revive Your Orchid
Follow these steps carefully to give your orchid the best chance at a full recovery.
Part 1: Assess the Damage
Remove the Orchid from Its Pot: Gently slide the orchid out of its current pot. This may be tricky if the roots are clinging to the sides. Be patient and gentle. If the pot is plastic, you can gently squeeze the sides to loosen the root ball.
Examine the Roots: This is the most critical step. Healthy roots are firm, plump, and either green (when wet) or silvery-gray (when dry). Unhealthy roots are brown, black, mushy, or papery and dry.
Trim Away the Dead: Using your sterilized scissors, carefully cut away all dead, mushy, or completely dried-out roots. Leave any firm, healthy roots intact. This prevents rot from spreading to the healthy tissue.
Remove Old Potting Mix: Gently shake off any old potting medium that is clinging to the roots. If it’s decomposed, smells sour, or has gone moldy, it’s definitely time for a change. Rinse the roots gently with room-temperature water to remove any remaining debris.
Part 2: The Miracle Tea Soak
Brew the Tea: Bring your 4 cups of water to a boil. Place the tea bag in your clean container and pour the hot water over it. Let it steep until the water cools completely to room temperature. Remove and discard the tea bag. The tea should be very weak—think the color of pale straw, not a dark, strong brew.
Submerge the Roots: Place the orchid (with its trimmed roots) into the container of cooled tea. The goal is to submerge only the roots. Try to keep the crown (where the leaves meet the roots) and any remaining leaves out of the water to prevent crown rot, which is fatal.
Soak for 20-30 Minutes: Allow the roots to soak in the tea for about 20-30 minutes. This gives them time to absorb moisture and the beneficial tannins. Do not soak for longer, as this can lead to problems.
Remove and Drain: Take the orchid out of the tea and let any excess water drip off. Place it on a paper towel while you prepare the new pot.
Part 3: Repot in Fresh Medium
Prepare the New Pot: Choose a clear pot with drainage holes that is just slightly larger than the root ball. Orchids like to be snug in their pots—a pot that’s too large can hold excess moisture and lead to rot.
Add Fresh Mix: Place a small amount of fresh orchid potting mix in the bottom of the pot.
Position the Orchid: Hold the orchid in the pot so that the base of the lowest leaves is just above the rim of the pot. The crown should not be buried.
Fill Around the Roots: Gently add more potting mix around the roots, tapping the pot to help it settle. Don’t pack it down too tightly—the roots need air circulation. Use a chopstick or pencil to gently work the mix between the roots.
Water In: After repotting, you can give the orchid a light watering (or another very weak tea soak) to help settle the new mix.
Aftercare: Helping Your Orchid Thrive
The tea soak is a fantastic first step, but long-term recovery depends on providing the right ongoing care. Here’s what your orchid needs to truly come back to life.
Light
Orchids need bright, indirect light. An east-facing window is ideal, providing gentle morning sun. A south or west-facing window may work if filtered by a sheer curtain. Direct sunlight will burn the leaves. If the leaves turn dark green, it’s a sign they aren’t getting enough light. If they turn yellow or reddish, they’re getting too much.
Watering
This is where most orchid owners go wrong. Overwatering is the #1 killer of orchids.
· The “Ice Cube” Myth: Despite a popular marketing campaign, you should never use ice cubes on orchids. They are tropical plants and the cold can damage their roots.
· The Soak and Dry Method: The best way to water is to take the pot to the sink and run room-temperature water through it for about 15-30 seconds, allowing it to drain completely. Or, you can do another soak in plain water for 10-15 minutes once a week.
· When to Water: Only water when the potting mix is almost dry. With a clear pot, you can see when the roots have turned from green to silvery-gray. You can also stick your finger or a wooden skewer about an inch into the mix—if it feels dry, it’s time to water.
Humidity
Orchids love humidity. They prefer levels between 40-70%. If your home is dry, especially in winter, increase humidity by:
· Placing a tray of pebbles filled with water beneath the pot (make sure the pot sits on the pebbles, not in the water).
· Grouping plants together to create a microclimate.
· Using a small room humidifier.
· Misting the leaves occasionally (but not the crown).
Temperature
Orchids appreciate a slight temperature drop at night, which often helps trigger reblooming. Aim for daytime temperatures of 65-75°F (18-24°C) and nighttime temperatures around 60-65°F (15-18°C).
Air Circulation
Good air movement is essential for preventing fungal and bacterial issues. A gentle ceiling fan or a small oscillating fan (not pointed directly at the plant) can make a big difference.
Fertilizer
Once your orchid shows signs of new growth (new roots or a new leaf), you can begin a regular, gentle fertilizing routine.
· Use a balanced, water-soluble orchid fertilizer (like 20-20-20) at half strength or a specialized “grow” formula.
· Fertilize every other week during the growing season (spring and summer).
· Reduce to once a month or pause entirely during the fall and winter.
· The “weakly, weekly” approach is a good rule of thumb—it’s better to under-fertilize than to over-fertilize.
Pro Tips for Orchid Revival
Want to maximize your chances of success? Here are some expert tips from experienced orchid growers:
Don’t Give Up Too Soon: Orchid recovery is slow. It can take weeks or even months to see significant improvement. Be patient and consistent with care.
Leaves May Not Recover: If leaves are severely wrinkled or damaged, they may never plump back up completely. The goal is to encourage new, healthy growth. Focus on the new leaves and roots.
Spot-Clean Leaves: Gently wipe orchid leaves with a damp cloth occasionally to remove dust. This allows them to photosynthesize more efficiently.
Sterilize Your Tools: Always use sterilized tools when cutting an orchid to prevent introducing disease.
Watch for Pests: Stressed orchids are more susceptible to pests like mealybugs, scale, and spider mites. Inspect regularly and treat promptly if you spot anything.
Trim the Flower Spike: If your orchid has a old, brown, dry flower spike, cut it off as close to the base as possible. This redirects the plant’s energy to root and leaf growth.
Frequently Asked Questions (FAQs)
Q: Can I use any type of tea?
A: For this method, stick to plain black tea. Herbal teas don’t contain the same beneficial tannins, and flavored teas may contain sugars or oils that could harm the plant. Green tea can be used in a pinch, but black tea is most effective.
Q: How often should I do the tea soak?
A: The tea soak is a rescue treatment, not a regular watering routine. Use it once when you first repot the orchid to give it a boost. After that, return to watering with plain water. You could do another tea soak once a month as a gentle tonic, but it’s not necessary for long-term care.
Q: My orchid has no roots left at all. Can it still be saved?
A: This is a challenging situation, but not impossible. You can try the “sphagnum moss method.” Place the base of the orchid in a small pot of moist sphagnum moss and keep it in a humid environment with bright, indirect light. Mist frequently. With luck and patience, it may sprout new roots. This method requires dedication but can work.
Q: How long will it take for my orchid to bloom again?
A: Orchids are on their own timeline. After a serious decline, it may take a full year or more for the plant to gather enough energy to produce a new flower spike. Focus on getting the leaves and roots healthy first; the flowers will come when the plant is ready.
Q: What is the green stuff on my orchid’s roots?
A: If the green stuff looks like small, bumpy patches, it’s likely algae, which is harmless and just means the pot is staying a bit moist. If it’s a white, cottony substance, it could be mealybugs, a common pest that needs to be treated with rubbing alcohol on a cotton swab.
Q: Should I cut the flower spike after the blooms fall?
A: Yes, this helps the plant conserve energy. For Phalaenopsis orchids, look at the spike. If it’s still green and healthy, you can cut it back to just above a node (the little bump on the stem). This may encourage a secondary spike or a new branch. If the spike is brown and dry, cut it off as close to the base of the plant as possible.
Q: Can I use this method on other orchids?
A: The tea soak method is gentlest and most effective for Phalaenopsis (moth orchids), which are the most common houseplant orchids. It can be used on other types with similar root structures, but always research the specific needs of your orchid variety.
Q: Why are my orchid’s leaves turning yellow after repotting?
A: Some yellowing can be normal, especially if the plant is stressed from the repotting process. However, if multiple leaves are yellowing rapidly, it could be a sign of overwatering or crown rot. Check your watering habits and ensure the crown isn’t staying wet.
The Science Behind the Trick
For those interested in the “why,” here’s a little more detail about what makes this method so effective.
Tannins as Natural Antifungals
Tannins are a type of polyphenol compound found in many plants, including tea. They have astringent properties and act as a natural defense mechanism against pathogens. When you soak orchid roots in a weak tea solution, you’re essentially giving them a mild, natural antifungal treatment that can help suppress the rot-causing bacteria and fungi that thrive in overly wet conditions.
Gentle Nutrient Boost
Black tea contains small amounts of nitrogen, phosphorus, potassium, and other micronutrients. While it’s not a substitute for regular fertilizer, this gentle nutrient boost can be just what a stressed orchid needs to kickstart recovery, without the risk of burning sensitive, damaged roots with chemical fertilizers.
Hydration Therapy
The soak itself is deeply hydrating for dehydrated orchid roots. Orchids often struggle because their roots have dried out completely. A thorough soak rehydrates the entire root system, plumping up the tissues and preparing them for active growth.
Troubleshooting Common Issues
Even with the best care, you might encounter some challenges. Here’s how to handle them:
Problem: The leaves are still wrinkled after watering.
Solution: If the roots are healthy but leaves remain wrinkled, the plant may have suffered permanent damage to those leaves. Focus on new growth. Once the plant has a robust root system, the next set of leaves should be firm and healthy.
Problem: Mold is growing on the potting mix.
Solution: This usually indicates poor air circulation or mix that’s staying too wet. Improve air movement around the plant and allow the mix to dry out more between waterings. You can also scoop out the top layer of moldy mix and replace it with fresh.
Problem: The orchid isn’t growing new roots.
Solution: Be patient—root growth can take time. Ensure the plant is getting enough light and warmth. You can also try using a rooting hormone or the “pothos buddy” method (placing a cutting of pothos in the same pot, as pothos produces natural rooting hormones).
Problem: New leaves are smaller than old ones.
Solution: This is normal for a recovering orchid. As the plant regains strength, new leaves will gradually increase in size. It’s a sign of progress!
Conclusion
Bringing a dying orchid back to life is one of the most rewarding experiences for any plant lover. It requires patience, observation, and a gentle touch, but the payoff—watching new roots emerge, a new leaf unfurl, or a flower spike appear—is immeasurable.
The simple tea soak trick is a powerful, natural tool in your orchid care arsenal, providing a gentle boost of hydration, nutrients, and antifungal protection when your plant needs it most. Combined with proper repotting and ongoing care, it can transform a struggling orchid into a thriving, blooming beauty.
Remember, the key to a healthy orchid is mimicking its natural environment: bright, indirect light; good air circulation; a wet-dry cycle for watering; and a little patience. Don’t be discouraged by slow progress. Every new root is a victory, every new leaf a sign that your care is working.
We hope this guide has given you the confidence and knowledge to rescue your struggling orchid. Give the tea soak method a try, and don’t forget to provide the consistent, loving care that follows. When your orchid finally rewards you with a stunning new bloom, you’ll know it was all worth it.
Have you tried this method? Do you have your own orchid revival story? We’d love to hear about it in the comments below! And if you’re looking for more plant care tips, be sure to check out our guides on Reviving a Peace Lily, The Best Natural Fertilizers for Houseplants, and How to Propagate Snake Plants in Water.
Happy growing! 🌸
Did this guide help you save your orchid? Share your success story with us on social media—we’d love to see your before and after photos!
More Ideas You Might Like
-

Why Some Homeowners Are Using Onion Water Around Orchids and What Usually Helps More for Strong Roots, Healthy Leaves, and Long-Lasting Blooms
Orchids are among the most elegant indoor flowering plants for homeowners who want graceful stems, glossy green leaves, long-lasting blooms, and a refined decorative display that fits beautifully in living rooms, bedrooms, apartments, home offices, bright kitchens, windowsills, covered patios, commercial interiors, luxury home staging, and premium indoor plant styling. A healthy orchid can turn…
-

Why Some Homeowners Are Pouring Aloe Water Around Orchids and What Usually Helps More for Strong Roots, Healthy Leaves, and Long-Lasting Blooms
Orchids are among the most elegant indoor flowering plants for homeowners who want graceful blooms, sculptural roots, glossy leaves, and a premium decorative display that fits beautifully in living rooms, bedrooms, apartments, home offices, bright kitchens, balcony gardens, covered patios, commercial interiors, luxury home staging, and refined indoor plant styling. A healthy orchid can make…
-
Why Some Homeowners Are Adding Brown Powder Around Snake Plants and What Usually Helps More for Strong Roots, Fuller Growth, and Healthy Indoor Leaves
Snake plant is one of the most dependable indoor plants for homeowners who want strong upright leaves, bold green patterning, yellow-edged variegation, easy maintenance, and a clean decorative display that fits beautifully in living rooms, bedrooms, apartments, home offices, bright kitchens, entry corners, sunny windowsills, plant shelves, commercial interiors, luxury home staging, and premium indoor…


