We have all had that painful moment. A favorite ceramic planter slips from the table, tips off a shelf, or gets knocked over while watering. There is a sharp crack, a scattering of soil, and suddenly the pot you loved is lying in pieces. Most people immediately think the planter is ruined. They sweep up the broken ceramic, rescue the plant, and throw the pieces away.
But what if those broken curved pieces are not trash at all?
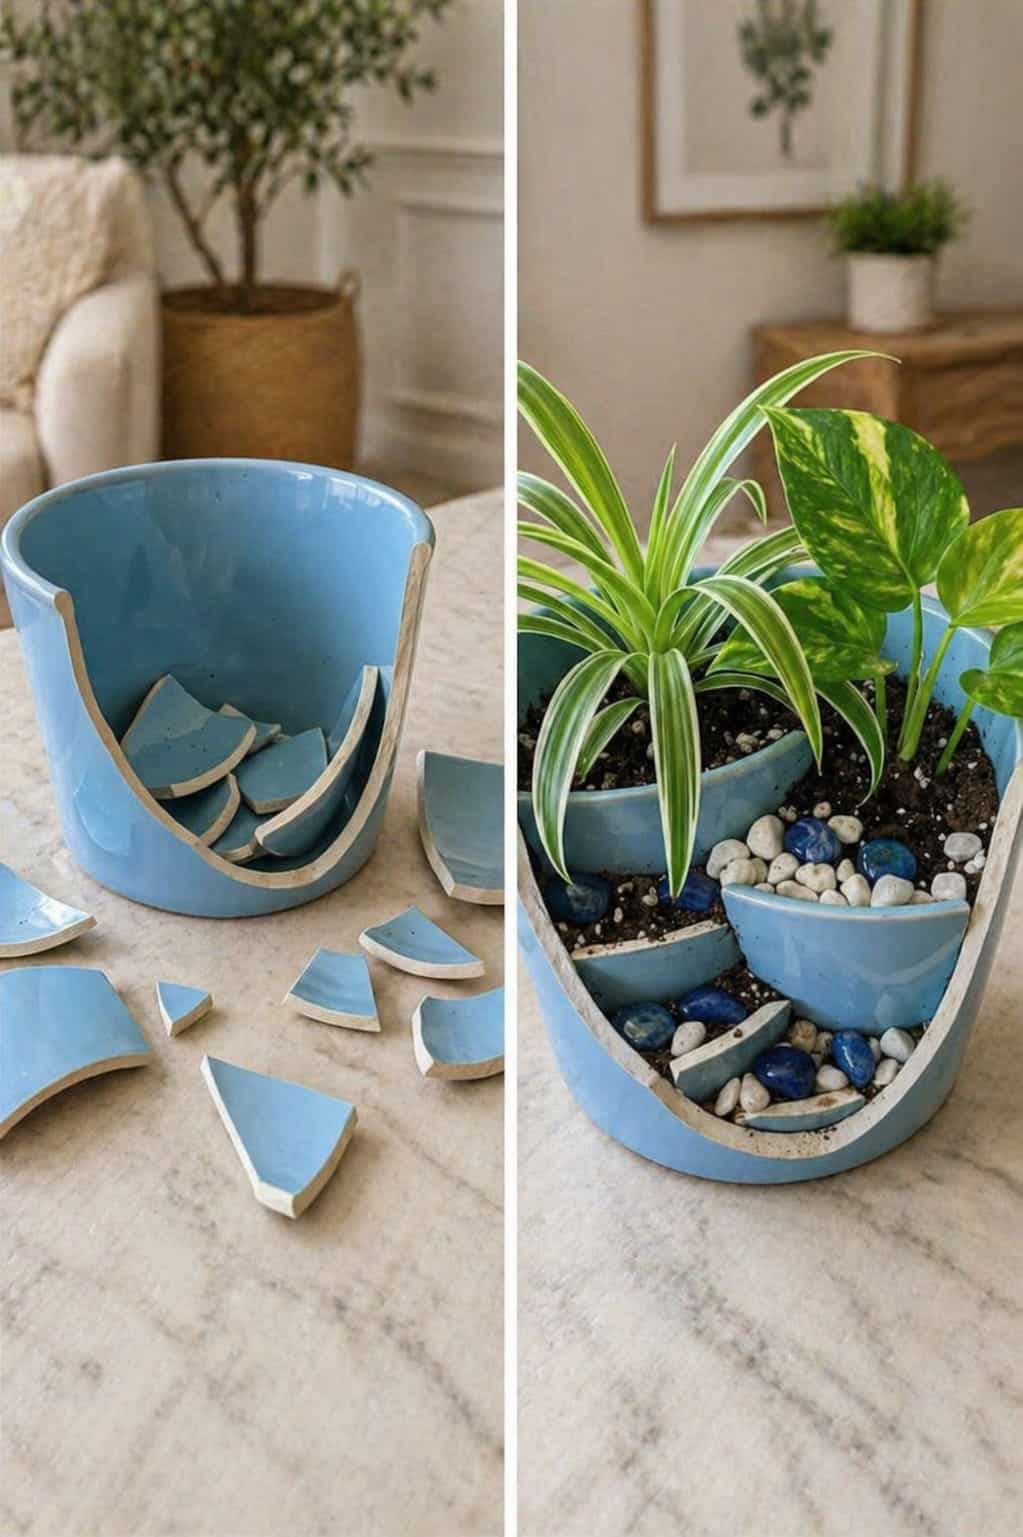
A broken planter can become the foundation for one of the most charming indoor plant projects you can make: a layered micro-garden. Instead of hiding the damage, you turn it into part of the design. The jagged ceramic edges become little retaining walls. The curved shards create terraces. The broken front becomes an open window into a miniature planted landscape. With a few small houseplants, pebbles, soil, and creativity, an accident becomes a beautiful piece of living decor.
This idea is especially useful during the colder months. As indoor heating dries the air, many houseplants begin to suffer from crispy tips, drooping leaves, and dull growth. Grouping plants together inside a layered broken-pot planter can help create a small pocket of moisture around the foliage. It will not replace a humidifier, but it can help build a more comfortable microclimate for plants that enjoy a little extra humidity.
This project is practical, beautiful, and surprisingly forgiving. You do not need to be an expert gardener or a professional craft maker. If you can arrange soil, stones, and small plants, you can create a broken-pot micro-garden that looks intentional, artistic, and expensive.
In this complete guide, you will learn exactly how to turn a broken ceramic planter into a layered indoor garden, what plants to use, how to arrange the pieces safely, how to improve humidity, how to water the finished planter, and how to avoid the common mistakes that cause indoor plant arrangements to fail.
What Is a Broken Planter Micro-Garden?
A broken planter micro-garden is a small indoor plant arrangement made inside a damaged ceramic pot. Instead of discarding the broken container, you use the remaining shell and ceramic shards to create layered planting zones. The result looks like a miniature landscape, with plants growing at different heights and small pathways or terraces made from broken pieces.
The most common version uses a pot that has broken open on one side. The back and sides remain mostly intact, while the broken front exposes the inside. This open shape is perfect because it lets you build visible layers. Larger shards are placed upright or angled inside the pot to form small retaining walls. Soil is added behind each piece, creating tiers where different plants can be placed.
Decorative stones, gravel, moss, glass pebbles, and small accents can be added to finish the scene. The final planter can look like a tiny garden, a fairy landscape, a modern plant bowl, or a sculptural indoor display.
This project is popular because it turns a mistake into something beautiful. A broken pot already has character. The cracks, curves, and uneven edges create a design that would be hard to achieve with a perfect container. Instead of looking damaged, the pot looks transformed.
Why Broken Ceramic Pieces Work So Well
Broken ceramic planter pieces are ideal for layered planting because they are curved, sturdy, and usually match the original pot perfectly. Their curved shape allows them to sit naturally inside the container. Their weight helps them stay in place. Their matching color creates a cohesive look, making the design feel intentional rather than random.
The jagged edges can be used as visual texture, while the smooth glazed surfaces add color and shine. If the planter was blue, white, terracotta, green, or patterned, those same colors can repeat throughout the arrangement. This gives the finished micro-garden a polished, artistic appearance.
Large pieces can act like small retaining walls. Smaller pieces can become decorative steps, borders, or dividers. Flat pieces can be used as tiny paths. Curved pieces can create pockets for soil and roots.
The trick is to think of the broken pieces not as damage, but as structure. They are the bones of the design. Once soil, plants, and stones are added, the broken planter becomes a layered container garden with depth and movement.
Why This Project Is Perfect for Winter Houseplants
Winter can be difficult for indoor plants. Heating systems dry out the air, daylight hours are shorter, and many plants slow their growth. Leaves may develop brown tips, soil may dry unevenly, and tropical plants may look less vibrant than they did in summer.
A broken-pot micro-garden can help in a few ways. First, grouping small plants together creates a more humid pocket of air around the foliage. Plants naturally release moisture through their leaves, and when several plants are close together, that moisture can slightly improve the local environment.
Second, the layered structure allows you to combine plants with similar needs in one display. For example, you can place moisture-loving plants together and keep them away from dry-loving succulents. When arranged correctly, this makes care easier.
Third, decorative stones and soil layers can hold a little moisture near the surface, helping the display feel fresher. This does not mean the planter should stay soggy. Good drainage is still essential. But the arrangement can create a softer, more plant-friendly environment than a single isolated pot sitting alone in dry air.
Finally, winter is a great time for indoor creative gardening. When outdoor gardening slows down, projects like this keep your hands busy and your home feeling alive.
Does Grouping Plants Really Increase Humidity?
Grouping plants can help create a small local humidity boost, especially around the leaves. Plants release moisture through transpiration, and when several plants sit close together, the air around them can become slightly more humid than the surrounding room.
This effect is usually modest. A broken planter arrangement will not transform a dry room into a tropical greenhouse. However, for small houseplants, even a small improvement can help reduce dryness stress, especially when combined with careful watering, pebble surfaces, and placement away from heating vents.
The layered micro-garden works best as part of a broader winter care strategy. Keep it away from radiators, fireplaces, and forced-air vents. Place it in bright indirect light. Avoid letting the soil become bone dry for moisture-loving plants. If your home is extremely dry, you can still use a humidifier nearby.
Think of the broken-pot garden as a miniature plant neighborhood. Each plant contributes a little moisture, and the close arrangement helps them share a more comfortable space.
Safety First: Handling Broken Ceramic
Before you start building, handle the broken planter carefully. Ceramic shards can be sharp. Wear gardening gloves or work gloves when sorting the pieces. Avoid running your fingers along jagged edges. If a piece has a dangerous sharp point, you can sand it gently with coarse sandpaper or wrap the edge with tape while planning the design.
Do not use pieces that are cracked so badly they crumble. You want sturdy shards that can hold soil in place. Very tiny pieces can be discarded or used as drainage material only if they are not sharp and will not block drainage holes.
If children or pets will be near the finished planter, make sure no sharp edges are exposed where they can be touched easily. You can position sharp edges downward into the soil or cover them with stones, moss, or soil.
The project should look rustic and creative, but it should also be safe. A beautiful planter is not worth cut fingers or unsafe edges.
What You Need for This Project
You do not need many materials to create a layered broken planter garden. Most of the charm comes from using what you already have.
- A broken ceramic planter with a large remaining shell
- Several large curved ceramic shards
- Gardening gloves
- Well-draining potting mix
- Small indoor plants with similar care needs
- Small pebbles or gravel
- Decorative stones, glass pebbles, or moss
- Activated charcoal if the drainage is limited
- A spoon or small trowel
- Optional sandpaper for sharp edges
- Optional small figurines, labels, or natural accents
The most important material is the potting mix. Do not use heavy outdoor garden soil. Indoor container gardens need a light mix that drains well. The right soil depends on the plants you choose. Tropical plants need a moisture-retentive but airy mix. Succulents need a gritty cactus-style mix.
Choosing the Right Broken Planter
The best broken planter for this project is one that still has a stable back and base. A pot broken mostly on the front side is perfect because it creates an open display window. The base should be strong enough to hold soil and plants without collapsing.
If the pot is broken into too many pieces and cannot stand securely, it may be better used as decorative shards in another planter. The main shell should sit flat on the table without wobbling. If it tilts, you can stabilize it with small felt pads, a tray, or a base layer of stones.
Drainage is also important. If the original pot had drainage holes, that is ideal. If it did not, you need to be very careful with watering. You can add a bottom layer of gravel and charcoal, but remember that gravel does not truly replace drainage holes. It only creates a small buffer. For most indoor plants, a drainage hole is strongly recommended.
Best Plants for a Broken-Pot Micro-Garden
The best plants for this project are small, slow-growing, and compatible with each other. You want plants that can live together without one taking over the entire arrangement. Choose plants with similar watering and light needs.
For a tropical-style indoor micro-garden, good options include:
- Spider plant babies
- Pothos cuttings
- Small philodendrons
- Fittonia
- Peperomia
- Small ferns
- Baby peace lilies
- Mini syngonium
For a dry succulent-style arrangement, good options include:
- Haworthia
- Small echeveria
- Gasteria
- Jade plant cuttings
- String of pearls cuttings
- Small sedum varieties
Do not mix moisture-loving tropical plants with dry-loving succulents in the same small planter unless you are very careful. They have different watering needs. A spider plant and pothos can live together more easily than a fern and cactus.
The Best Plant Combination for Beginners
If you are new to this project, a simple combination is spider plant, pothos, and peperomia. These plants are forgiving, attractive, and manageable indoors. Spider plants add grassy texture, pothos adds broad variegated leaves, and peperomia adds compact rounded foliage.
This combination looks lush without needing extreme humidity. It also works well in bright indirect light. Watering is easier because all three prefer not to be bone dry for too long, but they also do not want swampy soil.
If your broken pot is small, use only two plants. Crowding too many plants into a tiny container can create root competition and watering problems. A good micro-garden should have room to breathe.
Step-by-Step: How to Turn a Broken Planter into a Layered Micro-Garden
Step 1: Clean the Broken Pot
Remove old soil, dust, and loose debris from the broken planter. Rinse the pieces if needed and let them dry. If the pot previously held a diseased plant, wash it thoroughly before reusing it.
Inspect the pieces carefully. Choose the strongest curved shards for building terraces. Set aside any dangerous sharp fragments that cannot be used safely.
Step 2: Plan the Layout Before Adding Soil
Place the main broken pot on your work surface and test different shard arrangements. Try placing one large shard across the front to create a lower planting pocket. Add another piece behind it to create a second tier. Use smaller pieces as steps or borders.
Do not rush this part. The layout determines how the final garden will look. Move pieces around until the design feels balanced. The tallest area usually looks best toward the back, with smaller plants and stones near the front.
Step 3: Add a Drainage Layer If Needed
If your pot has drainage holes, you can add a small layer of pebbles at the bottom, but do not overdo it. If the pot has no drainage, add a thin layer of small stones and a little activated charcoal to help reduce odor and keep the bottom fresher.
Again, remember that drainage holes are better. A no-drainage pot requires careful watering. Use less water and check soil moisture often.
Step 4: Build the First Soil Layer
Add potting mix to the bottom of the planter. Press it gently into place, but do not compact it too tightly. The soil should support the shards while still allowing roots to breathe.
Place your first large ceramic shard at an angle to create a front wall. Add soil behind it. This creates your first raised planting area.
Step 5: Create the Second Tier
Place another shard behind the first one, slightly higher. Add more soil behind it. This creates a layered effect. The pieces should feel stable and should not slide forward easily.
You can use smaller stones or chunks of ceramic behind the walls for support. Make sure everything is secure before planting.
Step 6: Add the Plants
Remove each small plant from its nursery pot and gently loosen the roots. Place the largest plant toward the back or center. Add smaller plants to the front pockets. Use your fingers or a spoon to tuck soil around the roots.
Do not bury plants too deeply. Keep the soil level close to where it was in the original pot. Press gently to secure the plants, but avoid crushing the roots.
Step 7: Add Decorative Stones
Once the plants are in place, add decorative pebbles, gravel, or small stones to the surface. These help hide soil, cover sharp edges, and make the arrangement look finished.
White pebbles create a clean modern look. Blue glass stones can match a blue broken pot. Natural river rocks create a soft garden feel. Moss can add a woodland effect if the plants enjoy moisture.
Step 8: Water Lightly
After planting, water lightly. Do not flood the arrangement. The soil needs to settle around the roots, but too much water can cause shifting or soggy pockets.
If the pot has drainage holes, water until just a little drains out. If there are no drainage holes, add only a small amount and check the soil carefully over the next few days.
Step 9: Place in Bright Indirect Light
Most indoor micro-garden plants prefer bright indirect light. Place the finished planter near a bright window but away from harsh direct sun unless you are using succulents. Tropical plants can scorch in intense sun, while succulents need stronger light than pothos or spider plants.
A bright tabletop, windowsill, plant stand, or shelf can be perfect. Make sure the planter is stable and not likely to be knocked over again.
Continue to Page 2
Continue to page 2 for more details about this article and the key points many readers miss on the first page.