Snake plants are already famous for their bold, upright shape. Their long sword-like leaves rise from the soil like natural green architecture, making them one of the easiest houseplants to use in modern indoor decor. But in the image, the snake plant has been taken one step further. Instead of letting every leaf grow straight upward, the leaves have been gently guided into curling spiral shapes, creating a plant that looks less like an ordinary houseplant and more like a living sculpture.
This kind of decorative training instantly catches attention. The plant still has the familiar green snake plant pattern, but the curled leaves create movement, rhythm, and personality. It becomes playful, artistic, and highly decorative. In a red pot, the green spirals stand out even more, making the whole arrangement feel like a statement piece for a living room, plant corner, sunroom, patio, or entryway.
Smart homeowners are drawn to this idea because it turns a common plant into something unique. Many people already own snake plants, but most of them look similar: tall leaves, vertical shape, simple pot. A trained spiral snake plant feels custom-made. It can soften a room, add sculptural curves, and make a simple plant collection look more curated.
However, there is one important truth: snake plant leaves are not naturally flexible like vines. They are thick, firm, succulent leaves that can crack, bruise, or rot if forced. The spiral look must be created slowly, gently, and only with healthy young leaves that still have some flexibility. This is not a trick where you bend a mature leaf harshly in one day. It is a patient decorative training method.
This guide explains how to create a spiral snake plant display safely, what tools to use, which leaves to train, how long it takes, how to avoid breaking the plant, and how to care for the snake plant afterward so it stays strong, upright, decorative, and healthy indoors.
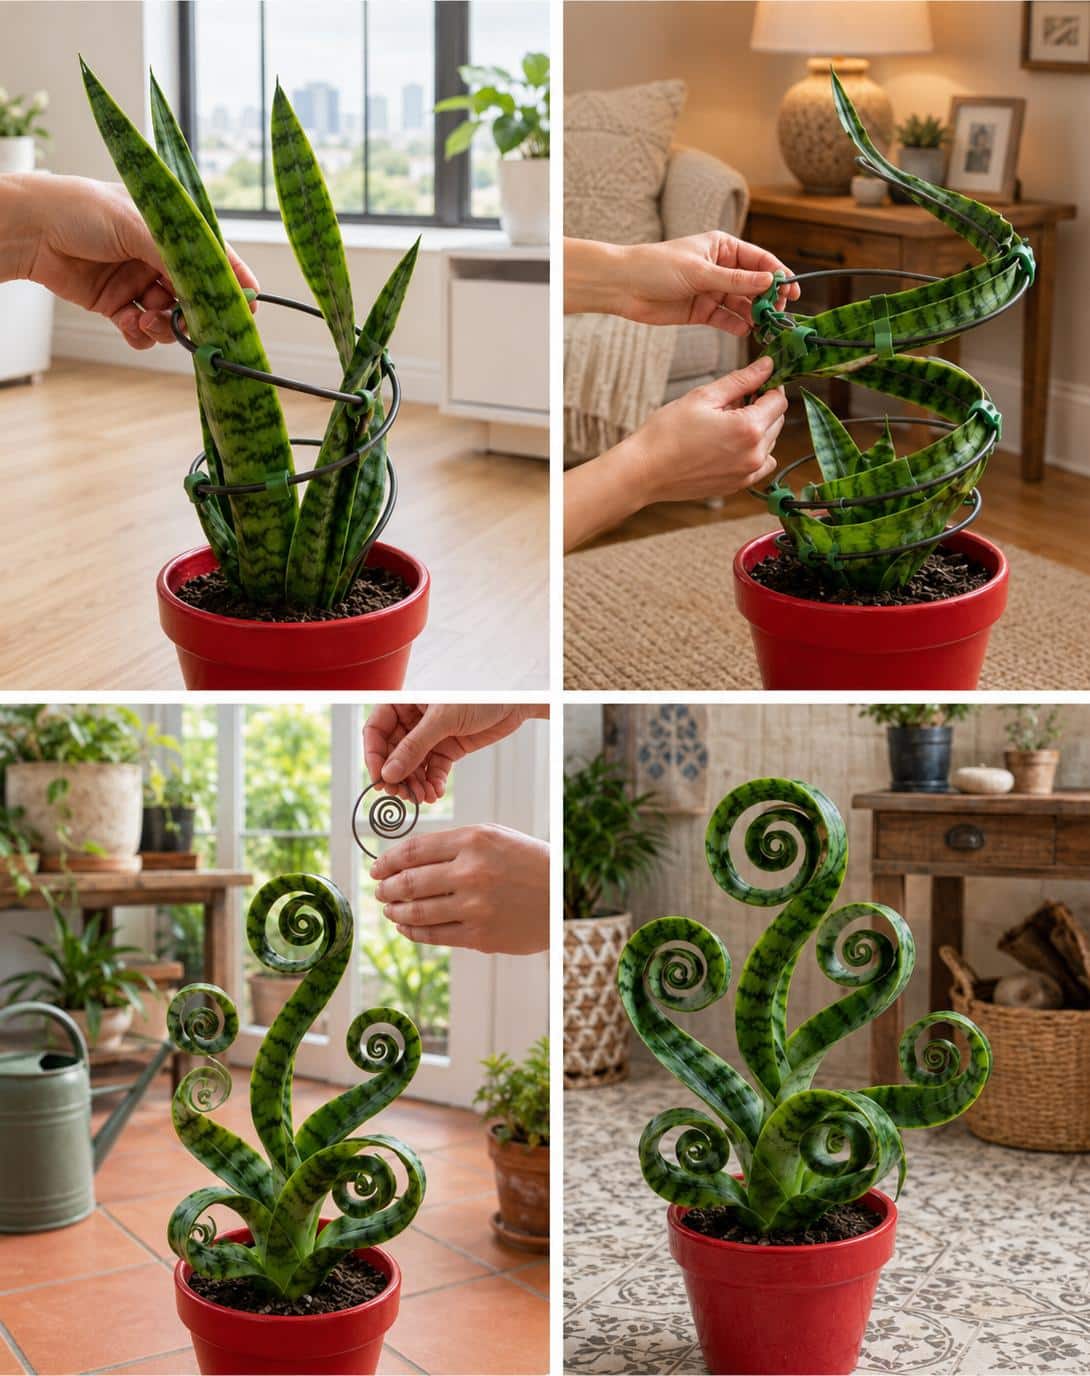
What Is Happening in the Image?
The image shows a snake plant in a red pot being shaped with a circular support frame. In the first section, the plant has normal upright leaves. In the next section, the leaves are gently guided sideways and secured to a curved frame. In the lower sections, the leaves appear curled into spirals, creating a decorative sculptural plant display.
This is best understood as a decorative leaf-training method. The idea is to use soft ties, plant clips, or a flexible frame to gradually guide snake plant leaves into curved shapes. Over time, the leaves may hold more of that curve, especially if they are young and still growing.
The finished plant looks artistic and unusual. It is not the natural growth habit of a classic snake plant, but it can be used as a creative display for homeowners who enjoy botanical styling.
Can Snake Plant Leaves Really Be Trained Into Spirals?
Snake plant leaves can sometimes be guided into curves when they are young and flexible, but they cannot be treated like soft vines. A pothos stem can wrap around a pole easily. A hoya vine can be trained along a hoop. A snake plant leaf is different. It is thick, stiff, and full of stored water. If you bend it too hard, it can split or snap.
So yes, you can create a spiral-inspired snake plant display, but only with patience and caution. The best results come from gently guiding leaves over time rather than forcing them quickly.
The most important rules are:
- Use only healthy leaves.
- Choose younger, more flexible leaves.
- Bend slowly over days or weeks.
- Use soft ties, not wire directly on the leaf.
- Never crease the leaf.
- Stop if the leaf shows cracking, soft spots, or stress.
If you want an instant spiral display, it is safer to create the spiral using a decorative support or artificial guide around the leaves rather than forcing the leaves into extreme curls.
Why This Look Feels Luxurious Indoors
Luxury indoor decor often depends on shape and intention. A regular plant can look nice, but a shaped plant looks designed. The spiral snake plant display adds curves to a plant that normally grows in straight lines. This contrast makes the plant feel more artistic.
The curved leaves create:
- Movement
- Visual softness
- A sculptural silhouette
- A custom-designed appearance
- A playful but elegant focal point
- A stronger decorative presence
A trained spiral snake plant is especially effective in rooms that have many straight lines: square tables, rectangular shelves, modern sofas, plain walls, and vertical windows. The curls soften the space and add a natural artistic element.
Best Snake Plants for Spiral Training
Not every snake plant is a good candidate for this method. Tall, mature, thick leaves are often too stiff. They may crack if bent. Younger plants or varieties with slightly thinner leaves are easier to guide.
Good candidates include:
- Young snake plant leaves that are still flexible
- Medium-height snake plants
- Healthy leaves with no cracks
- Plants growing actively in spring or summer
- Leaves that already lean slightly outward
Avoid using:
- Very old stiff leaves
- Leaves with brown tips or cracks
- Mushy leaves
- Recently repotted plants
- Plants recovering from rot
- Plants in very low light
- Leaves that are already weak or wrinkled
If your snake plant is stressed, do not train it. First restore its health with better light, correct watering, and well-draining soil.
Tools You Need
You do not need complicated equipment, but you do need gentle materials. The wrong tie can cut into the leaves and leave permanent scars.
Recommended Tools
- Soft plant ties
- Velcro plant tape
- Flexible garden wire covered in rubber or foam
- Plant clips with soft edges
- A circular plant support frame
- A small hoop, trellis, or spiral guide
- Clean scissors
- A stable pot
Materials to Avoid
- Bare metal wire
- Fishing line
- Tight rubber bands
- Thin string that cuts into leaves
- Zip ties pulled tightly
- Heavy clips that bruise the leaves
The ties should hold the leaf gently, not squeeze it. Snake plant leaves expand and move slightly as they grow, so any tie that is too tight can damage the plant.
Step-by-Step: How to Train a Snake Plant Into Decorative Spirals
Step 1: Start With a Healthy Plant
Before shaping, inspect the plant carefully. The leaves should feel firm. The soil should not smell sour. The base should not be mushy. The plant should be growing in a pot with drainage holes. If the plant is weak, wait.
A healthy snake plant can handle gentle training better than a stressed one. If your plant has yellowing, soft bases, or collapsing leaves, shaping will only make things worse.
Step 2: Choose the Right Leaves
Select leaves that are medium-sized, healthy, and slightly flexible. Young leaves are easier to train than older leaves. Do not choose the tallest, stiffest leaves first. Start with leaves that naturally lean outward or have a slight curve.
Touch the leaf gently. If it feels rigid and refuses to move, do not force it. Choose another leaf.
Step 3: Install a Gentle Support Frame
Place a circular support frame or flexible hoop around the plant. The support should sit firmly in the soil without damaging roots too much. Push support legs into the soil carefully near the edge of the pot, not directly through the center of the root mass.
The frame acts like a guide. You are not bending the leaf into a spiral all at once. You are using the frame to gradually encourage a curve.
Step 4: Guide the Leaf Slowly
Take one selected leaf and gently move it toward the support. Do not twist sharply. Do not fold. Do not crease. A snake plant leaf should curve smoothly, not bend at one hard point.
If the leaf resists, stop. Try again another day. You can train a leaf gradually by moving it a little more every few days.
Step 5: Secure With a Soft Tie
Use soft plant tape or a padded tie to attach the leaf loosely to the frame. The tie should be firm enough to hold the leaf in place but loose enough that you can slide a finger under it.
Never tie directly at a sharp angle. Place the tie along a natural curve. This helps avoid pressure marks.
Step 6: Train in Stages
After several days or a week, adjust the tie slightly and guide the leaf a little more. Continue this process slowly. The spiral effect is created through patience.
A safe training schedule might look like this:
- Week 1: gentle outward curve
- Week 2: stronger curve along the frame
- Week 3: partial loop shape
- Week 4 and beyond: refine the spiral if the leaf remains healthy
Some leaves may never curl dramatically. That is normal. The goal is a decorative curve, not plant torture.
Step 7: Watch for Stress
Check trained leaves every few days. Look for cracks, bruises, soft spots, brown scars, or yellowing. If you see damage, loosen the tie or release the leaf.
Warning signs include:
- A crease line
- A split in the leaf
- Soft watery patches
- Yellowing near the tie
- Brown marks where the tie touches
- Leaf base becoming loose
Step 8: Rotate the Pot
Rotate the pot weekly so the plant receives even light. This helps keep the display balanced and prevents the leaves from stretching unevenly toward the window.
Step 9: Keep Water Out of the Curled Areas
Curled leaves can trap water more easily than upright leaves. When watering, pour only onto the soil. Do not splash water into the curled leaves. Trapped moisture can cause spotting or rot.
Step 10: Maintain the Shape Carefully
Once the leaves are trained, keep the ties in place if needed. Some leaves may hold a curve; others may slowly return toward their natural shape. Adjust gently, and never force a leaf that wants to straighten.
How Long Does It Take?
A safe spiral training process can take several weeks or even months. If you try to create the look in one afternoon, you may break the leaves. The image shows a dramatic transformation, but in real plant care, slow training is safer.
Expect:
- Light curves: 1 to 2 weeks
- Noticeable decorative shaping: 3 to 6 weeks
- Stronger spiral effect: several months
- Permanent hold: not guaranteed
Snake plant leaves do not behave like bonsai branches or vines. Some may hold the trained shape only while supported.
Is This Safe for the Plant?
It can be safe if done gently, but it is not risk-free. Snake plants were not designed to be curled tightly. Their leaves are structural, succulent, and somewhat brittle. The safest version is a decorative support that guides the leaves without sharp bending.
This method is safest when:
- The plant is healthy
- The leaves are young
- The curves are gradual
- The ties are soft
- The plant is kept dry at the crown
- The room has good light
- The soil drains well
It becomes risky when:
- You force stiff leaves
- You create tight curls too quickly
- You tie leaves too tightly
- You train a stressed plant
- The plant is overwatered
- Water collects inside curled leaves
How to Care for a Trained Spiral Snake Plant
Once the plant is shaped, its care becomes even more important. A trained plant needs firm, healthy leaves to keep its sculptural look.
Light
Give bright indirect light. Snake plants tolerate low light, but trained leaves look better when the plant receives enough brightness to stay strong. A bright window with filtered light is ideal.
Avoid harsh direct afternoon sun, especially if the leaves are bent or stressed. Sunburned areas can become permanent brown patches.
Water
Water only when the soil is dry. Snake plants store water in their leaves and rhizomes. Overwatering is one of the fastest ways to weaken the plant.
When watering, pour around the soil surface. Keep water away from the center and away from curled leaf pockets.
Soil
Use fast-draining soil. A good mix is:
- 2 parts cactus or succulent mix
- 1 part perlite or pumice
- 1 part orchid bark or coarse grit
This protects the roots and helps prevent rot.
Pot
Use a pot with drainage holes. A heavy ceramic or terracotta pot is best because trained leaves and support frames can make the plant top-heavy.
Fertilizer
Feed lightly during spring and summer only. Use a balanced houseplant fertilizer or cactus fertilizer at half strength once every 6 to 8 weeks during active growth. Do not overfeed.
Continue to Page 2
Continue to page 2 for more details about this article and the key points many readers miss on the first page.