Snake plants are some of the most reliable houseplants you can grow indoors. They are bold, architectural, drought-tolerant, stylish, and forgiving. Their upright sword-shaped leaves make a room look cleaner and more modern, while their thick succulent texture helps them survive missed watering, low humidity, and busy household routines. But one of the most exciting things about snake plants is that you can multiply them from a single healthy leaf.
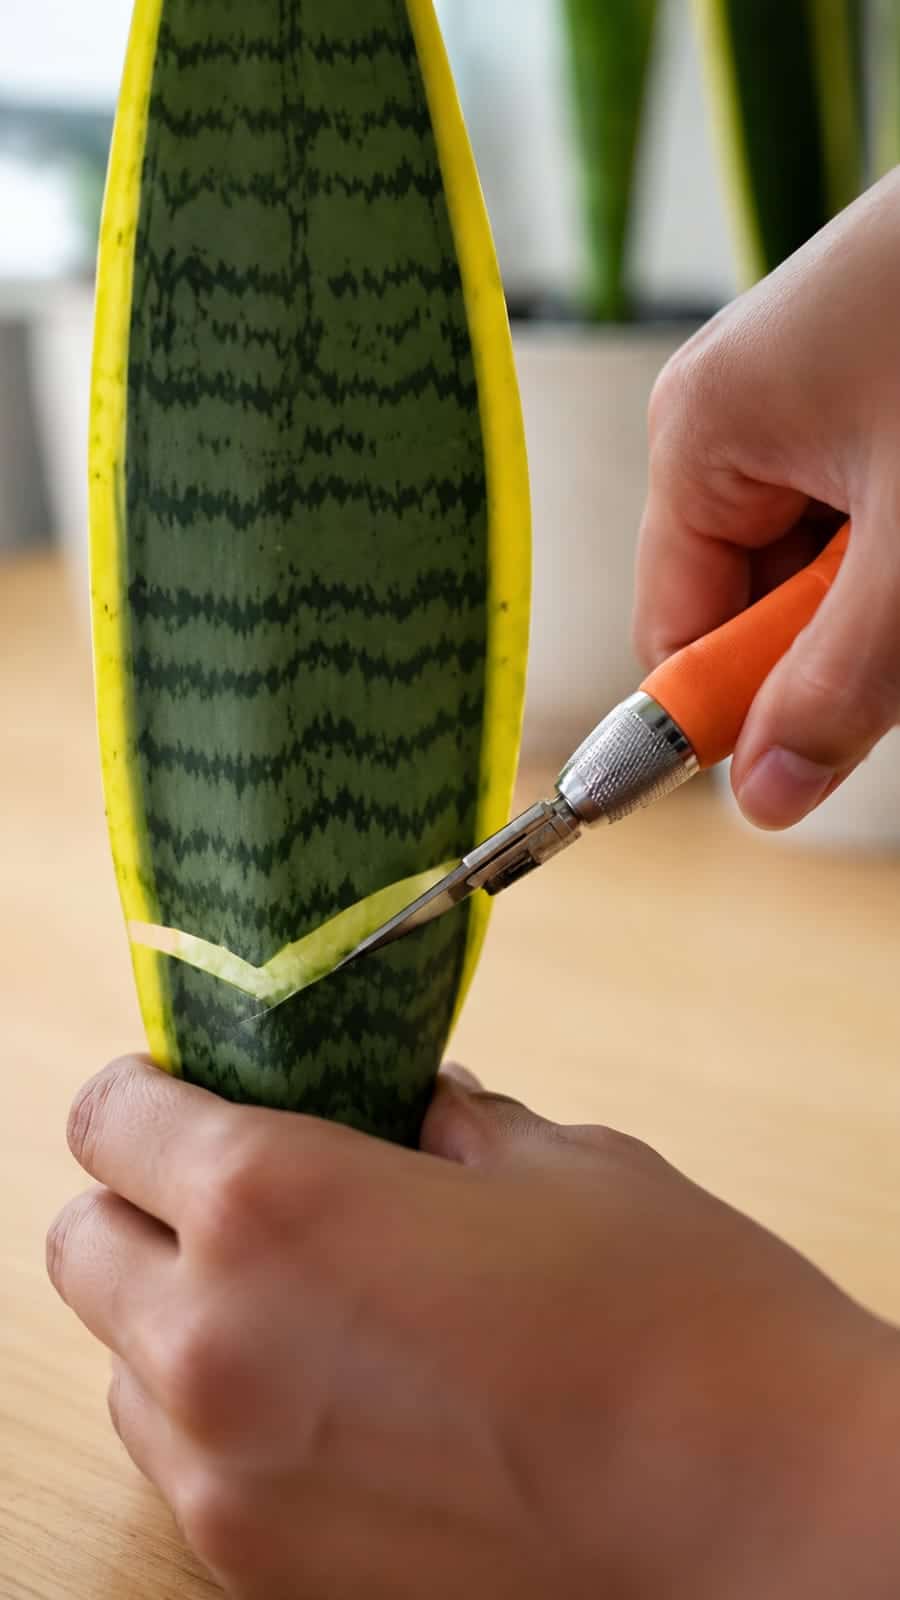
In the image, a hand is holding a snake plant leaf while another hand uses a sharp craft knife to cut a small V-shaped notch across the leaf. This looks unusual at first, but it points to a popular propagation idea: preparing a snake plant leaf cutting so it can grow roots and eventually produce new baby plants. Some plant owners cut the leaf into sections. Others make a small notch to mark the correct planting direction or increase the cut surface where roots may form. When done carefully, a snake plant leaf can become the beginning of several new plants.
Smart homeowners love this trick because it turns one plant into many without buying more. A single mature snake plant can provide cuttings for gifts, new pots, office decor, balcony corners, shelves, and table arrangements. It also gives old or damaged leaves a second life. Instead of throwing away a leaf that was trimmed from the plant, you can use it to grow a new snake plant.
However, this method must be done correctly. Snake plant propagation is easy, but it is not instant. The leaf must be cut cleanly, allowed to callus, planted in the correct direction, and kept in a lightly moist but never soggy medium. If the leaf is inserted upside down, it usually will not root properly. If the cutting is placed into wet soil immediately after cutting, it may rot. If the knife is dirty, the wound can become infected. If the soil is too dense, the cutting may collapse before producing roots.
This guide explains how to use the small-notch snake plant propagation trick safely, what the notch does, how to cut the leaf, how to prepare the cutting, how to root it in water or soil, how long it takes, and how to avoid the most common mistakes. By the end, you will know how to turn one healthy snake plant leaf into a new decorative plant for your home.
What Is Happening in the Image?
The image shows a snake plant leaf being cut with a sharp craft knife. The cut appears to form a small V-shaped notch near the lower portion of the leaf. This type of cut is often used when preparing snake plant leaves for propagation.
The V shape can serve two practical purposes. First, it clearly marks the bottom end of the cutting. That matters because snake plant leaves have a top and bottom direction. The bottom end is the end that must go into the water or soil. If you plant the cutting upside down, it will usually fail. A V-shaped notch makes the bottom easy to recognize.
Second, the notch creates more exposed cut surface. Some growers believe this may encourage more rooting area along the bottom edge. The most important part, though, is not the shape itself. The most important part is using a clean, sharp blade and allowing the cut to dry before planting.
Why Snake Plant Leaf Direction Matters
Snake plant propagation is directional. A leaf cutting will only root properly from the original bottom end of the leaf. This means the end that was closest to the base of the plant must be placed into soil or water. The end that was toward the leaf tip should remain upward.
This is where many beginners make mistakes. If you cut one long leaf into several pieces and place the pieces on a table, it can become difficult to remember which end is the bottom. A V-shaped notch solves this problem. By cutting a V into the bottom end immediately after making each section, you create a clear visual marker.
Some growers use a straight cut at the top and a V cut at the bottom. Others cut the bottom at an angle. The idea is the same: mark the direction so the cutting is planted correctly.
Why Smart Homeowners Like This Trick
This method is popular because it is affordable, satisfying, and practical. Snake plants are already easy to care for, but propagation makes them even more rewarding. Instead of buying new plants, you can multiply the plant you already have.
Homeowners use this trick because it can:
- Create new snake plants from one mature leaf
- Save money on houseplants
- Turn damaged leaves into new plants
- Make beautiful plant gifts
- Fill empty pots around the home
- Create matching decor plants for shelves and tables
- Teach beginners a simple propagation skill
- Help refresh an old, crowded snake plant
It is especially useful when a snake plant has one leaf that is too tall, leaning, scratched, or bent. Rather than discard the leaf, you can cut it into sections and propagate it.
Important Warning Before You Start
Cutting a snake plant leaf is permanent. The original leaf section removed from the mother plant will not grow back from the cut point in the same way. If you cut a full leaf off the plant, that leaf is gone from the parent plant. The plant may later produce new leaves from the rhizome, but the cut leaf itself will not repair into a perfect sword shape.
So only cut leaves you are willing to remove. Choose a mature, healthy leaf, or use a damaged leaf that you would trim anyway. Do not cut the most beautiful leaf from a small plant unless you are comfortable changing the plant’s appearance.
Best Time to Propagate Snake Plants
The best time to propagate snake plants is during the warm growing season, usually spring through early summer. During this period, the plant is more active, and cuttings are more likely to root successfully.
You can propagate indoors at other times of year if your home is warm and bright, but rooting may be slower in winter. Snake plants grow slowly even in ideal conditions, so patience is essential.
Best conditions include:
- Warm temperatures
- Bright indirect light
- Low to moderate humidity
- Clean tools
- Fast-draining medium
- A dry callus period before planting
What You Need
You do not need many supplies, but the tools should be clean and sharp. A dull blade can crush the leaf tissue and increase the chance of rot.
Tools and Materials
- A healthy snake plant leaf
- Sharp craft knife, razor blade, or clean pruning shears
- Rubbing alcohol for sterilizing the blade
- Paper towel
- Small tray or plate
- Fast-draining cactus or succulent mix
- Perlite or pumice
- Small pot with drainage holes
- Optional rooting hormone
- Optional glass jar if rooting in water
- Plant label or marker
Step-by-Step: How to Use the V-Notch Snake Plant Propagation Trick
Step 1: Choose a Healthy Leaf
Select a mature leaf that is firm, thick, and free from rot. The best leaf should feel strong and slightly rigid. Avoid leaves that are mushy, yellow, wrinkled, or diseased. A damaged leaf can be used if the damage is only cosmetic, but do not use a leaf with soft rot.
If the plant is variegated with yellow edges, remember that leaf cuttings may not always produce babies with the same yellow variegation. Many variegated snake plants propagated from leaf cuttings produce green pups. To preserve variegation, division is usually more reliable.
Step 2: Clean Your Blade
Wipe the knife or blade with rubbing alcohol. This helps reduce the chance of introducing bacteria or fungus into the fresh cut. Clean tools are especially important because snake plant leaves store moisture, and damaged moist tissue can rot if contaminated.
Step 3: Cut the Leaf From the Mother Plant
If you are taking a full leaf, cut it near the base using a clean straight cut. Hold the leaf gently and cut with confidence. Do not saw back and forth roughly. A clean cut heals better.
If you only want to remove a damaged top portion, cut below the damaged area. But for propagation, the healthier the section, the better.
Step 4: Cut the Leaf Into Sections
Cut the leaf into sections about 3 to 5 inches long. Each section can potentially become a new plant. Keep the pieces in order as you cut so you know which end is the bottom.
This is where the V-notch trick becomes useful. Immediately after cutting each piece, cut a small V shape into the bottom end. This marks the end that must be planted downward.
Step 5: Make the V-Shaped Notch
Using the clean knife, cut a shallow V shape at the bottom of the cutting. Do not cut too high into the leaf. The notch only needs to be deep enough to mark the bottom and expose a little more cut surface.
The top of the cutting can remain straight. This creates a simple system:
- Straight cut = top
- V cut = bottom
This prevents confusion later, especially if you are preparing many cuttings at once.
Step 6: Let the Cuttings Callus
This step is extremely important. Place the cuttings on a dry paper towel or tray in a warm, shaded spot. Let them dry for 2 to 5 days before planting. The cut ends should become slightly dry and sealed.
This drying period is called callusing. It reduces the risk of rot when the cutting is placed into soil or water.
Do not skip this step. Fresh snake plant cuts placed directly into wet soil often rot.
Step 7: Prepare the Potting Mix
Use a fast-draining mix. Snake plant cuttings hate soggy soil. A good propagation mix is:
- 2 parts cactus or succulent mix
- 1 part perlite or pumice
- Optional: a small amount of coarse sand
The mix should feel loose, gritty, and airy. Avoid heavy garden soil or dense indoor potting soil.
Step 8: Plant the Cutting Correctly
Insert the V-notched bottom end into the soil. Plant it about 1 inch deep. Press the soil gently around the cutting so it stands upright. Do not bury too much of the leaf.
If the cutting falls over, use a small support stick or plant clip. Do not pack the soil tightly.
Step 9: Water Lightly
After planting, water lightly just enough to settle the mix. Then let the soil dry almost completely before watering again. Snake plant cuttings rot easily if kept wet.
The soil should be lightly moist at times, not constantly damp.
Step 10: Place in Bright Indirect Light
Put the cuttings in bright indirect light. Avoid harsh direct sun while the cuttings are rootless. A bright windowsill with filtered light is ideal.
Too little light slows rooting. Too much direct sun can dehydrate or burn the cuttings.
How Long Does It Take to Root?
Snake plant propagation is slow. This is normal. Do not expect roots in a few days.
Typical timing:
- First root signs: 3 to 8 weeks
- Stronger roots: 2 to 4 months
- New pups: 3 to 6 months or longer
- Full decorative young plant: 6 to 12 months
Some cuttings take even longer. As long as the cutting remains firm and does not rot, it may still be working underground.
How to Know the Cutting Is Rooting
Do not pull the cutting out every week to check. This can damage new roots. Instead, gently test after several weeks by giving the cutting a very light tug. If it resists, roots may be forming.
Signs of success include:
- The cutting remains firm
- The leaf does not turn mushy
- The cutting resists gentle tugging
- New small shoots appear near the base
- The cutting stays upright more easily
The most exciting sign is a new pup emerging from the soil. This baby plant grows from underground root structures, not from the top of the original cutting.
Can You Root the Notched Cutting in Water?
Yes, snake plant leaf cuttings can root in water. The V-notch method can also be used for water propagation because it helps you identify the bottom end.
Water Propagation Method
- Cut the leaf into sections.
- Make a V notch at the bottom of each section.
- Let the cuttings callus for 2 days.
- Place the bottom end in a jar with 1 inch of water.
- Keep the top end above water.
- Change the water every 5 to 7 days.
- Place the jar in bright indirect light.
- Move to soil once roots are about 1 to 2 inches long.
Water propagation lets you watch the roots grow, which is satisfying. However, roots grown in water can be more delicate when moved to soil. Soil propagation is often simpler because roots adapt directly to soil conditions.
Soil Propagation vs. Water Propagation
Soil Propagation
Soil propagation is often better for long-term success because the roots grow directly into the medium where the plant will live. It also reduces transplant shock later.
Pros:
- Less transplant shock
- Lower maintenance
- Roots adapt directly to soil
- Good for beginners who do not want to change water
Cons:
- You cannot see roots forming
- It can be hard to know when rooting has started
- Overwatering can cause rot
Water Propagation
Water propagation is visually satisfying because you can see the roots. It is also useful if you like monitoring progress.
Pros:
- Easy to see root growth
- Fun for display
- Good for learning
Cons:
- Water must be changed regularly
- Cuttings may rot if water gets dirty
- Water roots may struggle when moved to soil
- Algae may grow in clear jars
Why the Cutting Must Callus
Callusing is one of the most important steps in snake plant propagation. When you cut a succulent leaf, the fresh wound is wet and vulnerable. If it touches wet soil immediately, bacteria and fungi may enter. The cutting can rot before roots form.
Allowing the cut end to dry creates a protective seal. This does not guarantee success, but it greatly improves the odds.
Callus time depends on conditions. In a warm dry room, 2 to 3 days may be enough. In a humid room, 4 to 5 days may be safer. The cut should feel dry, not wet or sticky.
How Deep Should You Plant the Cutting?
Plant the cutting only about 1 inch deep. If the cutting is buried too deeply, the lower portion may stay too wet and rot. The goal is to give the cutting enough support while keeping most of the leaf above the soil.
If the cutting is tall and unstable, use a small support rather than burying it deeper.
Continue to Page 2
Continue to page 2 for more details about this article and the key points many readers miss on the first page.