Orchids are some of the most beautiful indoor plants, but they can also be some of the most misunderstood. Many people focus only on the flowers, waiting for new spikes and bright blooms, while the real secret sits lower down: the roots. When orchid roots are healthy, the leaves stay firmer, the plant holds itself better, and flowering becomes much more reliable over time. When roots are weak, crowded, rotten, or buried in old compacted medium, even the most expensive orchid can begin to look tired.
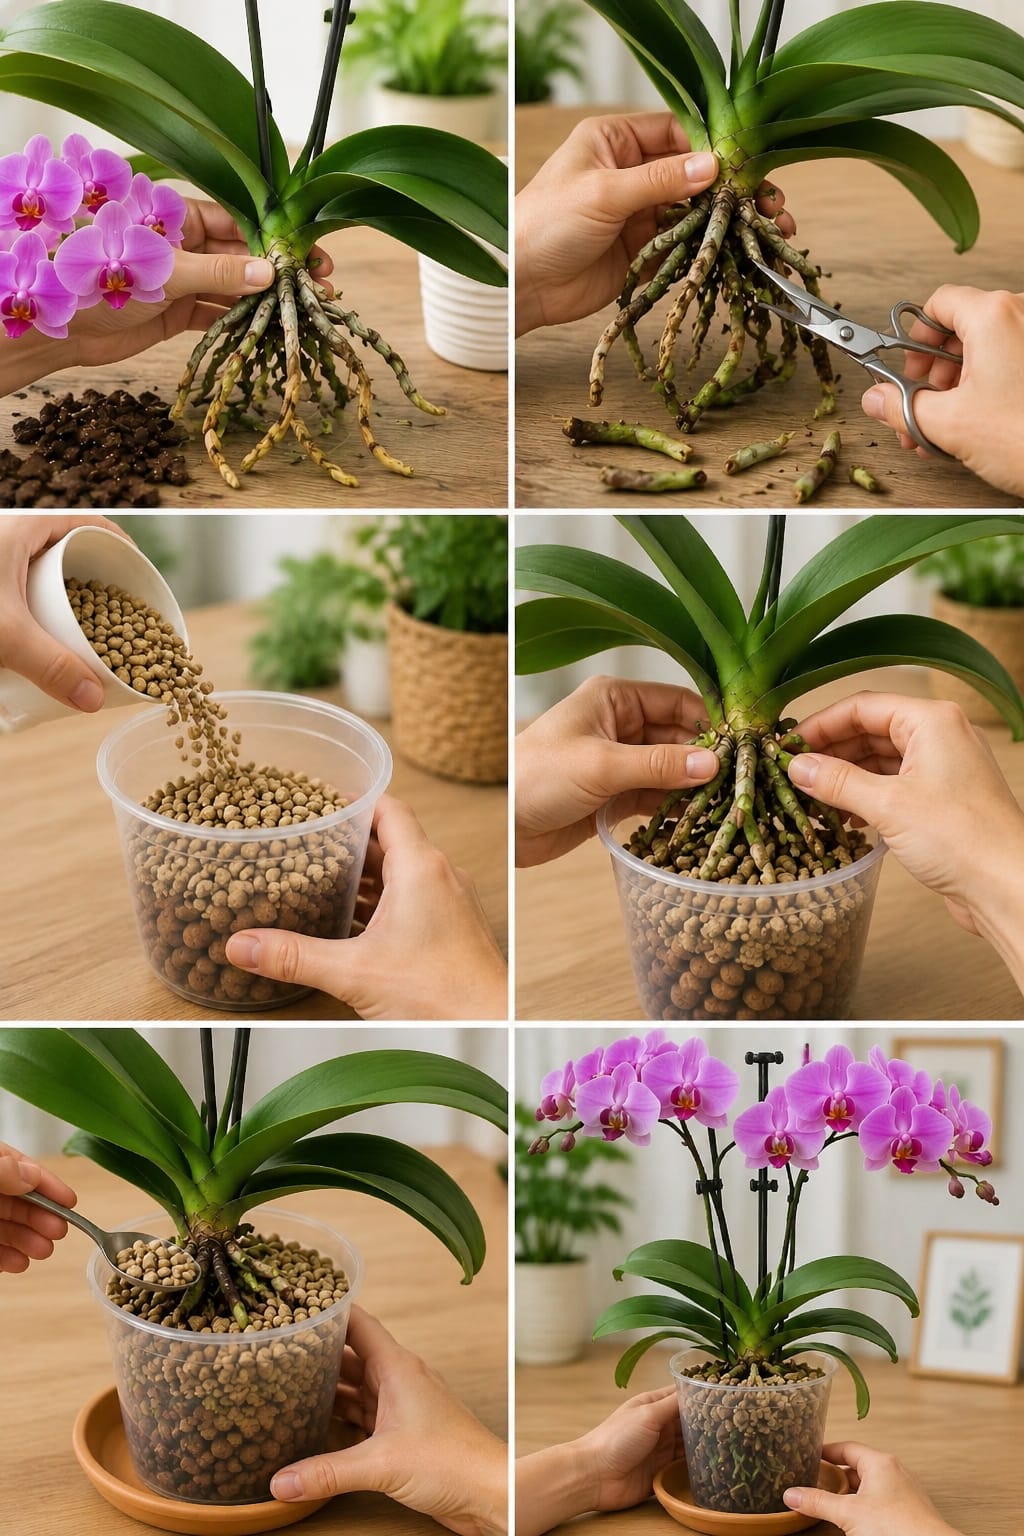
One simple way to refresh a struggling orchid is to clean the root area, remove damaged roots, and repot the plant into an airy container using a chunky, breathable growing setup. A clear pot with drainage, orchid bark, and lightweight clay pebbles can create a cleaner root environment that allows moisture to move through without suffocating the plant. This method does not force an orchid to bloom overnight, but it can give the plant a stronger base for future leaves, roots, and flower spikes.
The idea is simple: orchids do not want to sit in heavy wet soil. Most common home orchids, especially Phalaenopsis orchids, naturally grow with roots exposed to air. Their roots absorb moisture, but they also need oxygen. When the old potting mix breaks down, it becomes dense and wet. That is when roots can turn brown, mushy, hollow, or weak. Refreshing the orchid’s base helps restore airflow and gives the roots a cleaner place to grow.
Why Orchid Root Care Matters So Much
Orchid flowers may be the part everyone notices first, but roots are the part that decides whether the plant can keep blooming in the future. Healthy orchid roots are usually firm. They may look silvery when dry and green when wet. Some roots grow inside the pot, while others grow above the pot as aerial roots. Both types can be normal.
Unhealthy roots often look dark brown, black, mushy, dried out, flat, or hollow. If a root feels papery and empty, it is no longer helping the plant. If it feels soft and slimy, it may be rotting. Keeping too many dead roots around the base can trap moisture and reduce airflow. That makes it harder for new roots to grow.
Refreshing the root zone gives the orchid a chance to recover. It also helps you understand what is really happening below the leaves. Sometimes an orchid looks fine above the pot, but inside the container the roots are crowded, wet, and breaking down. A careful repot can prevent small problems from becoming serious.
When to Repot an Orchid
The best time to repot an orchid is usually after it finishes blooming, especially when new root growth is starting. Repotting while the plant is in full flower can cause stress, and flowers may fade sooner. However, if the roots are rotting badly or the potting mix smells sour, repotting may be necessary even if the plant still has flowers.
You may need to refresh your orchid if the potting medium looks broken down, the roots are packed too tightly, water stays inside the pot for too long, the plant wobbles, leaves are wrinkled despite watering, or roots look brown and mushy through a clear container. Another sign is when the orchid keeps producing leaves but refuses to rebloom for a long time. That does not always mean the roots are the problem, but checking the root system is a good first step.
Most orchids grown indoors benefit from repotting every one to two years, depending on the potting mix. Bark breaks down over time. Once it becomes soft, dusty, and compacted, it holds too much moisture around the roots. A fresh airy mix can make a big difference.
Why a Clear Pot Is Useful
A clear plastic pot is one of the easiest ways to care for orchids because it allows you to see the roots. You can watch root color, moisture level, and growth without disturbing the plant. When roots are green, they have recently absorbed water. When they turn silvery, the plant may be ready for watering again.
Clear pots also make the display look clean and modern when paired with a decorative outer container or a simple saucer. They allow light to reach some roots, which can be helpful for Phalaenopsis orchids. Most importantly, they make it easier to avoid overwatering because you can see whether the inside of the pot is still damp.
The pot must have drainage holes. A clear pot without drainage is not ideal for orchids. Water should pass through the medium and escape freely. If water sits at the bottom, the roots may rot.
Why Clay Pebbles Can Help
Lightweight clay pebbles, often called LECA, are round porous balls that can help create air pockets around roots. They are not the same as regular soil. They do not compact easily, and they allow water to move through the pot quickly. When used correctly, they can support a cleaner, more breathable orchid setup.
Clay pebbles can be used alone in semi-hydroponic orchid culture, but that requires a specific watering routine and is not always best for beginners. For many home growers, a safer approach is to combine clay pebbles with orchid bark or use them as a drainage-supporting layer and airy filler around the roots. The purpose is to avoid a dense, soggy root zone.
Before using clay pebbles, rinse them well. They can carry dust that clouds water and coats roots. Soaking them before use can also help them hold a little moisture without drying the roots too fast.
Materials You Need
To refresh an orchid with a clean pebble repotting method, prepare a clear orchid pot with drainage holes, orchid bark, rinsed clay pebbles, clean scissors or pruning shears, rubbing alcohol for sterilizing tools, a small saucer, and clean water. Optional materials include sphagnum moss, cinnamon for dry surface wounds, plant clips, and a support stake.
Use orchid bark instead of regular potting soil. Standard houseplant soil is usually too dense for orchids and can suffocate roots. Orchid bark keeps the root zone chunky and airy. If your home is very dry, a little sphagnum moss can help hold moisture, but too much moss can keep the roots wet for too long.
Clean tools are important. Cutting orchid roots with dirty scissors can spread bacteria or fungi. Wipe the blades with alcohol before trimming.
Step 1: Remove the Orchid From Its Old Pot
Gently loosen the orchid from its old container. If roots are stuck to the pot, do not pull hard. Squeeze the plastic pot slightly or cut it open if necessary. Orchids can cling tightly to containers, and forcing them out may break healthy roots.
Once the plant is free, shake away loose old bark or moss. If the old medium is stuck between roots, remove it slowly with your fingers. Be patient. The goal is to clean the roots without damaging the healthy ones.
If the orchid has long aerial roots, do not cut them just because they look untidy. Aerial roots are normal and can help the plant absorb moisture from the air. Only remove roots that are clearly dead, mushy, hollow, or rotten.
Step 2: Inspect the Root System
Look carefully at every root. Healthy roots are firm. They may be green, white, silver, or pale cream. Older roots may have some brown patches but still be firm and useful. Dead roots often feel empty, stringy, or soft.
Use your fingers to test questionable roots. If a root collapses when touched, it is probably dead. If the outer covering slips off and leaves a thin wire-like strand, that root is no longer functioning. If a root is firm but slightly discolored, keep it.
Do not over-trim. Some growers cut too much because they want the roots to look perfect. Orchids need living roots, even if they are not perfectly shaped. Remove only damaged material.
Step 3: Trim Dead or Rotten Roots
With sterilized scissors, cut away mushy, black, hollow, or completely dried roots. Make clean cuts close to the base, but avoid cutting into the crown of the plant. The crown is the central area where leaves and roots meet. Damage to the crown can cause serious problems.
After cutting, let the plant sit in a shaded airy place for a short time so the wounds can dry slightly. Some growers dust cut areas lightly with cinnamon because it is drying. If you use cinnamon, keep it away from healthy roots because it can dry them too much. Use only a tiny amount on cut surfaces if needed.
Never soak freshly cut roots in strong homemade mixtures, vinegar, harsh powders, or concentrated fertilizer. Orchids are sensitive. Gentle cleaning and good airflow are safer than aggressive treatments.
Step 4: Prepare the Pot
Place a layer of rinsed clay pebbles at the bottom of the clear pot. This helps create drainage space and keeps the base from staying soggy. Add a small amount of orchid bark over the pebbles. The pot should not be packed tightly. Orchids prefer support, but the roots still need air.
If the pot is too large, the medium may stay wet for too long. Choose a pot that fits the root system with a little room for new growth. Orchids usually prefer snug pots rather than oversized containers.
A clear pot placed on a simple terracotta saucer can look clean and natural. For a more decorative look, set the clear pot inside a ceramic cover pot, but always remove excess water after watering.
Step 5: Position the Orchid
Hold the orchid in the pot so the base of the plant sits just above the medium. Do not bury the crown. The leaves should remain above the potting mix. If the crown is buried, water can collect around it and cause rot.
Spread the roots gently inside the pot. Do not force stiff roots to bend sharply. If some roots naturally sit above the pot, let them remain there. Fill around the roots with orchid bark and clay pebbles, tapping the pot gently to settle the medium. Avoid pressing hard.
The orchid should feel stable but not smothered. If it wobbles, use a stake or plant clip until new roots anchor the plant.
Step 6: Water Carefully After Repotting
After repotting, water gently with clean room-temperature water. Let the water run through the pot and drain completely. Do not leave the pot sitting in standing water unless you are intentionally using a semi-hydroponic method and understand that system.
For a newly repotted orchid, avoid heavy fertilizing right away. The roots need time to adjust. Wait a few weeks before resuming a weak orchid fertilizer routine. Freshly trimmed roots can be sensitive.
After watering, place the orchid in bright indirect light. Avoid harsh direct sun while the plant recovers. Good light helps the orchid regain strength, but intense sun can stress leaves and roots.
How Often to Water After Repotting
Watering depends on your home conditions. In a warm, bright room, bark and clay pebbles may dry faster. In a cool or humid room, they may stay moist longer. Use the roots as your guide. If visible roots look green and the pot has condensation, wait. If roots look silvery and the medium feels mostly dry, water.
A common mistake is watering on a strict calendar. Orchids do better when watered according to dryness. Some may need water once a week, while others may need less often. Pot size, airflow, season, and medium type all matter.
Always let water drain. Root health depends on both moisture and oxygen.
Light for Better Orchid Recovery
After a root refresh, place the orchid where it receives bright indirect light. A spot near an east-facing window is often excellent. A south or west window may work if filtered by a sheer curtain. Leaves should look medium green. Very dark green leaves can mean low light, while yellowish or scorched patches can mean too much direct sun.
Good light is essential for future blooms. Fertilizer and repotting will not create flowers if the orchid does not receive enough light. Bright indirect light helps the plant build energy and produce new roots, leaves, and eventually flower spikes.
Airflow and Humidity
Orchids appreciate moderate humidity, but they do not like stagnant wet air. A clean airy setup works better than a sealed humid environment. If your home is very dry, place the orchid near other plants or use a humidity tray, but keep the pot above the waterline.
Do not mist the crown heavily. Water trapped between leaves can cause rot. If you mist, do it lightly in the morning and make sure the plant dries quickly.
Feeding After the Root Refresh
Wait until the orchid shows signs of stability before feeding. Once new root tips or new leaf growth appear, use a diluted orchid fertilizer. A weak feeding every few waterings is usually better than a strong feeding once in a while.
Flush the pot with plain water occasionally to remove mineral buildup. Clay pebbles and bark can collect fertilizer salts over time. Rinsing helps keep the root zone clean.
Never pour concentrated fertilizer directly onto dry roots. Water first or use a properly diluted solution.
Continue to Page 2
Continue to page 2 for more details about this article and the key points many readers miss on the first page.