Orchids are some of the most elegant houseplants you can grow, but they also show stress in very visible ways. A healthy orchid has firm green leaves, plump roots, and graceful flower spikes that make a window, shelf, greenhouse bench, or plant corner look refined and expensive. A struggling orchid, however, can quickly look tired. Its leaves may droop, roots may dry out or rot, flower spikes may stop growing, and the potting bark may begin to smell old or stale.
One useful orchid care routine is a careful root-cleaning reset. This method focuses on removing old dead roots, refreshing the potting medium, cleaning the root zone, and giving the orchid a gentle diluted rinse before returning it to a clean, airy pot. Some plant lovers also prepare a light golden natural rinse from turmeric or similar botanical ingredients, but this must be used with caution. Orchids are sensitive, and their roots need oxygen more than they need strong homemade liquids.
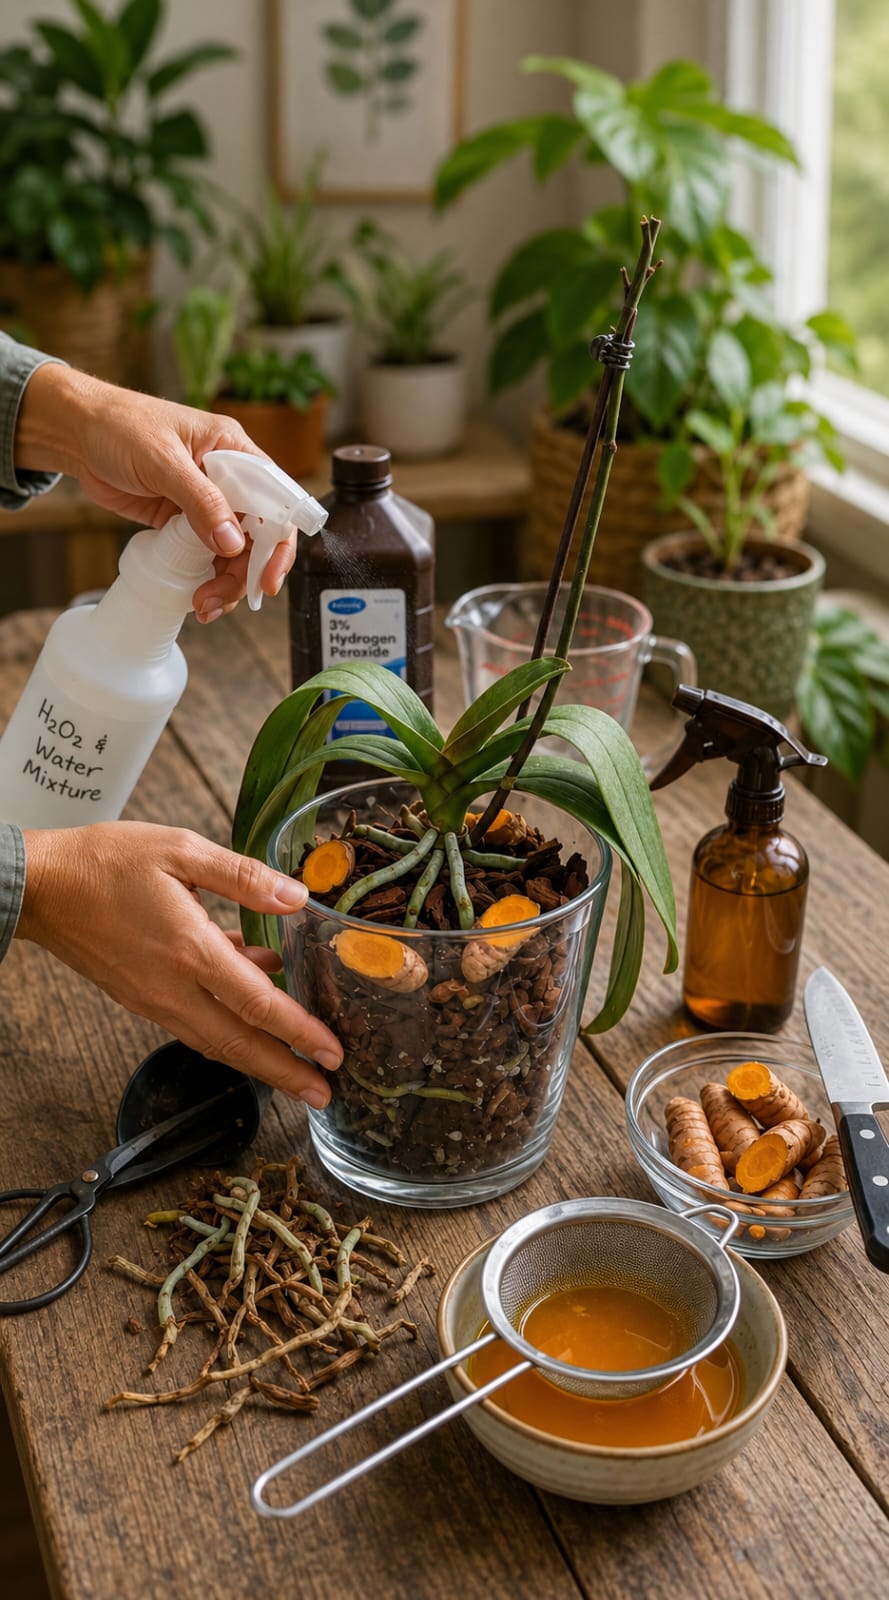
The key is balance. A diluted hydrogen peroxide rinse can be used carefully on damaged or questionable roots during a reset, but it should not become a daily or weekly habit. A golden natural rinse should be weak, strained, and optional. The most important steps are clean trimming, fresh bark, good drainage, bright indirect light, and careful watering.
This guide explains how to refresh a stressed orchid safely, how to inspect and clean the roots, how to use diluted hydrogen peroxide with caution, how to prepare a gentle golden rinse, and how to style the orchid afterward so it looks clean, healthy, and beautifully displayed.
Why Orchid Roots Need Special Care
Most common indoor orchids, especially Phalaenopsis orchids, do not grow like ordinary houseplants. Their roots are thick, exposed, and designed to cling to bark, absorb moisture from the air, and dry between waterings. In nature, many orchids grow attached to trees rather than buried in dense soil. This means their roots need airflow.
When orchids are planted in old compacted bark, wet moss, or a pot without good drainage, the roots can suffocate. They may turn brown, black, hollow, mushy, or slimy. Once roots are damaged, the leaves may wrinkle or droop because the plant cannot absorb water properly, even if the pot is wet.
A root-cleaning routine helps by removing dead material and giving the healthy roots a fresh environment. It does not magically revive a plant overnight, but it creates the conditions the orchid needs to recover.
Signs Your Orchid Needs a Root Reset
An orchid may need root attention if the potting bark smells sour, the roots look black or mushy, the leaves are limp, the plant dries too quickly, the pot remains wet for too long, or the orchid has stopped growing for months. A root reset may also be helpful after overwatering or when the orchid is in old broken-down potting mix.
Healthy orchid roots are firm. They are often silver or pale gray when dry and green when wet. Some roots may grow outside the pot, and that is normal. Dead roots feel hollow, papery, soft, or mushy. They may collapse when touched.
If only one or two roots look old but the plant is otherwise healthy, you may not need a full repot. But if many roots are damaged, the bark is old, or the plant is unstable, a careful reset can help.
Why Diluted Hydrogen Peroxide Is Sometimes Used
Hydrogen peroxide is sometimes used by plant owners as a temporary cleaning rinse for roots or tools. It releases oxygen as it breaks down, and it can help clean the surface of damaged areas. However, it must be used carefully. Strong or repeated use can irritate plant tissue and disturb beneficial microbes.
For orchids, hydrogen peroxide should not be poured regularly into the pot as a routine fertilizer or growth booster. It is not a fertilizer. It should only be considered during a cleaning reset, especially when removing mushy roots or dealing with suspicious root areas.
The safest approach is to use a mild dilution, apply it briefly, and then allow the plant to dry slightly before repotting. Healthy roots should not be soaked aggressively.
Important Safety Note
Only use standard household hydrogen peroxide at 3%, and dilute it with clean water. Do not use industrial-strength peroxide. Do not mix hydrogen peroxide with vinegar, bleach, ammonia, or other chemicals. Do not spray it into your eyes, breathe mist deeply, or use it around children and pets without care.
For plant use, keep the mixture mild. A simple cautious dilution is one part 3% hydrogen peroxide to three parts water. Some growers use it stronger for short contact, but for home orchid care, weaker is safer.
If your orchid is rare, very weak, or valuable, skip homemade chemical treatments and focus on sterile trimming, fresh bark, and careful watering.
Tools You Need for the Orchid Reset
- Clean scissors or pruning snips
- Fresh orchid bark or chunky orchid mix
- A clear orchid pot with drainage holes
- Clean water
- Optional diluted 3% hydrogen peroxide solution
- Optional gentle golden rinse, strained and diluted
- Paper towels or a clean cloth
- A small bowl for rinsing
- A spray bottle for light cleaning only
Clean tools are essential. Dirty scissors can spread problems from one plant to another. Wipe the blades before trimming and again after cutting damaged roots.
Step 1: Remove the Orchid From the Old Pot
Begin by gently removing the orchid from its pot. If the roots cling to the pot, squeeze the sides of a plastic pot or carefully loosen the bark. Do not pull hard from the leaves. Hold the base of the plant and work slowly.
Once the orchid is out, shake away loose bark. If pieces are stuck to healthy roots, do not rip them off forcefully. Soak the root ball in room-temperature water for a few minutes to soften old bark, then gently remove what you can.
This step helps you see the real condition of the roots. Many orchids look fine from above but have hidden problems inside the pot.
Step 2: Inspect the Roots Carefully
Look closely at each root. Firm roots should be kept, even if they are not perfectly green. Dry roots may look silver but still be healthy. A root is usually alive if it feels firm.
Remove roots that are mushy, black, slimy, hollow, or rotten. Dead roots may slide out of their outer coating and leave a thin string behind. These cannot help the plant and may decay further in the pot.
Do not over-trim. Orchids need as many healthy roots as possible. If a root is partly healthy and partly damaged, cut only the damaged portion.
Step 3: Trim Damaged Roots With Clean Tools
Use clean scissors to cut dead roots back to firm tissue. Make smooth cuts. If you cut into healthy green or white root tissue, stop and keep the remaining part.
After trimming several rotten roots, wipe or sterilize the scissors before cutting more. This reduces the chance of spreading decay.
Also remove old dried flower spikes if they are completely brown. If a spike is still green, you may leave it, but a very weak orchid often benefits from focusing on roots and leaves rather than flowers.
Step 4: Use a Mild Cleaning Rinse Only If Needed
If roots were mushy or the plant had a sour smell, you may use a mild diluted hydrogen peroxide rinse. Apply it briefly to the affected root area. A spray bottle can help target damaged areas without soaking the whole plant.
Use the diluted solution sparingly. The purpose is surface cleaning, not feeding. After applying, let the roots sit in open air for a short time so excess moisture evaporates.
Do not keep spraying repeatedly. Do not soak healthy roots for a long period. Too much can stress the plant.
Step 5: Prepare a Gentle Golden Natural Rinse
Some orchid growers like using a very weak golden rinse made from turmeric water as an optional natural step. Turmeric has a strong yellow color, so only a tiny amount is needed. This rinse should be strained carefully and diluted heavily. It should never be thick or gritty.
To prepare a cautious version, mix a tiny pinch of turmeric powder into one cup of warm water. Let it settle, then strain through a fine cloth or coffee filter. Dilute the strained liquid with two to three more cups of clean water. The final liquid should be pale yellow, not thick orange.
This step is optional. If you are unsure, skip it. Orchids can recover perfectly well with clean trimming, fresh bark, and proper watering.
How to Use the Golden Rinse Safely
If you choose to use the golden rinse, apply only a small amount around the roots before repotting or lightly through the bark after repotting. Do not pour thick powder into the pot. Do not coat the leaves. Do not let turmeric residue build up around the crown.
Use it rarely. Once during a reset is enough. Repeating it often may stain roots, bark, pots, and surfaces, and it may create residue in the potting medium.
The safest orchid routine is always light, clean, and breathable.
Step 6: Repot Into Fresh Orchid Bark
Choose fresh orchid bark or a chunky orchid mix. Avoid regular potting soil because it holds too much water and can suffocate orchid roots. A good orchid mix may include bark chips, perlite, charcoal, and a little sphagnum moss if your home is dry.
Place some bark in the bottom of the pot. Hold the orchid in the center and gently spread the roots. Add bark around the roots, tapping the pot lightly to settle the pieces. Do not pack the bark too tightly. Air pockets are important.
The crown of the orchid should sit above the mix, not buried. Buried crowns can rot.
Choosing the Right Pot
A clear plastic orchid pot is ideal because it allows you to see root color and moisture. It also helps you monitor root recovery after a reset. The pot must have drainage holes. Side ventilation holes are helpful too.
Do not choose a pot that is much larger than the root system. Extra space holds extra moisture and can lead to rot. Orchids usually prefer a snug pot with good airflow.
If you want a decorative look, place the clear pot inside a ceramic cover pot after watering and draining. Remove it for watering so liquid does not collect at the bottom.
When to Water After Repotting
If you trimmed many damaged roots, wait a few days before watering deeply. This gives small cuts time to dry and reduces the risk of rot. If the roots were mostly healthy and only lightly cleaned, you can water sooner.
When watering, use room-temperature water and pour it through the bark until it drains freely. Let the pot drain completely before returning it to its display spot.
After repotting, the orchid may look still for several weeks. This is normal. Root recovery takes time.
Best Light After a Root Reset
Place the orchid in bright indirect light. Avoid direct harsh sun, especially while the plant is recovering. A bright east-facing window or filtered light near a south or west window can work well.
Do not place a recovering orchid in a dark corner. Without enough light, it cannot rebuild energy. Good light encourages root growth, leaf strength, and future blooms.
Also avoid cold drafts, heat vents, or sudden temperature changes.
How to Water Orchids After Recovery
Once the orchid is stable, water based on root color and bark dryness. When roots look silver and the bark feels mostly dry, water. When roots are green and the pot feels damp, wait.
Most indoor orchids need water about once a week to once every two weeks, depending on temperature, light, humidity, and potting mix. Never follow a strict calendar without checking the plant.
Overwatering after a root reset can undo all the work. Let the roots breathe.
Should You Mist Orchid Leaves?
Light misting is not necessary for most indoor orchids and can cause problems if water sits in the crown. If you use a spray bottle, mist the air around the plant or the surface roots lightly, not the crown.
For leaf cleaning, a damp cloth is safer. Wipe leaves gently to remove dust. Keep the crown dry.
If water enters the crown, blot it with tissue.
How to Encourage New Roots
New roots appear when the orchid has warmth, bright indirect light, airflow, and proper moisture. Do not keep the bark constantly wet. Roots grow best when they receive moisture and then air.
A clear pot helps you see new green root tips. These tips are delicate, so avoid rough handling once they appear.
Do not fertilize heavily while the plant is rootless or stressed. Wait until you see signs of active growth, then use a very diluted orchid fertilizer.
How to Fertilize After a Reset
After the orchid begins growing again, use a balanced orchid fertilizer at half or quarter strength. Fertilize during active growth, then flush the pot with plain water occasionally to prevent buildup.
Do not combine fertilizer with hydrogen peroxide or homemade rinses on the same day. Keep routines simple and separate.
Too much fertilizer can burn roots, especially new tender roots.
How to Know the Orchid Is Improving
Positive signs include firm leaves, new root tips, a new leaf emerging from the crown, and roots turning green after watering. The plant may not bloom immediately, but root and leaf growth are the first signs of recovery.
If leaves continue to wrinkle, check whether enough healthy roots remain. If the crown is firm, the plant still has a chance. Be patient.
Orchids recover slowly. A successful reset may take months, not days.
Continue to Page 2
Continue to page 2 for more details about this article and the key points many readers miss on the first page.