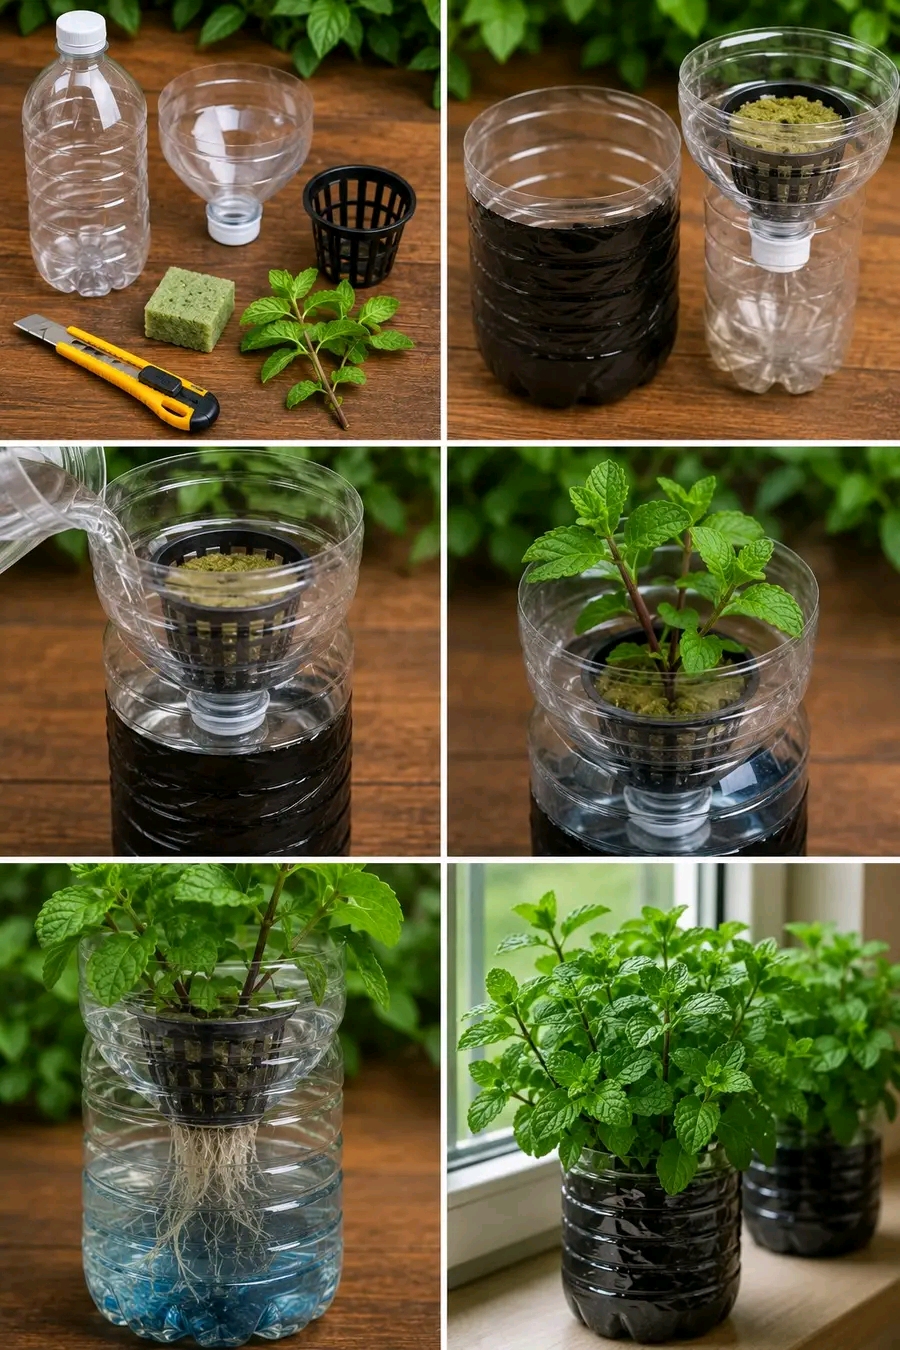
Mint is one of the easiest herbs to grow at home, and a plastic bottle self-watering planter makes the process even simpler. This clever setup uses a recycled bottle, water, a small planting cup, and a wick-style growing system to keep mint roots lightly hydrated without needing constant watering. It is affordable, practical, and perfect for anyone who wants fresh mint on a windowsill, kitchen counter, balcony, or small indoor garden shelf.
The idea is simple. A plastic bottle becomes a water reservoir. The upper part holds the mint cutting or young mint plant in a small basket or planting cup. Water stays below, and the roots grow down toward moisture. As the plant develops, the roots can reach into the water area and keep the mint fresh and green. This method is especially useful for herbs like mint because mint enjoys consistent moisture more than many dry-loving plants.
This project is also a great way to recycle plastic bottles into useful indoor planters. Instead of throwing the bottle away, you can turn it into a mini herb-growing station. The result is clean, compact, and decorative, especially when several bottle planters are lined up near a bright window.
Why Mint Grows Well in a Self-Watering Bottle
Mint is a moisture-loving herb. Unlike succulents, snake plants, or ZZ plants, mint does not like staying dry for too long. When mint dries out, the leaves wilt quickly, stems soften, and growth slows. A self-watering bottle helps solve this problem by giving the roots steady access to moisture.
The water reservoir below the plant keeps the growing medium from drying out too fast. This is helpful for busy plant lovers, beginners, and anyone growing herbs indoors where pots may dry quickly near windows.
Mint also roots easily. Cuttings can grow roots in water, soil, or moist growing media. That makes mint one of the best herbs for this simple recycled planter method.
Best Mint Types for This Project
Many mint varieties can grow in a bottle planter. Choose the one you like for tea, cooking, desserts, drinks, or fresh kitchen fragrance.
- Spearmint: Classic sweet mint flavor, great for tea and salads.
- Peppermint: Stronger flavor, useful for tea and desserts.
- Chocolate mint: Sweet aroma, nice for drinks and desserts.
- Apple mint: Soft fruity scent and fuzzy leaves.
- Moroccan mint: Excellent for fresh mint tea.
- Pineapple mint: Variegated leaves, decorative and fragrant.
Spearmint and Moroccan mint are especially good choices for kitchen growing because they are vigorous and easy to harvest.
What You Need
- One clean plastic bottle
- Sharp craft knife or scissors
- Small net pot, basket cup, or plastic cup with holes
- Mint cutting or young mint plant
- Water
- Growing medium such as coco coir, perlite, or lightweight potting mix
- Optional sponge cube or rock wool cube
- Optional wick cord or cotton strip
- Marker for cutting guide
- Small stones for weight, optional
Use a clean bottle and clean tools. A fresh setup reduces the chance of bad smells, algae, and root rot.
Choosing the Right Plastic Bottle
A medium or large plastic bottle works well. A 1-liter or 1.5-liter bottle gives enough space for a water reservoir. Smaller bottles can work for tiny cuttings, but they dry or empty faster.
Clear bottles let you see the water level and root growth. Dark bottles reduce algae because they block more light. If you use a clear bottle, you can wrap the lower part with black tape, paper, fabric, or paint to reduce algae growth.
A bottle with a stable base is best because mint can become top-heavy as it grows.
Step 1: Clean the Bottle
Wash the plastic bottle with warm water and mild soap. Rinse it well so no soap remains. Remove the label if you want a cleaner look.
Let the bottle dry before cutting. Dry plastic is easier to handle and safer to cut.
If the bottle had sugary drinks inside, clean it extra well. Sugar residue can attract ants and encourage bacteria.
Step 2: Cut the Bottle
Use a marker to draw a line around the upper third of the bottle. Cut along the line carefully. You will have two pieces: the bottom section for water and the top section that can act as a holder.
The top section can be turned upside down and placed into the bottom section. The bottle neck points downward into the water reservoir.
Be careful with sharp edges. Trim rough plastic edges with scissors.
Step 3: Create the Plant Holder
You can use the inverted bottle top as a holder, or you can place a small net pot or basket cup in the opening. A basket cup is useful because it allows roots to grow through the holes and reach the water below.
If using a plastic cup, poke several holes in the bottom and sides. The holes allow air and root movement.
The plant holder should sit securely without falling into the reservoir.
Step 4: Add Growing Medium
Mint can grow in several types of moist media. A light mix works better than heavy garden soil. Heavy soil can become muddy and smell bad in a self-watering system.
Good options include:
- Coco coir
- Perlite mixed with coco coir
- Light potting mix
- Rock wool cube
- Sponge cube for starting cuttings
- Small clay pebbles
If using potting soil, use only a light amount and avoid packing it tightly.
Step 5: Add a Wick if Needed
A wick helps pull water from the reservoir up to the growing medium. You can use cotton rope, thick yarn, or a strip of absorbent cloth.
Place one end of the wick in the growing medium and let the other end hang into the water reservoir. This helps keep the top section moist while the roots are still small.
Once mint roots grow down into the water, the wick becomes less important.
Step 6: Add Water to the Reservoir
Fill the bottom part of the bottle with clean water. Do not fill it all the way to the top. Leave some air space between the water and the plant holder if possible.
The wick should touch the water. If roots are already long, they can touch the water too.
Use room-temperature water. Very cold water can stress tender cuttings.
Step 7: Plant the Mint
Place the mint cutting or young mint plant into the growing medium. If using a cutting, make sure at least one node is below the medium or near moisture. Roots grow from nodes.
If using a rooted mint cutting, spread the roots gently and support the stem with the medium. Do not bury too many leaves.
Keep the plant upright and stable.
Step 8: Place It in Bright Light
Mint needs bright light to grow full and flavorful. Place the bottle planter near a bright window, balcony door, or sunny indoor spot. Morning sun is usually helpful. Harsh afternoon sun can heat the bottle and water too much, especially if the plastic is clear.
If mint becomes leggy, pale, or weak, it needs more light. If the leaves scorch or wilt quickly, the sun may be too strong or the water may be heating.
A bright windowsill is usually perfect.
How Much Light Mint Needs Indoors
Mint grows best with several hours of bright light each day. Indoors, it may need the brightest window you have. If natural light is weak, a grow light can help.
Low light will not kill mint immediately, but it will make the stems stretch and the leaves become smaller. The flavor can also become weaker.
For a bushy mint plant, light is just as important as water.
How the Self-Watering System Works
The bottle reservoir stores water below the plant. The wick or roots pull moisture upward as needed. This keeps the growing medium lightly moist without needing daily watering.
Mint likes this steady moisture, but the setup still needs oxygen. Do not pack the medium too tightly. Roots need both water and air.
If the water becomes dirty, stale, or smelly, change it.
How Often to Change the Water
Change the reservoir water every 5 to 7 days for the freshest results. If the water stays clear and clean, you may top it up between changes. But regular water changes prevent odor, algae, and bacteria buildup.
When changing water, rinse the bottom bottle section if it feels slimy. Clean water supports clean roots.
Do not let the reservoir dry completely, especially while the mint is young.
How to Prevent Algae
Algae grows when water receives light. Clear plastic bottles near windows can develop algae quickly. A little algae is common, but too much can make the planter look dirty and reduce water quality.
To reduce algae:
- Cover the lower reservoir with dark tape or paper.
- Use a dark bottle or painted bottle.
- Change water regularly.
- Keep fertilizer very light.
- Clean the bottle when green buildup appears.
A covered reservoir usually stays cleaner longer.
Should You Add Fertilizer?
Mint grown in water or a light medium will eventually need nutrients. Use a very weak liquid fertilizer once the plant is actively growing. Do not use strong fertilizer in a small bottle system.
A diluted hydroponic nutrient or mild liquid herb fertilizer can work. Use much less than the full label strength.
Too much fertilizer can burn roots, create algae, and make the water smell bad.
Signs Mint Needs Nutrients
- Leaves become pale green
- Growth slows despite good light
- New leaves are small
- Stems look thin
- Older leaves yellow slowly
Before feeding, make sure the plant has enough light and clean water. Low light can look like nutrient weakness.
Signs of Too Much Fertilizer
- Brown leaf tips
- Cloudy water
- Fast algae growth
- Roots turn brown or slimy
- Leaves curl or wilt
If this happens, empty the reservoir, rinse the roots gently, clean the bottle, and refill with plain water.
How to Make Mint Bushier
Mint becomes bushier when you pinch or trim it often. Cut the top growth just above a leaf pair. This encourages side shoots to grow.
Do not wait until the plant becomes tall and thin. Regular light trimming creates a fuller shape.
You can use the trimmed leaves for tea, salads, sauces, desserts, lemonade, or fresh kitchen fragrance.
How to Harvest Mint
Harvest mint by cutting stems, not just single leaves. Cut above a pair of leaves so the stem can branch again. Take small harvests regularly instead of removing most of the plant at once.
The best flavor often comes from young fresh leaves. Harvest in the morning if possible.
Always leave enough leaves on the plant so it can keep growing.
How to Root Mint Cuttings First
If you do not have a rooted mint plant, start with cuttings. Cut a healthy mint stem below a node. Remove the lower leaves. Place the stem in clean water until roots appear.
Roots may grow within a week or two in bright light. Once roots are visible, transfer the cutting into the bottle planter.
Mint roots quickly, which makes it ideal for beginner propagation.
Common Problems and Fixes
Mint Is Wilting
Check the water level. If the reservoir is dry, refill it. If the water is hot from direct sun, move the planter to filtered light. If roots are brown and slimy, clean the system and remove damaged roots.
Leaves Are Yellow
Yellow leaves can come from old age, low nutrients, low light, or stale water. Refresh the water, improve light, and feed lightly if the plant is actively growing.
Stems Are Long and Weak
This usually means not enough light. Move the planter closer to a bright window and pinch the tips to encourage bushier growth.
Water Smells Bad
Change the water immediately. Rinse the reservoir and remove dead roots or leaves. Avoid letting leaves sit in water.
Algae Is Growing
Cover the reservoir, reduce direct sun on the water, and clean the bottle more often.
Why the Bottle Should Not Stay Too Hot
Plastic bottles can heat up quickly in strong sun. Warm water holds less oxygen and can stress roots. If the bottle sits in direct afternoon sun, the water may become too warm for healthy root growth.
Use bright indirect light or morning sun. If the window gets very hot, move the bottle slightly back or shade the reservoir.
Mint likes light, but roots prefer cool clean water.
Can This Method Work for Other Herbs?
Yes, this recycled bottle method can work for several herbs and leafy plants. Mint is one of the easiest, but you can also try basil, oregano, lemon balm, parsley, and some leafy greens.
Some herbs need more light or more careful feeding. Basil grows fast but needs strong light. Parsley may take longer. Lemon balm behaves similarly to mint.
Start with mint if you are new to the method.
Indoor Decor Ideas
A plastic bottle planter can look surprisingly attractive with a few styling tricks. Wrap the lower reservoir with black paper, jute rope, fabric, kraft paper, or decorative tape. This hides algae and makes the planter look cleaner.
- Line several mint bottle planters on a kitchen windowsill.
- Wrap bottles with jute for a rustic herb garden look.
- Use black wrap for a modern style.
- Place the bottle inside a decorative ceramic cover pot.
- Add small handwritten herb labels.
- Group mint with basil and pothos cuttings for a green window display.
The planter can be practical and decorative at the same time.
Continue to Page 2
Continue to page 2 for more details about this article and the key points many readers miss on the first page.