Orchids are some of the most elegant indoor plants you can grow. Their glossy green leaves, graceful roots, and long-lasting blooms make them perfect for windowsills, plant shelves, dining tables, bright bathrooms, offices, and cozy indoor garden corners. A healthy orchid can flower for weeks, sometimes months, and with the right care it can bloom again year after year.
But orchids can also decline when their roots are damaged. Yellow leaves, wrinkled leaves, soft roots, black root tips, weak flower spikes, and loose plants in the pot are all signs that the root system needs attention. The good news is that many orchids can recover if the damaged roots are trimmed, the plant is cleaned properly, and it is moved into fresh airy orchid bark.
One simple orchid rescue routine uses a careful combination of root trimming, cinnamon powder, aloe gel or aloe water, humidity, and fresh bark. This method is popular because it focuses on the roots first. Instead of forcing flowers or pouring strong fertilizer on a weak plant, it helps the orchid rebuild from the base.
The key is safety. Cinnamon can be useful on cut areas, but it should not be packed heavily around live orchid roots because it can dry them out. Aloe can be gentle and soothing, but it should be used cleanly and lightly. Humidity can help new roots grow, but too much closed moisture can cause mold. Fresh orchid bark is important because orchid roots need air, not heavy wet soil.
This complete guide explains how to rescue an orchid with weak roots, how to trim damaged roots, how to use cinnamon safely, how to use aloe safely, how to create a humidity recovery setup, how to repot into fresh bark, how to water after recovery, how to encourage new roots, and how to style orchids beautifully indoors once they return to health.
Understanding Orchid Root Problems
Most indoor orchids, especially Phalaenopsis orchids, do not grow in regular soil. In nature, they often grow attached to trees, with their roots exposed to air, humidity, rain, and filtered light. Their roots are designed to breathe. They absorb moisture, then dry again.
When an orchid is kept in old bark, dense moss, a pot without enough drainage, or constantly wet conditions, the roots can suffocate. Healthy roots become weak, then soft, brown, black, or hollow. Once roots fail, the leaves begin to suffer because the plant cannot take up enough water.
This is why an orchid with yellow or wrinkled leaves is not always thirsty. Sometimes the plant has been watered too much, and the damaged roots can no longer absorb moisture. Adding more water can make the problem worse.
Signs Your Orchid Needs Root Rescue
- Leaves are yellowing from the base.
- Leaves look limp, wrinkled, or leathery.
- Roots are black, brown, hollow, or mushy.
- The potting bark smells sour or rotten.
- The orchid feels loose in the pot.
- Water stays in the pot too long.
- White mold appears on the bark.
- Flower buds fall before opening.
- The crown looks weak or dark.
- No new roots have appeared for a long time.
If several of these signs appear, the orchid needs root inspection before any fertilizer or homemade tonic is used.
What Healthy Orchid Roots Look Like
Healthy orchid roots are firm. When dry, they may look silver, gray, or pale green. When wet, they often turn green. Roots inside the pot can also look white or cream-colored if they are not exposed to light. The most important sign is firmness.
Unhealthy roots are mushy, slimy, flat, hollow, black, dark brown, or smelly. These damaged roots should be removed because they no longer help the plant and can spread rot.
Why Fresh Bark Matters
Old orchid bark breaks down over time. When bark pieces become soft and compacted, they hold too much water and reduce airflow. This creates the perfect environment for root rot.
Fresh bark gives the roots air pockets. It allows water to flow through the pot and drain quickly. For root recovery, fresh bark is usually better than old moss or dense soil.
Never repot most common orchids into regular garden soil. Soil stays too wet and can suffocate the roots.
Tools and Materials You Need
- Clean sharp scissors or pruning shears
- Rubbing alcohol or boiling water for tool cleaning
- Fresh orchid bark mix
- Clear orchid pot with drainage holes
- Cinnamon powder
- Fresh aloe gel or diluted aloe water
- Clean bowl of room-temperature water
- Optional sphagnum moss
- Clear plastic bag or humidity dome
- Plant label or support stake
- Soft cloth or paper towel
Clean tools are very important. Dirty scissors can spread bacteria or fungal problems from one plant to another.
Step 1: Remove the Orchid From the Old Pot
Hold the orchid gently at the base and slide it out of the pot. If the roots are stuck, squeeze the pot lightly or cut the plastic pot if needed. Do not pull hard on the leaves. Orchid crowns and roots can break easily.
Once removed, shake away old bark or moss. If moss is stuck around the roots, loosen it carefully with your fingers. Old wet moss near the crown can hide rot, so take your time.
Step 2: Rinse the Roots Gently
Use room-temperature water to rinse the roots. This helps you see which roots are healthy and which are dead. Wet healthy roots often turn green. Rotten roots usually stay brown, black, or mushy.
Do not scrub the roots aggressively. Orchid roots have a delicate outer layer called velamen. This layer helps absorb water and protects the root. Handle it gently.
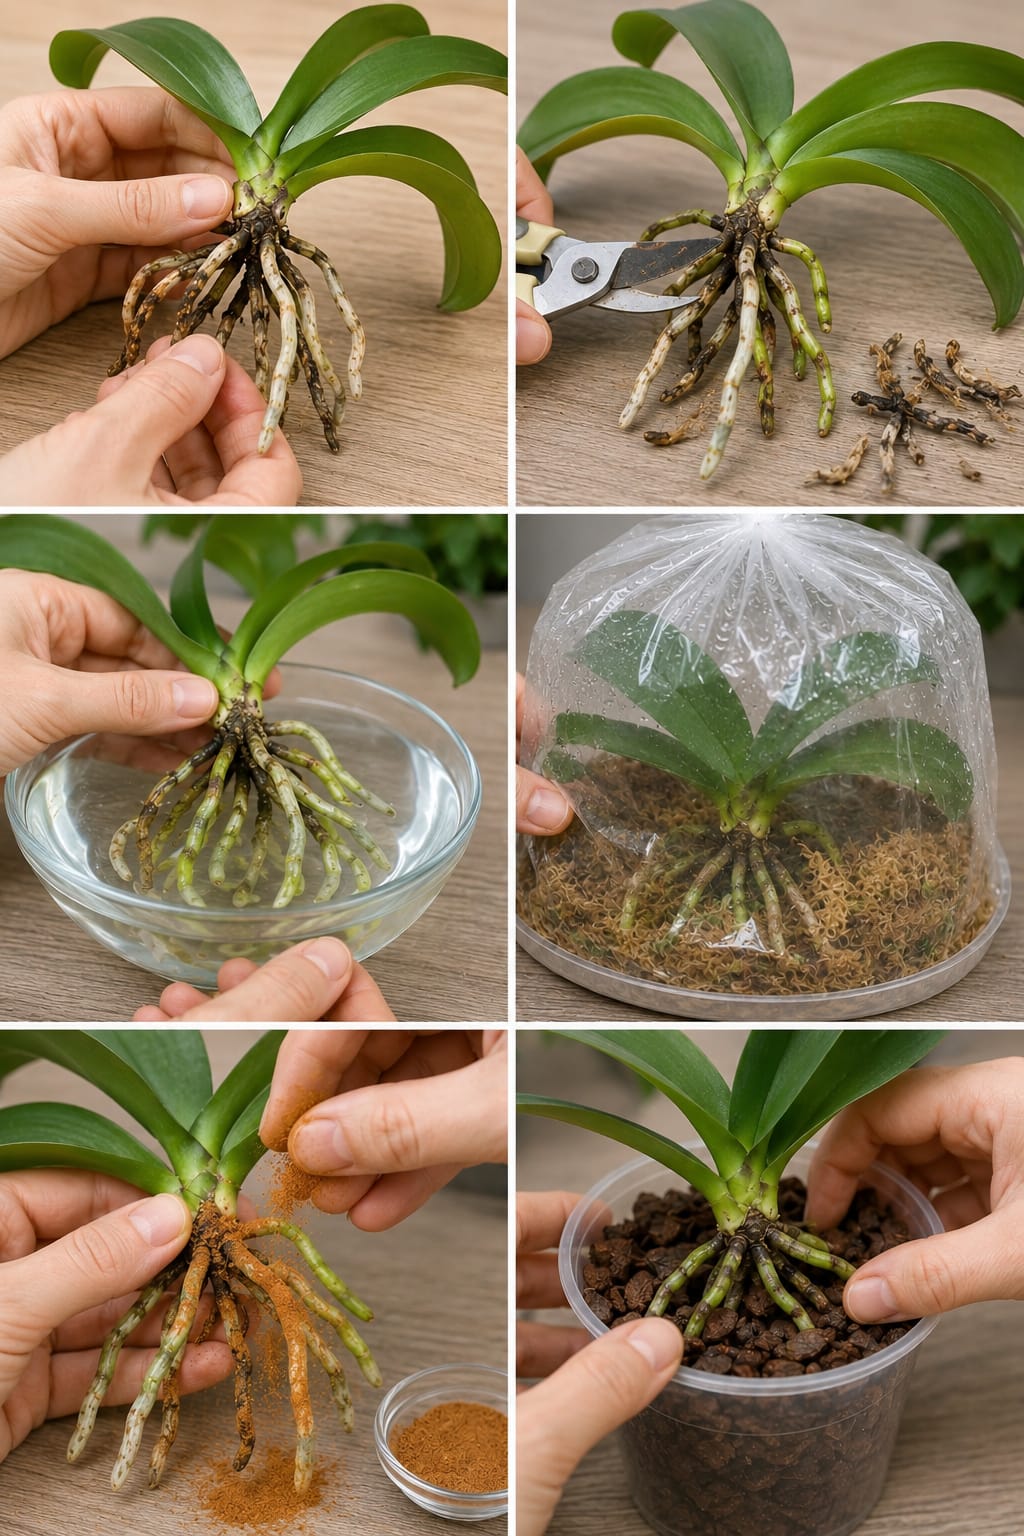
Step 3: Trim Dead or Rotten Roots
Use clean scissors to remove roots that are black, mushy, hollow, or rotten. Cut back to firm healthy tissue. If a root is only dry at the tip but firm near the base, remove only the dead part.
Do not remove every root just because it looks pale. Some pale roots are healthy. The test is firmness. Firm roots are worth keeping.
Step 4: Use Cinnamon Safely
Cinnamon is often used in plant care because it can help dry and protect cut areas. For orchids, it should be used carefully. Apply only a tiny amount to cut ends or damaged spots. Do not coat all live roots with cinnamon. Too much cinnamon can dry out roots and slow recovery.
The safest method is to dip a clean cotton swab into cinnamon and touch only the cut areas. Think of it as a spot treatment, not a full root covering.
Step 5: Use Aloe Gently
Aloe gel or aloe water can be used as a mild natural root support. Fresh aloe is often used by plant lovers because it feels gentle and soothing. But it should still be clean and diluted.
Simple Aloe Water Recipe
- 1 teaspoon fresh aloe gel
- 1 cup clean water
Blend or stir well, then strain if needed. Dip the cleaned roots briefly or mist the bark lightly after repotting. Do not leave thick aloe gel packed around the roots because it can become sticky and collect debris.
Step 6: Let the Orchid Dry Briefly
After trimming and treating cut areas, let the orchid sit in a shaded indoor spot for 30 minutes to 2 hours. This gives cuts time to dry slightly before repotting. Do not leave the plant in hot sun during this time.
Step 7: Repot Into Fresh Orchid Bark
Place a little fresh bark in the bottom of the pot. Hold the orchid so the crown sits above the bark level. Add bark around the roots, gently tapping the pot to settle the pieces. Do not pack bark too tightly. Roots need airflow.
The crown should stay dry and above the medium. If the crown is buried, rot can develop.
Step 8: Create a Gentle Humidity Recovery Setup
If the orchid has very few roots left, humidity can help it recover. Place the orchid in a clear plastic bag or under a humidity dome, but do not seal it completely. Leave some air exchange.
Open the bag daily for fresh air. If condensation becomes heavy, open it more. If mold appears, remove the humidity cover and improve airflow.
Step 9: Place in Bright Indirect Light
After rescue, place the orchid in bright indirect light. Avoid direct hot sun because the plant is stressed and can lose moisture quickly. An east-facing window or bright filtered window is often ideal.
Good light helps the orchid produce energy for new roots. Too little light slows recovery.
Step 10: Water Carefully After Repotting
Do not overwater after rescue. If many roots were removed, the plant cannot absorb much water yet. Lightly moisten the bark, then let it dry slightly before watering again.
Water when the bark is nearly dry and roots look silver. Always let water drain fully. Never let the pot sit in water.
Best Orchid Bark Mix for Recovery
A chunky orchid bark mix is usually best. It gives air and drainage. For a weak orchid, avoid dense potting soil and avoid packing too much moss around the roots.
Good Recovery Mix
- Medium orchid bark
- Perlite
- A small amount of charcoal, optional
- A tiny amount of sphagnum moss only if your home is very dry
If your home is humid or you tend to overwater, use mostly bark. If your home is very dry, a little moss can help, but it should not stay soggy.
How Often to Water a Recovering Orchid
A recovering orchid usually needs less water than a healthy orchid because it has fewer roots. Check the bark and roots instead of following a strict schedule.
In many homes, watering every 7 to 14 days may work, but it depends on the pot size, bark type, temperature, humidity, and light. Always check before watering.
Signs the Orchid Is Recovering
- New green root tips appear.
- Leaves become firmer.
- The crown stays firm and green.
- New leaf growth begins.
- No sour smell comes from the pot.
- Bark dries normally between waterings.
- The plant feels more stable over time.
Recovery can take months. Orchids are slow, so patience is part of the process.
Signs the Orchid Is Still in Trouble
- The crown becomes black or soft.
- Leaves continue yellowing quickly.
- Roots keep turning mushy.
- Mold grows inside the pot.
- The plant smells rotten.
- No firm roots remain.
- Leaves collapse completely.
If the crown is rotten, recovery is very difficult. If some healthy crown tissue remains, you can still try a humidity recovery setup.
How to Encourage New Orchid Roots
New orchid roots grow from the base of the plant when conditions are stable. The plant needs warmth, bright indirect light, humidity, and gentle moisture. Avoid moving it constantly.
Root Growth Tips
- Keep temperatures warm but not hot.
- Use bright indirect light.
- Maintain moderate humidity.
- Keep bark airy.
- Avoid overwatering.
- Do not fertilize heavily.
- Keep the crown dry.
- Be patient.
Should You Fertilize a Recovering Orchid?
Do not fertilize immediately after root rescue. A weak root system can burn easily. Wait until new roots begin to grow. Then use a diluted orchid fertilizer at quarter strength.
Once the plant is stronger, feed lightly during active growth. It is better to underfeed a recovering orchid than overfeed it.
Can Cinnamon Make Orchid Roots Grow?
Cinnamon does not make roots grow directly. It is mainly used to dry and protect cut areas. Too much cinnamon can dry healthy roots. Use it only on cuts, not as a thick powder over the entire root system.
Can Aloe Make Orchid Roots Grow?
Aloe may support a gentle recovery routine, but it is not magic. New roots depend on healthy crown tissue, proper light, warmth, humidity, and correct watering. Aloe should be used lightly and cleanly.
How to Prevent Orchid Root Rot
- Use a pot with drainage holes.
- Use orchid bark, not regular soil.
- Water only when bark is nearly dry.
- Do not let water sit in the crown.
- Empty decorative pots after watering.
- Keep the plant in bright indirect light.
- Repot when bark breaks down.
- Do not overpack moss around roots.
Common Orchid Rescue Mistakes
- Leaving rotten roots attached.
- Using dirty scissors.
- Coating all roots with cinnamon.
- Planting in regular soil.
- Watering too soon and too often.
- Burying the crown.
- Sealing humidity bags with no airflow.
- Fertilizing before new roots appear.
- Putting a weak orchid in direct sun.
- Repotting into a pot that is too large.
How to Clean Orchid Leaves During Recovery
Dusty leaves cannot absorb light well. Wipe orchid leaves gently with a damp cloth. Support each leaf from underneath and wipe from base to tip. Do not let water collect in the crown.
Clean leaves help the plant photosynthesize, which supports root recovery.
Best Light for Orchids
Most Phalaenopsis orchids prefer bright indirect light. If leaves are very dark green, the orchid may need more light. If leaves become yellow-green or scorched, the light may be too strong.
An east-facing window is often perfect. A south or west window may need a sheer curtain. Avoid harsh midday sun, especially after root rescue.
Continue to Page 2
Continue to page 2 for more details about this article and the key points many readers miss on the first page.