A DIY worm tower is one of the smartest ways to feed a raised garden bed naturally. It turns kitchen scraps into slow-release compost directly inside the soil, encourages earthworm activity, improves soil structure, reduces food waste, and gives your vegetables, herbs, and flowers a steady supply of organic nutrition without constant fertilizing. If you are looking for the best organic garden fertilizer system that works automatically, this DIY worm tower is the ultimate solution for low-maintenance composting at home.
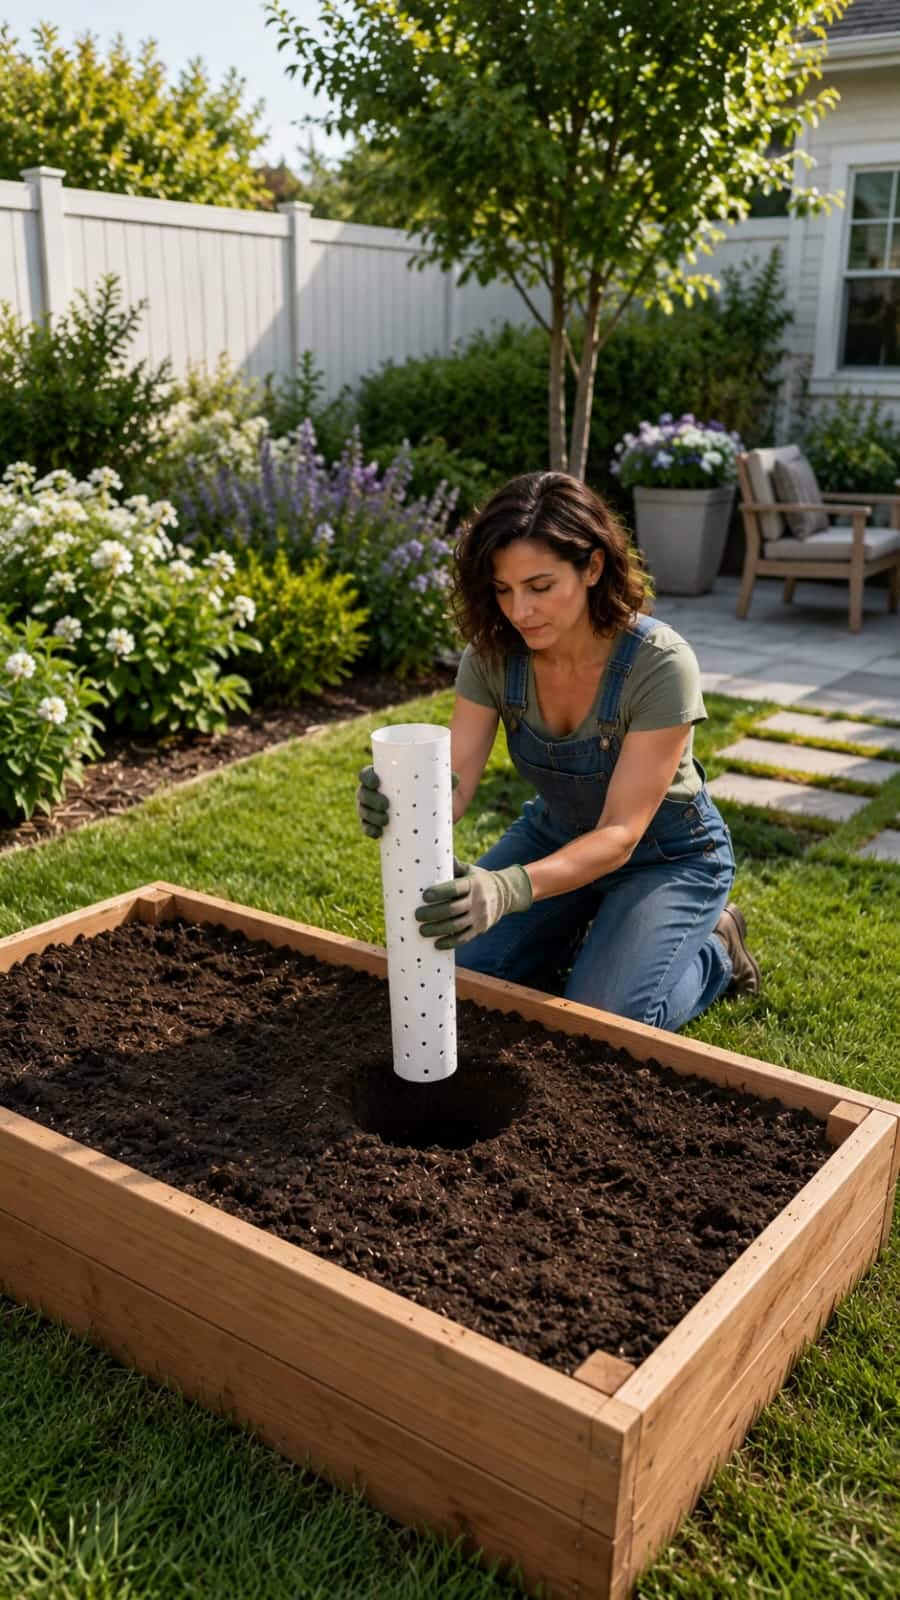
The image shows a gardener installing a white perforated pipe into the center of a raised bed. This is the basic idea behind a worm tower: a vertical tube is buried partly into the soil, filled with small amounts of fruit and vegetable scraps, and covered with a lid. Worms enter through the holes, feed on the scraps, break them down, and carry nutrient-rich castings into the surrounding garden bed. This how to build a worm tower for raised beds guide will turn your garden into a self-feeding ecosystem.
Instead of making compost in a separate bin and carrying it to the garden later, the worm tower lets composting happen exactly where your plants need it. It is simple, low-cost, space-saving, and perfect for raised beds, backyard vegetable gardens, small-space gardens, patio planters, edible landscapes, and organic gardening systems. This easy DIY in-ground composter is a game-changer for sustainable vegetable gardening.
Once installed correctly, a worm tower can quietly feed your garden for months. This natural slow-release fertilizer for vegetables will boost your harvest without any chemical inputs.
What Is a DIY Worm Tower? – The Best In-Ground Composting System
A worm tower is a vertical composting tube installed directly into garden soil. The buried section has holes that allow worms to move in and out. The top section remains above the soil so you can add kitchen scraps and bedding material. This how to compost kitchen scraps in the garden method is both simple and highly effective.
Inside the tower, food scraps slowly decompose. Earthworms and composting worms enter through the holes, eat the softened organic matter, and leave behind worm castings. These castings spread into the nearby soil and help nourish plant roots naturally. This organic fertilizer for raised beds system is perfect for high-yield vegetable gardening.
A worm tower works like a mini in-bed compost system. It does not replace all garden feeding, but it can dramatically improve soil fertility over time.
Why Gardeners Love Worm Towers – Top Benefits for Organic Gardening
Worm towers are popular because they solve several gardening problems at once. They reduce kitchen waste, improve soil health, support beneficial microbes, and provide a steady organic fertilizer source inside the garden bed. This best composting method for small gardens is a favorite among sustainable homesteaders.
A well-built worm tower can help:
- Feed raised bed soil naturally
- Turn food scraps into worm castings
- Reduce household kitchen waste
- Improve soil aeration
- Increase microbial activity
- Support healthier plant roots
- Reduce the need for synthetic fertilizer
- Keep composting simple and contained
- Save space in small gardens
- Create a low-maintenance organic gardening system
For gardeners who want a sustainable garden, a worm tower is one of the easiest projects to build. This DIY organic soil amendment will pay dividends for years.
How a Worm Tower Feeds the Garden Automatically – The Science of Vermicomposting
The “automatic feeding” happens through worm activity and natural decomposition. This vermicomposting in raised beds technique is pure genius.
Here is the process:
- You place chopped kitchen scraps inside the tower.
- The scraps soften and begin breaking down.
- Worms enter through holes in the buried pipe.
- They eat the decomposing food scraps.
- They produce nutrient-rich worm castings.
- The castings move into the surrounding soil.
- Plant roots benefit from the improved soil fertility.
The tower acts like a slow-release compost station. Instead of spreading fertilizer across the bed every week, you keep adding small amounts of organic matter into the tower and let soil life do the work. This how to increase soil fertility naturally method is perfect for low-work gardening.
Best Places to Install a Worm Tower – Ideal Locations for Maximum Plant Growth
A worm tower works best in a raised garden bed or in-ground vegetable bed with healthy soil and regular moisture. Choosing the best location for a worm tower is key to success.
Good locations include:
- Raised vegetable beds
- Herb garden beds
- Tomato and pepper beds
- Leafy green beds
- Flower garden borders
- Permaculture garden beds
- Backyard composting areas
- Large patio planter boxes
Place the tower where plant roots can benefit from the composting activity, but do not crowd it too close to delicate stems. The center of a raised bed is often ideal. This DIY garden fertilization hack works wonders for heavy-feeding vegetables.
How Many Worm Towers Do You Need? – Sizing Guide for Your Garden
For a typical 4-foot by 4-foot raised bed, one worm tower is usually enough. For larger beds, you can install more than one. This worm tower spacing guide helps you plan.
| Garden Bed Size | Suggested Worm Towers | Best Placement |
|---|---|---|
| 2 ft x 4 ft | 1 small tower | Center or back corner |
| 4 ft x 4 ft | 1 standard tower | Center of bed |
| 4 ft x 8 ft | 2 towers | Evenly spaced |
| Large in-ground bed | 1 tower every 4 to 6 feet | Near heavy feeders |
Do not install too many towers in a small bed. A worm tower is a feeding station, not a trash can. Overloading a bed with scraps can create odor, pests, and poor soil balance.
Materials You Need – DIY Worm Tower Supply List
This DIY project is simple and affordable. Most materials are easy to find at a hardware store or garden center. Here is your worm tower materials checklist.
Basic Supplies
- 1 PVC pipe or food-safe plastic pipe, 4 to 6 inches wide
- Pipe length of about 18 to 24 inches
- Drill
- Drill bit, about ¼ inch to ½ inch wide
- Pipe cap, planter saucer, tile, or lid
- Small shovel or garden trowel
- Compost, shredded paper, or dry leaves
- Kitchen scraps
- Watering can
- Optional: sandpaper for smoothing holes
A wider pipe is easier to fill and maintain. A 4-inch pipe works well for small beds, while a 6-inch pipe gives more space for scraps and bedding. This best pipe size for worm tower tip will save you frustration.
Best Pipe Size for a Worm Tower – Choosing the Right Diameter
The pipe should be wide enough for food scraps, air movement, and worm activity. Use this worm tower pipe diameter guide for best results.
- 3-inch pipe: Works, but can clog easily
- 4-inch pipe: Good for most raised beds
- 6-inch pipe: Best for larger beds and easier feeding
- 18 to 24 inches tall: Ideal for most raised beds
About 10 to 14 inches of the pipe should be buried below the soil, with 6 to 10 inches above the soil for easy access.
Should You Use PVC? – Safe Materials for Garden Composting
PVC pipe is commonly used because it is durable, affordable, and easy to drill. If you prefer a more natural look, you can use a food-safe bucket with holes, a terracotta chimney flue, or a thick bamboo section if available. This safe materials for DIY compost tower advice ensures a non-toxic system.
Whatever material you use, it should be:
- Strong enough to stay upright
- Safe for garden use
- Easy to drill or perforate
- Open at the bottom
- Covered at the top
- Resistant to breaking down too quickly
Step 1: Cut the Pipe – Proper Length for Raised Bed Depth
Cut your pipe to about 18 to 24 inches long. The exact length depends on the depth of your raised bed. This how to cut pipe for worm tower step is quick and easy.
For a standard raised bed, a 24-inch pipe works well. Bury roughly half to two-thirds of the pipe in the soil. Leave enough above ground so you can easily open it, add scraps, and cover it again.
Step 2: Drill Holes in the Lower Section – Essential for Worm Entry
The holes are the most important part of the worm tower. They allow worms to move in and out freely. Follow this worm tower hole drilling guide for optimal performance.
Drill holes only in the section that will be buried underground. Avoid drilling too many holes above the soil line because that can attract flies and allow odors to escape.
Hole Guidelines
- Drill holes around the lower 10 to 14 inches of the pipe
- Space holes about 1 to 2 inches apart
- Use ¼ inch to ½ inch holes
- Drill holes on all sides
- Leave the top section mostly solid
- Keep the bottom open
After drilling, smooth rough edges with sandpaper if needed. Sharp plastic edges are not ideal for worms or hands.
Step 3: Dig a Hole in the Garden Bed – Proper Placement
Choose a central spot in the raised bed and dig a hole deep enough to bury the perforated section of the pipe. This how to install worm tower in raised bed step is straightforward.
The hole should be wide enough so the pipe slides in easily. Place the pipe upright, then backfill soil around it firmly so it stands straight.
Make sure the bottom of the pipe touches the soil. Worms need to enter from below and through the side holes.
Step 4: Add Bedding Material – Creating a Worm-Friendly Environment
Before adding food scraps, place a small amount of bedding material inside the bottom of the tower. This best bedding for worm tower tip keeps your system healthy.
Good bedding options include:
- Shredded newspaper
- Shredded cardboard
- Dry leaves
- Finished compost
- Coconut coir
- A handful of garden soil
Bedding helps absorb moisture, reduce odor, and create a comfortable environment for worms.
Step 5: Add Kitchen Scraps – What to Feed Your Worm Tower
Add a small amount of chopped kitchen scraps. Start slowly. A new worm tower needs time to become active. This what to put in worm tower guide lists the best options.
Best scraps for worm towers include:
- Fruit peels
- Vegetable scraps
- Coffee grounds in small amounts
- Tea leaves
- Crushed eggshells
- Wilted greens
- Banana peels, chopped
- Apple cores, chopped
- Carrot peels
- Cucumber ends
Chopping scraps into small pieces helps them break down faster and makes them easier for worms to process. This how to speed up worm tower composting trick is essential.
Foods to Avoid in a Worm Tower – Keep Your System Healthy
A worm tower is not the same as a garbage bin. Some foods create odor, attract pests, or disturb the worm environment. Follow this what not to put in worm tower list.
Avoid adding:
- Meat
- Fish
- Dairy
- Oil
- Greasy foods
- Salty food
- Cooked leftovers with seasoning
- Large amounts of citrus
- Onion in large amounts
- Garlic in large amounts
- Pet waste
- Diseased plants
Small amounts of citrus or onion are usually not disastrous, but too much can make the tower unpleasant and slow worm activity.
Step 6: Cover the Scraps – Preventing Odor and Pests
After adding scraps, cover them with a handful of dry bedding material. This is one of the best ways to prevent smell and flies. This how to keep worm tower from smelling tip is crucial.
Use:
- Dry leaves
- Shredded cardboard
- Shredded paper
- A little finished compost
- Loose garden soil
Never leave fresh scraps exposed at the top of the tower. Covering them keeps the system clean and balanced.
Step 7: Add a Lid – Protecting Your Worm Tower
A worm tower must have a lid. The lid keeps rain, rodents, flies, and excess sunlight out of the tower. This best lid for worm tower guide offers simple options.
Simple lid options include:
- PVC pipe cap
- Upside-down plant saucer
- Flat tile
- Small terracotta saucer
- Wooden cover
- Recycled plastic lid
The lid should fit securely but still be easy to remove when feeding the tower.
Step 8: Keep the Tower Moist, Not Wet – Perfect Moisture Balance
Worms need moisture, but they also need oxygen. The tower should feel like a damp sponge, not a soggy bucket. This worm tower moisture guide prevents common problems.
If the contents are too dry, add a small splash of water. If they are too wet, add shredded cardboard or dry leaves.
Good Moisture Signs
- Contents feel damp
- No sour smell
- No standing liquid
- Worms are active
- Scraps slowly disappear
Too Wet Signs
- Sour odor
- Slime
- Fruit flies
- Standing liquid
- Rotten smell
Do You Need to Add Worms? – Best Worms for Your Tower
If your raised bed already has earthworms, they may naturally find the tower. In many gardens, worms will come on their own once food scraps begin decomposing. This best worms for worm tower guide helps you choose.
However, if your raised bed is new, isolated, or filled with sterile bagged soil, you may need to add composting worms.
The best worms for worm towers are usually red wigglers. They are excellent composters and stay near organic material. Regular deep-burrowing earthworms may help the soil, but they are not as efficient at processing kitchen scraps inside the tower.
You can add a small handful of red wigglers into the tower after adding bedding and moist scraps.
Best Worms for a Garden Worm Tower – Comparison Table
| Worm Type | Best Use | Notes |
|---|---|---|
| Red wigglers | Composting scraps | Best choice for worm towers |
| Garden earthworms | Soil aeration | May enter naturally |
| European nightcrawlers | Composting and soil movement | Can work in larger systems |
Do not add worms to extremely hot, dry, wet, or chemical-treated soil. They need a comfortable environment to survive.
How Often Should You Feed a Worm Tower? – Feeding Schedule for Success
Start small. Add scraps once every 5 to 7 days at first. Check whether the previous scraps are breaking down before adding more. This worm tower feeding frequency guide prevents overfeeding.
Once the tower is active, you can feed it more often, but avoid overfilling it.
Simple Feeding Schedule
- Week 1: add one small handful of scraps
- Week 2: check moisture and odor
- Week 3: add another small handful
- After one month: feed as scraps disappear
If scraps are piling up and not breaking down, you are adding too much food.
How Much Food Should You Add? – Portion Control for Healthy Composting
A worm tower works best with small, regular amounts of food. It should never be packed full of scraps. This how much to feed worm tower tip is essential.
For a standard 4-inch pipe, start with:
- ½ cup chopped scraps once or twice per week
For a 6-inch pipe, start with:
- 1 cup chopped scraps once or twice per week
Adjust based on how quickly the scraps disappear.
What Plants Benefit Most From a Worm Tower? – Best Crops for Rich Soil
Many garden plants benefit from worm castings and improved soil health. Heavy-feeding vegetables especially appreciate the slow-release nutrition. This best plants for worm tower garden list will help you plan.
Good plants near a worm tower include:
- Tomatoes
- Peppers
- Cucumbers
- Zucchini
- Kale
- Lettuce
- Spinach
- Basil
- Parsley
- Chard
- Beans
- Flowers in raised beds
Place the tower near crops that enjoy rich organic soil, but avoid disturbing roots when installing it.
Will a Worm Tower Smell? – Odor Prevention Tips
A healthy worm tower should smell earthy, not rotten. Bad smell usually means too much food, too much moisture, or the wrong scraps. This how to prevent worm tower odor guide will keep things fresh.
How to Prevent Odor
- Chop scraps small
- Do not overfeed
- Avoid meat, dairy, and oil
- Cover scraps with dry bedding
- Keep the lid on
- Add dry cardboard if wet
- Keep the tower aerated
If the tower smells bad, stop feeding it for a week or two, add dry bedding, and let the worms catch up.
Will a Worm Tower Attract Rodents? – Pest Prevention Strategies
A properly managed worm tower is less attractive to rodents than an open compost pile, but poor feeding habits can still cause problems. Follow this worm tower rodent prevention guide for peace of mind.
To reduce rodent risk:
- Use a tight-fitting lid
- Do not add meat or dairy
- Do not overfill with fruit
- Bury the lower pipe section deeply
- Cover scraps with bedding
- Keep the top clean
- Use a cap that cannot be easily knocked off
If rodents are common in your area, use a secure lid and consider placing wire mesh at the bottom before installation.
Continue to Page 2
Continue to page 2 for more details about this article and the key points many readers miss on the first page.