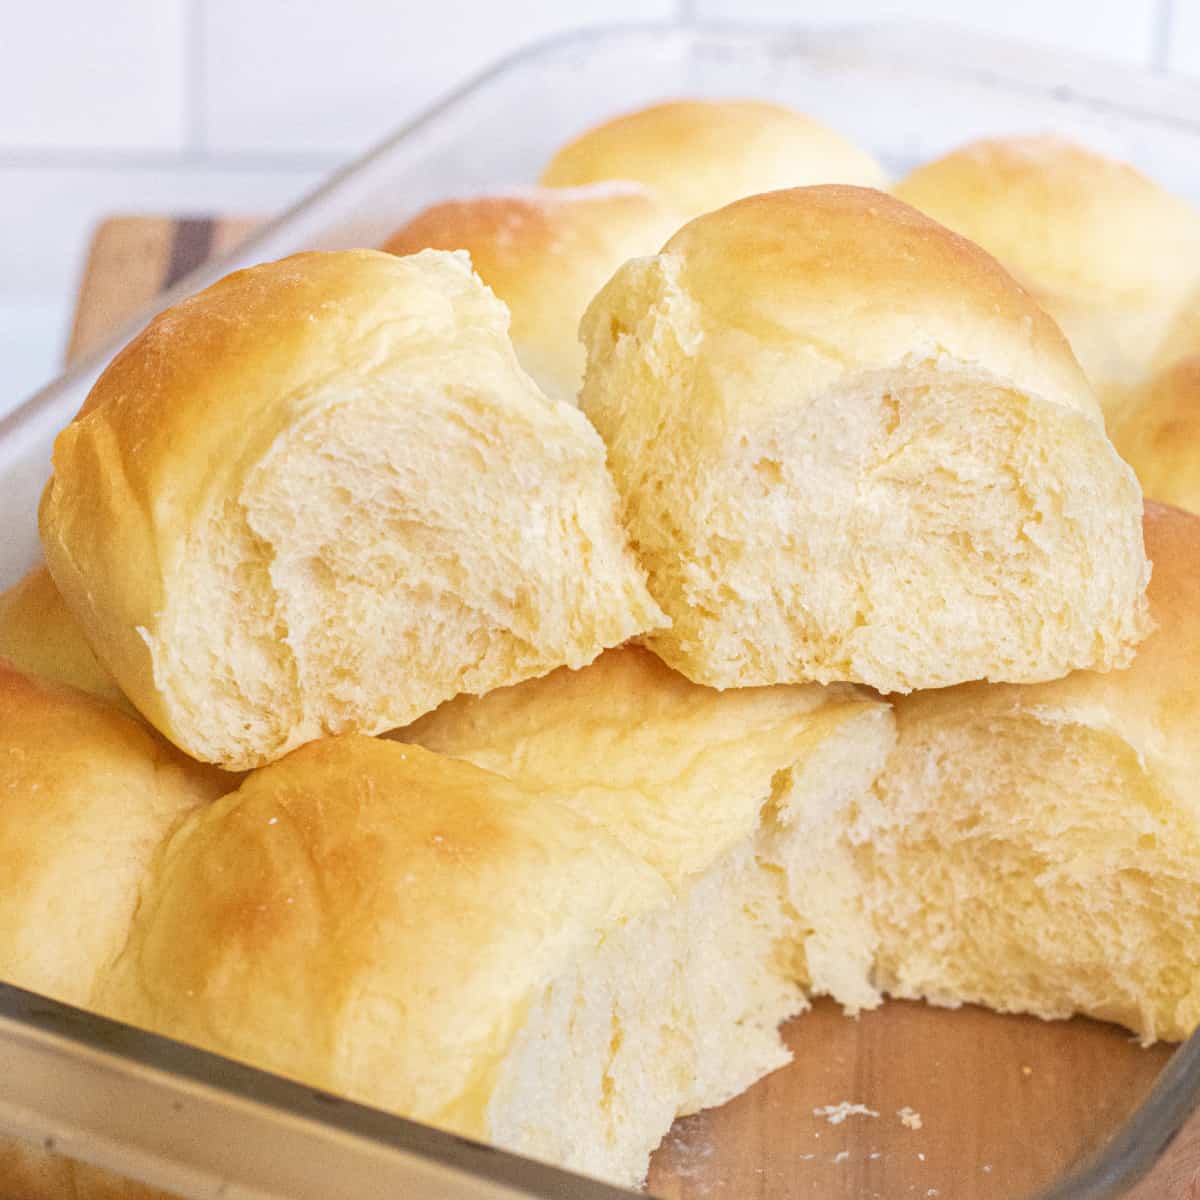
Use this recipe for Homemade Hawaiian Rolls to create the traditional sweet, soft rolls at home! They’re easier to prepare than store-bought Kings Hawaiian sweet rolls and go well with all of your favorite sliders and small sandwiches!

Who is aware of the traditional orange roll bag? So get ready to bid them farewell, or “Aloha”! We have developed an original recipe for homemade Hawaiian rolls that, in my opinion, surpass the quality of King’s Hawaiian rolls! These Hawaiian sweet rolls are even fluffier than the original, yet they still have all the sweet flavor you could ever want! Better still, they’re shockingly simple to prepare!
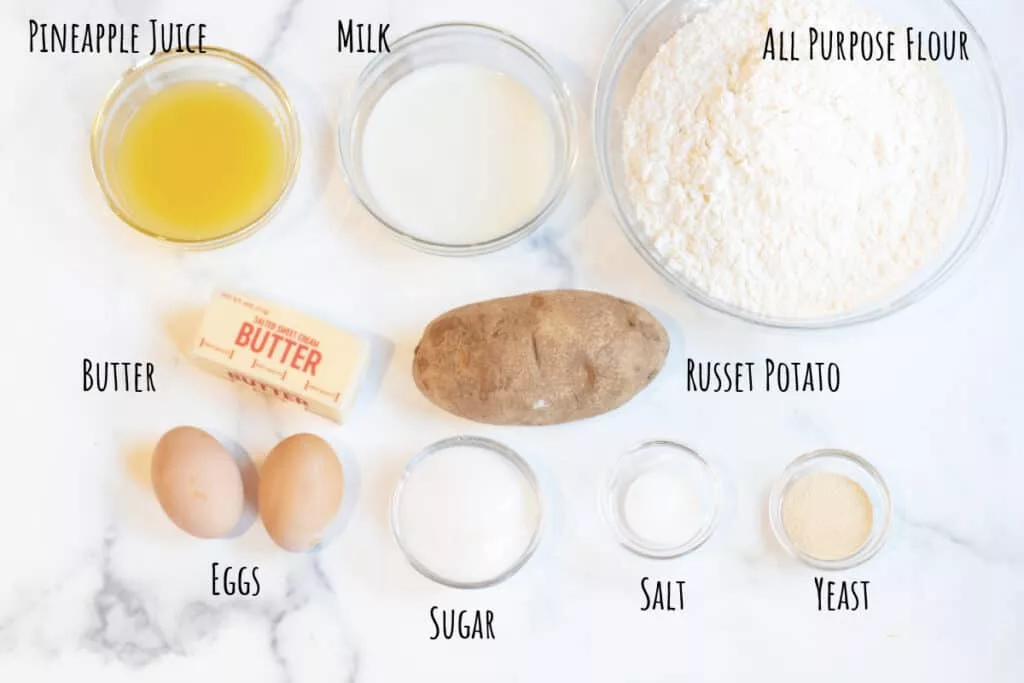
Ingredients Needed For Homemade Hawaiian Rolls
- All-Purpose Flour: Although bread flour can also be used in this recipe, I promise that all-purpose flour will work just as well and give you the desired amount of fluff in your rolls.
- Russet Potato: I adore using potato starch into my bread dough! It contributes to the dough’s wonderful soft texture by helping to hold onto moisture. Yukon Gold potatoes work well too, but avoid using waxy potatoes.
- The Hawaiian flavor of these Hawaiian sweet rolls is pineapple juice!
- Sugar: The sweetness of the Kings Hawaiian rolls cannot be fully captured by the pineapple juice alone.
- Milk, butter, and eggs are essential for taste and structure!
- Additional ingredients for bread include salt and active yeast.
How to Make Homemade Hawaiian Rolls
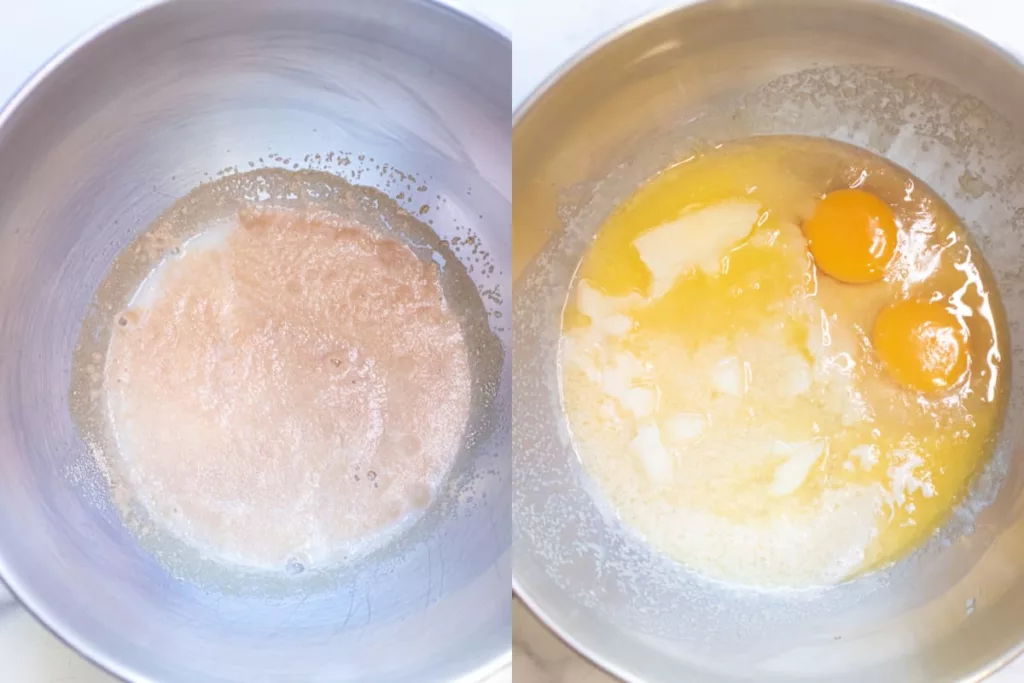
Get the Yeast Going
First, use some warm milk and sugar to activate the yeast. When everything is done, mix in the mashed potatoes, melted butter, pineapple juice, and eggs.
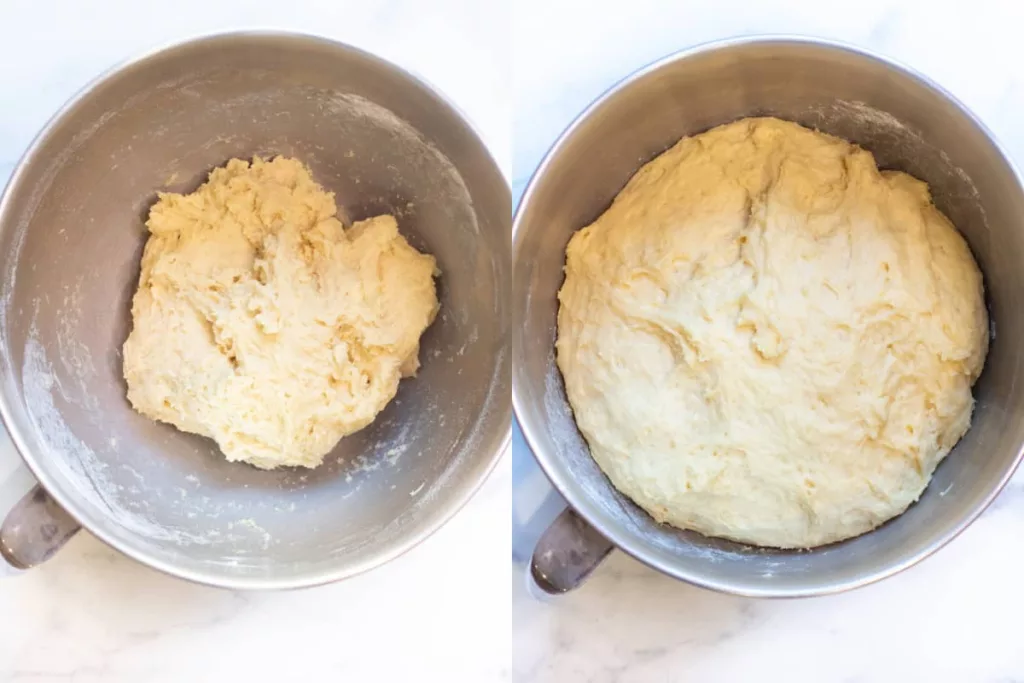
Add Flour Using your handy stand mixer, add the flour and mix until a really moist, sticky dough forms. After it has doubled, cover and let it rise.
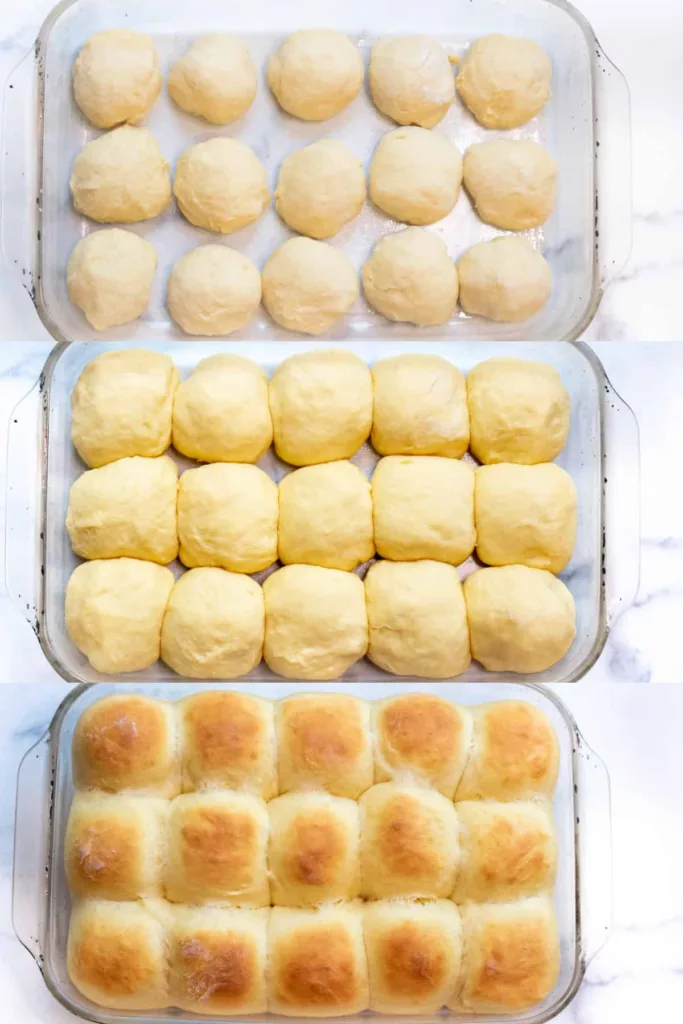
Form, Float, Cook! Form into fifteen little balls, allow to rise one more, and bake!
Pro Tips!
Weigh the components.
It’s crucial to weigh your flour while baking, especially when making bread, to ensure the most precise and reliable results every time. This is due to the fact that a single cup of all-purpose flour can vary greatly from one measurement to the next. A kitchen scale is a very practical and reasonably priced equipment, particularly if you bake bread frequently!
Is a Stand Mixer Necessary?
Without a doubt not. This can definitely be completed by hand; it just requires a little more effort.
Weigh the Dough Balls
One more justification for a kitchen scale! This will assist you in weighing your dough balls so that your rolls come out uniformly proportioned.
Make advance preparations in Homemade Hawaiian Rolls.
There are two methods for preparing this dough ahead of time!
First Rise Overnight: After preparing the dough, cover the bowl and refrigerate it for the entire night. Remove the bowl the following day and allow the dough to rise; it should take a minimum of two hours to double.
Overnight Second Rise: Form the dough balls, cover, and place them in the refrigerator. Let them rise for a further one to two hours in the refrigerator before baking, and give yourself at least three hours before you need them. Freeze: Using a baking sheet covered with parchment paper, shape the dough balls and quickly freeze them. Store in an airtight freezer bag or container when it has frozen. When you’re ready to bake, remove the frozen dough balls, place them on a baking sheet that has been buttered, and allow them to defrost and rise for about four to five hours.

More Recipes You Might Like
- Spiced Zucchini Cake
- Southern Sweet Potato Pie
- Easy Apple Fritters
- Peach Scones with Bourbon Icing Spiced
Homemade Hawaiian Rolls
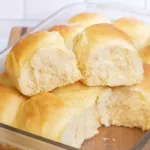
Use this recipe for Homemade Hawaiian Rolls to create the traditional sweet, soft rolls at home! They're easier to prepare than store-bought Kings Hawaiian sweet rolls and go well with all of your favorite sliders and small sandwiches!
- 450 grams all purpose flour 3 1/2 cups
- 10 grams active yeast 2 1/4 teaspoons
- 107 grams sugar 1/2 cup
- 1/3 cup 2% milk warmed to about 90 degrees
- 7 grams fine ground salt
- 1/2 cup pineapple juice
- 131 grams mashed potato 2/3 cup or approximately 1 medium sized potato
- 2 eggs
- 2 tablespoons butter melted
- Place a small saucepan of water and diced potatoes in it. Turn the heat to high. Potatoes should be fork-tender after boiling for at least ten minutes. After draining and mashing the mixture well, leave it to cool. To get a smooth and silky mash, make sure your potatoes are cooked through.
- To bring milk’s temperature to around 90 degrees, microwave it for 15 to 30 seconds. In the bowl of a stand mixer, combine sugar and milk and stir. When the yeast starts to bubble, add it and let it sit for about ten minutes to activate.
- Add melted butter, eggs, salt, mashed potato, and pineapple juice when the yeast has activated. Once the egg yolks are cracked and the potato starts to combine with the liquids, mix on medium speed with the dough hook.
- While the mixer is running, add the flour gradually. Mix the flour in until a very sticky dough forms, after adding all of the flour.
- After the dough has doubled in size, approximately an hour, cover the mixer with plastic wrap and let it rise.
- Grease a 9×13 baking dish and dust a clean tabletop or cutting board with flour. Scoop the dough out of the mixing bowl onto your floured surface and sprinkle some dough around the rising dough’s edge after the first rise. After adding a bit more flour to the surface, cut the dough into 2.2–2.5 ounce portions with a dough cutter. As an alternative, you might divide the dough in half and then divide each half of the dough piece again until you have fifteen or sixteen dough balls.
- Roll each ball of dough into a ball or form the dough into a ball shape by pulling the edges under and under. Because the dough is quite sticky, you will frequently need to flour your hands. Place dough balls onto a baking sheet that has been oiled.
- Put a fresh kitchen towel on top and let it rise for an additional thirty to forty minutes. Preheat oven to 350 degrees Fahrenheit.
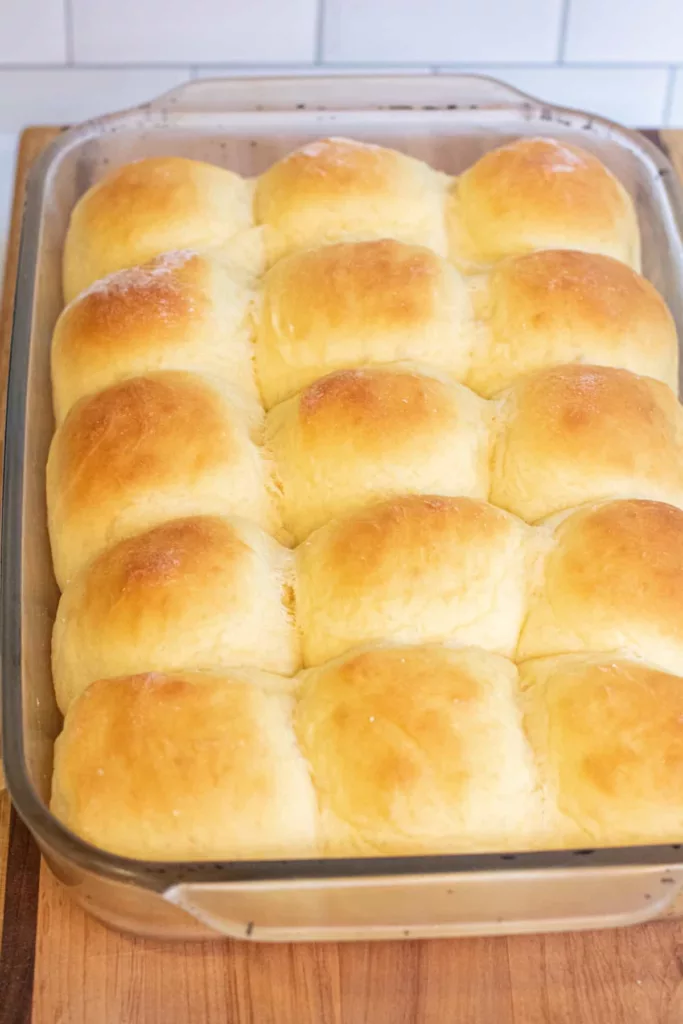
- The dough balls should be placed in the oven and baked for 20 to 25 minutes, checking at the 20-minute mark to make sure the rolls are golden brown on top.
- Have fun!
For every roll, there is an approximate nutritional value.
Make advance preparations.
First rise overnight: After preparing the dough, cover the bowl and refrigerate it. Remove the bowl the following day and allow the dough to rise; it should take a minimum of two hours to double.
Second Rise: Make the dough balls, cover them, and refrigerate overnight. Let them rise for a further one to two hours in the refrigerator before baking, and give yourself at least three hours before you need them.
Freeze: Using a baking sheet covered with parchment paper, shape the dough balls and quickly freeze them. Store in an airtight freezer bag or container when it has frozen. When you’re ready to bake, remove the frozen dough balls, place them on a baking sheet that has been buttered, and allow them to defrost and rise for about four to five hours.
Keepsake
Counter: Tightly cover and keep chilled for two to three days.
Refrigerate: For up to a week, store in an airtight container in the refrigerator.
Freezer: After the cooked rolls have fully cooled, you may store them for up to three months.
Alterations
Flour: Bread flour is an additional option.
Potato: Yukon Gold potatoes work well too, but avoid using waxy potatoes. For even more sweetness, you may also use a sweet potato, but be aware that it will change color.
Use 1% milk to full.