Weeds can make a clean pathway, patio, driveway, or garden border look messy almost overnight. They grow through sidewalk cracks, between paving stones, along fence lines, beside gravel paths, and around garden edges where dust, moisture, and tiny seeds collect. Even if the rest of the yard looks beautiful, a row of stubborn weeds can make the whole outdoor space feel unfinished.
This homemade weed killer solution is a simple outdoor method made with white vinegar, Epsom salt, and dish soap. The goal is to coat unwanted weeds directly, let the sun dry the mixture naturally, and watch the weeds begin to wilt within 24 to 48 hours. After the weeds turn sad, limp, and dry, the pathway can be swept clean for a neater garden transformation.
This method works best on weeds growing in hardscape areas where you do not want plants to grow, such as driveway cracks, walkway seams, gravel edges, patio joints, and open pathway borders. It should not be sprayed near flowers, grass, vegetables, herbs, shrubs, or plants you want to keep, because this mixture is non-selective. If it touches green leaves, it may damage them.
Why Weeds Take Over Pathways So Quickly
Weeds are successful because they do not need perfect soil. Many weeds can grow in tiny cracks where soil dust, rainwater, and sunlight collect. A small opening between stones can become the perfect place for weed seeds to sprout. Once the roots settle in, the plant spreads fast and makes the path look untidy.
Some weeds have shallow roots and are easy to dry out. Others have deep roots and return after the top leaves are damaged. That is why the best garden cleanup routine combines spraying, waiting, removing dry weeds, sweeping, and repeating when needed.
The goal is not only to make weeds wilt. The goal is to turn a messy walkway into a cleaner pathway and a more polished garden area.
What This Homemade Weed Killer Does
This solution helps dry the visible leaves of unwanted weeds. White vinegar affects the leafy surface. Epsom salt helps pull moisture from the plant tissue. Dish soap helps the mixture cling to the leaves instead of sliding off right away.
When sprayed on a warm sunny day, the mixture works faster because sunlight helps dry the leaves. Many small weeds begin to look sad and wilted within hours. After 24 to 48 hours, the weeds often look brown, limp, and easier to remove.
Deep-rooted weeds may need a second spray or hand removal after they weaken. For long-term results, treat small weeds early before they become large and woody.
Important Safety Notes Before You Start
This homemade weed killer is powerful enough to damage plants you like, so careful use is very important. It should be sprayed only on unwanted weeds. Do not spray it across a lawn, flower bed, vegetable garden, herb planter, or around young trees.
- Use outdoors only.
- Wear gloves if your skin is sensitive.
- Avoid splashing into eyes.
- Do not spray on windy days.
- Do not spray before rain.
- Do not use near ponds or water features.
- Keep away from children and pets while mixing and spraying.
- Label any leftover mixture clearly.
- Rinse the sprayer after use.
Because the recipe contains salt, avoid repeated heavy use in soil where you want future plants to grow. Salt can affect soil quality. This method is best for paths, cracks, gravel, and areas where plant growth is not wanted.
Ingredients Needed
- 1 gallon white vinegar, about 3.8 liters
- 2 cups Epsom salt
- 1/4 cup dish soap
- Clean garden pump sprayer
- Mixing stick or long spoon
- Measuring cup
- Gloves
- Warm sunny day
Use plain white vinegar. Use a clean sprayer that has not held harsh chemicals. If the sprayer was used before, rinse it thoroughly so old residue does not mix with the weed solution.
The 6-Step Homemade Weed Killer Method
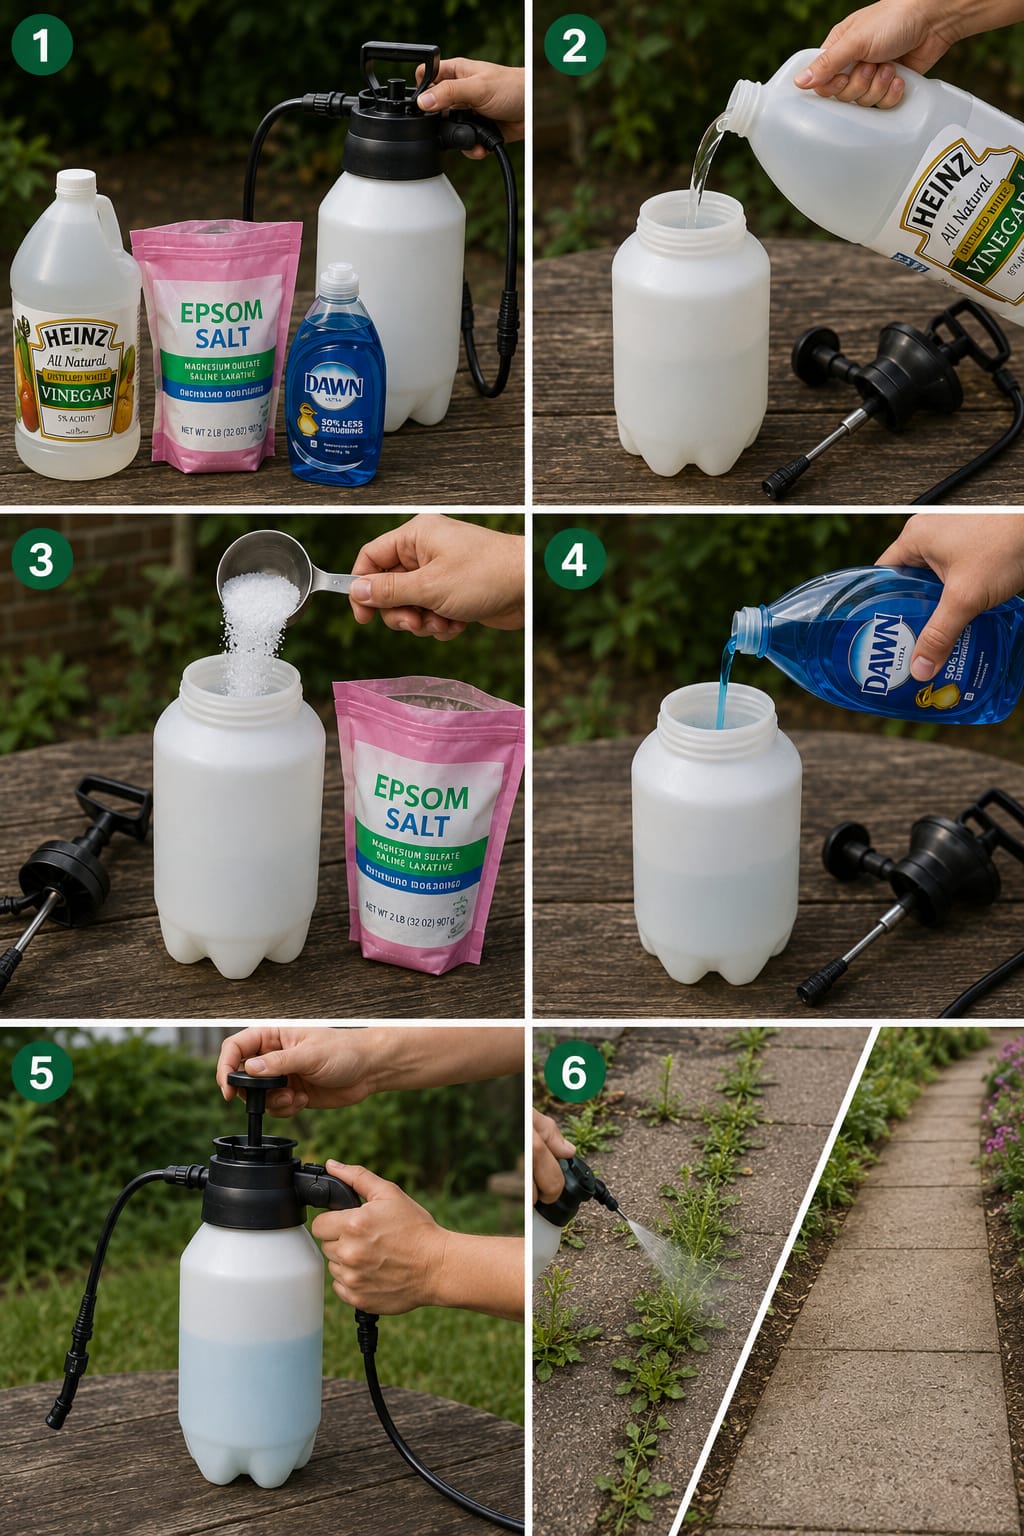
Step 1: Prepare the Sprayer
Take a clean garden pump sprayer or a large mixing container and place it on a flat outdoor surface. Choose a well-ventilated area. Check that the sprayer is empty, clean, and working properly. Keep the lid, hose, and nozzle nearby so the mixture can be closed quickly after mixing.
Step 2: Add the White Vinegar
Pour 1 gallon of white vinegar slowly into the container. Pour carefully to avoid splashing. Vinegar is the main liquid base of this weed killer solution. It works best when it sits directly on weed leaves during warm, dry weather.
Step 3: Add the Epsom Salt
Add 2 cups of Epsom salt little by little. Do not dump it in all at once. Stir for 1 to 2 minutes so most of the salt dissolves. A few small crystals may remain, but the mixture should be mostly blended before spraying.
Step 4: Add the Dish Soap
Add 1/4 cup dish soap slowly around the side of the container. Stir gently with a spoon or mixing stick. Do not shake aggressively because too much foam can make the sprayer harder to use. Dish soap helps the mixture stick to weed leaves.
Step 5: Close and Pump the Sprayer
Pour the mixture into the garden pump sprayer if you used a separate container. Close the lid tightly. Pump the sprayer several times to build pressure. Test the nozzle in a safe spot away from plants you want to keep. Adjust it to a controlled spray.
Step 6: Spray the Weeds and Wait for the Transformation
Choose a warm sunny day with little wind. Move close to the weeds and spray directly onto the leaves until they are fully coated. Spray the tops, sides, center, and lower leaves. Avoid nearby flowers, grass, vegetables, herbs, and healthy plants.
Leave the weeds untouched and let the sun dry the mixture naturally. Wait 24 to 48 hours. The weeds should begin to look sad, wilted, and brown. After they dry, pull or sweep away the dead growth to reveal a cleaner pathway and tidier garden area. If some weeds are still green, spray those stubborn areas again.
Best Places to Use This Solution
- Sidewalk cracks
- Driveway seams
- Patio joints
- Gravel paths
- Stone walkway cracks
- Fence lines away from wanted plants
- Garden path edges
- Paver gaps
- Mulch borders where no delicate plants are nearby
This solution is especially useful for hardscape areas. It is not the best choice for mixed garden beds because spray drift can harm surrounding plants.
Where Not to Use It
- Lawns
- Vegetable beds
- Flower beds
- Herb gardens
- Near young trees
- Near shrubs you want to keep
- Soil where you plan to plant soon
- Near ponds, streams, or drains
If weeds are growing very close to flowers or vegetables, hand-pulling is safer. You can also use a small hand tool to remove weeds from tight areas.
Why Sunny Weather Matters
This homemade weed spray works better on warm sunny days because the leaves dry faster. The mixture needs time to sit on the weed surface. Rain can wash it away before it works. Wind can blow the spray onto nearby plants.
Morning or early afternoon is often ideal. The weeds get several hours of sun after treatment. The visible wilting effect usually appears faster when the weather is dry and bright.
What to Expect After 24 to 48 Hours
Small weeds may begin wilting within a few hours. Their leaves may look dull, limp, curled, or darker. After 24 hours, many weeds look weak and sad. After 48 hours, treated weeds often appear brown and dry.
Large weeds may only wilt on top. If the roots are deep, they can return later. For those weeds, spray once, wait for wilting, then pull the weakened plant from the root if possible.
The biggest visual improvement comes after cleanup. Once wilted weeds are removed and the path is swept, the walkway looks cleaner and the garden border feels more organized.
How to Create the Cleaner Pathway Look
After the weeds wilt, do not leave the dead growth sitting on the path for too long. Remove it for a neat finish. Use gloves, a broom, a crack weeder, or a small garden tool. Pull out dry stems, sweep away debris, and clear the edges.
For a more polished garden transformation, refresh gravel, straighten border stones, trim nearby plants, and remove loose leaves. These small finishing touches make the area look intentionally maintained rather than simply sprayed.
Why Some Weeds Need a Second Spray
Not all weeds respond the same way. Young soft weeds usually wilt faster. Older weeds with thick stems or deep roots may stay partly green. If some weeds survive after 24 to 48 hours, spray again on the remaining green leaves.
Focus on the center and lower leaves because these areas help absorb the mixture. Spray carefully and avoid nearby wanted plants.
Common Mistakes to Avoid
- Spraying on a windy day
- Spraying before rain
- Spraying too close to flowers or grass
- Using too much mixture in garden soil
- Leaving dead weeds without cleanup
- Expecting one spray to kill every deep root
- Using a dirty sprayer
- Forgetting to rinse the sprayer afterward
- Letting pets walk through freshly sprayed areas
- Storing leftover mixture without a label
The safest and cleanest results come from targeted spraying, patience, and follow-up cleanup.
How to Protect Nearby Plants
If weeds are near plants you want to keep, protect them before spraying. Use cardboard, a plastic shield, or a bucket as a barrier. Hold the shield between the weed and the good plant while you spray. Spray close to the weed instead of misting from far away.
A controlled stream is safer than a wide mist. The less drift, the better.
Can This Homemade Weed Killer Damage Grass?
Yes. This mixture can damage grass. Do not spray it on lawn weeds unless you are willing to damage the surrounding grass. For lawn weeds, use hand-pulling, lawn-safe weed controls, or proper lawn care methods.
If the mixture accidentally touches grass, rinse the area quickly with clean water. Damage may still happen, but rinsing can reduce the effect.
Can It Be Used Around Vegetable Gardens?
It is better not to use this salt-based spray near vegetables. Vegetable gardens need healthy soil, and salt can create problems. Also, spray drift can damage edible plants.
For vegetable beds, use mulch, hand-pulling, hoeing, cardboard barriers, and regular weeding instead. These methods are safer for productive soil.
Can It Be Used on Gravel?
Yes, gravel areas are one of the best places for this type of weed spray. Weeds often grow through gravel where soil collects. Spray directly on the leaves, wait for wilting, and rake or pull dry weeds later.
For longer-lasting results, add fresh gravel where the surface has thinned. A thicker gravel layer can reduce weed growth.
Can It Be Used on Patio Cracks?
Yes. Patio cracks and paver joints are common problem areas. Spray directly into the weeds, not across the entire patio. After the weeds dry, remove them and sweep the joints. If soil has built up between pavers, clean it out to reduce future weeds.
How to Store Leftover Mixture
It is best to mix only what you need. If you have leftover solution, store it in a clearly labeled container away from children, pets, food, and indoor storage areas. Do not store it in drink bottles. Do not leave it in direct sun.
Before using leftovers, stir gently. Salt can settle, and the sprayer nozzle may clog if crystals remain.
How to Clean the Sprayer
After spraying, rinse the pump sprayer with clean water. Fill it partly with water, pump it, and spray water through the nozzle to clear the hose. This prevents salt and soap buildup from clogging the sprayer.
Let the sprayer dry before storing it. Keep it labeled for garden weed use only.
How to Prevent Weeds From Returning
- Sweep pathways weekly.
- Remove soil from cracks.
- Pull weeds before they seed.
- Add fresh gravel to thin areas.
- Use mulch around garden borders.
- Fill large cracks where weeds root deeply.
- Trim plants that drop debris onto paths.
- Check after rain for new seedlings.
Prevention keeps the garden looking clean with less work. Tiny weeds are easier to manage than mature weeds with deep roots.
Outdoor Styling After Weed Cleanup
Once the weeds are wilted and removed, the outdoor area can look completely different. A clean path makes the garden feel calmer and more cared for. You can improve the final look with simple styling touches.
- Sweep the path after removing dead weeds.
- Trim overgrown border plants.
- Add fresh mulch beside the walkway.
- Place terracotta pots along clean edges.
- Refresh gravel for a brighter path.
- Add solar lights beside the walkway.
- Use stepping stones for structure.
- Keep edges sharp with a garden spade.
The weed killer handles the messy growth, but styling completes the transformation. The result is a cleaner pathway, a neater garden area, and a more inviting outdoor space.
Indoor and Home Organization Tip
Even though this spray is used outdoors, the tools should be stored properly. Keep vinegar, Epsom salt, dish soap, and the sprayer in a garden cabinet, garage shelf, or outdoor storage box. Label the sprayer clearly so it is not reused for watering houseplants or spraying gentle plant tonics.
Good organization helps prevent mistakes. A sprayer used for weed killer should not be used later for delicate indoor plants.
6-Step Method Quick Recap
- Prepare a clean garden pump sprayer outdoors.
- Pour in 1 gallon white vinegar.
- Add 2 cups Epsom salt slowly and stir.
- Add 1/4 cup dish soap and stir gently.
- Close the sprayer and pump to build pressure.
- Spray weeds on a warm sunny day, wait 24 to 48 hours, then clean the wilted weeds from the path.
Continue to Page 2
Continue to page 2 for more details about this article and the key points many readers miss on the first page.