Rubber plants are some of the most beautiful indoor plants you can grow at home. Their thick glossy leaves, strong upright stems, and clean tropical look make them perfect for living rooms, bedrooms, bright offices, kitchens, plant shelves, and cozy indoor corners. A healthy rubber plant can become a bold statement plant, and the best part is that you can grow a new one from a simple cutting.
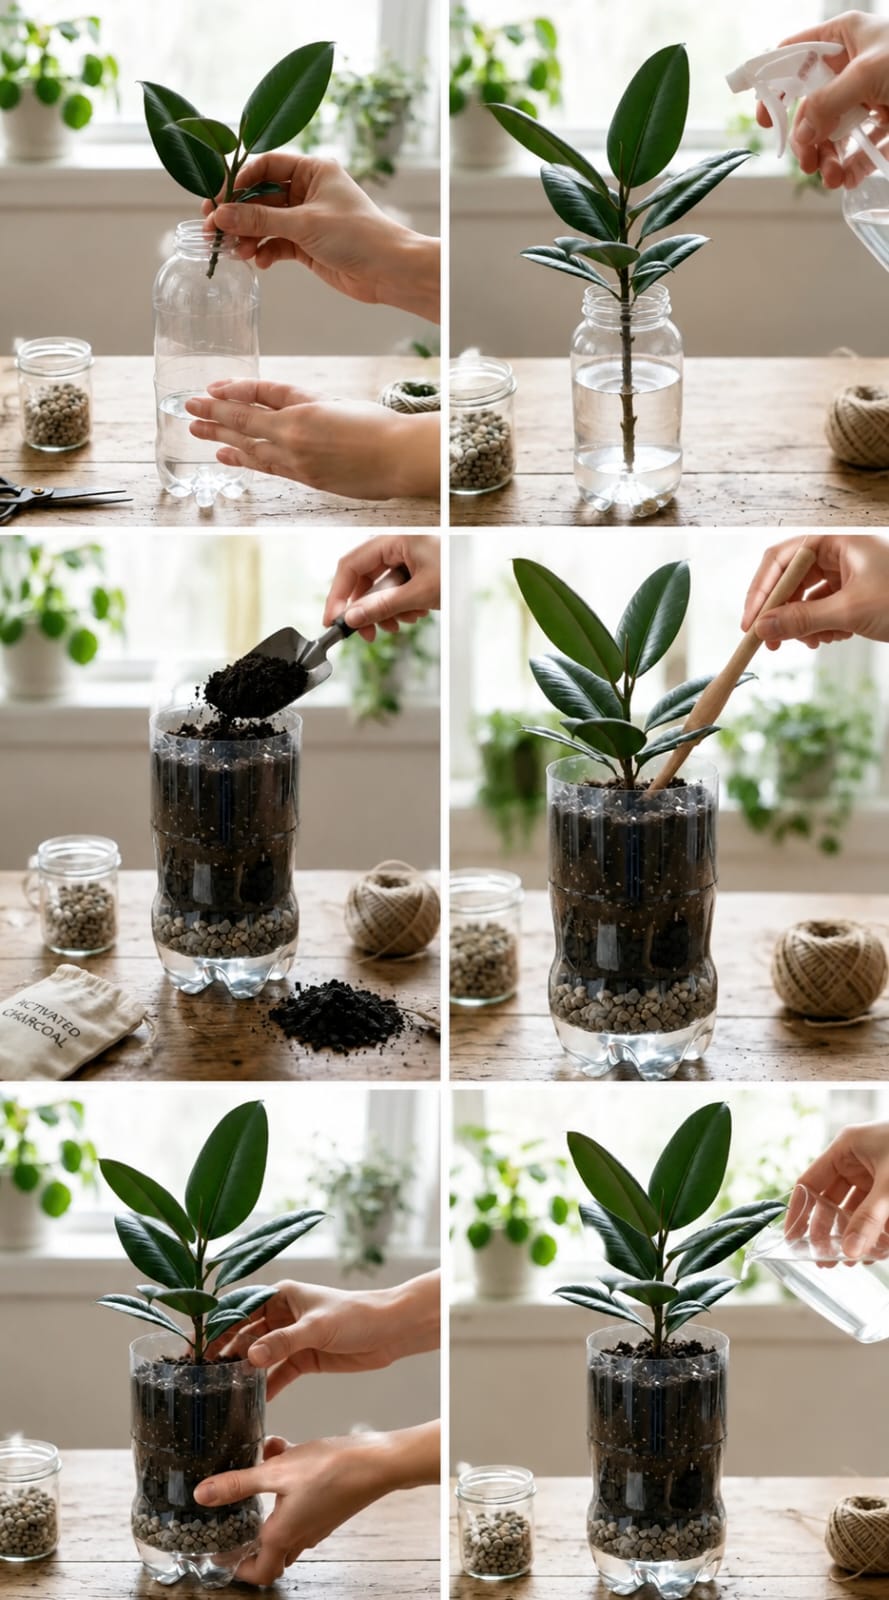
The image shows an easy propagation and potting idea using a recycled plastic bottle, water, small pebbles, activated charcoal, soil, and a young rubber plant cutting. This method is popular because it is simple, affordable, and easy to follow. Instead of buying a new pot right away, you can reuse a plastic bottle as a clear container. The clear sides let you see the layers, moisture level, and root progress.
This guide explains how to grow a rubber plant cutting in a plastic bottle safely, how to use pebbles and activated charcoal, how to add soil, how to water correctly, how to prevent root rot, how to care for new growth, and how to move the plant into a permanent pot later. The goal is to help your rubber plant cutting grow strong roots and healthy glossy leaves without overwatering or suffocating the roots.
What Is a Rubber Plant?
The rubber plant, also called Ficus elastica, is a tropical houseplant known for its thick, shiny leaves. Many varieties have deep green leaves, burgundy leaves, cream variegation, or pink tones. It grows upright and can become tall indoors when given enough light and care.
Rubber plants are popular because they look elegant but are not too difficult to grow. They enjoy bright indirect light, moderate watering, warm temperatures, and well-draining soil. They do not like soggy roots, cold drafts, or sudden changes in care.
Why Grow Rubber Plant in a Plastic Bottle?
A plastic bottle is useful for starting cuttings because it is lightweight, cheap, and easy to cut. It also lets you create visible layers inside the container. You can add pebbles at the bottom, activated charcoal above them, then soil on top. This gives the plant a simple temporary growing setup.
The clear plastic also helps beginners see what is happening below the soil. You can notice excess water, root growth, or problems more easily than in an opaque pot.
However, a plastic bottle should be used carefully. It must have drainage holes or a drainage plan. If water sits at the bottom with no escape, the roots can rot. Rubber plants do not like standing water.
Important Safety Note About Drainage
A plastic bottle without drainage holes can trap water. This can create root rot, fungus gnats, sour soil, and weak growth. If you are using a bottle as a planter, make drainage holes in the bottom. If you want to keep water in the very bottom layer, make sure the soil layer does not stay constantly wet.
The safest method is to make several small holes in the bottom of the bottle before planting. Place the bottle on a saucer so extra water can drain out. If you do not want holes, water very sparingly and monitor the moisture carefully. For long-term growth, a proper pot with drainage is better.
What You Need
- Healthy rubber plant cutting or young rooted rubber plant
- Clean plastic bottle
- Scissors or craft knife
- Small pebbles or gravel
- Activated charcoal
- Fresh well-draining potting mix
- Perlite or orchid bark, optional
- Clean water
- Small spoon or trowel
- Wooden stick for settling soil
- Spray bottle, optional
- Bright indirect light
Choosing the Best Rubber Plant Cutting
Choose a healthy cutting with firm leaves and a strong stem. A good cutting should have at least one node. A node is the part of the stem where leaves or roots can grow. Without a node, the cutting may not root properly.
A cutting with two or three leaves is enough. Too many leaves can make the cutting lose moisture quickly. If the leaves are very large, some growers cut one leaf in half to reduce water loss, but this is optional.
How to Take a Rubber Plant Cutting
- Choose a healthy stem from the mother plant.
- Use clean sharp scissors or pruning shears.
- Cut below a node.
- Keep one or two healthy leaves on the cutting.
- Remove any lower leaves that would sit in soil or water.
- Let the milky sap stop flowing.
- Allow the cut end to dry for a short time before planting.
Rubber plants release white sap when cut. This sap can irritate skin, so wash your hands after handling it. Keep the sap away from eyes, pets, and children.
Water Rooting Before Planting
You can root a rubber plant cutting in water before placing it in the bottle planter. Place the cutting in a jar with clean water, making sure the node is underwater and leaves stay above the water. Change the water every few days.
Roots may take several weeks to appear. Rubber plants can be slower than pothos or Tradescantia. Be patient and keep the cutting in bright indirect light.
Can You Plant a Cutting Directly in Soil?
Yes. Rubber plant cuttings can be rooted directly in soil. This method avoids the transition from water roots to soil roots. Use a light moist mix and keep the cutting stable. Do not keep the soil soggy.
If you are a beginner, water rooting may feel easier because you can see roots growing. Soil rooting can be stronger long term if done correctly.
Preparing the Plastic Bottle
Wash the bottle well and remove any label. Cut the top section off to create a wide opening. The lower part becomes the planter. Smooth any sharp edges if needed.
Use scissors or a hot nail to make drainage holes in the bottom. Several small holes are better than one large hole. Drainage helps protect the roots from sitting in water.
Step 1: Add Pebbles to the Bottom
Add a layer of small pebbles or gravel to the bottom of the bottle. This layer helps keep the base stable and creates space for excess water to move away from the soil.
Do not rely only on pebbles if the bottle has no drainage holes. Pebbles do not remove water from the container. They only create a lower layer. Drainage holes are still safer.
Step 2: Add Activated Charcoal
Activated charcoal can help keep the container fresher by reducing odor and absorbing some impurities. It is often used in terrariums and closed plant displays. In this setup, it can be added as a thin layer above the pebbles.
Do not add a thick layer. A small amount is enough. Too much charcoal is not necessary and may reduce space for roots.
Step 3: Add Fresh Soil
Add well-draining soil above the charcoal layer. Rubber plants prefer soil that holds light moisture but drains well. Regular potting soil can be improved with perlite, orchid bark, or coarse material.
Simple Rubber Plant Soil Mix
- 2 parts indoor potting mix
- 1 part perlite
- 1 part orchid bark or coco chips
This mix gives roots moisture and air. Avoid heavy garden soil because it can become compacted in a bottle.
Step 4: Place the Rubber Plant Cutting
Make a hole in the soil with your finger or a wooden stick. Place the rubber plant cutting or young rooted plant into the hole. Keep the stem upright. The node or roots should be covered, but the leaves should stay above the soil.
Press the soil gently around the stem to hold it stable. Do not pack the soil too tightly. Roots need oxygen.
Step 5: Settle the Soil
Use a small stick to settle the soil around the roots. This removes large air gaps while keeping the mix loose. Add more soil if needed, but leave some space at the top of the bottle so watering is easier.
The plant should stand upright and feel secure.
Step 6: Water Gently
Water lightly after planting. Pour slowly until the soil is evenly moist. If you made drainage holes, let extra water drain out. Empty the saucer after watering.
Do not flood the bottle. Rubber plant cuttings need moisture, but they can rot if the soil stays wet.
Where to Place the Bottle Planter
Place the rubber plant in bright indirect light. A bright window with filtered light is ideal. Avoid direct hot sun, especially through a clear plastic bottle, because it can heat the roots and dry the plant quickly.
An east-facing window is often a good choice. A south or west window may need a sheer curtain.
Best Light for Rubber Plants
Rubber plants grow best in bright indirect light. They can tolerate medium light, but growth will be slower. Variegated varieties need brighter light to keep their colors strong.
Too little light can cause weak stems, leaf drop, and slow rooting. Too much direct sun can burn leaves. Find a bright but gentle spot.
How Often to Water
Water when the top layer of soil begins to dry. In a plastic bottle, soil may dry more slowly than in terracotta. Always check before watering.
Stick your finger into the soil. If it feels damp, wait. If the top inch feels dry, water lightly. Rubber plants prefer a dry-down period between waterings.
Signs Your Rubber Plant Needs Water
- Top inch of soil feels dry.
- Pot feels lighter.
- Leaves look slightly less firm.
- Soil pulls slightly from the sides.
- The plant has not been watered for several days or weeks, depending on conditions.
Signs of Overwatering
- Yellow leaves
- Brown mushy roots
- Soft stem base
- Sour soil smell
- Fungus gnats
- Mold on soil
- Leaves dropping while soil is wet
If the soil is wet and leaves are dropping, do not add more water. Check the roots and improve drainage.
How to Prevent Root Rot
- Use drainage holes in the bottle.
- Use loose soil with perlite or bark.
- Water only when the top soil dries.
- Do not let water sit at the bottom.
- Keep the plant in bright indirect light.
- Avoid oversized containers.
- Do not pack soil tightly.
Root rot is the biggest risk in bottle planters. Good drainage and careful watering are the best protection.
When to Move the Plant to a Permanent Pot
A plastic bottle is useful as a starter container, but it is not always the best long-term pot. Once the rubber plant has strong roots and new growth, move it into a proper pot with drainage holes.
Repot when roots fill the bottle, when the plant becomes top-heavy, or when you notice the soil staying wet too long. Choose a pot only slightly larger than the root ball.
Best Pot for Rubber Plant
A rubber plant grows well in terracotta, ceramic, or plastic pots as long as there are drainage holes. Terracotta dries faster and helps prevent overwatering. Ceramic pots look stylish but may hold moisture longer. Plastic pots are lightweight but also hold moisture longer.
The most important rule is drainage.
How to Repot From Bottle to Pot
- Water lightly a day before repotting if soil is very dry.
- Gently squeeze or cut the bottle if roots are stuck.
- Remove the plant carefully.
- Keep the root ball as intact as possible.
- Place in a pot with fresh well-draining soil.
- Keep the plant at the same depth.
- Water lightly and let drain.
- Place in bright indirect light.
If roots are tangled in the bottle ridges, cut the bottle away instead of pulling hard.
Should You Fertilize a New Rubber Plant Cutting?
Do not fertilize immediately after planting a cutting. Wait until the plant has roots and begins producing new growth. Fertilizer can burn weak young roots.
Once established, feed lightly during spring and summer with a balanced houseplant fertilizer diluted to half strength. Feed every 4 to 6 weeks during active growth.
How to Keep Rubber Plant Leaves Glossy
Rubber plant leaves naturally shine when they are clean and healthy. Dust can make them look dull. Wipe each leaf gently with a damp cloth. Support the leaf with one hand and wipe with the other.
Do not use heavy oily leaf shine. It can attract dust and block the leaf surface. Clean water is usually enough.
Humidity for Rubber Plants
Rubber plants enjoy moderate humidity but can tolerate average indoor conditions. If the air is very dry, leaf edges may brown or new leaves may unfurl poorly.
You can increase humidity by grouping plants, using a humidifier, or placing the plant in a bright bathroom. Good airflow is still important.
Temperature Needs
Rubber plants like warm stable temperatures. Keep them away from cold drafts, open winter windows, air conditioners, and heaters. Sudden temperature changes can cause leaf drop.
A stable warm room helps cuttings root faster and mature plants grow better.
Continue to Page 2
Continue to page 2 for more details about this article and the key points many readers miss on the first page.