Common Rubber Plant Problems
Leaves Dropping
Leaf drop can happen from overwatering, underwatering, low light, cold drafts, or sudden movement. Check soil moisture and location first.
Yellow Leaves
Yellow leaves often mean overwatering or poor drainage. Check if the soil is staying wet too long.
Brown Leaf Edges
Brown edges may come from dry air, inconsistent watering, too much direct sun, or fertilizer buildup.
Slow Growth
Slow growth is normal while a cutting roots. If an established plant grows slowly, give brighter indirect light.
Soft Stem
A soft stem can mean rot. Remove the plant from wet soil and check the roots.
How to Make Rubber Plant Grow Fuller
Rubber plants naturally grow upward. To encourage branching, you can prune the top once the plant is established. Cutting the top encourages side shoots below the cut.
Do not prune a fresh cutting too soon. Let it root and grow stronger first.
How to Propagate More Rubber Plants
Once your plant grows larger, you can take more cuttings. Stem cuttings with nodes are the most common method. You can root them in water, soil, moss, or a clear propagation container.
Always use clean tools and handle the sap carefully.
Activated Charcoal Benefits
Activated charcoal can help keep a small container fresher. It may reduce odor and help manage some impurities. This is why it is often used in terrariums and bottle planters.
But charcoal does not replace drainage. It is a support layer, not a magic fix. If the soil is always wet, roots can still rot.
Pebbles: Helpful but Not Enough Alone
Pebbles can create a decorative base and add weight to the bottle. They can also separate water from soil slightly. However, pebbles do not remove water from the container. If there is no drainage, excess water still remains inside.
Use pebbles as part of the setup, but do not depend on them alone.
Indoor Styling Ideas
A rubber plant in a clear recycled bottle can look creative and modern. It is especially attractive for plant shelves, bright windowsills, and DIY decor corners.
- Place on a wooden table for a natural look.
- Use jute twine around the bottle for rustic style.
- Group with small jars of pebbles and charcoal.
- Place near a bright window with filtered light.
- Use a tray to catch water after watering.
- Move into a ceramic pot when mature.
- Style with pothos, peperomia, and snake plants.
- Use the bottle method as a propagation display.
Best Rooms for Rubber Plant Cuttings
- Bright living room
- Kitchen windowsill
- Home office
- Bedroom near a bright window
- Sunroom with filtered light
- Bright bathroom
- Plant shelf with grow lights
- Dining room with indirect light
Seasonal Care
Spring
Spring is the best time to take cuttings, repot, and encourage new growth.
Summer
Growth is usually faster. Water when soil dries and protect from harsh direct sun.
Fall
Growth slows. Reduce watering slightly and keep the plant warm.
Winter
Water less often. Keep away from cold drafts and avoid fertilizing if growth is slow.
Weekly Care Routine
- Check soil moisture.
- Look through the bottle for excess water.
- Check leaves for firmness.
- Rotate the container for even light.
- Remove fallen leaves.
- Check for mold or gnats.
- Keep in bright indirect light.
Monthly Care Routine
- Clean leaves with a damp cloth.
- Check root growth through the bottle.
- Review drainage and moisture.
- Add water only when needed.
- Prepare to repot if roots are crowded.
- Feed lightly only after strong growth appears.
- Move closer to light if growth is weak.
Common Mistakes to Avoid
- Using a bottle with no drainage and watering heavily
- Planting in dense garden soil
- Keeping the cutting in direct hot sun
- Leaving the soil soggy
- Using too much activated charcoal
- Pulling roots hard from the bottle
- Fertilizing before roots form
- Letting leaves sit in water
- Using dirty scissors for cuttings
- Ignoring yellow leaves and wet soil
Frequently Asked Questions
Can I grow a rubber plant in a plastic bottle?
Yes, you can use a plastic bottle as a temporary propagation container or starter pot. Make drainage holes for safer long-term use.
Does activated charcoal help rubber plants?
Activated charcoal can help keep a small container fresher, but it does not replace drainage or proper watering.
How long does a rubber plant cutting take to root?
It can take several weeks. Some cuttings root in 3 to 6 weeks, while others take longer depending on light and temperature.
Can rubber plant cuttings root in water?
Yes. Place a node underwater and keep leaves above water. Change the water regularly.
Why are my rubber plant leaves turning yellow?
Yellow leaves often come from overwatering, poor drainage, or low light. Check the soil and roots first.
When should I move it from the bottle to a pot?
Move it when roots are strong, the plant becomes top-heavy, or the bottle no longer drains or supports the plant well.
Should I mist rubber plant leaves?
Misting is not necessary. It is better to provide stable humidity and wipe leaves clean with a damp cloth.
Final Thoughts
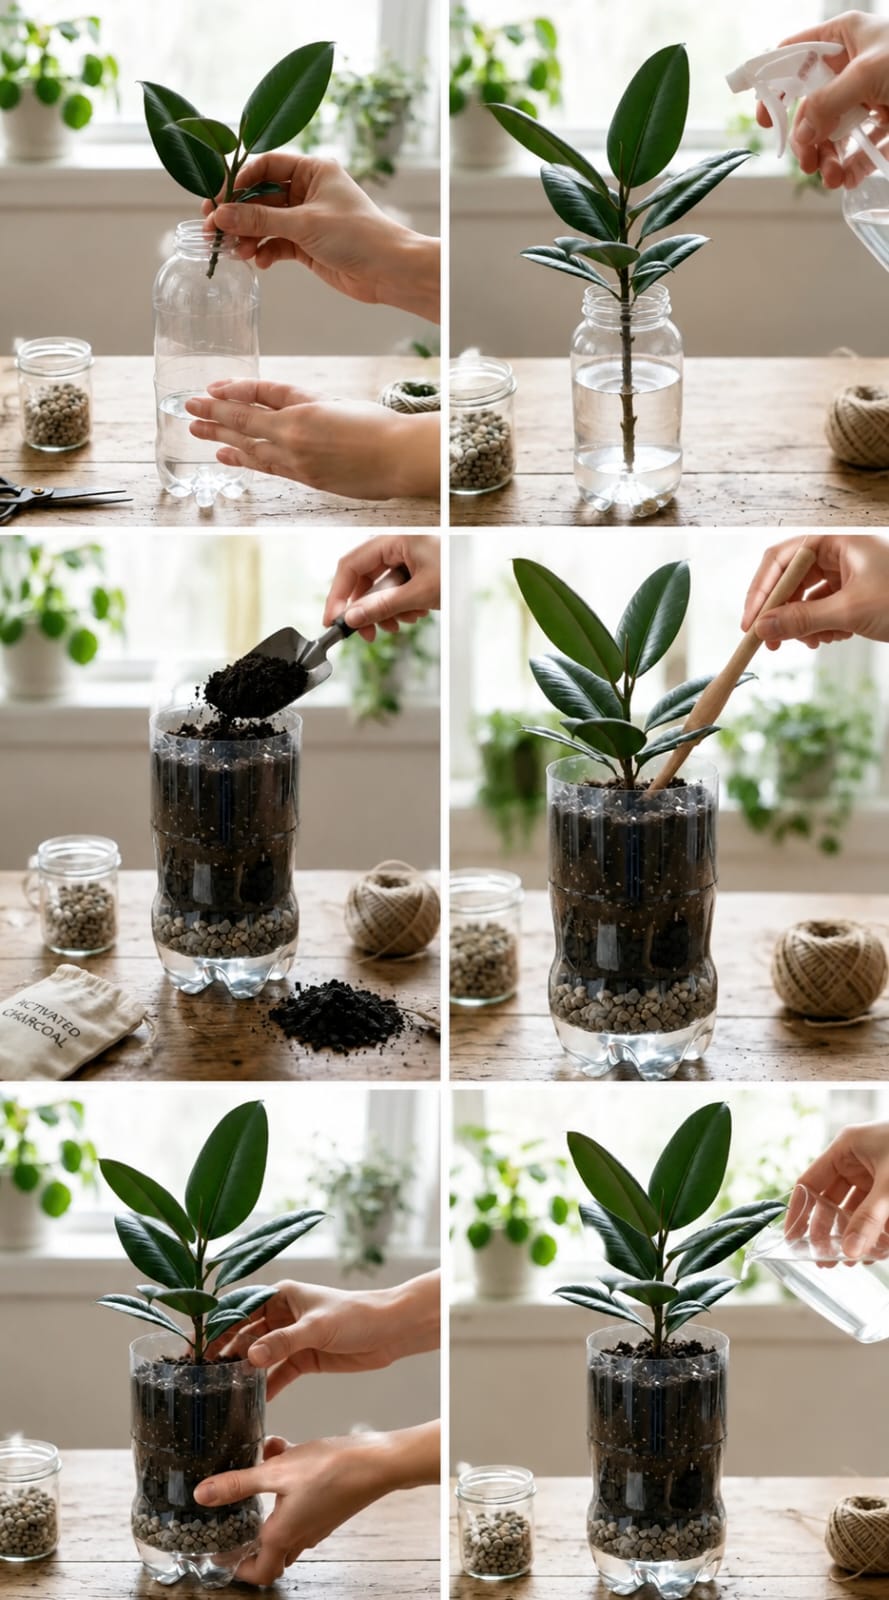
Growing a rubber plant cutting in a plastic bottle is a simple and creative way to start a new plant. The clear container lets you see the layers and monitor moisture. Pebbles add stability, activated charcoal helps keep the setup fresh, and loose soil gives roots a place to grow.
The most important part is drainage. Rubber plant roots do not like sitting in water. Use drainage holes, water only when the soil begins to dry, and keep the plant in bright indirect light. Avoid heavy soil, strong fertilizer, and harsh direct sun while the cutting is young.
With patience and proper care, your rubber plant cutting can grow firm roots, glossy leaves, and a strong upright shape. Once it becomes established, move it into a proper pot and continue simple care. This easy recycled bottle method is a fun way to multiply your rubber plant and add more fresh greenery to your home.