Best Rooms for Peace Lily
- Living room
- Bedroom
- Bright bathroom
- Home office
- Dining room
- Kitchen windowsill
- Entryway with filtered light
- Plant shelf near a window
The best room is bright, warm, and free from cold drafts.
Seasonal Peace Lily Care
Spring
Spring is a good time to repot, divide, refresh soil, and begin light feeding. Growth becomes more active as light increases.
Summer
Water more often if the soil dries faster. Keep away from harsh direct sun and maintain humidity.
Fall
Reduce feeding as growth slows. Move closer to a bright window if daylight becomes weaker.
Winter
Water less often. Keep away from cold windows and drafts. Do not fertilize unless the plant is actively growing.
Weekly Care Routine
- Check soil moisture.
- Look for yellow leaves.
- Empty the saucer after watering.
- Wipe dusty leaves if needed.
- Check for mold or gnats.
- Rotate the planter slightly.
- Keep in bright indirect light.
Monthly Care Routine
- Inspect the roots through the bottle.
- Check if the bottle is still stable.
- Review watering frequency.
- Clean all leaves.
- Remove spent flowers.
- Feed lightly during active growth.
- Plan repotting if roots are crowded.
Common Mistakes to Avoid
- Using a bottle with no drainage holes
- Watering too often
- Using heavy garden soil
- Burying the plant crown too deeply
- Leaving water in the saucer
- Keeping the plant in direct hot sun
- Fertilizing right after repotting
- Using unknown homemade liquids
- Ignoring sour soil smell
- Keeping the plant in a dark corner
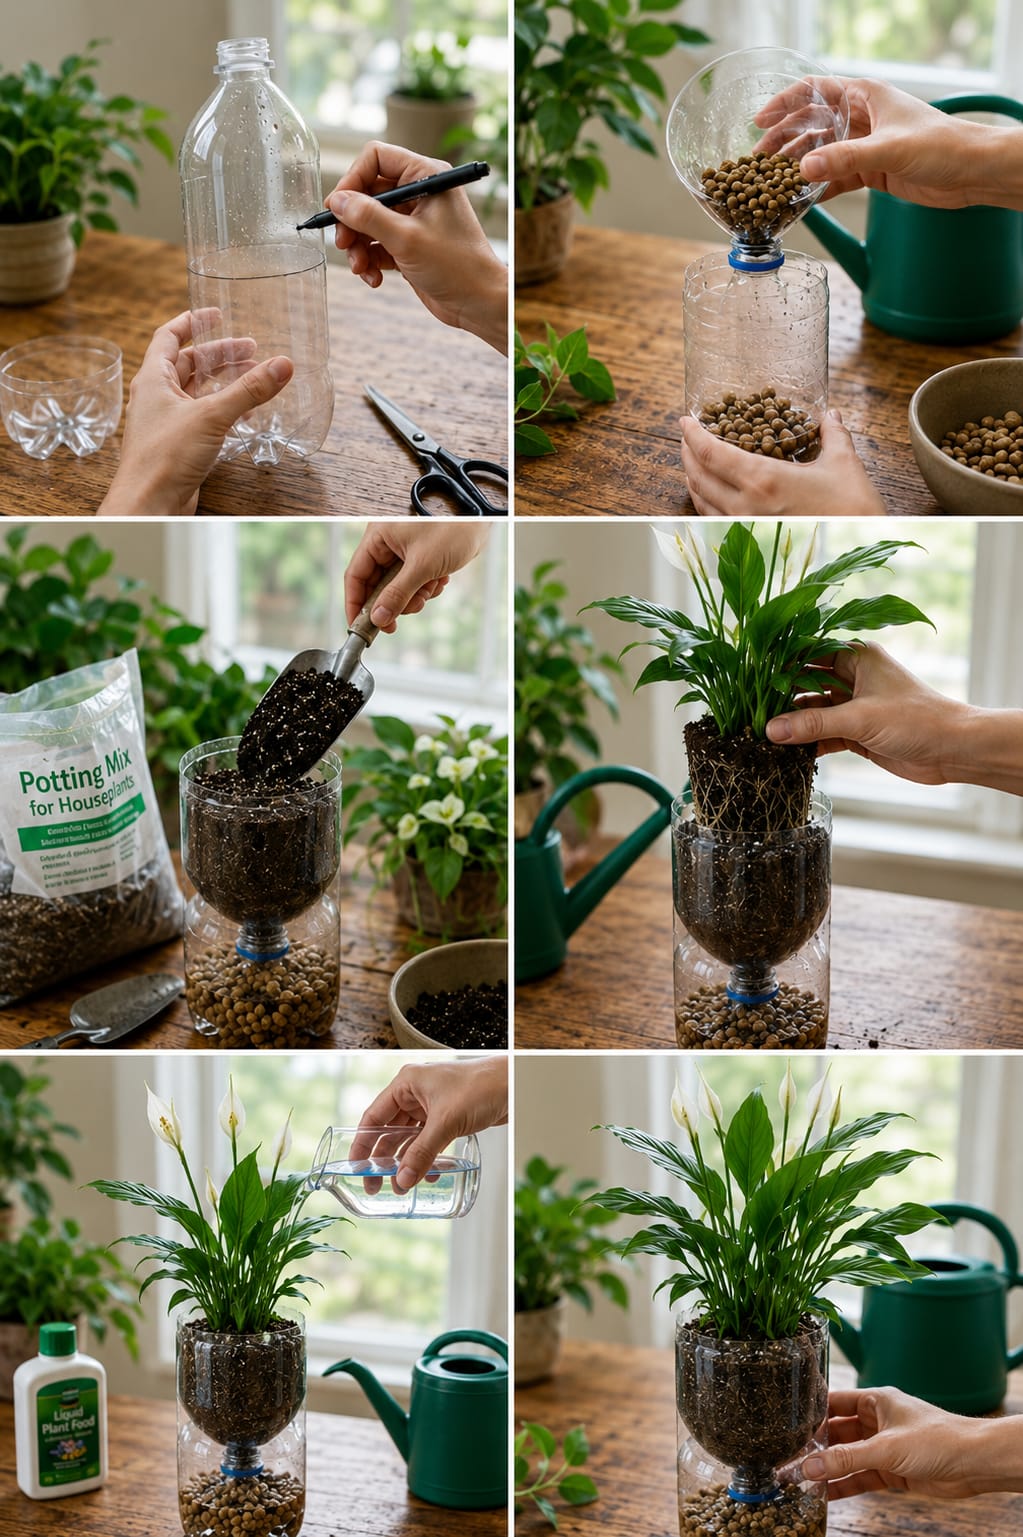
Simple 6-Step Summary
- Cut a clean plastic bottle and make drainage holes.
- Add clean pebbles to the bottom.
- Add fresh well-draining potting mix.
- Place the peace lily root ball into the bottle.
- Water gently and let extra water drain.
- Place in bright indirect light and care normally.
Frequently Asked Questions
Can peace lily grow in a plastic bottle?
Yes, a peace lily can grow in a plastic bottle temporarily if the bottle is large enough and has drainage holes.
Do I need pebbles at the bottom?
Pebbles add stability and create a base layer, but they do not replace drainage holes. Extra water still needs a way to escape.
How often should I water peace lily in a bottle?
Water when the top inch of soil feels slightly dry. Always check first because plastic holds moisture longer than terracotta.
Why is my peace lily drooping?
Drooping can mean the plant is thirsty, but it can also mean overwatering. Check the soil before watering.
Can this method make peace lily bloom?
The bottle method alone does not force blooms. Bright indirect light, healthy roots, and proper care encourage flowers.
When should I move it to a real pot?
Move it when roots fill the bottle, the plant becomes top-heavy, or the soil stays wet too long.
Should I fertilize after planting?
Wait 4 to 6 weeks after planting. Then feed lightly during spring and summer with diluted fertilizer.
Final Thoughts
Growing a peace lily in a plastic bottle is a simple and creative way to reuse materials while caring for a beautiful indoor plant. The method works best for small peace lilies, divisions, or temporary displays. The clear bottle lets you see the layers, watch moisture levels, and enjoy a DIY plant project at home.
The most important part is drainage. Make holes in the bottle, use clean pebbles, add airy soil, and water carefully. Keep the plant in bright indirect light and avoid soggy soil. Peace lilies like moisture, but they cannot stay in standing water.
With the right setup, your peace lily can grow glossy green leaves, strong roots, and elegant white blooms. Use the bottle planter as a starter home, then move the plant into a proper pot when it grows larger. This easy method is affordable, decorative, and perfect for anyone who loves simple indoor gardening.