Poinsettias are one of the most recognizable decorative plants in the world. Their bright red bracts, deep green leaves, and festive shape make them a favorite for windowsills, tabletops, entryways, porches, and holiday displays. Many people buy poinsettias during the winter season, enjoy them for a few weeks, then throw them away once the color fades. But with the right care, poinsettias can live for years and can even be multiplied from cuttings.
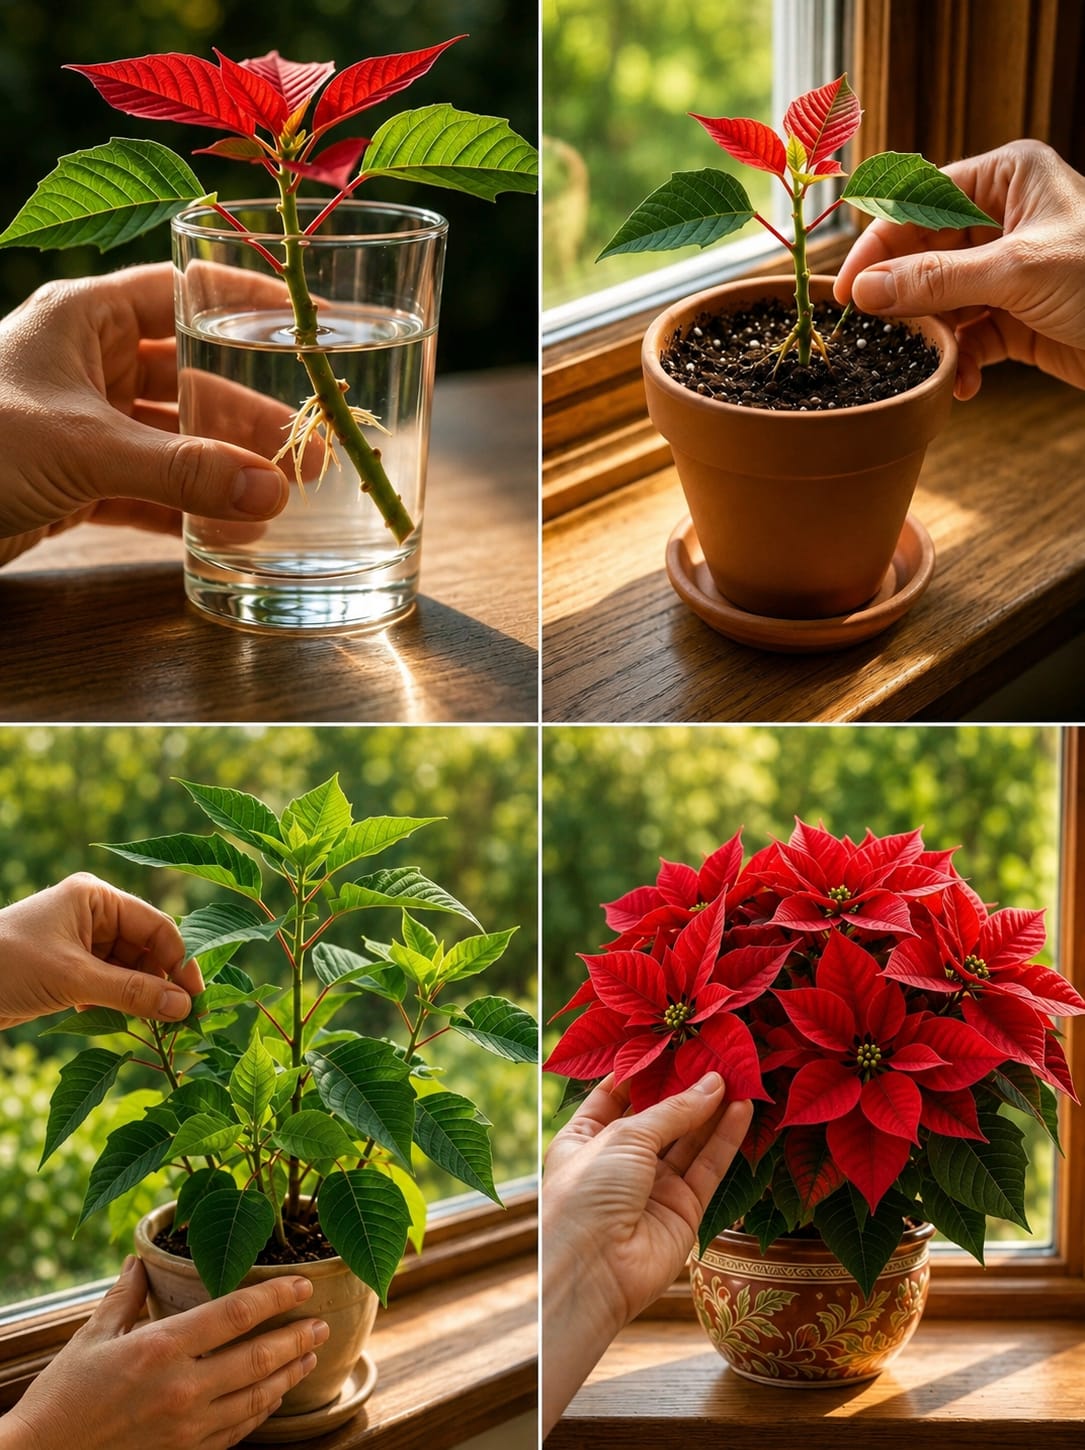
Growing poinsettias from cuttings is a rewarding plant project. A healthy stem cutting can root in water or a light soil mix, grow into a young plant, and eventually become a full poinsettia with colorful red bracts. This process takes patience, but it is not difficult when you understand what the plant needs. The secret is clean cutting, gentle rooting, warm conditions, bright indirect light, and careful watering.
Poinsettias are not true flowers in the way many people think. The famous red “flowers” are actually colored bracts, which are modified leaves. The small yellow parts in the center are the true flowers. To get the beautiful red display again, the plant needs healthy growth first, then a special light-and-dark routine later in the season.
Why Grow Poinsettias from Cuttings?
Growing poinsettias from cuttings is useful if you want more plants without buying new ones. It also allows you to keep a favorite poinsettia variety going year after year. If you have a plant with strong stems, rich color, or a shape you love, cuttings can help you create new plants from it.
This method is also satisfying because you can watch the whole transformation. A small stem placed in water or soil slowly develops roots, grows leaves, becomes bushier, and eventually turns into a decorative plant. For plant lovers, this process is often more enjoyable than simply buying a finished plant.
Another benefit is styling. Small poinsettias grown from cuttings can be used in groups, table displays, windowsill arrangements, holiday centerpieces, or indoor plant shelves. Several small plants in matching pots can look beautiful and festive.
Choosing the Right Parent Plant
The parent plant should be healthy, strong, and free from pests. Do not take cuttings from a plant that is wilting badly, rotting, covered in insects, or showing major leaf damage. A weak parent plant often produces weak cuttings.
Look for stems that are firm and green, not woody and dry. The cutting should have healthy leaves and a growing tip. Avoid stems that are flowering heavily or covered in damaged leaves.
A good cutting starts with a good plant. Healthy stems root more easily and grow into stronger young poinsettias.
Best Time to Take Poinsettia Cuttings
The best time to take poinsettia cuttings is during warm active growth, usually spring or early summer. This gives the cutting enough warmth, light, and time to develop roots before the cooler season arrives.
You can also take cuttings after pruning a poinsettia that has finished its decorative season, but the plant should first recover and produce fresh new growth. Fresh young growth roots better than old woody stems.
Avoid taking cuttings during cold winter conditions unless you can provide warmth and bright light indoors. Cuttings root more slowly in cool rooms.
Tools You Need
Prepare everything before cutting. Clean tools reduce the chance of rot and disease.
- Sharp clean scissors or pruning shears
- A small glass of clean water
- Small pots with drainage holes
- Light potting mix
- Perlite or sand for drainage
- Optional rooting hormone
- Gloves
- Plant labels
- A clear plastic cover or humidity dome if rooting in soil
Wash or wipe your cutting tool before use. A clean cut heals better and reduces stress on the plant.
A Quick Safety Note About Poinsettia Sap
Poinsettias release a white milky sap when cut. This sap can irritate sensitive skin and may be bothersome if it gets into the eyes or mouth. Wear gloves if you have sensitive skin, and wash your hands after handling cut stems.
The sap can also drip onto furniture or fabric, so work on a washable surface. A wooden table, tray, or garden bench is ideal.
Let the cutting rest briefly after cutting so the sap slows before placing it into water or soil.
How to Take a Poinsettia Cutting
Choose a healthy stem about 4 to 6 inches long. Cut just below a leaf node, which is the point where a leaf joins the stem. Roots often form near nodes, so this area is important.
Remove the lower leaves from the cutting. Keep a few leaves at the top so the cutting can continue making energy. If the leaves are large, you can trim them slightly to reduce water loss.
After cutting, dip the cut end in clean water for a short moment to help stop excess sap flow. Then allow it to rest for several minutes before rooting.
Rooting Poinsettia Cuttings in Water
Water rooting is simple and easy to watch. Place the lower part of the cutting into a glass of clean water. Make sure no lower leaves sit below the waterline, because submerged leaves can rot.
Keep the glass in bright indirect light. Avoid harsh direct sun, which can heat the water and stress the cutting.
Change the water every few days to keep it fresh. If the water becomes cloudy or smells bad, change it immediately and rinse the glass.
Roots may appear after a few weeks, but timing can vary. Warmth and light help the process move faster.
Rooting Poinsettia Cuttings in Soil
Soil rooting can produce stronger roots from the beginning because the cutting adapts directly to a growing medium. Use a light mix that drains well but holds gentle moisture.
A good rooting mix may include:
- Indoor potting mix
- Perlite
- Coco coir
- Fine bark
- A small amount of sand
Insert the cutting into the mix so at least one node is below the surface. Firm the mix gently around the stem. Water lightly, then place the pot in bright indirect light.
A clear humidity cover can help, but it should not trap too much moisture. Open it daily for airflow.
Water Rooting vs. Soil Rooting
Both methods can work. Water rooting is easy because you can see the roots growing. Soil rooting is often better for long-term strength because roots form directly in the medium where the plant will grow.
If you root in water, move the cutting into soil once roots are about 1 to 2 inches long. Do not wait until the roots become very long and tangled. Water roots can be fragile and may struggle when moved to soil.
If you root directly in soil, be patient. You cannot see the roots, but you can watch for new leaf growth and gentle resistance when tugged lightly.
Using Rooting Hormone
Rooting hormone is optional. It can help cuttings root more reliably, especially if conditions are not perfect.
If using rooting hormone, dip only the bottom end of the cutting into the powder or gel. Tap off the excess. Too much can clump around the stem.
Rooting hormone is not required, but it can be useful for beginners who want to improve success.
Best Light for Poinsettia Cuttings
Poinsettia cuttings need bright indirect light. They should not sit in a dark corner, but they also should not sit in strong direct sun while rooting.
A bright windowsill with filtered light is ideal. Morning sun can be gentle, but hot afternoon sun may wilt the cutting.
If indoors, choose a warm bright location near a window. If outdoors, place cuttings in bright shade where they are protected from harsh sun and wind.
Warmth Helps Roots Develop
Poinsettias are tropical plants, so they root best in warm conditions. A cool room slows rooting and increases the chance of failure.
Keep cuttings away from cold windows, drafts, air-conditioning vents, and chilly outdoor nights. Warm, stable conditions are better than sudden temperature changes.
A warm windowsill with filtered light can work very well.
How Long Roots Take to Form
Poinsettia cuttings may begin rooting in a few weeks, but some take longer. The exact time depends on temperature, cutting health, light, and method.
Do not disturb the cutting too often. If rooting in soil, constant tugging can break delicate new roots. If rooting in water, avoid touching the roots once they begin forming.
Patience is important. As long as the cutting remains firm and green, it may still be working on roots.
When to Pot a Water-Rooted Cutting
Once the roots are about 1 to 2 inches long, move the cutting into soil. Use a small pot with drainage holes and a light potting mix.
Make a hole in the soil first, place the roots gently inside, and cover them carefully. Do not press too hard. Water lightly after planting.
Keep the plant in bright indirect light for a few weeks while it adjusts from water to soil.
Choosing the Right Pot
Start with a small pot. A young cutting does not need a large container. Too much extra soil holds moisture, and wet soil can damage young roots.
A pot about 3 to 4 inches wide is often enough for a small rooted cutting. As the plant grows, you can move it into a larger pot later.
Always use a pot with drainage holes. This is essential for healthy roots.
Best Soil for Young Poinsettias
Poinsettias like soil that holds some moisture but still drains well. Heavy garden soil is not ideal for containers.
A good mix for young poinsettias may include:
- Quality indoor potting mix
- Perlite
- Coco coir
- Fine bark
- A small amount of compost
The soil should feel light and airy. If water sits on the surface for a long time, the mix may be too dense.
Watering Young Poinsettias
Young poinsettias need consistent moisture, but not soggy soil. Water when the top layer begins to feel dry.
Water thoroughly until excess drains from the bottom, then empty the saucer. Do not let the pot sit in water.
Too much water can cause root rot. Too little water can cause wilting and leaf drop. The goal is steady, moderate moisture.
How to Encourage Bushier Growth
Once the young poinsettia is rooted and growing, pinch the growing tip to encourage branching. This helps create a fuller plant instead of one tall single stem.
Pinching means removing the top little growing point with clean fingers or scissors. New side shoots will develop below the pinch.
Repeat light pinching during active growth to shape the plant. Stop pinching before the season when you want bracts to color.
Feeding Young Poinsettias
Do not fertilize fresh cuttings before they root. Once the plant is established and producing new leaves, use a balanced houseplant fertilizer at half strength.
Feed every 3 to 4 weeks during active growth. Avoid strong fertilizer because young roots can burn.
Reduce feeding as the plant enters the color-forming season.
Why Poinsettia Leaves Drop
Poinsettias can drop leaves when stressed. Common causes include cold drafts, sudden temperature changes, overwatering, underwatering, low light, or root stress.
If leaves drop after moving the plant, give it stable conditions and avoid overwatering. Check the soil before adding more water.
Consistent warmth, light, and moisture help reduce leaf drop.
How to Get Red Bracts Again
To turn green poinsettia leaves into red bracts, the plant needs a special short-day routine. This means long periods of darkness each night for several weeks.
Starting in early fall, give the plant about 14 hours of complete darkness every night and bright light during the day. Even small amounts of light at night can interrupt the process.
This routine usually takes 8 to 10 weeks. Once color develops, the plant can be displayed normally again.
The Short-Day Routine Explained
Each evening, place the poinsettia in a dark closet, cabinet, or covered box. In the morning, return it to bright indirect light.
The dark period must be consistent. Streetlights, lamps, or room lights can interfere. The plant needs uninterrupted darkness.
During the day, it still needs bright light to stay healthy. Darkness alone is not enough.
Keeping the Plant Compact
Poinsettias can become tall and leggy if they do not receive enough light or if they are not pinched during growth.
To keep the plant compact, provide bright light, pinch new growth during spring and summer, and avoid overfeeding with too much nitrogen.
A fuller poinsettia looks better in decorative pots and produces a more attractive holiday display.
Common Poinsettia Problems
Poinsettias can face a few common problems indoors:
- Leaf drop from cold drafts
- Yellow leaves from overwatering
- Wilting from underwatering or root stress
- Pale growth from low light
- Leggy stems from weak light
- Root rot from poor drainage
- Failure to turn red from too much nighttime light
Most problems can be fixed by adjusting light, temperature, watering, and drainage.
Continue to Page 2
Continue to page 2 for more details about this article and the key points many readers miss on the first page.