Learn how to train your snake plant into a beautiful spiral shape. Step‑by‑step guide, materials, patience tips, and care advice. Transform your Sansevieria into living art.
Let’s be honest: snake plants (Sansevieria, now Dracaena) are already architectural beauties. Their upright, sword‑shaped leaves bring a modern, sculptural feel to any room. But have you ever seen a snake plant twisted into a graceful spiral? It’s a showstopper – a living piece of art that turns a humble houseplant into a conversation starter.
The good news? You don’t need a rare variety or a green thumb magic trick. A spiral snake plant is simply a regular snake plant that has been gently trained over time. With patience, the right technique, and a little creativity, you can guide your plant’s leaves into a stunning spiral form.
In this complete guide, I’ll walk you through everything you need to know – from choosing the right plant and gathering materials, to step‑by‑step training, ongoing care, and troubleshooting. Plus, I’ll share tips on using decorative stones or moss to elevate your final presentation.
Let’s turn your snake plant into a spiral masterpiece.
Why a Spiral Snake Plant?
A spiral snake plant offers the best of both worlds: the resilience and easy care of a snake plant, plus the artistic flair of a trained topiary. Whether you place it on a mantel, a side table, or as a centerpiece, it’s guaranteed to draw attention.
· Unique and eye‑catching – No two spirals are exactly alike.
· Conversation starter – Guests will ask, “How did you do that?”
· Creative outlet – A fun, low‑stress project for plant lovers.
· Uses ordinary snake plants – No special variety needed.
Choosing the Right Plant
Not every snake plant is ready for training. Start with the right candidate.
Ideal Plant Characteristics Why It Matters
Young, flexible leaves (under 1 year old) Older leaves are stiff and prone to snapping.
Healthy, pest‑free A stressed plant won’t train well.
Actively growing (spring or early summer) Growth = flexibility.
Medium size (6–12 inches tall) Too small is hard to work with; too large is rigid.
Pro tip: If you have a mature snake plant with stiff leaves, you can still try training only the new pups (offsets) that emerge. They are much more pliable.
Materials You’ll Need
Item Purpose
Young snake plant The canvas for your spiral
Cylindrical support (bottle, PVC pipe, sturdy cardboard tube) Central guide to wrap leaves around
Soft plant ties (velcro tape, garden twist ties, or soft cotton string) Secure leaves without damage
Well‑draining potting mix (cactus/succulent mix + perlite) Healthy roots = successful training
Pot with drainage holes Prevents waterlogging
Bright, indirect light Energy for steady growth
Decorative stones or moss (optional) For finishing touch
Step‑by‑Step Training Guide
Step 1: Prepare the Plant
Repot your snake plant into fresh, well‑draining soil if needed. Water lightly a day before training – leaves should be hydrated but not overly turgid.
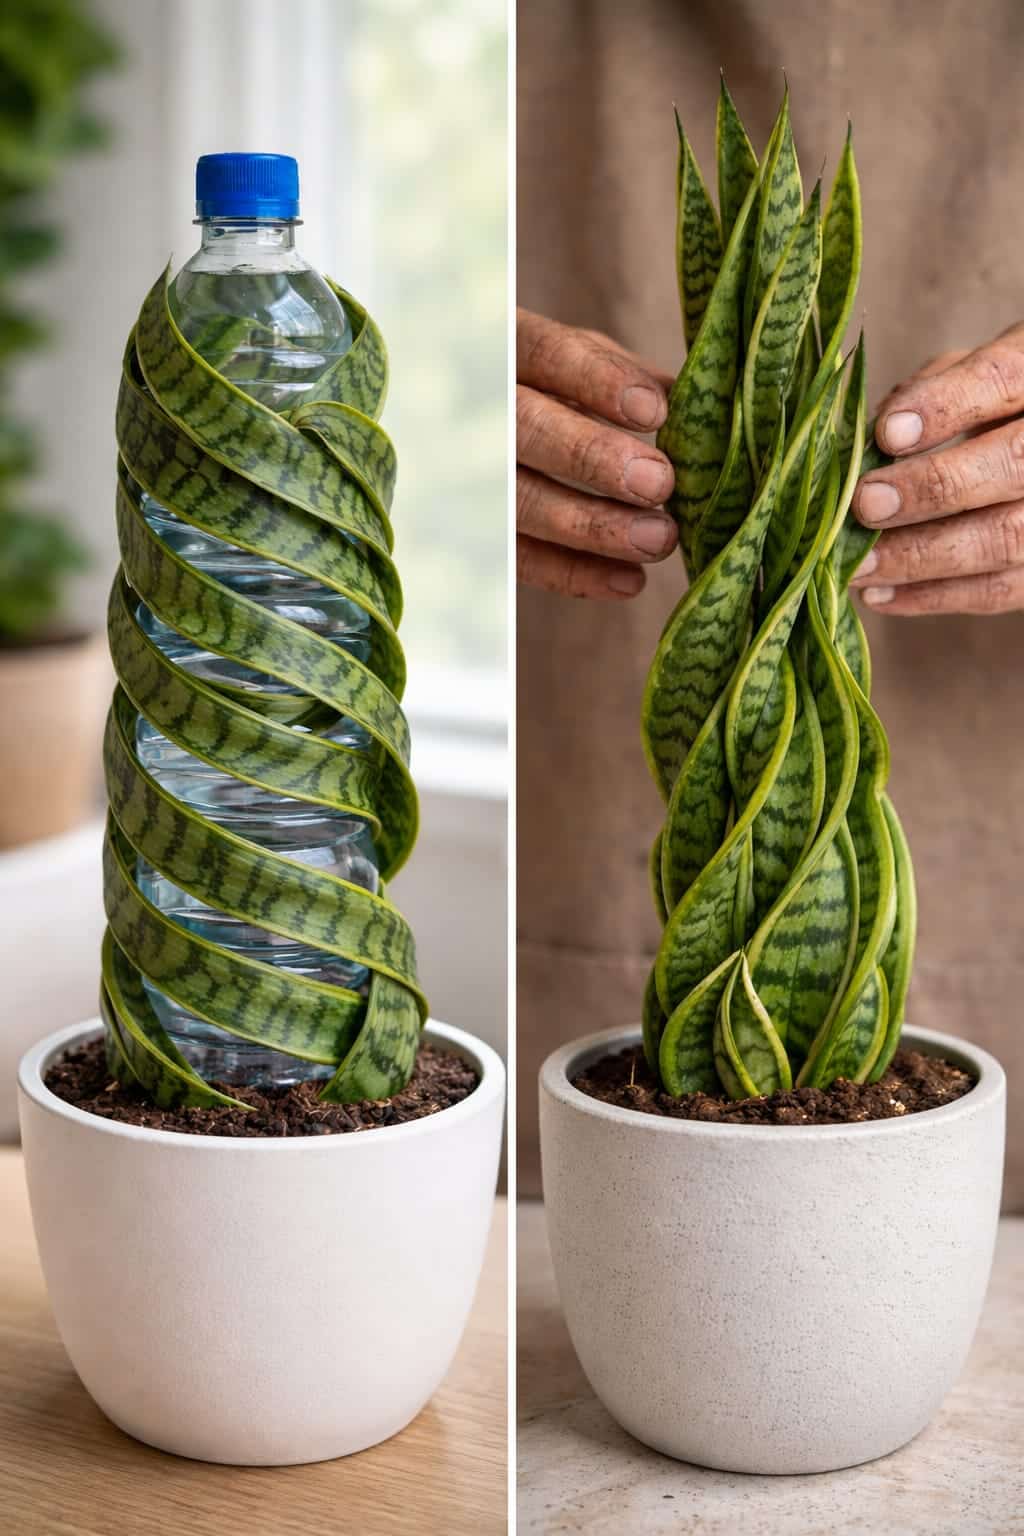
Step 2: Insert the Central Support
Place your cylindrical support in the center of the pot, close to the base of the plant. It should be tall enough to accommodate the leaves as they grow (6–12 inches). You can also lean the support against the pot’s edge.
Step 3: Gently Wrap the Leaves
Starting with the most flexible leaf, slowly guide it around the support. Do not force it – if you feel resistance or see a crease forming, stop. Work with one leaf at a time, wrapping in the direction you want the spiral (clockwise or counter‑clockwise).
Step 4: Secure Loosely
Use soft plant ties to hold the leaves against the support. The ties should be snug enough to hold the shape but loose enough to allow the leaf to expand as it grows. Check ties weekly and loosen if they become tight.
Never use wire, zip ties, or anything that can cut into the leaf.
Step 5: Provide Ideal Growing Conditions
· Light: Bright, indirect light (east or west window). Low light slows growth dramatically.
· Water: Let soil dry completely between waterings. Overwatering weakens leaves.
· Temperature: 65–85°F (18–29°C). Avoid cold drafts.
Step 6: Rotate the Pot
Rotate the pot a quarter turn every week to ensure even light exposure. This prevents the plant from leaning toward the window and keeps the spiral balanced.
Step 7: Be Patient – Training Takes Months
A noticeable spiral can take 3–6 months. A tight, permanent shape may take a year or more. Do not rush – forcing the leaves can cause permanent damage.
Step 8: Gradually Remove Supports
Once the spiral looks stable (leaves hold their shape without springing back), start removing ties one at a time over 2–3 weeks. If a leaf straightens out, reapply the tie and continue training.
Time and Patience: What to Expect
This is not a quick project – it’s a slow and rewarding journey. Snake plants grow gradually, and the spiral shape may take several months to fully develop.
Timeframe Progress
1–2 weeks Leaves begin to show slight curve.
1–3 months Noticeable spiral forming; ties may need adjustment.
3–6 months Shape holds after ties removed for short periods.
6–12 months Permanent spiral; plant can be displayed without support.
Expect to spend a few minutes each week adjusting ties, rotating the pot, and checking the plant’s progress. Over time, you’ll see the leaves naturally follow the spiral path, creating a beautiful, structured form.
The key is consistency. With regular care and gentle guidance, your snake plant will transform into a stunning spiral that reflects both nature and your creativity.
Continue to Page 2
Continue to page 2 for more details about this article and the key points many readers miss on the first page.