Orchids have a special way of making any corner feel more refined. Their smooth green leaves, sculptural roots, and delicate flowers can turn a simple windowsill, balcony table, or indoor plant shelf into a calm and expensive-looking display. But orchids can also be confusing. They do not grow like many ordinary houseplants, and their roots need air, light moisture, and careful handling. This is why creative orchid lovers are always looking for gentle tricks that support root freshness, cleaner potting, and better presentation.
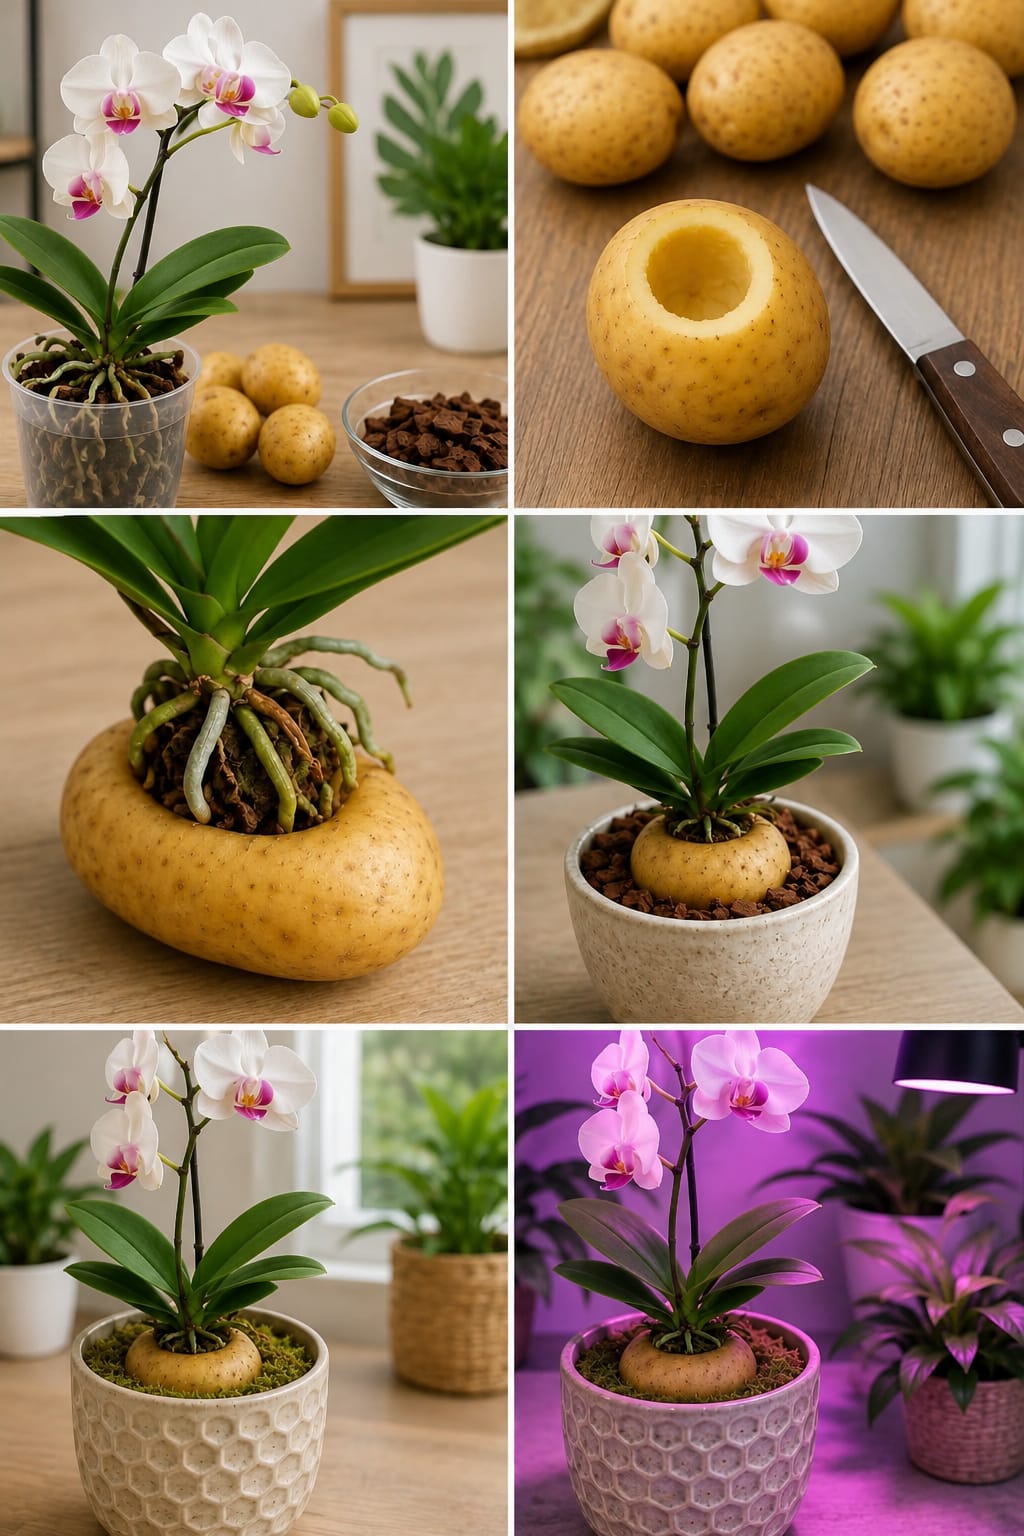
One unusual idea that has become popular among plant lovers is the potato orchid trick. The basic idea is simple: a clean potato is hollowed or shaped, then used as a temporary natural support around the orchid’s root base before the plant is settled into a decorative potting setup. Some gardeners also use a very light potato-water rinse as a mild rooting-support routine. The purpose is not to “force” orchids to bloom overnight. Instead, this trick is best understood as a decorative and moisture-support method that can help organize orchid roots, create a rustic natural look, and encourage a more careful care routine.
Used correctly, the potato trick can be a creative plant-care experiment. Used carelessly, it can create rot, mold, pests, or root damage. Orchids are sensitive plants, so the method must be clean, temporary, and very controlled. This guide explains how to use the idea safely, how to avoid the common mistakes, and how to turn a simple orchid pot into a more polished decorative display.
Why Orchid Roots Need Special Care
Orchid roots are different from the roots of many common houseplants. Many popular orchids, especially Phalaenopsis orchids, naturally grow with thick roots that like airflow. These roots absorb moisture but do not enjoy sitting in heavy, wet soil. When they are packed into dense soil or left in soggy conditions, they can quickly become soft, brown, and unhealthy.
This is the main reason orchid care feels different. A healthy orchid does not need ordinary garden soil. It usually prefers chunky bark, airy orchid mix, moss used carefully, or a well-draining setup that allows the roots to breathe. The roots should look firm, plump, and silvery-green or green after watering. If the roots become mushy, dark, or hollow, the plant is warning you that moisture has become too much.
The potato trick should never replace proper orchid potting mix. It should not be treated as a permanent wet base. Instead, it can be used as a short-term support or decorative rooting idea only when the orchid roots are already healthy and the gardener is willing to monitor the setup closely.
What the Potato Orchid Trick Is Really For
The potato orchid trick is often presented as if it can make orchids bloom fast. A more realistic way to use it is as a gentle root-support and styling idea. A clean potato can be hollowed in the center to hold the orchid base while the roots sit around it. The potato acts like a soft temporary anchor, helping the orchid stand upright while it is placed into a pot with bark or moss.
Because potato contains moisture and starch, it should not be buried deeply and forgotten. If it stays wet for too long, it can break down. That is why the safest approach is to use a small piece of potato as a temporary support, keep most of the orchid roots in airy material, and remove the potato if it starts to soften or smell.
Another safer variation is potato water. A few thin slices of potato can be soaked in water, then the water can be strained and heavily diluted. This weak water can be used occasionally to rinse orchid roots or lightly moisten the potting medium. Again, this is not a complete fertilizer. It is simply a gentle homemade plant-care routine.
Important Safety Rule Before Trying This Trick
The most important rule is simple: never let potato stay wet against orchid roots for too long. Orchids hate trapped moisture around the crown and root base. If a potato piece becomes soft, slimy, or sour, remove it immediately. A rotting potato can damage orchid roots and attract fungus gnats.
Always use a fresh, clean potato. Do not use cooked potato, salted potato, old potato, moldy potato, or potato with green skin. Never add sugar, honey, milk, or thick kitchen liquids to the orchid pot. These ingredients can attract pests and cause fungal problems indoors.
For the cleanest results, treat the potato trick as a short experiment, not as a permanent orchid-growing system.
Materials You Need
- One small fresh potato
- A clean knife
- A spoon or small carving tool
- Healthy orchid with firm roots
- Orchid bark or airy orchid mix
- A pot with excellent drainage
- Optional sphagnum moss, used lightly
- Clean water
- A tray or saucer
- Small support stake and soft plant clip if needed
The pot should have drainage holes. A clear orchid pot is useful because it allows you to watch root color and moisture. If you prefer a decorative ceramic pot, place the orchid inside a plastic orchid liner first, then set that liner into the decorative outer pot.
How to Prepare the Potato Support
Choose a small potato that is firm and fresh. Wash it well under running water to remove dust and soil. Dry it with a clean towel. With a clean knife, cut a shallow opening in the top of the potato. Use a spoon to hollow out a small cup-shaped center. The opening should be wide enough to support the lower base of the orchid, but not so deep that the orchid crown gets buried.
The orchid crown should always stay above the potting surface. If the crown sits inside a wet potato hollow, water may collect there and cause rot. The potato should touch only the lower base gently, while the roots spread outward into bark or airy mix.
Do not use a huge potato. A large potato holds more moisture and takes longer to dry, increasing the risk of rot. A small support is safer and easier to remove later.
How to Place the Orchid
Remove the orchid from its old pot only if repotting is needed. If the orchid is currently blooming and healthy, avoid disturbing the roots too much. If repotting is necessary, gently remove old bark from around the roots. Trim only dead, hollow, or mushy roots with clean scissors. Keep all firm green or silvery roots.
Place the lower base of the orchid lightly into the hollowed potato. Do not push hard. Spread the roots around the potato naturally. Then place the orchid and potato support into the pot. Fill around the roots with orchid bark. Keep the bark loose, not tightly packed.
The potato should remain close to the upper surface, not buried deep at the bottom. This makes it easier to inspect and remove. If the plant needs extra support, use a stake and soft clip rather than burying the orchid deeper.
Watering After the Potato Trick
After setting the orchid into bark, water lightly. Let water run through the pot and drain completely. Do not leave the pot sitting in water. If using a decorative outer pot, remove any water that collects inside it.
Because the potato contains moisture, reduce watering slightly at first. Check the bark before watering again. If the bark still feels damp, wait. Orchid roots should not stay wet every day.
A good routine is to water when the roots look silvery and the bark feels mostly dry. In warm rooms, this may be once a week. In cooler or darker rooms, it may take longer. Always adjust based on the plant and potting medium, not a strict calendar.
When to Remove the Potato
The potato should be removed if it becomes soft, dark, wet, sour-smelling, or moldy. In many indoor conditions, it is better to treat the potato as a temporary support for a few days to two weeks, then remove it carefully and replace the space with fresh orchid bark.
To remove it, gently lift the top bark away, hold the orchid steady, and take out the potato piece without breaking roots. Fill the gap with fresh bark. The orchid should remain upright if the roots and bark are arranged properly. A stake can help while the plant settles.
This step is important. Leaving potato inside the pot for too long is the biggest mistake with this method.
How to Make a Gentle Potato Water for Orchids
A safer version of the trick is a very weak potato water. This avoids placing a whole potato in the pot. To make it, cut two or three thin slices of fresh potato and soak them in one cup of clean water for a few hours. Strain the water very well. Then dilute one tablespoon of this potato water into one liter of clean water.
Use the diluted water only occasionally, about once a month during active growth. Pour it through the bark and let it drain fully. Do not spray thick potato water on leaves or flowers. Do not store the mixture for many days because it can ferment.
This weak rinse can become part of a gentle plant-care ritual, but it should not replace orchid fertilizer.
Can Potato Make Orchids Bloom Faster?
Potato alone will not make orchids bloom instantly. Orchids bloom when several conditions are right: healthy roots, enough light, proper watering, suitable temperature changes, and enough time. A weak homemade tonic may support a care routine, but it cannot replace the plant’s natural growth cycle.
If an orchid has not bloomed for a long time, check light first. Many orchids fail to bloom because they sit in a dark corner. Bright indirect light is usually better. Leaves should look medium green, not extremely dark. Very dark leaves can mean the orchid is not receiving enough light to flower well.
Also check root health. A plant with damaged roots will focus on survival before blooming. Healthy roots come before flowers.
Continue to Page 2
Continue to page 2 for more details about this article and the key points many readers miss on the first page.