Orchids are some of the most elegant plants you can grow at home. Their graceful stems, glossy leaves, sculptural aerial roots, and long-lasting blooms make them feel luxurious even when they are placed in a simple pot. But many plant lovers become nervous when it comes to propagation. Orchids look delicate, and one wrong cut can slow the plant down for months.
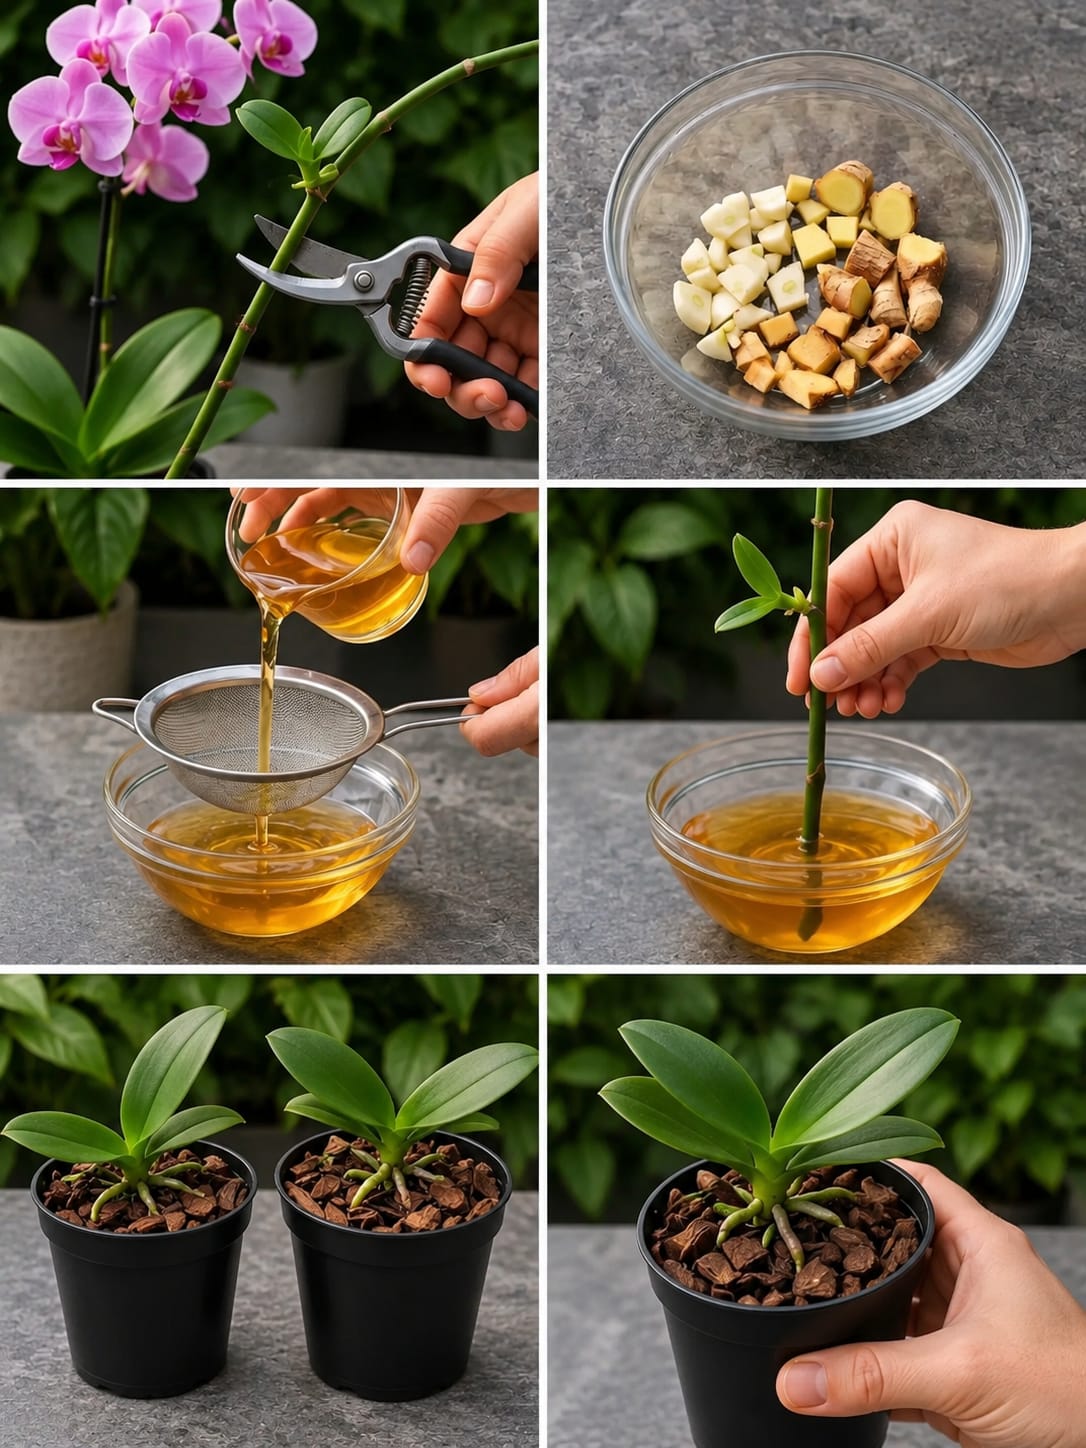
One creative method that often gets attention is the potato propagation trick. The idea is simple: a small orchid stem section or keiki is supported with a mild natural soak made from potato pieces, sometimes combined with garlic or ginger-style kitchen ingredients, then planted into a clean orchid mix. The potato is not magic, and it does not replace proper orchid propagation rules. But it can be used as a gentle homemade rooting-support routine when handled carefully.
The real secret is not the potato alone. The success comes from using the right orchid material, keeping everything clean, protecting the cut from rot, using airy bark, and giving the young plant stable humidity without drowning the roots.
This guide explains how to use the potato idea safely, how to propagate orchids the correct way, and how to turn small orchid starts into a refined indoor display that looks clean, calm, and expensive.
Why Orchid Propagation Feels Difficult
Orchids are different from many common houseplants. You cannot simply cut a random leaf and expect it to root. A Phalaenopsis orchid leaf alone will not grow into a new plant because it does not contain the correct growing points. To create a new orchid, you usually need a keiki, a division, a healthy stem section with active nodes, or a suitable orchid type that can be divided.
This is where many beginners make mistakes. They cut leaves, bury aerial roots too deeply, place the plant in heavy soil, or soak orchid parts for too long. Orchids need air around their roots. They naturally grow in loose, airy conditions, not compact soil. That is why a clean orchid bark mix is usually much safer than garden soil or dense compost.
What the Potato Trick Is Supposed to Do
The potato trick is usually used as a mild homemade support soak. Potato contains starch and moisture, and some gardeners believe a weak potato water rinse can help keep a cutting hydrated while it is being prepared. It should be treated as a gentle support step, not a guaranteed propagation method.
The safest way to use it is not to bury chunks of potato inside the orchid pot. Fresh potato can rot, attract fungus gnats, and create a sour smell if it stays wet in the potting mix. Instead, use potato water briefly, strain it well, and keep the actual planting medium clean and airy.
For orchids, cleanliness matters more than richness. Too much organic kitchen material around orchid roots can quickly become a problem.
Important: Potato Does Not Replace a Real Orchid Node
Before trying this method, remember this rule: the orchid piece must already have the ability to grow. A potato cannot turn a plain leaf into a new orchid.
The best pieces to use are:
- A small keiki with tiny roots already forming
- A healthy cane division from a suitable orchid type
- A stem section with a visible node from an appropriate orchid
- A young side growth separated from a mature plant
If the plant material has no node, no crown, no growing eye, and no root potential, the potato soak will not create a new orchid.
What You Need
- One healthy orchid mother plant
- Clean pruning scissors or garden snips
- One small potato
- Optional: one small piece of ginger or one very small garlic piece
- Clean water
- A glass bowl
- A fine strainer
- Small orchid pots with drainage holes
- Orchid bark mix
- Optional sphagnum moss
- Optional charcoal pieces
- Plant labels
Use only clean tools. Orchids are sensitive to bacterial and fungal problems after cutting, so the cleaner the process, the better the result.
How to Make a Gentle Potato Root-Support Soak
This soak should be light, strained, and used fresh. Do not make it thick like a paste, and do not leave it fermenting for days.
Simple method:
- Wash one small potato well.
- Cut a few small cubes.
- Add the cubes to a bowl with clean water.
- Let them sit for 30 to 60 minutes.
- Mash lightly or stir.
- Strain the liquid through a fine strainer.
- Use the strained water immediately.
For a very mild version, dilute the strained potato water again with clean water. Orchids do not need a heavy mixture. A weak solution is safer than a strong one.
Should You Add Garlic or Ginger?
Some gardeners add garlic or ginger because these ingredients are often used in homemade garden routines. However, orchids can be sensitive, and strong garlic water may irritate roots or leave residue. If used, it should be extremely diluted.
A safer beginner version is potato water alone. If you want to experiment, use only a tiny piece of garlic or ginger, strain very well, and test on one plant section first. Never pour a strong kitchen mixture on your entire orchid collection.
How to Take a Suitable Orchid Cutting
Propagation depends on the orchid type. Phalaenopsis orchids are often propagated through keikis or nodes on flower spikes. Dendrobiums and some cane orchids can be divided when they have mature canes and new growth. Always identify your orchid type before cutting.
For a Phalaenopsis-style orchid, the safest option is a keiki. A keiki is a baby orchid that grows on a flower spike or near the base of the plant.
A keiki is ready when it has:
- At least 2 to 3 leaves
- Roots around 5 cm long
- A firm green base
- No yellowing or mushy tissue
If the keiki is too tiny, leave it attached longer. Removing it too early makes survival harder.
How to Use the Potato Soak on Orchid Starts
Once you have a suitable orchid start, the potato soak can be used as a short hydration step.
- Prepare the strained potato water.
- Place only the lower root or node area into the liquid.
- Soak for 10 to 20 minutes only.
- Remove the orchid piece.
- Let it air-dry for a short time until the surface is no longer dripping.
- Plant it into clean orchid bark.
Do not soak orchid crowns for hours. Do not submerge the leaves. Do not allow liquid to sit inside the crown because trapped moisture can cause crown rot.
Best Potting Mix After the Soak
The potting mix matters more than the soak. Use a mix that allows roots to breathe.
A good beginner orchid mix:
- Orchid bark as the main base
- A small amount of sphagnum moss for moisture
- Perlite for air pockets
- Charcoal for freshness
Avoid regular garden soil. It holds too much water and can suffocate orchid roots. For young orchid starts, a small pot is better than a large one because it dries more evenly and reduces the risk of rot.
How to Plant the Orchid Start
- Choose a small pot with drainage holes.
- Add a little orchid bark to the bottom.
- Place the orchid start gently in the center.
- Spread the roots naturally without forcing them down.
- Add bark around the roots.
- Keep the crown above the potting mix.
- Do not pack the bark too tightly.
- Water lightly after planting.
The crown should remain exposed and dry. Orchids do not like being buried like typical garden plants.
Aftercare for New Orchid Starts
The first few weeks are important. A newly planted orchid start needs humidity and gentle light, but not constant wetness.
Place it in bright indirect light. Keep it away from strong afternoon sun, cold drafts, heaters, and air conditioners. Water lightly when the bark begins to dry. If sphagnum moss is used, check it carefully because moss can stay wet longer than bark.
Good aftercare routine:
- Bright indirect light
- Warm room temperature
- Gentle airflow
- Light watering only when needed
- No fertilizer for the first few weeks
- No standing water in the saucer
Roots should slowly adapt to the new pot. If the leaves stay firm and green, the plant is adjusting well.
How Long Does Orchid Propagation Take?
Orchid propagation is slow. Even with perfect care, it can take months before a young orchid looks full. New roots may appear first, followed by new leaves. Flowers usually take much longer.
A small orchid start may need 1 to 2 years before it becomes a strong blooming plant. This is normal. Orchids reward patience more than quick tricks.
Common Mistakes With the Potato Orchid Method
The potato method can fail when it is used too heavily. Orchids do not like dirty, sugary, or rotting materials around their roots.
Avoid these mistakes:
- Burying raw potato pieces in the pot
- Using thick potato paste on orchid roots
- Soaking the crown for too long
- Planting in regular soil
- Using a pot with no drainage
- Keeping the bark constantly wet
- Cutting a leaf with no node
- Expecting instant flowers
The cleanest version is the safest: a short strained soak, then clean bark and careful aftercare.
How to Know the Orchid Start Is Healthy
A healthy young orchid will stay firm, green, and upright. The roots may look pale when dry and greener after watering. New root tips are often bright green or light-colored.
Good signs include:
- Firm leaves
- No mushy crown
- Fresh green root tips
- No bad smell from the pot
- Slow but steady new growth
Bad signs include black roots, soft stems, yellowing crown tissue, sour smell, and collapsed leaves. If these appear, remove the plant from the pot and check for rot.
Continue to Page 2
Continue to page 2 for more details about this article and the key points many readers miss on the first page.