Alocasia plants are some of the most dramatic houseplants you can grow indoors. Their bold arrow-shaped leaves, deep green color, bright veins, and sculptural stems make them look like living artwork. When an Alocasia is healthy, it can turn a quiet corner into a tropical focal point, bring height to a plant shelf, and create a lush indoor jungle feeling without needing dozens of plants.
Alocasia plants are beautiful, but they are also more sensitive than many beginner houseplants. They like warmth, humidity, bright filtered light, airy soil, steady moisture, and clean leaves. When one part of the routine is missing, the plant often shows it quickly. Leaves may droop, yellow, curl, brown at the edges, or stop growing. The good news is that Alocasia care becomes much easier when you follow a simple repeatable routine.
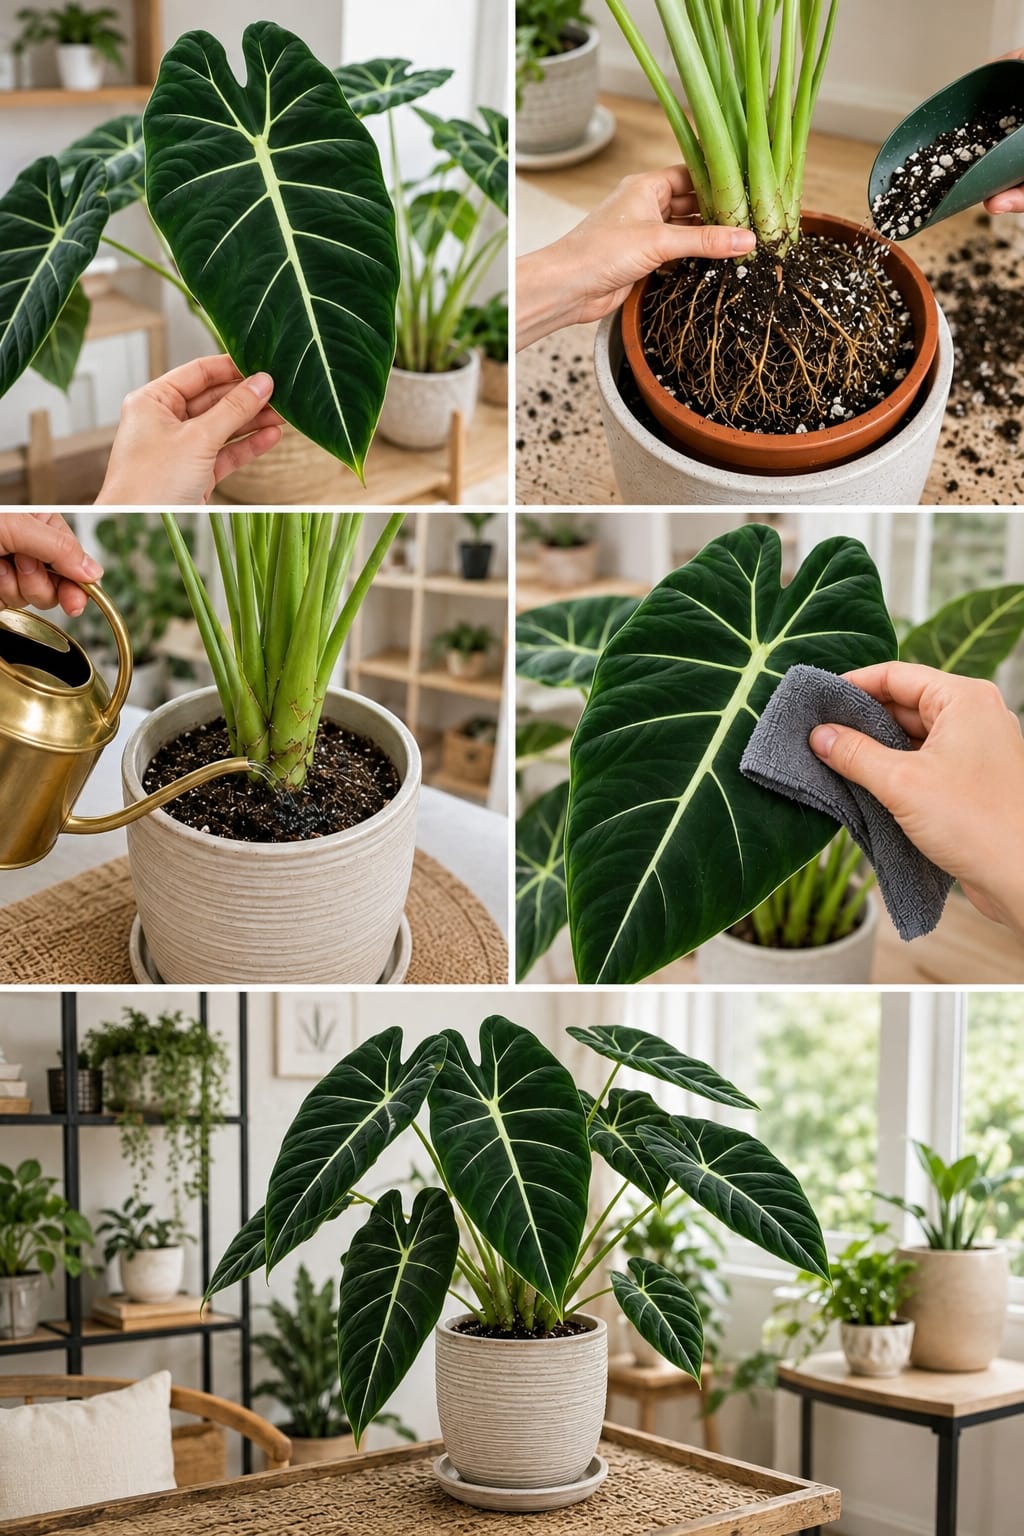
This 5-step Alocasia care routine focuses on the basics that matter most: checking leaf health, refreshing the root zone, using an airy potting mix, watering correctly, cleaning the leaves, and placing the plant where it can thrive. These steps help support strong roots, glossy foliage, and larger leaves over time.
Why Alocasia Plants Need a Care Routine
Alocasia plants are tropical plants. In their natural environment, they grow in warm, humid areas with filtered light and rich but well-draining soil. Indoors, conditions are very different. Air can be dry, light can be weak, and pots can hold too much water if the soil is heavy.
This is why Alocasia plants need a balanced care routine. They do not like being ignored completely, but they also do not like being overwatered or overfed. They prefer steady attention. A little checking, cleaning, watering, and adjustment can make a big difference.
The best Alocasia care routine is not complicated. It is consistent. When you understand what the plant is asking for, you can prevent many problems before they become serious.
Step 1: Check the Leaves First
The leaves tell you a lot about the plant’s condition. Alocasia leaves are large, sensitive, and expressive. They often show stress before the roots or soil problems become obvious.
Healthy Alocasia leaves should look firm, rich in color, and upright. The veins should appear clear and defined. New leaves should emerge cleanly and expand without tearing or curling severely.
When checking the leaves, look for:
- Yellowing leaves
- Brown crispy edges
- Soft dark spots
- Dust buildup
- Pest marks
- Drooping stems
- Curling leaves
- New growth problems
One older yellow leaf is not always a disaster. Alocasia plants naturally retire older leaves, especially when producing new ones. But if several leaves yellow at once, the plant may be dealing with watering, light, humidity, or root stress.
What Large Healthy Leaves Mean
Large healthy leaves usually mean the plant has enough light, moisture, and root strength to support bigger growth. Alocasia plants need energy to produce those dramatic leaves. That energy comes from light, healthy roots, and balanced care.
If your Alocasia produces smaller leaves than before, check the light first. Low light often causes smaller, weaker leaves. Also check if the plant is root-bound or if the soil has become compacted.
A healthy Alocasia does not always grow fast, but new leaves should look strong and well-formed.
Step 2: Refresh the Root Zone
Strong leaves begin with strong roots. Many Alocasia problems start below the soil surface. If the soil is too dense, too wet, old, compacted, or poorly draining, the roots can struggle. Once roots struggle, leaves quickly show stress.
Refreshing the root zone does not always mean a full repot. Sometimes it simply means checking the soil, loosening the top layer, removing old compacted mix, or adding fresh airy material around the plant.
If the plant is healthy but the soil looks tired, you can gently refresh the top layer. Remove a small amount of old soil from the surface and replace it with fresh airy potting mix. This improves airflow and gives the plant a cleaner growing environment.
When to Fully Repot an Alocasia
A full repot is useful when the plant is root-bound, the soil smells sour, water drains poorly, or roots are circling tightly around the pot. Alocasia plants should not be repotted too often because they can be sensitive to root disturbance, but they do benefit from fresh soil when the old mix breaks down.
Signs your Alocasia may need repotting include:
- Roots coming out of drainage holes
- Water sitting on the soil surface
- Soil staying wet too long
- Plant drying too fast because roots fill the pot
- Slow growth during active season
- Sour smell from the soil
- Repeated yellowing after watering
The best time to repot is spring or early summer, when the plant has enough warmth and light to recover.
How to Handle Alocasia Roots Carefully
Alocasia roots can be delicate. When removing the plant from its pot, support the base and work slowly. Do not pull hard on the stems. Loosen the pot first, then slide the root ball out gently.
Healthy roots are usually firm and light-colored. Some may be tan or cream. Rotten roots are mushy, dark, hollow, or foul-smelling. If you find rotten roots, trim them with clean scissors before repotting.
Do not remove all soil aggressively unless the plant has root rot or pests. Gentle handling helps reduce transplant shock.
Step 3: Use an Airy Potting Mix
Alocasia plants like moisture, but they do not like heavy soggy soil. This is one of the most important points in Alocasia care. The soil should hold enough water for the roots, but it should also allow oxygen to move through the pot.
A good Alocasia soil mix should feel chunky, soft, and breathable. It should not feel like mud. When watered, it should absorb moisture and then drain well.
A strong Alocasia mix may include:
- High-quality indoor potting mix
- Perlite
- Orchid bark
- Coco coir
- Pumice
- A small amount of compost or worm castings
- Charcoal, optional
This type of mix gives the roots both moisture and air. It also helps prevent the waterlogged conditions that lead to root rot.
Why Perlite Helps Alocasia Plants
Perlite is the small white material often seen in potting mixes. It helps create air pockets in the soil and improves drainage. For Alocasia plants, perlite is useful because it prevents the mix from becoming dense and compacted.
If your current soil feels heavy, adding perlite can help. However, do not only sprinkle it on top. It works best when mixed throughout the soil.
A good ratio for many indoor Alocasia plants is about two parts potting mix, one part perlite, and one part bark or another chunky material.
Why Bark Helps the Roots
Fine orchid bark creates structure in the soil. It keeps the mix from collapsing and allows roots to breathe. Alocasia roots appreciate this because they need moisture without suffocation.
Bark also helps mimic the loose organic material found in tropical forest floors. It is especially helpful in larger pots where dense soil can stay wet too long.
If your Alocasia has repeated root problems, switching to a chunkier mix can make a major difference.
Step 4: Water the Right Way
Watering Alocasia plants correctly is one of the biggest keys to success. These plants like consistent moisture, but not soggy soil. The goal is to keep the soil lightly moist during active growth while still allowing some drying between waterings.
Water when the top inch of soil begins to feel dry. Do not wait until the entire root ball becomes bone dry for too long, especially during warm growing months. But do not water when the soil is already wet.
When watering, pour slowly around the soil surface until water drains from the bottom. Then empty the saucer. Never let the pot sit in standing water.
How Often Should You Water Alocasia?
There is no perfect calendar for watering because every home is different. Light, humidity, pot size, soil mix, temperature, and season all affect how quickly the soil dries.
In bright warm conditions, an Alocasia may need water once or twice a week. In cooler or lower-light conditions, it may need water much less often.
Always check the soil before watering. A moisture meter, wooden stick, or finger test can help. The top layer should be slightly dry before watering again.
Signs an Alocasia Needs Water
A thirsty Alocasia may droop slightly, especially if the soil is dry. Leaves may look less firm, and the pot may feel lighter. If watered in time, the plant may perk up again.
However, drooping does not always mean thirst. Alocasia can also droop from overwatering, root rot, cold stress, or shock. Always check the soil before adding water.
If the soil is dry and the plant droops, water it. If the soil is wet and the plant droops, check the roots and drainage.
Signs of Overwatering
Overwatering can damage Alocasia roots quickly. Watch for:
- Yellowing leaves
- Soft stems
- Wet soil for many days
- Dark mushy spots
- Sour smell from the pot
- Fungus gnats
- Drooping even when soil is wet
If these signs appear, stop watering and inspect the root zone. You may need to repot into fresh airy soil and remove damaged roots.
Use Room-Temperature Water
Alocasia plants dislike cold shocks. Use room-temperature water when watering. Very cold water can stress tropical roots, especially during cooler seasons.
If your tap water is very hard or heavily treated, the plant may develop brown edges over time. Filtered water, rainwater, or water left out overnight may help sensitive plants.
Consistency matters more than perfection. Avoid sudden changes in care.
Step 5: Clean the Leaves
Alocasia leaves are large and beautiful, but they collect dust easily. Dust blocks light, dulls the leaf surface, and can hide pests. Cleaning the leaves helps the plant look better and function better.
Use a soft damp cloth to wipe each leaf gently. Support the leaf from underneath with one hand and wipe with the other. Do not scrub aggressively because Alocasia leaves can bruise or tear.
Clean both the top and underside of the leaves. Pests often hide under leaves and along veins.
How Often to Clean Alocasia Leaves
Clean the leaves every 2 to 4 weeks, or whenever dust is visible. In dusty rooms or near open windows, cleaning may be needed more often.
You can also rinse the plant gently in the shower if the plant is not too large. Use lukewarm water and let the leaves dry in a warm spot with good airflow.
Clean leaves look richer, darker, and more dramatic.
Do Not Use Heavy Leaf Shine
Avoid oily commercial leaf-shine products on Alocasia leaves. They can leave residue, clog the leaf surface, attract dust, or make the leaves look unnatural.
A damp cloth is usually enough. For extra cleaning, you can use water with a tiny drop of mild soap, then wipe again with plain water.
The goal is clean leaves, not coated leaves.
Checking for Pests While Cleaning
Leaf cleaning is the perfect time to check for pests. Alocasia plants can attract spider mites, thrips, aphids, scale, and mealybugs. These pests can damage leaves quickly if ignored.
Look for:
- Tiny moving dots
- Fine webbing
- Silvery streaks
- Sticky residue
- White cottony spots
- Small brown bumps
- Distorted new growth
If pests appear, isolate the plant and treat early. Early pest control is much easier than waiting until the infestation spreads.
Best Light for Alocasia Plants
Alocasia plants need bright indirect light. They can tolerate some gentle morning light, but harsh direct afternoon sun can burn the leaves.
A bright window with filtered sunlight is ideal. East-facing windows often work well. South or west windows can work if the plant is protected by a sheer curtain or placed a few feet away from the glass.
Low light may keep the plant alive for a while, but it will usually produce smaller leaves, weaker stems, and slower growth.
How to Tell If Light Is Too Low
An Alocasia in low light may show these signs:
- Small new leaves
- Long weak stems
- Leaning toward the window
- Slow growth
- Fewer leaves over time
- Soil staying wet too long
If you notice these signs, move the plant gradually to a brighter location. Do not suddenly place it in strong sun, because the leaves can burn.
How to Tell If Light Is Too Strong
Too much direct sun can scorch Alocasia leaves. Signs include pale patches, crispy brown areas, faded leaf color, or dry curled edges.
If this happens, move the plant away from direct sun or use a sheer curtain. Bright filtered light is best.
Alocasia plants love brightness, but not harsh burning sun.
Humidity for Bigger Leaves
Humidity is very important for Alocasia plants. Dry indoor air can cause crispy edges, curling leaves, and slow growth. These plants often look best when humidity is moderate to high.
Ways to improve humidity include:
- Group plants together
- Use a humidifier
- Place the plant in a bright bathroom
- Use a pebble tray carefully
- Avoid heating vents
- Keep the plant away from dry drafts
A humidifier is often the most effective method indoors. It supports not only Alocasia plants but also calatheas, ferns, philodendrons, and other tropical houseplants.
Temperature Needs
Alocasia plants prefer warm temperatures. Keep them away from cold drafts, open winter windows, air conditioners, and chilly floors.
Cold stress can cause drooping, yellowing, or leaf loss. Sudden temperature changes can also shock the plant.
A warm stable room is best. If you are comfortable in the room, the plant will usually be more comfortable too, as long as humidity and light are suitable.
Why Alocasia Plants Go Dormant
Some Alocasia plants slow down or go partly dormant during winter. They may stop producing leaves or even drop several leaves. This can be normal if light and warmth decrease.
During dormancy, reduce watering and stop fertilizing. Keep the soil slightly moist, not wet. When warmth and light increase again, the plant may begin growing new leaves.
Do not throw away an Alocasia just because it loses leaves. If the corm or root system is still firm, it may regrow.
Continue to Page 2
Continue to page 2 for more details about this article and the key points many readers miss on the first page.