Orchids are some of the most elegant flowering houseplants you can grow indoors. Their graceful stems, glossy green leaves, thick aerial roots, and long-lasting flowers make them perfect for bright windows, living rooms, bedrooms, plant shelves, home offices, and indoor garden displays. A healthy orchid can bloom for weeks or even months, adding a luxury tropical look to any home. If you want the best natural orchid bloom booster, this guide will show you how to use a safe homemade calcium tonic.
But orchids can also be frustrating. One month they look beautiful, and the next month the leaves start turning yellow, the flower spikes dry out, roots look tired, and blooming stops completely. Many orchid owners begin searching for natural orchid fertilizer, homemade orchid food, orchid bloom booster tricks, and safe ways to encourage new flower spikes without burning the roots. That’s where the yogurt and eggshell calcium tonic for orchids comes in as an affordable, organic solution.
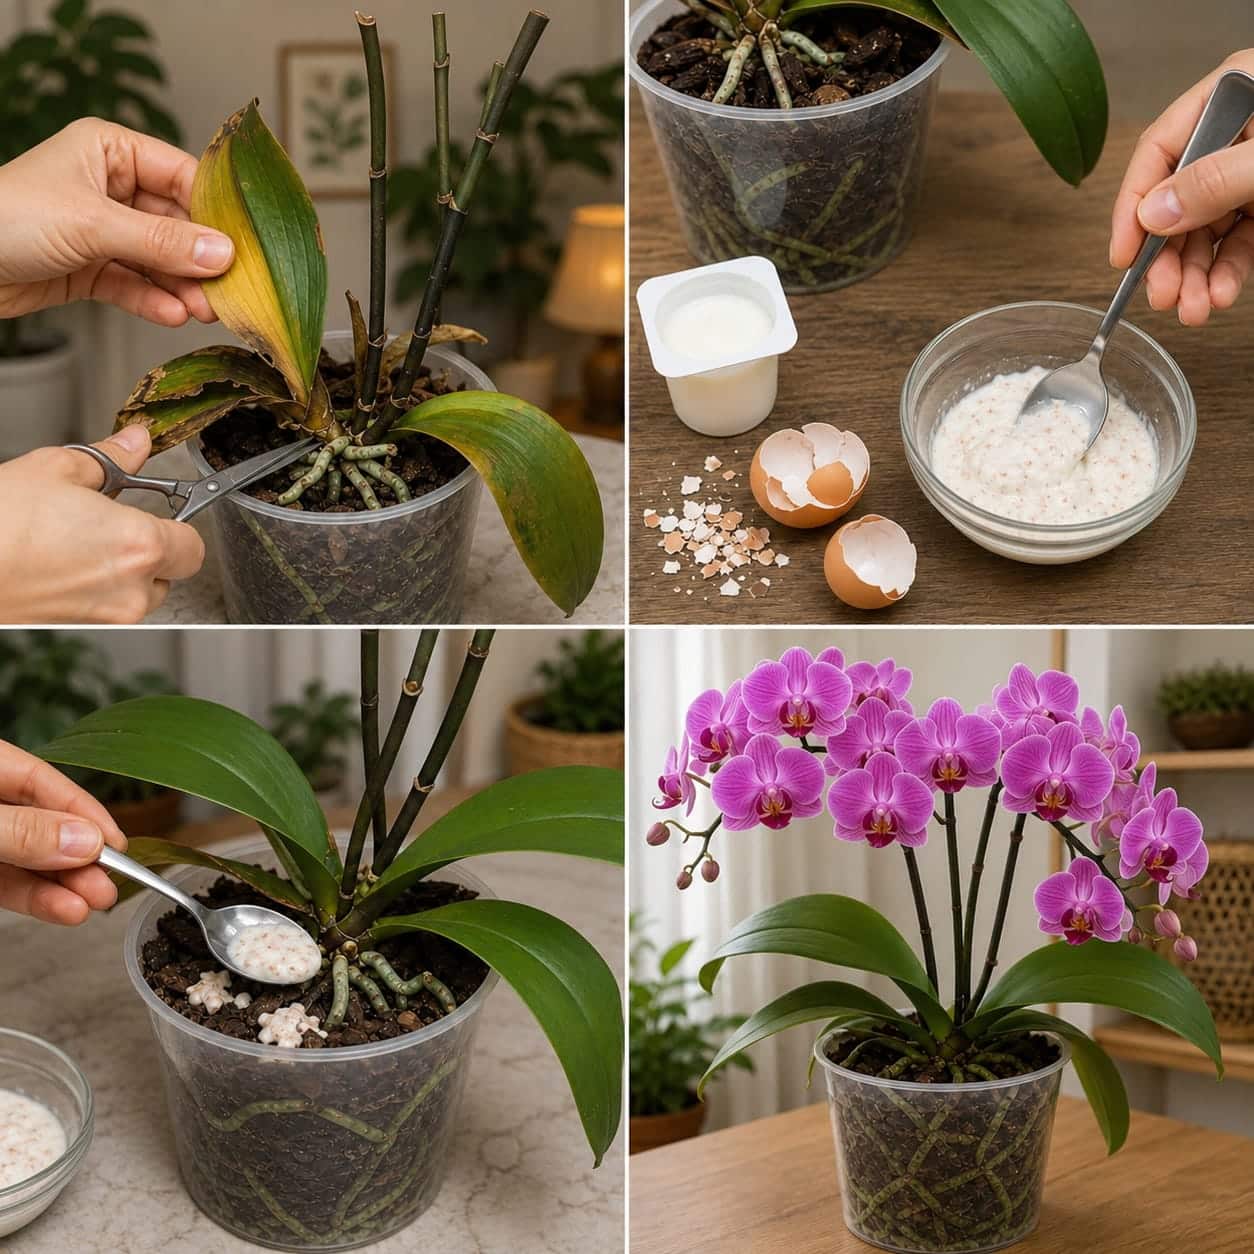
The image shows a four-step orchid care method. First, damaged orchid leaves are trimmed. Then a white creamy mixture is prepared using plain yogurt and crushed eggshells. Next, a spoonful of the mixture is applied near the orchid roots. Finally, the orchid appears healthy and full of beautiful pink blooms. This method is often called the best homemade orchid bloom stimulant by indoor gardening enthusiasts.
This trick is best understood as a yogurt and eggshell calcium tonic for orchids. The idea is to use a very small amount of diluted yogurt and finely crushed eggshell to support root-zone microbes and provide mild calcium. However, orchids are sensitive plants. They do not grow in regular soil, and their roots need air. A thick dairy mixture can easily become harmful if used too much, too often, or if it is packed around the crown and roots. For premium orchid care at home, you need the safe version.
The safe version of this orchid trick is not to bury yogurt in the pot or coat the roots with thick paste. The safe method is to use a tiny amount of a very diluted mixture, apply it only to the potting medium surface, keep it away from the orchid crown, and use it rarely. For many orchids, a strained eggshell tea for plants is even safer than a thick yogurt mixture. This is one of the top organic orchid root tonics you can prepare in minutes.
This guide explains how to use the yogurt and eggshell orchid trick safely, how to prepare the mixture, how often to apply it, when to avoid it, and how to combine it with proper orchid care for healthier leaves, stronger roots, and better blooming potential. Follow these professional orchid growing secrets to transform your orchids.
What Plant Is in the Image?
The plant in the image appears to be a Phalaenopsis orchid, often called a moth orchid. Phalaenopsis orchids are among the most popular indoor orchids because they can bloom beautifully indoors and are easier to care for than many other orchid types. For best orchid care for beginners, Phalaenopsis is the top choice.
A healthy Phalaenopsis orchid usually has:
- Firm green leaves
- Thick silver-green aerial roots
- A loose bark-based potting mix
- Strong flower spikes
- No mushy crown
- No sour smell from the pot
- Bright indirect light
In the first panel of the image, the orchid has yellowing damaged leaves and old flower spikes. In the final panel, the orchid is shown with healthy green leaves and many pink flowers. The transformation suggests a plant recovery and bloom support routine using a highly effective calcium root tonic for orchids.
What Is the White Mixture?
The white mixture appears to be made from plain yogurt and crushed eggshells. This homemade orchid tonic is often promoted as a natural calcium fertilizer for indoor plants or a bloom-support recipe.
The ingredients may include:
- Plain unsweetened yogurt
- Clean crushed eggshells
- A little water to dilute
Yogurt contains beneficial bacteria and small amounts of nutrients, while eggshells contain calcium carbonate. Calcium can support plant cell strength and root health, but eggshells break down slowly. Yogurt may support microbial life in some growing environments, but it can also spoil quickly in an indoor orchid pot. That is why this trick must be used carefully. Orchids are not garden vegetables. They grow in bark, moss, or airy orchid mix, and their roots need oxygen. Thick organic mixtures can clog the potting medium and create rot if used incorrectly. For safe homemade orchid food recipes, always prioritize dilution.
Important Warning Before Using Yogurt on Orchids
Do not pour thick yogurt into an orchid pot. Do not pack yogurt around orchid roots. Do not apply yogurt to the crown, leaves, or flower spikes. Orchids are sensitive to stagnant moisture and organic buildup. Ignoring this can ruin your premium orchid fertilizer routine.
Too much yogurt can cause:
- Sour smell
- Mold on orchid bark
- Fungus gnats
- Sticky residue
- Root suffocation
- Crown rot
- Bacterial growth
- Weak roots
- Leaf yellowing
- Potting mix breakdown
The mixture in the image looks thick and creamy. For real orchid care, it should be diluted much more than it appears. A tiny amount is enough. This is a powerful orchid bloom booster trick only when used sparingly.
Why Gardeners Use Eggshells for Orchids
Eggshells are used because they contain calcium. Calcium helps plants build strong cell walls and can support root and leaf structure. Orchids do not need huge amounts of calcium, but they can benefit from balanced minerals when grown in bark mixes that contain little nutrition. Using eggshells is a cost-effective organic orchid care method.
Eggshells may help support:
- Strong orchid roots
- Healthy leaf structure
- Better root tip growth
- Long-term mineral balance
- Recovery after stress
- Blooming support when overall care is correct
However, eggshells are not a complete orchid fertilizer. They do not provide enough nitrogen, phosphorus, potassium, or trace minerals to replace a balanced orchid fertilizer. For best results with homemade orchid food, combine eggshells with a proper feeding schedule.
Why Gardeners Add Yogurt
Plain yogurt is sometimes used in homemade plant recipes because it contains live cultures and small amounts of calcium and protein. The theory is that very diluted yogurt may support beneficial microbes around the roots. This makes it a natural probiotic plant tonic for orchids.
But orchids are different from outdoor garden plants. Their potting mix is open and airy, not dense soil. If yogurt is used too heavily, it can spoil before it helps. For indoor orchids, yogurt must be used as a tiny diluted tonic, not as a regular fertilizer. The best rule is simple:
If you can smell yogurt in the pot after application, you used too much.
The Safe Yogurt and Eggshell Orchid Tonic Recipe
This is the safer version of the trick shown in the image. It is much more diluted than the thick mixture in the bowl. Follow this top-rated homemade orchid bloom stimulant recipe for best results.
Ingredients
- 1 teaspoon plain unsweetened yogurt
- 1 cup clean water
- ¼ teaspoon finely powdered clean eggshell
- Small bowl
- Spoon
- Fine strainer if needed
How to Make It
- Use only plain unsweetened yogurt.
- Add 1 teaspoon yogurt to 1 cup water.
- Stir until the liquid becomes thin and cloudy.
- Add ¼ teaspoon very fine eggshell powder.
- Stir well.
- Let heavy particles settle for a few minutes.
- Use only a small spoonful on the orchid bark surface.
The mixture should not be thick. It should be thin, lightly cloudy, and easy to pour. If it looks like cream or paste, dilute it with more water. This gentle calcium root tonic for orchids is now ready to use.
How to Make Eggshell Powder for Orchids
Eggshells must be clean before they are used around indoor plants. Dirty shells with egg residue can attract pests and smell bad. Making your own powder is a simple DIY orchid supplement.
Steps
- Rinse eggshells immediately after cracking eggs.
- Remove any egg white or yolk residue.
- Let the shells dry completely.
- Bake them on low heat for 10 minutes if desired.
- Crush them into small pieces.
- Grind them into a fine powder using a blender, grinder, or mortar and pestle.
- Store in a dry jar.
The finer the powder, the easier it is to distribute. Large shell pieces break down very slowly and are less useful for potted orchids. This is a zero-waste orchid care tip that saves money.
Safer Option: Eggshell Tea for Orchids
If you want the benefits of eggshells without the risk of yogurt spoilage, eggshell tea is safer. Many professional orchid growers recommend this method.
Ingredients
- 2 clean dried eggshells
- 1 liter water
How to Prepare
- Rinse and dry the eggshells.
- Crush them into small pieces.
- Boil 1 liter of water.
- Add the crushed shells.
- Let the mixture steep overnight.
- Strain completely.
- Use the cooled water on the orchid potting medium.
This is a mild calcium water. It is less likely to smell or attract pests than yogurt. Consider this your best organic orchid bloom booster alternative.
How to Apply the Yogurt and Eggshell Mixture Safely
The image shows the mixture being spooned onto the orchid potting mix. This can be safe only if the amount is tiny and the mixture is heavily diluted. Applying it correctly is key to successful orchid reblooming.
Safe Application Steps
- Check that the orchid roots are not rotting.
- Make sure the orchid pot has drainage holes.
- Use the mixture only after normal watering has drained.
- Apply 1 to 2 teaspoons around the outer bark surface.
- Keep it away from the crown.
- Do not pour it between the leaves.
- Do not coat aerial roots with thick mixture.
- Let the pot drain fully.
- Do not repeat often.
For orchids, less is better. A small amount on the bark surface is safer than soaking the whole pot. This is a high-value orchid feeding technique that protects sensitive roots.
Where Not to Put the Mixture
Never place yogurt or eggshell paste in the orchid crown. The crown is the central area where leaves meet. If moisture or organic material stays there, crown rot can develop quickly. Avoid these common mistakes for premium orchid health.
Avoid applying the mixture to:
- The crown
- Leaf bases
- Flower spikes
- Open flowers
- Damaged leaves
- Rotting roots
- Wet moss packed around the crown
Apply only to the surface of the orchid bark, away from the central growing point.
How Often Should You Use This Trick?
This is not a weekly orchid fertilizer. Use it rarely. For best orchid care routine, follow this schedule.
A safe schedule:
- Once during spring if the orchid is actively growing
- Once during summer if roots are healthy
- Do not use in fall unless the orchid is growing strongly
- Do not use in winter
For most orchids, once every 2 to 3 months is the maximum. If you notice smell, mold, gnats, or sticky bark, stop immediately. This natural orchid bloom booster works best with restraint.
Can This Trick Make Orchids Bloom?
The yogurt and eggshell trick cannot force an orchid to bloom. It may support root health and mineral balance, but blooms depend on the full care routine. For guaranteed orchid reblooming tips, combine this tonic with proper conditions.
Phalaenopsis orchids bloom best when they receive:
- Bright indirect light
- Healthy roots
- Good airflow
- Correct watering
- Proper orchid bark mix
- Light fertilizer during growth
- A slight nighttime temperature drop before blooming
If your orchid has poor light or rotten roots, no homemade mixture will make it bloom. Invest in professional orchid fertilizer products for consistent results.
Why the Orchid Leaves Were Trimmed First
The first panel of the image shows yellow and damaged leaves being removed. This is an important step. Damaged orchid leaves can drain energy from the plant, especially if they are mostly yellow, diseased, or rotting. Pruning is a critical orchid maintenance skill.
Remove orchid leaves when they are:
- Fully yellow
- Brown and soft
- Rotting at the base
- Diseased
- Severely damaged
Do not remove every slightly yellow leaf too early. If part of the leaf is still green and firm, it may still help the plant produce energy.
How to Trim Orchid Leaves Safely
Use clean sharp scissors or pruning shears. Proper trimming prevents disease and supports optimal orchid growth.
- Disinfect the scissors with rubbing alcohol.
- Hold the damaged leaf gently.
- Cut only the dead or badly damaged tissue.
- If the entire leaf is yellow, cut near the base without damaging the crown.
- Do not tear leaves by hand.
- Keep the cut area dry.
After trimming, avoid wetting the cut area for a day. This helps reduce rot risk.
Should You Cut Old Orchid Spikes?
The first panel also shows old flower spikes. If a spike is brown and dry, it can be cut off near the base. If it is still green, some growers leave it because it may produce a side branch. This decision impacts future orchid blooming cycles.
Cut the spike if:
- It is brown and dry
- It is hollow
- It has no active buds
- The orchid is weak and needs recovery
Leave the spike if:
- It is green and firm
- The orchid has healthy roots
- There are active nodes
- The plant is not stressed
For a weak orchid, cutting old spikes helps redirect energy to roots and leaves.
Best Potting Mix for Orchids
Orchids should not be planted in regular potting soil. Their roots need air. A good orchid mix drains quickly and keeps the roots oxygenated. Choosing the best orchid potting mix is half the battle.
Good Orchid Mix
- Medium orchid bark
- Small amount of sphagnum moss
- Perlite
- Charcoal
- Coco chips if desired
If the bark is broken down, sour, or compacted, repotting will help more than any homemade fertilizer.
Continue to Page 2
Continue to page 2 for more details about this article and the key points many readers miss on the first page.